ESP CITROEN C5 AIRCROSS 2020 Handbook (in English)
[x] Cancel search | Manufacturer: CITROEN, Model Year: 2020, Model line: C5 AIRCROSS, Model: CITROEN C5 AIRCROSS 2020Pages: 292, PDF Size: 8.59 MB
Page 201 of 292
199
The jack must only be used to change
a wheel with a damaged or punctured tyre.
Do not use any jack other than the one
supplied with this vehicle.
If the vehicle does not have its original
jack, contact a
CITROËN dealer or
a
qualified workshop to obtain the correct
jack for it.
The jack meets European standards,
as defined in the Machinery Directive
2006/42/CE.
The jack does not require any
maintenance.
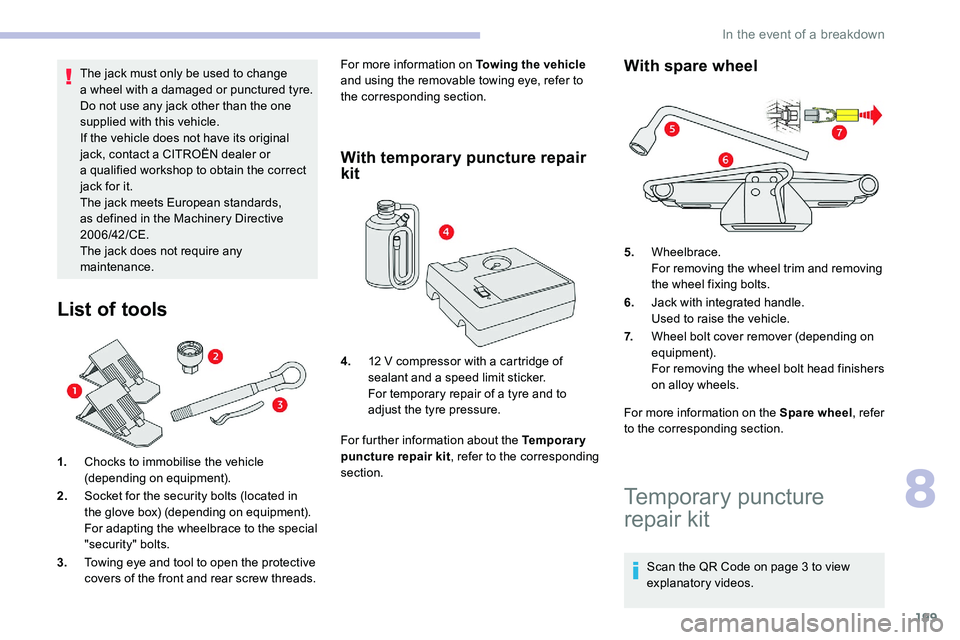
List of tools
1. Chocks to immobilise the vehicle
(depending on equipment).
2. Socket for the security bolts (located in
the glove box) (depending on equipment).
For adapting the wheelbrace to the special
"security" bolts.
3. Towing eye and tool to open the protective
covers of the front and rear screw threads. For more information on Towing the vehicle
and using the removable towing eye, refer to
the corresponding section.
With temporary puncture repair
kit
For further information about the Temporary
puncture repair kit , refer to the corresponding
section.
With spare wheel
For more information on the Spare wheel , refer
to the corresponding section.
4.
12
V compressor with a
cartridge of
sealant and a
speed limit sticker.
For temporary repair of a
tyre and to
adjust the tyre pressure. 5.
Wheelbrace.
For removing the wheel trim and removing
the wheel fixing bolts.
6. Jack with integrated handle.
Used to raise the vehicle.
7. Wheel bolt cover remover (depending on
equipment).
For removing the wheel bolt head finishers
on alloy wheels.
Temporary puncture
repair kit
Scan the QR Code on page 3 to view
e xplanatory videos.
8
In the event of a breakdown
Page 204 of 292
202
Do not exceed the speed of 50 mph
( 80 km/h) when driving with a tyre repaired
using this type of kit.
Checking/adjusting tyre
pressures
You can also use the compressor,
without injecting sealant, to check and, if
necessary, adjust the tyre pressures.
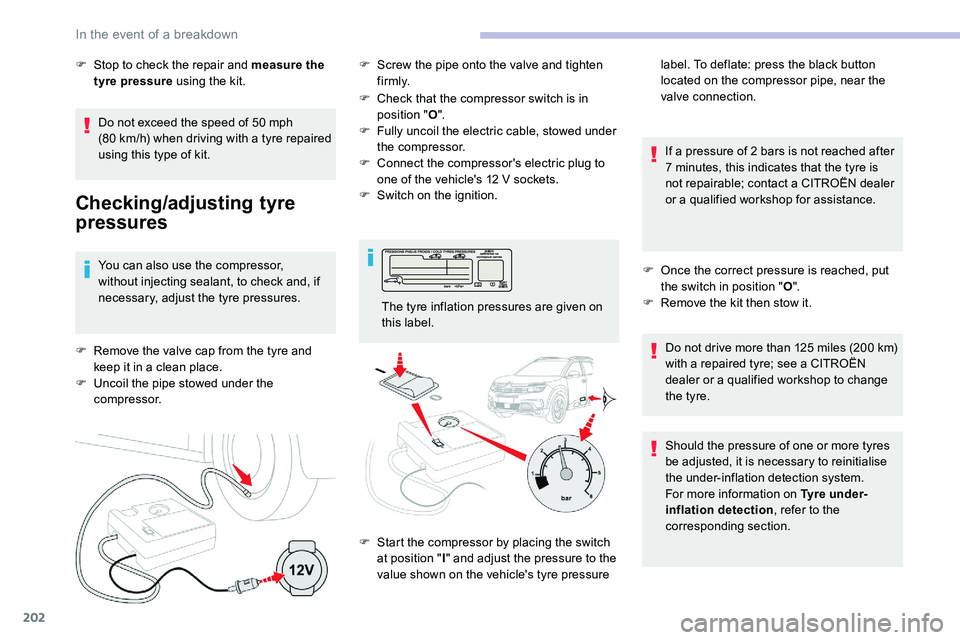
F
R
emove the valve cap from the tyre and
keep it in a
clean place.
F
U
ncoil the pipe stowed under the
compressor. F
C
heck that the compressor switch is in
position " O".
F
F
ully uncoil the electric cable, stowed under
the compressor.
F
C
onnect the compressor's electric plug to
one of the vehicle's 12 V sockets.
F
S
witch on the ignition.
If a pressure of 2 bars is not reached after
7 minutes, this indicates that the tyre is
not repairable; contact a CITROËN dealer
or a
qualified workshop for assistance.
F O nce the correct pressure is reached, put
the switch in position " O".
F
R
emove the kit then stow it.
F
S
top to check the repair and measure the
tyre pressure using the kit. F
S
crew the pipe onto the valve and tighten
f i r m l y.
The tyre inflation pressures are given on
this label.
F
S
tart the compressor by placing the switch
at position " I" and adjust the pressure to the
value shown on the vehicle's tyre pressure label. To deflate: press the black button
located on the compressor pipe, near the
valve connection.
Do not drive more than 125 miles (200 km)
with a
repaired tyre; see a CITROËN
dealer or a
qualified workshop to change
the tyre.
Should the pressure of one or more tyres
be adjusted, it is necessary to reinitialise
the under-inflation detection system.
For more information on Tyre under-
inflation detection , refer to the
corresponding section.
In the event of a breakdown
Page 210 of 292

208
Model C
1.Daytime running lamps/sidelamps (LED).
2. Direction indicators (W Y21W).
3. Dipped beam headlamps (H7-55W).
4. Main beam headlamps (HB3-65W).
5. Front foglamps (P21W).
Opening the bonnet /Access to bulbs
With the engine warm, proceed with
caution – Risk of burns!
Take care with objects or clothing that
could be caught in the blades of the
engine fan – Risk of strangulation!
Direction indicators (halogen
headlamps)
Rapid flashing of a direction indicator
l amp (left or right) indicates that one of
the bulbs on the corresponding side has
failed.
Amber coloured bulbs, such as the
direction indicators, must be replaced
by bulbs with identical colour and
specifications.
Main beam headlamps (halogen
headlamps)
F Turn the bulb holder a quarter turn anti-
clockwise.
F
P
ull the bulb and bulb holder assembly
rearwards.
F
R
eplace the bulb.
To refit, carry out these operations in reverse
o r d e r. F
R
emove the protective cover.
F
D
isconnect the bulb connector.
F
T
urn the bulb holder anti-clockwise.
F
R
emove the bulb and replace it.
To refit, carry out these operations in reverse
order. When refitting, close the protective cover
very carefully to guarantee the sealing of the
lamp.
In the event of a breakdown
Page 215 of 292
213
Installing electrical accessories
Your vehicle's electrical system is
designed to operate with standard or
optional equipment.
Before installing other electrical
equipment or accessories on your vehicle,
contact a CITROËN dealer or a qualified
workshop. CITROËN accepts no responsibility for
the cost incurred in repairing your vehicle
or for rectifying malfunctions resulting
from the installation of accessories
not supplied and not recommended by
CITROËN and not installed in accordance
with specifications, in particular when the
combined power consumption of all of the
additional equipment connected exceeds
10
milliamperes.
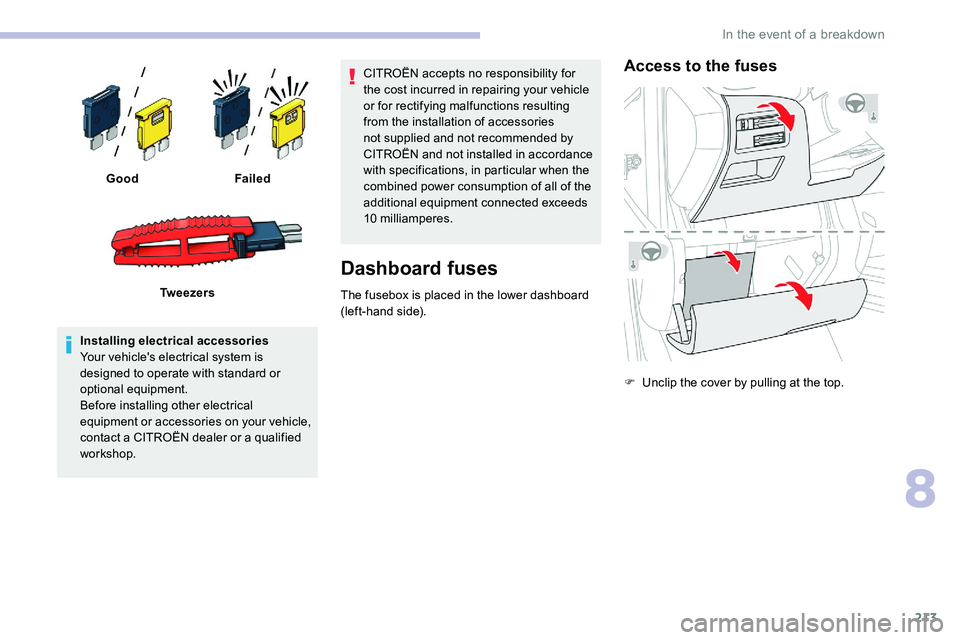
Dashboard fuses
The fusebox is placed in the lower dashboard
(left-hand side).
Access to the fuses
F Unclip the cover by pulling at the top.
Good
Failed
Tw e e z e r s
8
In the event of a breakdown
Page 220 of 292

218
F switch off the ignition and wait for four minutes.
At the battery, it is only necessary to
disconnect the (+) terminal.
Quick-release terminal clamp
Disconnecting the (+) terminal Reconnecting the (+) terminal
Do not apply force when pressing the
lever, as if the clamp is not positioned
correctly, locking will be impossible; start
the procedure again.
After reconnecting the battery
F Depending on equipment, lift the plastic
cover on the (+) terminal.
F
Ra
ise the lever A fully to release the clamp B .
F
R
emove the clamp B by lifting it off.
F Raise the lever A fully.
F R eplace the open clamp B on the (+)
terminal.
F
P
ush the clamp B fully down.
F
L
ower the lever A to lock the clamp B .
F
D
epending on equipment, lower the plastic
cover on the (+) terminal. After reconnecting the battery, turn on the
ignition and wait 1
minute before starting
the engine, in order to enable the electronic
systems to initialise.
If minor problems nevertheless persist
following this operation, contact a CITROËN
dealer or a qualified workshop.
Referring to the corresponding section, you
must reinitialise certain systems yourself, such
as:
-
t
he key with remote control or electronic key
(depending on version),
- t he sunroof and its electric blind,
-
t
he electric windows,
-
t
he date and time,
-
t
he preset radio stations.
The Stop & Start system may not be
operational during the trip following the
first engine start.
In this case, the system will only be
available again after a
continuous
period of immobilisation of the vehicle,
a period which depends on the exterior
temperature and the state of charge of the
battery (up to about 8
hours).
In the event of a breakdown
Page 221 of 292

219
Towing the vehicle
Procedure for having your vehicle towed or
for towing another vehicle using a removable
mechanical device.
Access to the tools
The towing eye is stored in a toolbox, under the
bo ot floor.
The opening tool for the rear protective cover is
secured to the towing eye.
For more information on the Vehicle tools ,
refer to the corresponding section.
Towing your vehicle
F On the front bumper, unclip the cover by using the tool fixed on the towing eye.
F
R
elease the cover to the right and then
downwards.
F
S
crew the towing eye in fully.
F
I
nstall the towbar.F
P
ut the gearbox into neutral.
Failure to obser ve this instruction could
result in damage to certain components
(braking, transmission, etc.) and the
absence of braking assistance the next
time the engine is started. Automatic gearbox: never tow the vehicle
with the front wheels on the ground with
the engine off.
F
U
nlock the steering and release the parking
brake.
F
S
witch on the hazard warning lamps on
both vehicles.
F
M
ove off gently, drive slowly and for a short
distance.
Towing another vehicle
F On the rear bumper, unclip the cover by using the tool fixed on the eye.
F
P
ull the cover downwards.
F
S
crew the towing eye in fully.
F
I
nstall the towbar.
8
In the event of a breakdown
Page 224 of 292

222
Engine technical data and
towed loads
Engines
The engine characteristics are given in the
vehicle's registration document, as well as in
sales brochures.The maximum power corresponds to the
value type-approved on a
test bed, under
conditions defined in European legislation
(Directive 1999/99/EC).
For more information, contact a
CITROËN
dealer or a
qualified workshop.
Weights and towed loads
The weights and towed loads relating to your
vehicle are given in the registration document,
as well as in sales brochures.
These values are also given on the
manufacturer's plate or label.
For more information, contact a CITROËN
dealer or a
qualified workshop. The GTW (Gross Train Weight) and towed load
values indicated are valid up to a
maximum
altitude of 1,000 metres. The towed load value
must be reduced by 10% for each additional
1,000 metres of altitude.
The maximum authorised nose weight
corresponds to the weight permitted on the
towball.
When exterior temperatures are high,
the vehicle per formance may be limited
in order to protect the engine. When the
exterior temperature is higher than 37°C,
limit the towed weight.
Towing using a lightly loaded vehicle can
adversely affect roadholding.
Braking distances are increased when
towing a trailer.
When using a
vehicle to tow, never exceed
a
speed of 62 mph (100 km/h) (obser ve
the local legislation in force).
If the exterior temperature is high, it is
recommended that the engine be allowed
to idle for 1
to 2 minutes after the vehicle
comes to a
stop, to facilitate its cooling.
D. Tyres/paint code label.
This label is affixed to the driver's door
aperture.
It bears the following information about the
tyres:
-
t
he tyre pressures, unladen and laden,
-
t
he tyre specification, made up of the
dimensions and type as well as the load and
speed indices,
-
t
he spare tyre pressure.
It also indicates the paint colour code.
The vehicle may be originally equipped
with tyres with higher load and speed
indices than those indicated on the label,
without affecting inflation pressure.
Technical data
Page 228 of 292
2
The touch screen is of the "capacitive"
type.
To clean the screen, use a soft, non-
abrasive cloth (e.g. spectacles cloth) with
no additional product.
Do not use sharp objects on the screen.
Do not touch the screen with wet hands.
Certain information is displayed permanently in
the upper bar of the touch screen:
-
R
eminder of the air conditioning information
(depending on version), and direct access to
the corresponding menu.
-
R
eminder of the Radio Media and
Telephone menu information.
-
R
eminder of the privacy information.
-
A
ccess to the Settings of the touch screen
and digital instrument panel.
Selection of the audio source (depending on
equipment):
-
F
M/DAB/AM radio stations (depending on
equipment).
-
T
elephone connected via Bluetooth and
Bluetooth multimedia broadcast (streaming).
-
U
SB memory stick.
-
M
edia player connected via the auxiliary
socket (depending on equipment).
-
C
D player (depending on equipment). In the "Settings" menu it is possible to
create a
profile for just one person or
a
group of people with shared interests,
with the possibility of entering multiple
settings (radio presets, audio settings,
ambiences, etc.); these settings are taken
into account automatically.
In very hot conditions, the volume may
be limited to protect the system. It may go
into standby (screen and sound off) for at
least 5
minutes.
The return to normal takes place when
the temperature in the passenger
compartment has dropped.
Press the back arrow to go back a
level or
confirm.
Steering mounted controls
Steering mounted controls –
Ty p e 1
Radio:
Select the previous/next preset radio
station.
Select the previous/next item in
a
menu or a list.
Media:
Select the previous/next track.
Select the previous/next item in
a
menu or a list.
Radio:
Short press: display the list of radio
stations.
Long press: update the list.
Media:
Short press: display the list of
folders.
Long press: display the available
sorting options.
Change audio source (radio; USB;
AUX if equipment connected; CD;
streaming).
Confirm a
selection.
CITROËN Connect Radio
Page 233 of 292
7
Playing TA messages
The TA (Traffic Announcement) function
gives priority to TA alert messages.
To operate, this function needs good
reception of a radio station that transmits
this type of message. While traffic
information is being broadcast, the current
media is automatically interrupted so that
the TA message can be heard. Normal
play of the media previously playing is
resumed at the end of the message.
Press Radio Media to display the
primary page.
Press the " OPTIONS" button to go to the
secondary page.
Activate/deactivate " TA".
Press in the grey zone to confirm.
Audio settings
Press Radio Media to display the
primary page.
Press the " OPTIONS" button to go to the
secondary page.
Press "Audio settings ". Select the "
To n e" or "Balance " or
" Sound " or "Voice " or "Ringtones "
tab to configure the audio settings.
Press the back arrow to confirm.
In the " To n e" tab, the Ambience audio
settings, as well as Bass , Medium and
Tr e b l e are different and independent for
each audio source.
In the " Balance " tab, the All passengers ,
Driver and Front only settings are
common to all sources.
In the " Sound" tab, activate or deactivate
" Volume linked to speed ", "Auxiliary
input " and " Touch tones ".
The balance/distribution (or spatialisation
with the Arkamys
© system) is audio
processing that allows the quality of the
sound to be adapted according to the
number of passengers in the vehicle.
On-board audio: the Arkamys Sound
Staging
© optimises the distribution of
sound in the passenger compartment.
DAB (Digital Audio
Broadcasting) radio
Terrestrial Digital Radio
Digital radio provides higher quality sound.
The different "multiplexes/ensembles"
offer a
choice of radio stations arranged in
alphabetical order.
Press Radio Media to display the
primary page.
Press the " OPTIONS" button to go to the
secondary page.
Press "Band" to select the " DAB
band ".
Press in the grey zone to confirm.
FM-DAB tracking
"DAB" does not cover 100% of the
te r r i to r y.
When the digital radio signal is poor,
the "FM-DAB tracking" allows you to
continue listening to the same station,
by automatically switching to the
corresponding "FM" analogue station (if
there is one).
.
CITROËN Connect Radio
Page 243 of 292

17
Radio
QUESTIONRESPONSESOLUTION
The reception quality of the tuned radio station
gradually deteriorates or the stored stations are
not working (no sound, 87,5
MHz is displayed,
e t c .) . The vehicle is too far from the transmitter of
the station or no transmitter is present in the
geographical area.
Activate the "RDS" function by means of the
upper band to enable the system to check
whether there is a
more power ful transmitter in
the geographical area.
The environment (hills, buildings, tunnels,
basement car parks, etc.) blocks reception,
including in RDS mode. This phenomenon is normal and does not
indicate a
failure of the audio equipment.
The aerial is absent or has been damaged (for
example when going through a
car wash or into
an underground car park). Have the aerial checked by a
dealer.
I cannot find some radio stations in the list of
received stations.
The name of the radio station changes. The station is not received or has changed its
name in the list.
Press the round arrow on the "List" tab of the
"Radio" page.
Some radio stations send other information
in place of their name (the title of the song for
example).
The system interprets these details as the
station name.
.
CITROËN Connect Radio