headlamp CITROEN C5 AIRCROSS 2020 Handbook (in English)
[x] Cancel search | Manufacturer: CITROEN, Model Year: 2020, Model line: C5 AIRCROSS, Model: CITROEN C5 AIRCROSS 2020Pages: 292, PDF Size: 8.59 MB
Page 4 of 292
2
.
.
Instrument panels 8
W arning and indicator lamps 1 1
Indicators
26
Manual test
2
9
Lighting dimmer
3
0
Trip computer
3
1
Touch screen
3
2
Date and time adjustment
3
4Electronic key with remote control function and built-
in key
3
5
Keyless Entry and Starting
3
7
Central locking
4
1
Back-up procedures
4
1
Doors 44
Boot
44
Hands-free tailgate
4
5
Alarm
4
9
Electric windows 5 1
Panoramic opening sunroof 5 2
Correct driving position
5
4
Front seats
5
4
Steering wheel adjustment
5
8
Mirrors
58
Rear seats
6
0
Heating and Ventilation
6
1
Manual air conditioning
6
3
Dual-zone automatic air conditioning
6
4
Recirculation of interior air
6
7
Front demist – defrost
6
8
Heated windscreen
6
8
Rear screen demist – defrost
6
8
Additional Heating/Ventilation
6
9
Front fittings
7
1
Courtesy lamps
7
5
Interior ambient lighting
7
5
Boot fittings
7
6Lighting control
7
9
Direction indicators
8
0
Daytime running lamps/Sidelamps
8
1
Parking lamps
8
1
Automatic illumination of headlamps
8
1
Guide-me-home and welcome lighting
8
2
Automatic headlamp dipping
8
3
Headlamp adjustment
8
4
Cornering lighting
8
5
Wiper control stalk 8 5
Changing a wiper blade 8 7
Automatic windscreen wipers
8
8
General safety recommendations
8
9
Hazard warning lamps
8
9
Horn
90
Emergency or assistance call
9
0
Electronic stability control (ESC)
9
1
Advanced Grip Control
9
5
Hill Assist Descent Control
9
6
Seat belts
9
7
Airbags
101
Child seats
1
04
Deactivating the front passenger airbag
1
06
ISOFIX mountings and child seats
1
11
i-Size child seats
1
14
Child lock
1
15
Over view
Instruments Access
Ease of use and comfort Safety
Lighting and visibility
Eco-driving
Instruments and controls 4
Contents
Page 7 of 292
5
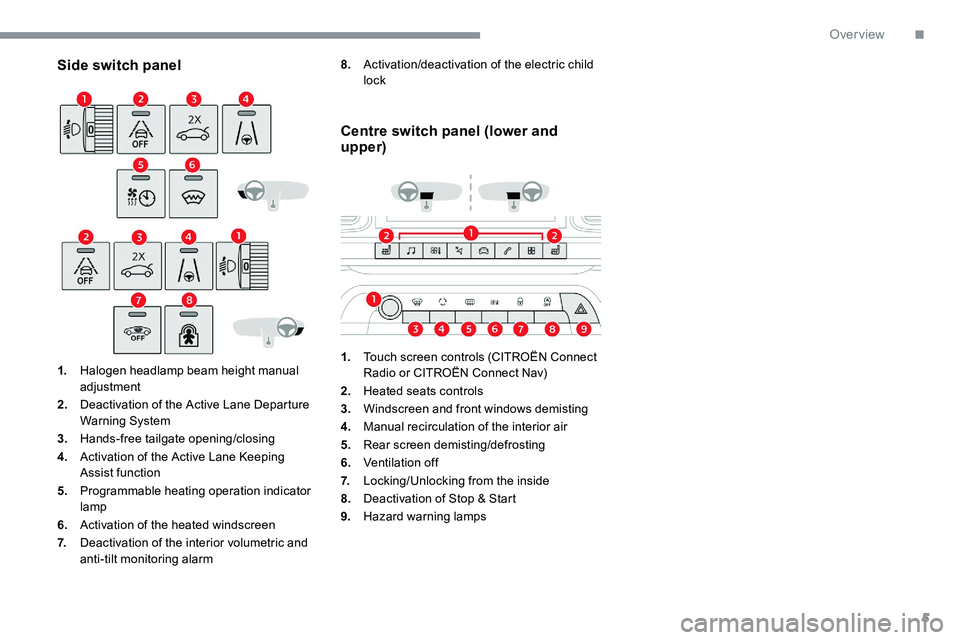
Side switch panel
1.Halogen headlamp beam height manual
adjustment
2. Deactivation of the Active Lane Departure
Warning System
3. Hands-free tailgate opening/closing
4. Activation of the Active Lane Keeping
Assist function
5. Programmable heating operation indicator
lamp
6. Activation of the heated windscreen
7. Deactivation of the interior volumetric and
anti-tilt monitoring alarm
Centre switch panel (lower and
upper)
1.Touch screen controls (CITROËN Connect
Radio or CITROËN Connect Nav)
2. Heated seats controls
3. Windscreen and front windows demisting
4. Manual recirculation of the interior air
5. Rear screen demisting/defrosting
6. Ventilation off
7. Locking/Unlocking from the inside
8. Deactivation of Stop & Start
9. Hazard warning lamps
8.
Activation/deactivation of the electric child
lock
.
Over view
Page 8 of 292
6
As a passenger, if you avoid connecting your
m ultimedia devices (film, music, video game,
etc.), you will contribute towards limiting the
consumption of electrical energy, and so of
fuel.
Disconnect your portable devices before
leaving the vehicle.
Eco- driving
Eco-driving is a range of everyday practices that allow the motorist to optimise their fuel consumption and CO2 emissions.
Optimise the use of your gearbox
With a manual gearbox, move off gently and
c hange up without waiting. While accelerating,
change up early.
With an automatic gearbox, give preference
to automatic mode and avoid pressing the
accelerator pedal heavily or suddenly.
The gear efficiency indicator invites you to
engage the most suitable gear: as soon as the
indication is displayed in the instrument panel,
follow it straight away.
For vehicles fitted with an automatic gearbox,
this indicator appears only in manual mode.
Drive smoothly
Maintain a safe distance between vehicles,
u se engine braking rather than the
brake pedal, and press the accelerator
progressively. These practices contribute
towards a
reduction in fuel consumption and
CO
2 emissions and also help reduce the
b
ackground traffic noise.
If your vehicle has cruise control, make use of
the system at speeds above 25
mph (40 km/h)
when the traffic is flowing well.
Control the use of your electrical
equipment
Before moving off, if the passenger
compartment is too warm, ventilate it by
opening the windows and air vents before
using the air conditioning.
Above 31
mph (50 km/h), close the windows
and leave the air vents open.
Consider using equipment that can help
keep the temperature in the passenger
compartment down (sunroof blind and window
blinds, etc.). Switch off the headlamps and front foglamps
when the ambient light level does not require
their use.
Avoid running the engine before moving off,
particularly in winter; your vehicle will warm up
much faster while driving. Unless it has automatic regulation, switch off
the air conditioning as soon as the desired
temperature has been reached.
Switch off the demisting and defrosting
controls, if these are not automatically
managed.
Switch off the heated seat as soon as
possible.
Eco-driving
Page 26 of 292
24
Warning/indicator lampStateCause Actions/Observations
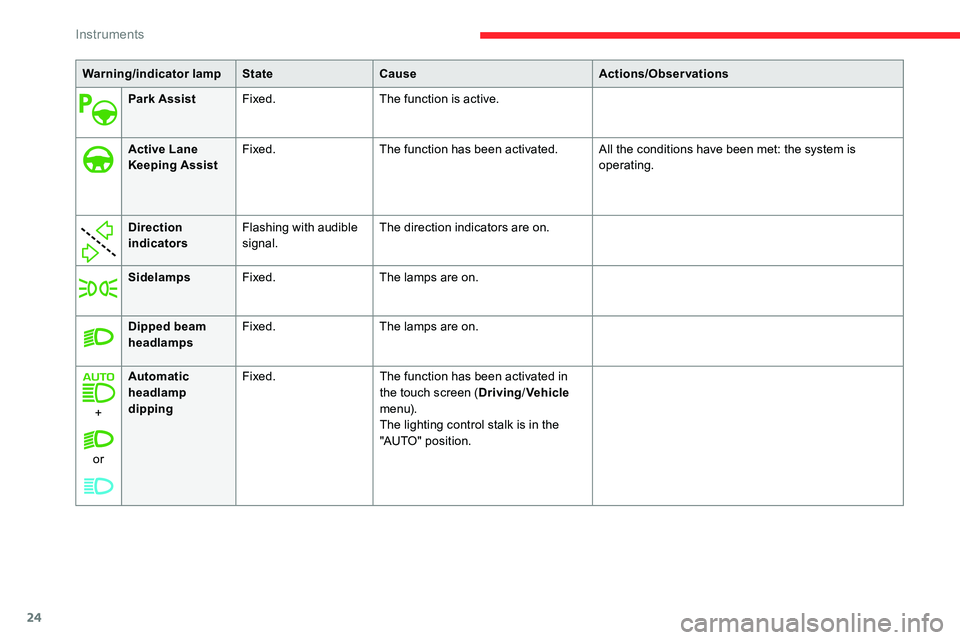
Park Assist Fixed. The function is active.
Active Lane
Keeping Assist Fixed.
The function has been activated. All the conditions have been met: the system is
operating.
Direction
indicators Flashing with audible
signal. The direction indicators are on.
Sidelamps Fixed. The lamps are on.
Dipped beam
headlamps Fixed.
The lamps are on.
+
or Automatic
headlamp
dipping
Fixed.
The function has been activated in
the touch screen (Driving/Vehicle
m e n u).
The lighting control stalk is in the
"AUTO" position.
Instruments
Page 27 of 292
25
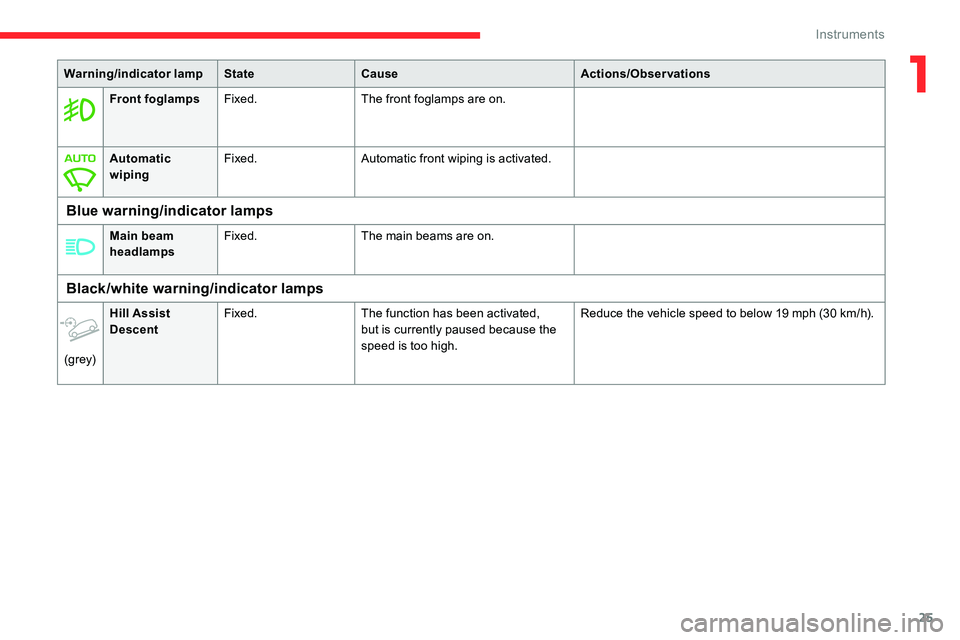
Front foglampsFixed. The front foglamps are on.
Automatic
wiping Fixed.
Automatic front wiping is activated.
Blue warning/indicator lamps
Main beam
headlampsFixed.
The main beams are on.
Warning/indicator lamp
StateCause Actions/Observations
Black/white warning/indicator lamps
(grey)Hill Assist
Descent
Fixed.
The function has been activated,
but is currently paused because the
speed is too high. Reduce the vehicle speed to below 19 mph (30 km/h).
1
Instruments
Page 39 of 292
37
Ensure that no person or object could
prevent the correct closing of the windows
and sunroof.
If, on versions with alarm, you want to
leave the windows and/or sunroof partly
open, you must first deactivate the
volumetric alarm protection.
For more information on the Alarm, refer
to the corresponding section.
Deadlocking
Deadlocking deactivates the exterior
and interior door controls, as well as the
central locking button on the dashboard.
The horn remains operational.
You must therefore never leave anyone
inside the vehicle when it is deadlocked.
If your vehicle is fitted with an alarm,
activation is confirmed by fixed
illumination of the direction indicators for
a
few seconds.
With the remote control
F Within 5 seconds of locking the
vehicle, press the button again to
deadlock it.
With the key
F Within 5 seconds of locking the vehicle, turn
the key to the rear again to deadlock it.
Locating your vehicle
This function allows you to identify your vehicle
from a distance, particularly in poor light. Your
vehicle must be locked.
F
P
ress this button. The courtesy
lamps will come on and the
direction indicators will flash for
a
few seconds.
Welcome lighting
Availability of this function depends on version. F
B
riefly press this button. The
sidelamps, dipped beam
headlamps, number plate lamps
and door mirror spotlamps come
on for 30 seconds.
Pressing again before the end of the timed
period switches off the lamps immediately.
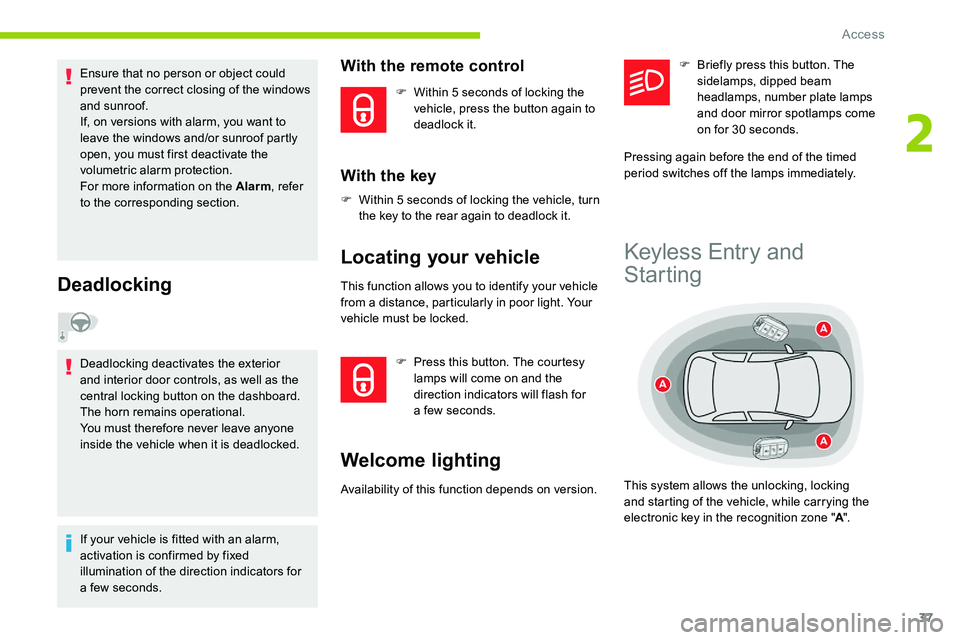
Keyless Entry and
Starting
This system allows the unlocking, locking
and starting of the vehicle, while carrying the
electronic key in the recognition zone " A".
2
Access
Page 61 of 292

59
As a safety measure, the mirrors should
b e adjusted to reduce the blind spots.
The objects that you see in the mirrors are
in fact closer than they appear.
Take this into account in order to
correctly judge the distance of vehicles
approaching from behind.
Folding
F From outside: lock the vehicle using the remote control or the key.
F
F
rom inside: with the
ignition on, pull the control
A from the central position
rearwards.
If the mirrors are folded using control
A , they will not unfold when the vehicle
is unlocked. It will be necessary to pull
control A again.
Unfolding
F From outside: unlock the vehicle using the remote control or the key.
F
F
rom inside: with the ignition on, pull
the control A from the central position
rearwards. The folding and unfolding of the door
mirrors when locking or unlocking the
vehicle can be deactivated via the vehicle
configuration menu.
If necessary, the mirrors can be folded
manually.
Automatic tilting in reverse gear
System which automatically tilts the mirrors
downwards to assist with parking manoeuvres
in reverse gear.
With the engine running, on engaging reverse
gear, the mirror glasses tilt downwards.
They return to their initial position:
-
a f
ew seconds after coming out of reverse
g e a r,
-
o
nce the speed of the vehicle exceeds
6
mph (10 km/h),
-
o
n switching off the engine. This function is activated/
deactivated via the " Vehicle
settings " tab in the Driving/Vehicle
menu of the touch screen.
Rear view mirror
Equipped with an anti-dazzle system, which
darkens the mirror glass and reduces the
nuisance to the driver caused by the sun,
headlamps from other vehicles, etc.
Manual model
Adjustment
F A djust the mirror so that the glass is
directed correctly in the "day" position.
Day/night position
F
P
ull the lever to change to the "night" anti-
dazzle position.
F
P
ush the lever to change to the normal
"day" position.
3
Ease of use and comfort
Page 81 of 292

79
Lighting control
In some weather conditions (e.g. low
temperature or humidity), the presence
of misting on the internal sur face of the
glass of the headlamps and rear lamps is
normal; it disappears after the lamps have
been on for a few minutes.
If one or more lamps fails, a message
asks you to check the lamp or lamps
concerned.
Travelling abroad
The design of the dipped beam headlamps
allows, without modification, driving in
a
country that drives on the other side
of the road to the country in which your
vehicle was sold.
Never look too closely at the luminous
beam of "Full LED" headlamps: risk of
serious eye injury.
Main lighting
Automatic illumination of headlamps/
Daytime running lamps.
Sidelamps only.
Dipped or main beam headlamps.
Headlamp dipping Foglamps
Rear foglamps
They operate with the dipped or
main beam headlamps on.
F
R
otate the ring for wards to switch them on
and rear wards to switch them off.
When the lighting is switched off automatically
(" AUTO " position), the foglamps and the dipped
beam headlamps will remain on.
Front and rear foglamps
They operate with the dipped beam
headlamps on, in manual or auto
mode.
Pull the stalk to switch between dipped and
main beam headlamps.
4
Lighting and visibility
Page 82 of 292
80
Turn and release the ring:
F o nce for wards to switch on the front
foglamps and then a
second time for the
rear foglamps.
F
o
nce rear wards to switch off the rear
foglamps and then a
second time for the
front foglamps.
If the lighting is switched off automatically
(" AUTO " position) or the dipped beam
headlamps are switched off manually, the
foglamps and sidelamps remain on.
F
T
urn the ring rear wards to switch the
foglamps off; the sidelamps will then switch
of f.
In good or rainy weather, both day and
night, using the front foglamps and the
rear foglamp is prohibited. In these
situations, the power of their beams may
dazzle other drivers. They should only be
used in fog or falling snow.
In these weather conditions, it is your
responsibility to switch on the foglamps
and dipped beam headlamps manually as
the sunshine sensor may detect sufficient
light.
Switch off the foglamps when they are no
longer necessary. Switching off of the lighting when the
ignition is switched off
On switching off the ignition, all of the
lighting turns off immediately, except for
dipped beam if automatic guide-me-home
lighting is activated.
Switching on the lighting after
switching off the ignition
From the AUTO
position, move the main
lighting ring to the desired position or,
from another position, move the ring to the
AUTO position then to a
position.
On opening the driver's door a
temporary
audible signal warns the driver that the
lighting is on.
It will go off automatically after a
period of
time that depends on the state of charge
in battery (entering energy economy
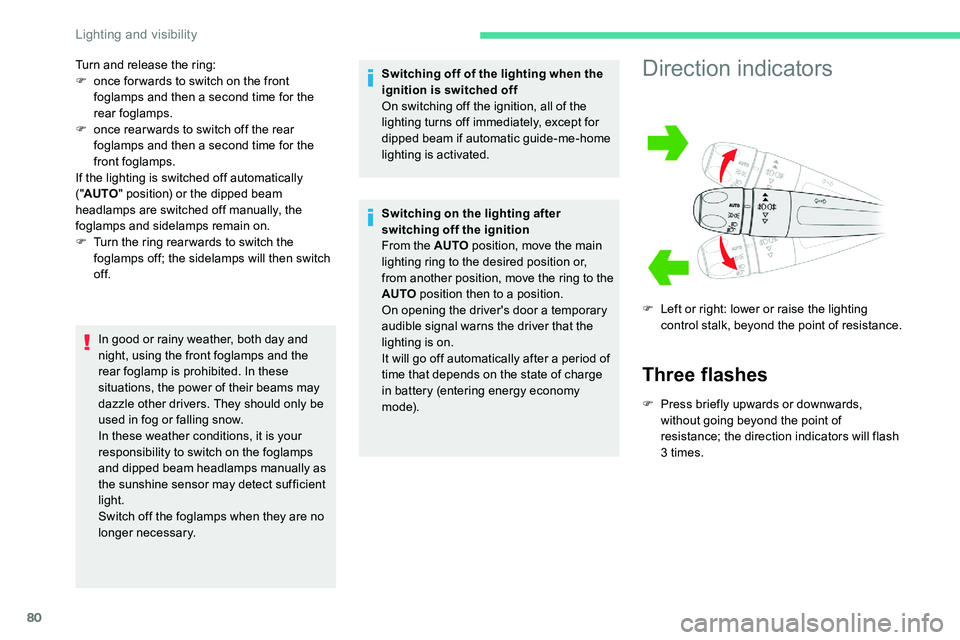
m o d e).Direction indicators
Three flashes
F Press briefly upwards or downwards, without going beyond the point of
resistance; the direction indicators will flash
3
times.
F
L
eft or right: lower or raise the lighting
control stalk, beyond the point of resistance.
Lighting and visibility
Page 83 of 292
81
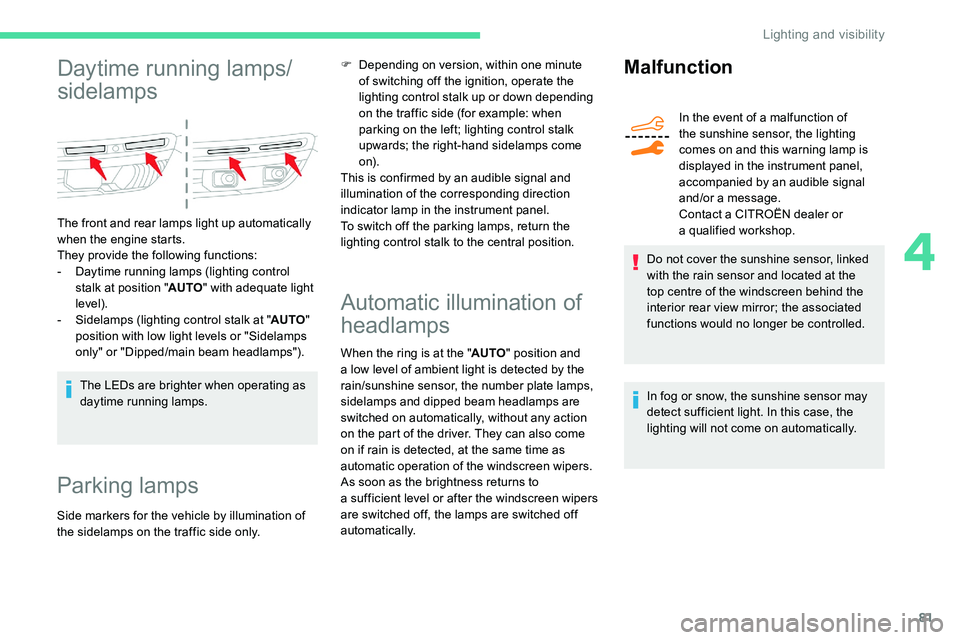
Daytime running lamps/
sidelamps
The front and rear lamps light up automatically
when the engine starts.
They provide the following functions:
-
D
aytime running lamps (lighting control
stalk at position " AUTO" with adequate light
level).
-
S
idelamps (lighting control stalk at " AUTO"
position with low light levels or "Sidelamps
only" or "Dipped/main beam headlamps").
The LEDs are brighter when operating as
daytime running lamps.
Parking lamps
Side markers for the vehicle by illumination of
the sidelamps on the traffic side only.
Automatic illumination of
headlamps
When the ring is at the " AUTO" position and
a low level of ambient light is detected by the
rain/sunshine sensor, the number plate lamps,
sidelamps and dipped beam headlamps are
switched on automatically, without any action
on the part of the driver. They can also come
on if rain is detected, at the same time as
automatic operation of the windscreen wipers.
As soon as the brightness returns to
a
sufficient level or after the windscreen wipers
are switched off, the lamps are switched off
automatically.
Malfunction
In the event of a malfunction of
t he sunshine sensor, the lighting
comes on and this warning lamp is
displayed in the instrument panel,
accompanied by an audible signal
and/or a
message.
Contact a
CITROËN dealer or
a
qualified workshop.
Do not cover the sunshine sensor, linked
with the rain sensor and located at the
top centre of the windscreen behind the
interior rear view mirror; the associated
functions would no longer be controlled.
In fog or snow, the sunshine sensor may
detect sufficient light. In this case, the
lighting will not come on automatically.
F
D
epending on version, within one minute
of switching off the ignition, operate the
lighting control stalk up or down depending
on the traffic side (for example: when
parking on the left; lighting control stalk
upwards; the right-hand sidelamps come
o n).
This is confirmed by an audible signal and
illumination of the corresponding direction
indicator lamp in the instrument panel.
To switch off the parking lamps, return the
lighting control stalk to the central position.
4
Lighting and visibility