lock CITROEN C5 AIRCROSS 2022 Handbook (in English)
[x] Cancel search | Manufacturer: CITROEN, Model Year: 2022, Model line: C5 AIRCROSS, Model: CITROEN C5 AIRCROSS 2022Pages: 276, PDF Size: 7.92 MB
Page 192 of 276
190
In the event of a breakdown
► Stop all power consumption.
► Immobilise the vehicle and switch the ignition
off.
►
Identify the defective fuse using the current
allocation tables and diagrams.
T
o replace a fuse, it is essential to:
►
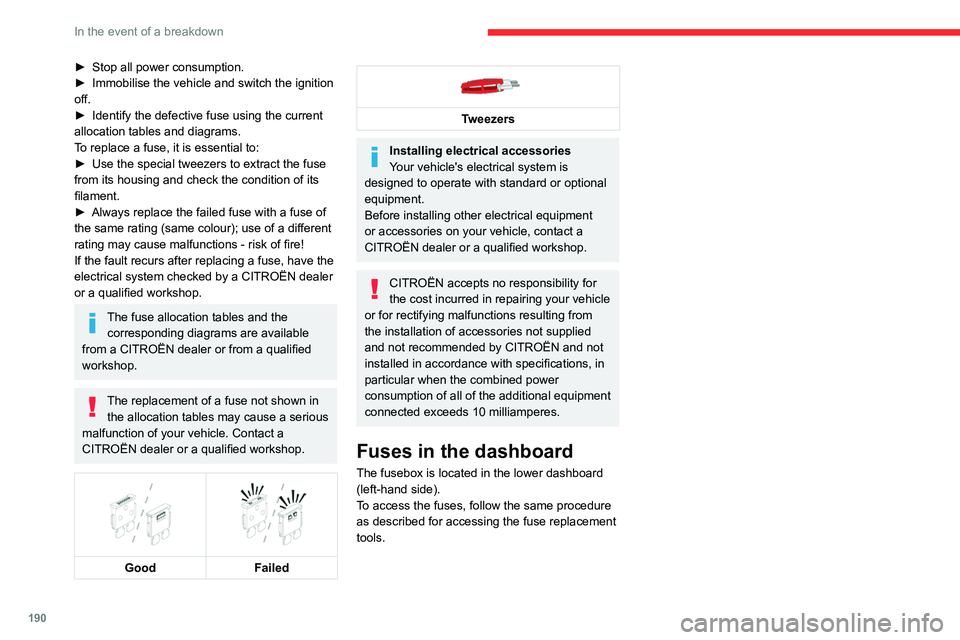
Use the special tweezers to extract the fuse
from its housing and check the condition of its
filament.
►
Always replace the failed fuse with a fuse of
the same rating (same colour); use of a different
rating may cause malfunctions - risk of fire!
If the fault recurs after replacing a fuse, have the
electrical system checked by a CITROËN dealer
or a qualified workshop.
The fuse allocation tables and the corresponding diagrams are available
from a CITROËN dealer or from a qualified
workshop.
The replacement of a fuse not shown in the allocation tables may cause a serious
malfunction of your vehicle. Contact a
CITROËN dealer or a qualified workshop.
Good
Failed
Tweezers
Installing electrical accessories
Your vehicle's electrical system is
designed to operate with standard or optional
equipment.
Before installing other electrical equipment
or accessories on your vehicle, contact a
CITROËN dealer or a qualified workshop.
CITROËN accepts no responsibility for
the cost incurred in repairing your vehicle
or for rectifying malfunctions resulting from
the installation of accessories not supplied
and not recommended by CITROËN and not
installed in accordance with specifications, in
particular when the combined power
consumption of all of the additional equipment
connected exceeds 10 milliamperes.
Fuses in the dashboard
The fusebox is located in the lower dashboard
(left-hand side).
To access the fuses, follow the same procedure
as described for accessing the fuse replacement
tools.
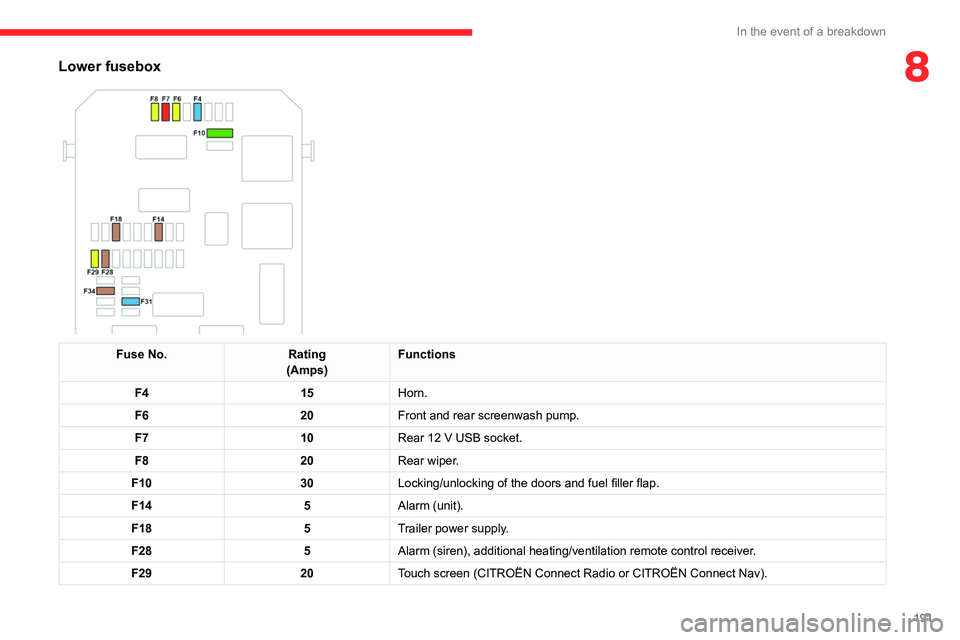
Lower fusebox
Fuse No. Rating
(Amps) Functions
F4 15Horn.
F6 20Front and rear screenwash pump.
F7 10Rear 12 V USB socket.
F8 20Rear wiper.
F10 30Locking/unlocking of the doors and fuel filler flap.
F14 5Alarm (unit).
F18 5Trailer power supply.
F28 5Alarm (siren), additional heating/ventilation remote control receiver.
F29 20Touch screen (CITROËN Connect Radio or CITROËN Connect Nav).
Page 193 of 276
191
In the event of a breakdown
8Lower fusebox
Fuse No.Rating
(Amps) Functions
F4 15Horn.
F6 20Front and rear screenwash pump.
F7 10Rear 12
V USB socket.
F8 20Rear wiper.
F10 30Locking/unlocking of the doors and fuel filler flap.
F14 5Alarm (unit).
F18 5Trailer power supply.
F28 5Alarm (siren), additional heating/ventilation remote control receiver.
F29 20Touch screen (CITROËN Connect Radio or CITROËN Connect Nav).
Page 196 of 276

194
In the event of a breakdown
Fuse No.Rating
(Amps) Functions
F24 40Trailer power supply.
F26 25Front foglamps.
12 V battery
Procedure for starting the engine using another
battery or for charging a discharged battery.
Lead-acid starter batteries
These batteries contain harmful
substances (sulphuric acid and lead).
They must be disposed of in accordance
with regulations and must never under any
circumstances be discarded with household
waste.
Take used remote control batteries and
vehicle batteries to a special collection point.
Protect your eyes and face before
handling the battery.
All operations on the battery must be carried
out in a well ventilated area and away from
naked flames and sources of sparks, to avoid
any risk of explosion or fire.
Wash your hands afterwards.
Access to the battery
The battery is located under the bonnet.
For access to the (+) terminal:
► Unlock the bonnet by activating the internal
release lever
, then the external safety catch.
►
Raise the bonnet.
(+)
Positive terminal.
It has a quick-release clamp.
(-) Negative terminal.
As the battery's negative terminal is not
accessible, a remote earth point is placed near
the battery.
Starting using another
battery
If your vehicle's battery is flat, the engine can be
started using a backup battery (either external or
from another vehicle) and jump leads or using a
battery booster.
Never start the engine by connecting a
battery charger.
Never use a 24
V or higher battery booster.
Check beforehand that the backup battery
has a nominal voltage of 12
V and a capacity
at least equal to that of the discharged
battery.
The two vehicles must not be in contact with
each other.
Switch off all electricity-consuming equipment
on both vehicles (audio system, wipers,
lighting, etc.).
Make sure that the jump leads are well away
from the engine’s moving parts (fan, belt,
etc.).
Do not disconnect the (+) terminal while the
engine is running.
Page 198 of 276
196
In the event of a breakdown
► At the end of the charging operation, switch
off charger B
before disconnecting the cables
from battery A.
If this label is present, use only a 12 V
charger to avoid causing irreversible
damage to the electrical components
connected to the Stop & Start system.
24V
12V
Never try to charge a frozen battery - risk
of explosion!
If the battery has frozen, have it checked by a
CITROËN dealer or by a qualified workshop
who will verify that the internal components
have not been damaged and that the case
has not cracked, which would mean a risk of
toxic and corrosive acid leaking.
Disconnecting the battery
In order to maintain an adequate state of charge
for starting the engine, it is recommended that
the battery be disconnected if the vehicle is
taken out of service for a long period.
Before disconnecting the battery:
►
Close all openings (doors, boot, windows,
roof). ►
Switch off all electrical consumers (audio
system, wipers, lighting, etc.).
►
Switch off the ignition and wait for 4
minutes.
At the battery, it is only necessary to disconnect
the (+) terminal.
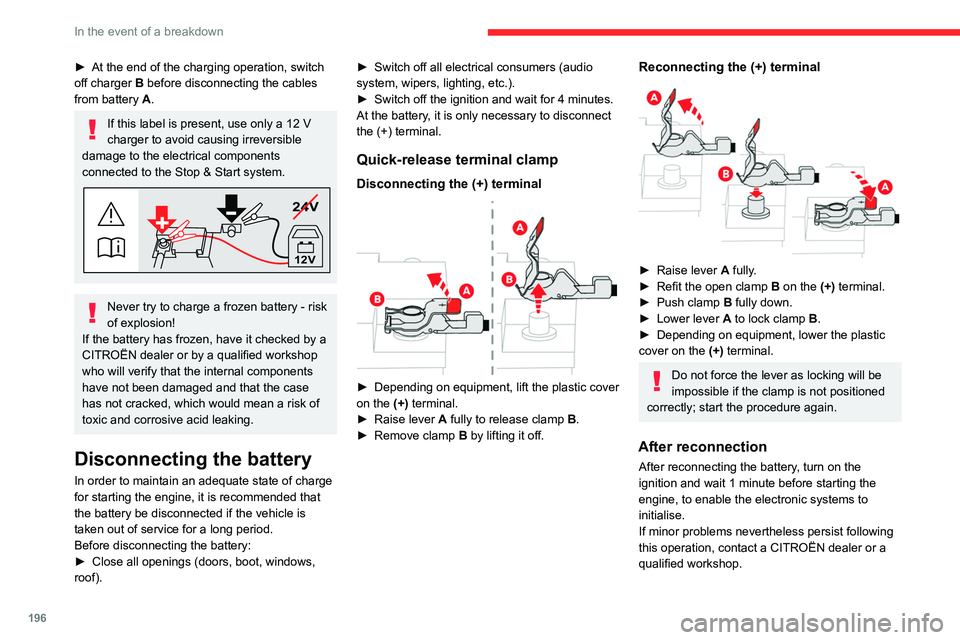
Quick-release terminal clamp
Disconnecting the (+) terminal
► Depending on equipment, lift the plastic cover
on the (+) terminal.
►
Raise lever
A
fully to release clamp
B
.
►
Remove clamp
B
by lifting it off.
Reconnecting the (+) terminal
► Raise lever A fully.
► Refit the open clamp B on the (+) terminal.
►
Push clamp
B fully down.
►
Lower lever
A
to lock clamp B.
►
Depending on equipment, lower the plastic
cover on the
(+) terminal.
Do not force the lever as locking will be
impossible if the clamp is not positioned
correctly; start the procedure again.
After reconnection
After reconnecting the battery, turn on the
ignition and wait 1 minute before starting the
engine, to enable the electronic systems to
initialise.
If minor problems nevertheless persist following
this operation, contact a CITROËN dealer or a
qualified workshop.
Referring to the relevant section, reset certain
equipment:
– Remote control key or electronic key
(depending on version).
– Sunroof and electric sun blind.
– Electric windows.
– Date and time.
– Preset radio stations.
The Stop & Start system may not be
operational during the trip following the
first engine start.
In this case, the system will only be
available again after a continuous period of
immobilisation of the vehicle, a period which
depends on the exterior temperature and the
state of charge of the battery (up to about 8
hours).
Accessory battery (Rechargeable hybrid)
The rechargeable hybrid system has two
accessory batteries: one at the front and one at
the rear of the vehicle.
The batteries contain harmful substances (sulphuric acid and lead).
They must be disposed of in accordance
with regulations and must never under any
circumstances be discarded with household
waste.
Page 201 of 276
199
In the event of a breakdown
8
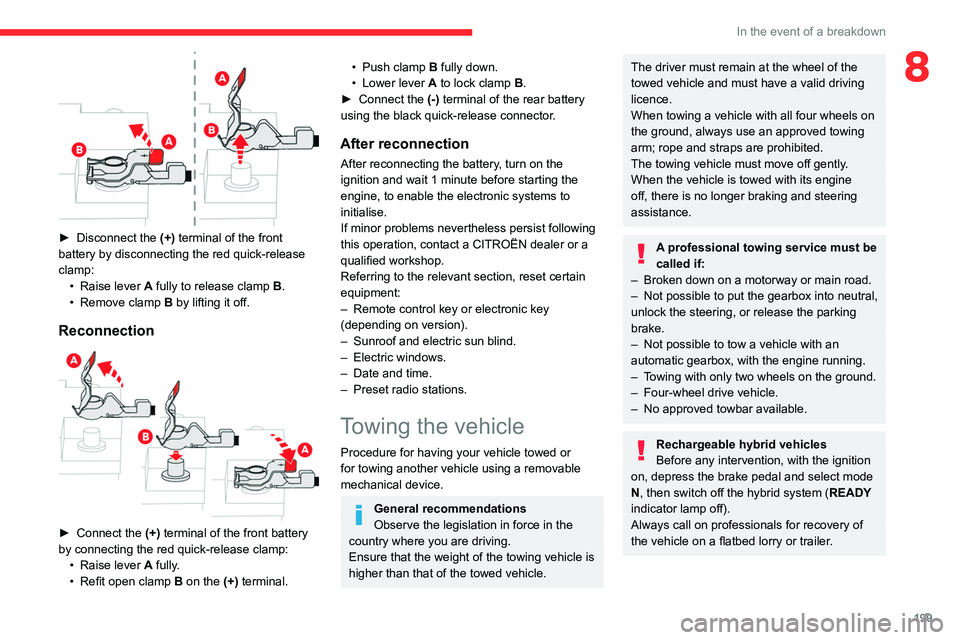
► Disconnect the (+) terminal of the front
battery by disconnecting the red quick-release
clamp: •
Raise lever
A
fully to release clamp
B
.
•
Remove clamp
B
by lifting it off.
Reconnection
► Connect the (+) terminal of the front battery
by connecting the red quick-release clamp: •
Raise lever
A
fully.
•
Refit open clamp
B
on the (+) terminal.
• Push clamp B fully down.
• Lower lever A to lock clamp B.
►
Connect the
(-) terminal of the rear battery
using the black quick-release connector.
After reconnection
After reconnecting the battery, turn on the
ignition and wait 1 minute before starting the
engine, to enable the electronic systems to
initialise.
If minor problems nevertheless persist following
this operation, contact a CITROËN dealer or a
qualified workshop.
Referring to the relevant section, reset certain
equipment:
–
Remote control key or electronic key
(depending on version).
–
Sunroof and electric sun blind.
–
Electric windows.
–
Date and time.
–
Preset radio stations.
Towing the vehicle
Procedure for having your vehicle towed or
for towing another vehicle using a removable
mechanical device.
General recommendations
Observe the legislation in force in the
country where you are driving.
Ensure that the weight of the towing vehicle is
higher than that of the towed vehicle.
The driver must remain at the wheel of the
towed vehicle and must have a valid driving
licence.
When towing a vehicle with all four wheels on
the ground, always use an approved towing
arm; rope and straps are prohibited.
The towing vehicle must move off gently.
When the vehicle is towed with its engine
off, there is no longer braking and steering
assistance.
A professional towing service must be
called if:
–
Broken down on a motorway or main road.
–
Not possible to put
the gearbox into neutral,
unlock the steering, or release the parking
brake.
–
Not possible to tow a vehicle with an
automatic gearbox, with the engine running.
–
T
owing with only two wheels on the ground.
–
Four-wheel drive vehicle.
–
No approved towbar available.
Rechargeable hybrid vehicles
Before any intervention, with the ignition
on, depress the brake pedal and select mode
N, then switch off the hybrid system (READY
indicator lamp off).
Always call on professionals for recovery of
the vehicle on a flatbed lorry or trailer.
Page 203 of 276
201
In the event of a breakdown
8Accessing the tools
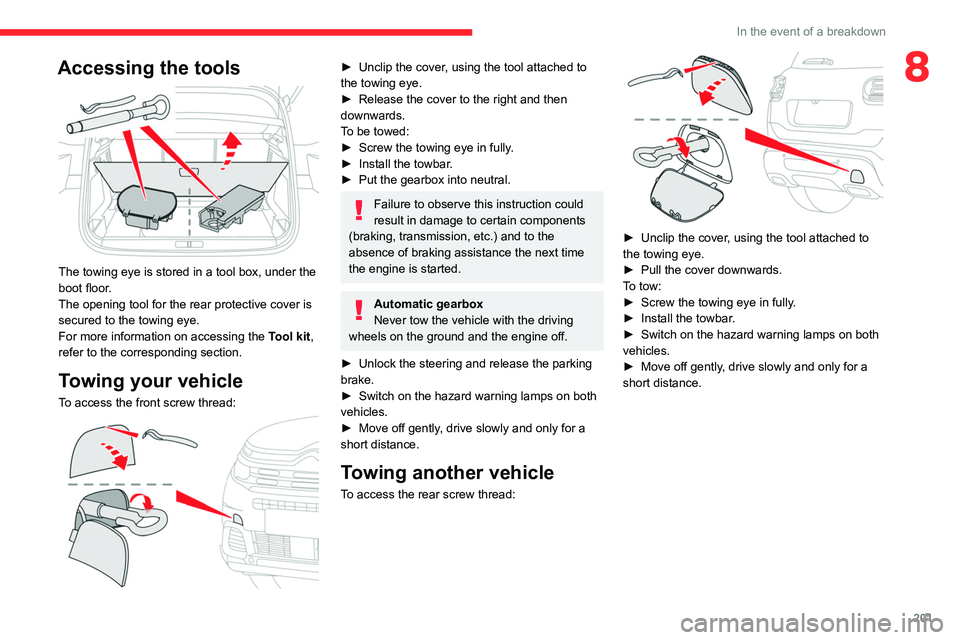
The towing eye is stored in a tool box, under the
boot floor.
The opening tool for the rear protective cover is
secured to the towing eye.
For more information on accessing the Tool kit,
refer to the corresponding section.
Towing your vehicle
To access the front screw thread:
► Unclip the cover , using the tool attached to
the towing eye.
►
Release the cover to the right and then
downwards.
T
o be towed:
►
Screw the towing eye in fully
.
►
Install the towbar
.
►
Put the gearbox into neutral.
Failure to observe this instruction could
result in damage to certain components
(braking, transmission, etc.) and to the
absence of braking assistance the next time
the engine is started.
Automatic gearbox
Never tow the vehicle with the driving
wheels on the ground and the engine off.
►
Unlock the steering and release the parking
brake.
►
Switch on the hazard warning lamps on both
vehicles.
►
Move off gently
, drive slowly and only for a
short distance.
Towing another vehicle
To access the rear screw thread:
► Unclip the cover , using the tool attached to
the towing eye.
►
Pull the cover downwards.
T
o tow:
►
Screw the towing eye in fully
.
►
Install the towbar
.
►
Switch on the hazard warning lamps on both
vehicles.
►
Move off gently
, drive slowly and only for a
short distance.
Page 213 of 276

2 11
CITROËN Connect Radio
10Enter the FM and AM waveband values
using the virtual keypad.
Press "OK" to confirm.
Radio reception may be affected by the
use of electrical equipment not approved
by the Brand, such as a USB charger
connected to the 12 V socket.
The exterior environment (hills, buildings,
tunnels, basement car parks, etc.) may
block reception, including in RDS mode.
This phenomenon is perfectly normal in the
context of radio wave transmission, and
in no way indicative of an audio system
malfunction.
Changing the waveband
Press Radio Media to display the main
page.
Press the "OPTIONS " button to access the
secondary page.
Press "Band" to change waveband.
Press in the shaded area to confirm.
Presetting a station
Select a radio station or frequency.Make a short press on the star outline. If
the star is solid, the radio station is
already preset.
Or
Select a radio station or frequency.
Press "Preset ".
Make a long press on one of the buttons
to preset the station.
Activating/Deactivating RDS
RDS, if activated, allows you to continue
listening to the same station by automatically
retuning to alternative frequencies.
Press Radio Media to display the main
page.
Press the "OPTIONS " button to access the
secondary page.
Activate/deactivate "RDS".
Press in the shaded area to confirm.
RDS station tracking may not be
available nationwide, as many radio
stations do not cover 100
% of the country.
This explains the loss of reception of the
station during a journey.
Displaying text information
The "Radio Text" function displays information
transmitted by the radio station relating to the
station or the currently playing song.
Press Radio Media to display the main
page. Press the "OPTIONS
" button to access the
secondary page.
Activate/deactivate "News".
Press in the shaded area to confirm.
Playing TA messages
The TA (Traffic Announcement) function gives
priority to TA alert messages. To operate, this
function needs good reception of a radio station
that transmits this type of message. While traffic
information is being broadcast, the current
media is automatically interrupted so that the
TA message can be heard. Normal play of the
previously playing media resumes at the end of
the message.
Press Radio Media to display the main
page.
Press the "OPTIONS " button to access the
secondary page.
Activate/deactivate "TA ".
Press in the shaded area to confirm.
Audio settings
Press Radio Media to display the main
page.
Press the "OPTIONS " button to access the
secondary page.
Press "Audio settings".
Page 216 of 276
214
CITROËN Connect Radio
Telephone
USB sockets
Depending on equipment, for more information
on the USB sockets compatible with CarPlay® or
Android Auto applications, refer to the "Ease of
use and comfort" section.
For the list of compatible smartphones,
visit the Manufacturer's website in your
country.
Synchronising a smartphone enables
users to display applications that support
the smartphone’s CarPlay
® or Android Auto
technology on the vehicle’s screen. For
CarPlay
® technology, the CarPlay® function
must first be activated on the smartphone.
Unlock the smartphone for the communication
process between the smartphone and the
system to work.
As principles and standards are constantly
changing, we recommend keeping the
smartphone's operating system up-to-
date, together with the date and time on
the smartphone and the system.
CarPlay® smartphone
connection
Depending on country.
On connecting the USB cable, the
CarPlay® function deactivates the
system's Bluetooth® mode.
The "CarPlay " function requires the use of
a compatible smartphone and compatible
applications.
Connect the USB cable. The smartphone
charges when connected by the USB
cable.
From the system, press Telephone to
display the CarPlay® interface.
Or
If the smartphone has already connected
by Bluetooth®.Connect the USB cable. The smartphone
charges when connected by the USB
cable.
From the system, press "Telephone" to
display the main page.
Press the "PHONE" button to go to the
secondary page.
Press "CarPlay" to display the CarPlay®
interface.
When the USB cable is disconnected
and the ignition is switched off then back
on, the system will not automatically switch to
Radio Media mode; the source must be
changed manually.
The CarPlay® navigation can be accessed
at any time by pressing the system's
Navigation button.
Android Auto smartphone connection
Depending on country.On the smartphone, download the
Android Auto application.
The "Android Auto" function requires the
use of a compatible smartphone and
applications.
Telephone not connected by
Bluetooth®
Connect a USB cable. The smartphone
charges when connected by a USB cable.
From the system, press "Telephone" to
display the main page.
Press "Android Auto" to start the
application in the system.
Depending on the smartphone, it may be
necessary to activate the "Android Auto"
function.
During the procedure, several screen
pages relating to certain features are
displayed.
Accept to start and complete the connection.
When connecting a smartphone to the
system, we recommend enabling
Bluetooth
® on the smartphone.
Telephone connected by Bluetooth®
From the system, press "Telephone" to
display the main page.
Page 220 of 276

218
CITROËN Connect Radio
Press "Configuration" to access the
secondary page.
Press "Date and time".
Select "Time".
Press this button to set the time using the
virtual keypad.
Press "OK" to save the time.
Press this button to set the time zone.
Select the display format for the time
(12h/24h).
Activate or deactivate summer time (+1 hour).
Activate or deactivate GPS synchronisation (UTC).
Press the back arrow to save the settings.
The system may not automatically manage the change between winter and
summer time (depending on the country of
sale).
Setting the date
Press Settings to display the main page.
Press "Configuration" to access the
secondary page.
Press "Date and time".
Select "Date".
Press this button to set the date.
Press the back arrow to save the date.
Select the display format for the date.
Press the back arrow again to confirm.
Time and date setting is only available if
"GPS Synchronisation:" is deactivated.
Frequently asked
questions
The following information groups together the answers to the most frequently asked questions
concerning the system.
Radio
The reception quality of the tuned radio
station gradually deteriorates or the station
presets are not working (no sound, 87.5 MHz
is displayed, etc.).
The vehicle is too far from the selected station’s
transmitter, or no transmitter is present in the
geographical area.
►
Activate the "RDS" function in the upper bar
to enable the system to check whether there is
a more powerful transmitter in the geographical
area. The environment (hills, buildings, tunnels,
basement car parks, etc.) is blocking reception,
including in RDS mode.
This is a perfectly normal phenomenon, and is
not indicative of an audio system malfunction.
The aerial is missing or has been damaged
(for example while entering a car wash or
underground car park).
►
Have the aerial checked by a dealer
.
I cannot find some radio stations in the list of
received stations.
The name of the radio station changes.
The station is no longer received or its name has
changed in the list.
►
Press the round arrow on the "List" tab on the
"Radio" page.
Some radio stations send other information
in place of their name (the title of the song for
example).
The system interprets these details as the station
name.
►
Press the round arrow on the "List" tab on the
"Radio" page.
Media
Playback of my USB memory stick starts only
after a very long wait (around 2 to 3 minutes).
Some files supplied with the memory stick may
greatly slow down access to reading the memory
stick (multiplication by 10 of the cataloguing
time).
Page 233 of 276
231
CITROËN Connect Nav
11Displaying charging station
details
Press Navigation to display the main
page.
Press this button to display the list of
services.
Press "POI on map" to display the list
of points of interest.
Press one of the buttons to search for
"Stations".
Activate/deactivate "Stations".
Press this button to display a secondary
page.
Select the "Settings" tab.
Select the desired connector type.
Press "OK" to save.
Displaying weather
information
Press Navigation to display the main
page.
Press this button to display the list of
services.
Select "View map".
Select "Weather".
Press this button to display basic
information.
Press this button to display detailed
weather information.
The temperature displayed at 6 a.m. will be the maximum temperature for the day.
The temperature displayed at 6 p.m. will be
the minimum temperature for the night.
Applications
USB sockets
Depending on equipment, for more information
on the USB sockets compatible with CarPlay® or
Android Auto applications, refer to the "Ease of
use and comfort" section.
For the list of compatible smartphones,
visit the Manufacturer's website in your
country.
Synchronising a smartphone enables
users to display applications that support
the smartphone’s CarPlay
® or Android Auto
technology on the vehicle’s screen. For
CarPlay
® technology, the CarPlay® function
must first be activated on the smartphone.
Unlock the smartphone for the communication
process between the smartphone and the
system to work.
As principles and standards are constantly
changing, we recommend keeping the
smartphone's operating system up-to-
date, together with the date and time on
the smartphone and the system.
Connectivity
Press Applications to display the main
page.
Press "Connectivity" to access the CarPlay
® or
Android Auto functions.
CarPlay® smartphone
connection
Depending on country.
On connecting the USB cable, the
CarPlay® function deactivates the
system's Bluetooth® mode.
The "CarPlay " function requires the use of
a compatible smartphone and compatible
applications.
Connect the USB cable. The smartphone
charges when connected by the USB
cable.
Press "Telephone" to display the
CarPlay® interface.
Or
Connect the USB cable. The smartphone
charges when connected by the USB
cable.