fold seats CITROEN C5 AIRCROSS 2022 Handbook (in English)
[x] Cancel search | Manufacturer: CITROEN, Model Year: 2022, Model line: C5 AIRCROSS, Model: CITROEN C5 AIRCROSS 2022Pages: 276, PDF Size: 7.92 MB
Page 38 of 276

36
Access
There are several ways of operating the tailgate:
A.Using the Keyless Entry and Starting system
electronic key.
B. Using the exterior tailgate control.
C. Using the interior tailgate control.
D. Using the control on the dashboard*.
E. Using the “Hands-Free Tailgate Access”
function below the rear bumper.
Opening / Closing
► Press and hold the central button A of the
electronic key.
or
► Briefly press the exterior tailgate control B,
with the electronic key on your person.
* Depending on version.
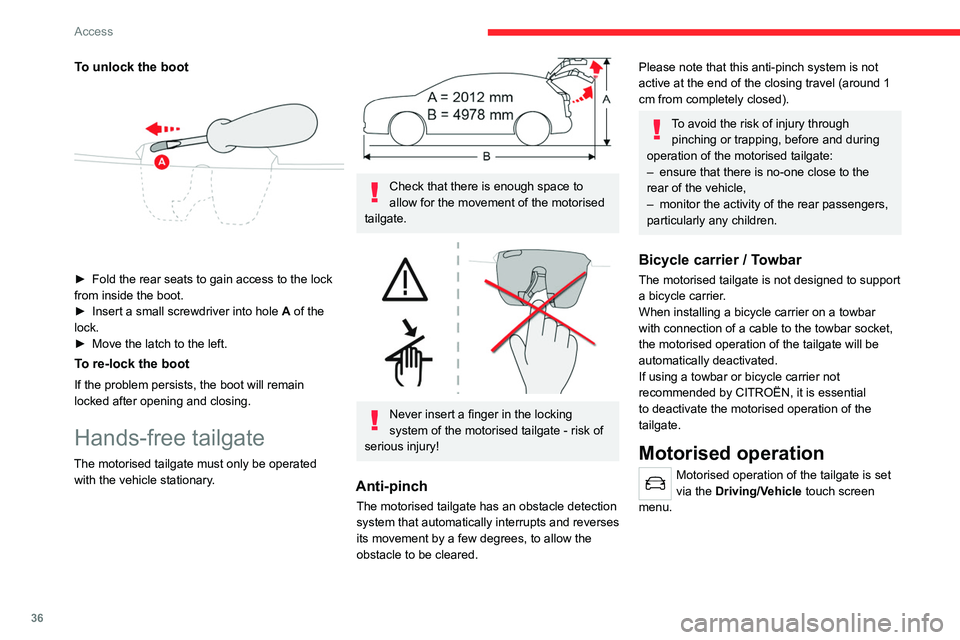
To unlock the boot
► Fold the rear seats to gain access to the lock
from inside the boot.
►
Insert a small screwdriver into hole A
of the
lock.
►
Move the latch to the left.
To re-lock the boot
If the problem persists, the boot will remain
locked after opening and closing.
Hands-free tailgate
The motorised tailgate must only be operated with the vehicle stationary.
Check that there is enough space to
allow for the movement of the motorised
tailgate.
Never insert a finger in the locking
system of the motorised tailgate - risk of
serious injury!
Anti-pinch
The motorised tailgate has an obstacle detection
system that automatically interrupts and reverses
its movement by a few degrees, to allow the
obstacle to be cleared.
Please note that this anti-pinch system is not
active at the end of the closing travel (around 1
cm from completely closed).
To avoid the risk of injury through pinching or trapping, before and during
operation of the motorised tailgate:
–
ensure that there is no-one close to the
rear of the vehicle,
–
monitor the activity of the rear passengers,
particularly any children.
Bicycle carrier / Towbar
The motorised tailgate is not designed to support
a bicycle carrier.
When installing a bicycle carrier on a towbar
with connection of a cable to the towbar socket,
the motorised operation of the tailgate will be
automatically deactivated.
If using a towbar or bicycle carrier not
recommended by CITROËN, it is essential
to deactivate the motorised operation of the
tailgate.
Motorised operation
Motorised operation of the tailgate is set
via the Driving/Vehicle touch screen
menu.
Page 52 of 276

50
Ease of use and comfort
retrieve the seat belt and hold it during the
operation.
► Put the backrest 2 in the upright position and
push firmly to latch it home.
► Check that the release strap 1 has correctly
returned to its position.
► Ensure that the outer seat belts are not
trapped during the operation.
Please note: an incorrectly latched
backrest compromises the safety of
passengers in the event of sudden braking or
an impact.
The contents of the boot may be thrown
forward - risk of serious injury!
Heating and Ventilation
Air intake
The air circulating in the passenger compartment
is filtered and originates either from the
exterior, via the grille located at the base of the
windscreen, or from the inside in air recirculation
mode.
Controls
The controls are accessible in the " Air
conditioning " touch screen menu and are also
grouped together in the control panel on the
centre console.
The rear head restraints can be removed.
To remove a head restraint:
►
pull the head restraint as far up as it will go,
►
press the lugs
A to release the head restraint
and remove it completely,
►
stow the head restraint.
T
o refit a head restraint:
►
insert the head restraint rods into the guides
in the corresponding seat backrest,
►
push the head restraint down as far as it will
go,
►
press the lugs
A to release the head restraint
and push it fully down.
Never drive with passengers seated at
the rear when the head restraints are
removed; they must be in place and in the
high position.
Longitudinal adjustment
Seat operations must only be done with
the vehicle stationary.
Each seat can be adjusted individually.
► Raise the control and slide the seat forwards
or backwards.
Once the backrest is folded, it is no
longer possible to slide the seat.
Backrest angle
Several adjustment positions are possible.
► Move the seat forward.
► Pull the strap forward, then tilt the backrest to
the desired position.
Folding the backrests
The backrests must only be operated with the vehicle stationary.
Preliminary operations:
►
lower the head restraints,
►
if necessary
, move the front seats forward,
►
check that no person or object could interfere
with the folding of the backrests (clothing,
luggage, etc.),
►
check that the outer seat belts are properly
tensioned along the pillars, that the central belt
is stowed and that the tongues of the three belts
are correctly in the storage position.
► Pull the strap 1 firmly to release the backrest.
► Guide the backrest 2 down to the horizontal
position.
Repositioning the backrests
Before raising the backrest of the outer
seats to the normal position, please
Page 66 of 276

64
Ease of use and comfort
Behind the front seats
► Fold down the rear seats.
► Insert the ends of the bar, one after the other,
into the fixing points in the roof.
► Attach the net’s straps to the upper anchoring
points, located in the housing of the Top Tether
fixings.
► Pull on the straps to stretch the net.
Behind the rear seats
► Remove the load space cover.
Page 67 of 276

65
Ease of use and comfort
3Behind the front seats
► Fold down the rear seats.
► Insert the ends of the bar , one after the other,
into the fixing points in the roof.
►
Attach the net’
s straps to the upper anchoring
points, located in the housing of the Top Tether
fixings.
►
Pull on the straps to stretch the net.
Behind the rear seats
► Remove the load space cover .►
Insert the ends of the bar
, one after the other,
into the fixing points of the roof.
►
Attach the straps of the net to the lower rings,
located on each side trim of the boot.
►
Pull on the straps to stretch the net.
2-position boot floor
Depending on equipment,
this two-position floor
allows the boot volume to be optimised using the
lateral stops located on the sides:
–
High position ( 100 kg max.
): to obtain a flat
floor up to the front seats, when the rear seats
are folded down.
–
Low position ( 150 kg max.
): maximum boot
volume.
To change the height:
► Lift and pull the floor towards you using its
central handle, then use the lateral stops to
move it.
►
Push the floor fully forwards to place it in the
desired position.
Ensure that the boot is empty before
moving the boot floor.
To increase the boot volume with the floor in the
low position:
►
Pull the rear seat crossmember up vertically
to the level of the markings.
►
T
o put it back in place, push it as far as it will
go until it engages.
Page 86 of 276

84
Safety
Advice
The driver must ensure that passengers use the seat belts correctly and that they
are all fastened before setting off.
Wherever seated in the vehicle, you must
always fasten the seat belt, even for short
journeys.
Do not invert the seat belt buckles, as they
will not fulfil their role properly.
To ensure the proper functioning of the belt
buckles, make sure that there are no foreign
bodies present (e.g. a coin) before fastening.
Before and after use, ensure that the seat belt
is reeled in correctly.
After folding or moving a seat or rear bench
seat, ensure that the seat belt is positioned
and reeled in correctly.
Installation
The lower part of the strap must be
positioned as low as possible over the pelvis.
The upper part must be positioned in the
hollow of the shoulder.
In order to be effective, a seat belt must:
– be tightened as close to the body as
possible.
– be pulled in front of you with a smooth
movement, ensuring that it is not twisted.
– only be used to secure one person.
– not show signs of tearing or fraying.
– not be changed or modified, in order to
avoid affecting its performance.
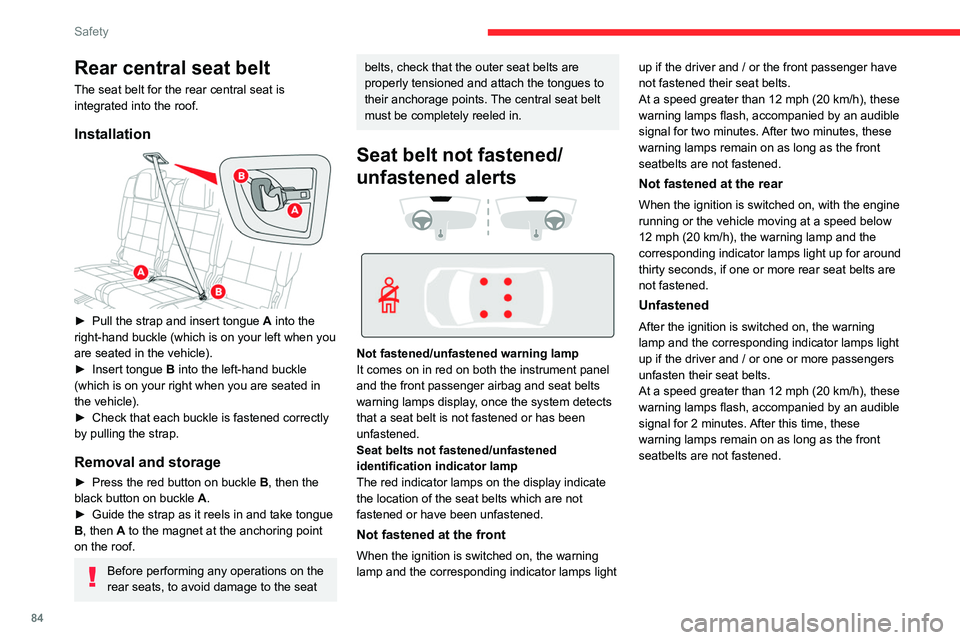
Rear central seat belt
The seat belt for the rear central seat is
integrated into the roof.
Installation
► Pull the strap and insert tongue A into the
right-hand buckle (which is on your left when you
are seated in the vehicle).
►
Insert tongue
B into the left-hand buckle
(which is on your right when you are seated in
the vehicle).
►
Check that each buckle is fastened correctly
by pulling the strap.
Removal and storage
► Press the red button on buckle B , then the
black button on buckle A.
►
Guide the strap as it reels in and take tongue
B
, then A to the magnet at the anchoring point
on the roof.
Before performing any operations on the
rear seats, to avoid damage to the seat
belts, check that the outer seat belts are
properly tensioned and attach the tongues to
their anchorage points. The central seat belt
must be completely reeled in.
Seat belt not fastened/
unfastened alerts
Not fastened/unfastened warning lamp
It comes on in red on both the instrument panel
and the front passenger airbag and seat belts
warning lamps display, once the system detects
that a seat belt is not fastened or has been
unfastened.
Seat belts not fastened/unfastened
identification indicator lamp
The red indicator lamps on the display indicate
the location of the seat belts which are not
fastened or have been unfastened.
Not fastened at the front
When the ignition is switched on, the warning
lamp and the corresponding indicator lamps light up if the driver and / or the front passenger have
not fastened their seat belts.
At a speed greater than 12 mph (20 km/h), these
warning lamps flash, accompanied by an audible
signal for two minutes. After two minutes, these
warning lamps remain on as long as the front
seatbelts are not fastened.
Not fastened at the rear
When the ignition is switched on, with the engine
running or the vehicle moving at a speed below
12 mph (20
km/h), the warning lamp and the
corresponding indicator lamps light up for around
thirty seconds, if one or more rear seat belts are
not fastened.
Unfastened
After the ignition is switched on, the warning
lamp and the corresponding indicator lamps light
up if the driver and / or one or more passengers
unfasten their seat belts.
At a speed greater than 12 mph (20 km/h), these
warning lamps flash, accompanied by an audible
signal for 2 minutes. After this time, these
warning lamps remain on as long as the front
seatbelts are not fastened.
Page 87 of 276

85
Safety
5Advice
The driver must ensure that passengers use the seat belts correctly and that they
are all fastened before setting off.
Wherever seated in the vehicle, you must
always fasten the seat belt, even for short
journeys.
Do not invert the seat belt buckles, as they
will not fulfil their role properly.
To ensure the proper functioning of the belt
buckles, make sure that there are no foreign
bodies present (e.g.
a coin) before fastening.
Before and after use, ensure that the seat belt
is reeled in correctly.
After folding or moving a seat or rear bench
seat, ensure that the seat belt is positioned
and reeled in correctly.
Installation
The lower part of the strap must be
positioned as low as possible over the pelvis.
The upper part must be positioned in the
hollow of the shoulder.
In order to be effective, a seat belt must:
–
be tightened as close to the body as
possible.
–
be pulled in front of you with a smooth
movement, ensuring that it is not twisted.
–
only be used to secure one person.
–
not show signs of tearing or fraying.
–
not be changed or modified, in order to
avoid affecting its performance.
Recommendations for children
Use a suitable child seat if the passenger
is less than 12 years old or shorter than 1.5
metres.
Never use the same seat belt to secure more
than one child.
Never carry a child on your lap.
For more information on Child seats, refer to
the corresponding section.
Maintenance
In accordance with current safety
regulations, for all work on your vehicle's
seat belts, contact a qualified workshop with
the skills and equipment needed, which a
CITROËN dealer is able to provide.
Have the seat belts checked regularly by a
CITROËN dealer or a qualified workshop,
particularly if the straps show signs of
damage.
Clean the seat belt straps with soapy water or
a textile cleaning product, sold by CITROËN
dealers.
Airbags
General information
System designed to help improve the safety
of the occupants sitting in the front seats and
the rear outer seats, in the event of a violent
collision. The airbags supplement the action
of the seat belts equipped with a force limiting
system.
Electronic detectors record and analyse the
front and side impacts sustained in the impact
detection zones:
–
In the event of violent impact, the airbags
deploy instantly and help better protect the
occupants of the vehicle; immediately after the
impact, the airbags deflate rapidly in order not
to hinder the visibility or the possible exit of the
occupants.
–
In the event of a slight impact, a rear impact
and under certain rollover conditions, the airbags
may not deploy; only the seat belt helps to
protect you in these situations.
The seriousness of the impact depends on the
nature of the obstacle and the speed of the
vehicle at the moment of collision.
The airbags do not operate when the
ignition is switched off.
This equipment will only deploy once. If a
second impact occurs (during the same or a
subsequent accident), the airbag will not be
deployed again.
Page 249 of 276

247
Alphabetical index
Electronic brake force distribution (EBFD) 78
Emergency braking assistance (EBA)
78
Emergency call
76
Emergency switching off
101–102
Emergency warning lamps
75, 178
Emissions control system, SCR
19, 173
Energy economy mode
165
Energy flows
24
Energy recovery
20, 110
Engine
173
Engine compartment
168–169
Engine, Diesel
152, 169, 178, 204
Engine, petrol
112, 169, 203
Engines
202–204
Environment
7, 34, 58
e-Save function (energy reserve)
25
ESC (electronic stability control)
78
Expanded traffic sign recognition
121
F
Fatigue detection 136
Filling the AdBlue® tank
171, 174
Filling the fuel tank
152–153
Filter, air
172
Filter, oil
172
Filter, particle
171–172
Filter, passenger compartment
51, 171
Fitting a wheel
183–184
Fitting roof bars
167–168
Fittings, boot
63
Fittings, interior
60–61
Flap, charging 161
Flap, fuel filler
152–153
Flashing indicators
68, 186
Flat bed (recovery)
199
Floor, boot, adjustable
65
Fluid, brake
170
Fluid, engine coolant
170
Foglamps, front
67, 71, 187
Foglamps, rear
67, 188
Folding the rear seats
49–50
Frequency (radio)
234
Fuel
7, 152
Fuel consumption
7, 20
Fuel tank
152–153
Fusebox, dashboard
189
Fusebox, engine compartment
189, 193
Fuses
189–190, 193
G
Gauge, fuel 152
Gearbox, automatic
9, 105, 107–109,
112, 114, 172, 195
Gearbox, manual
9, 104, 112, 114, 172
Gear lever, manual gearbox
104
Gear shift indicator ~ Gear efficiency
indicator
11 3
Glove box
60
G.P.S.
228
Grab handles
45, 60
H
Hands-free access 37
Hands-free tailgate
36–38
Hazard warning lamps
75, 178
Headlamp adjustment
71
Headlamps, automatic dipping
70
Headlamps, automatic illumination
69
Headlamps, dipped beam
187
Headlamps, halogen
71, 185
Headlamps, main beam
186
Head restraints, front
44–45
Head restraints, rear
49–50
Heating
51, 54, 57–58
Heating, additional
57–58
Heating, programmable
26, 57–59
Highway Driver Assist
126
Hill Assist Descent Control (HADC)
81–82
Hill Descent Control
82
Hill start assist
112–113
Histogramme, fuel consumption
24, 26
Horn for pedestrians
76
I
Ignition 99, 101, 238
Ignition on
101
Immobiliser, electronic
98
Indicator, AdBlue® range
18
Indicator, coolant temperature
18
Indicator, engine oil level
17, 21
Indicators, direction
68, 186