rear view mirror CITROEN C5 AIRCROSS 2022 Handbook (in English)
[x] Cancel search | Manufacturer: CITROEN, Model Year: 2022, Model line: C5 AIRCROSS, Model: CITROEN C5 AIRCROSS 2022Pages: 276, PDF Size: 7.92 MB
Page 4 of 276

2
Contents
■
Overview
■
Eco-driving
1InstrumentsInstrument panel 9
Warning and indicator lamps 11
Indicators 17
Manual test 21
Lighting dimmer 21
Trip computer 22
Touch screen 23
Date and time adjustment 25
Remote functions (Rechargeable hybrid) 26
2AccessElectronic key with remote control function and
built-in key, 27
Keyless Entry and Starting 29
Central locking 32
Back-up procedures 32
Doors 34
Boot 35
Hands-free tailgate 36
Alarm 39
Electric windows 41
Panoramic sunroof 42
3Ease of use and comfortCorrect driving position 44
Front seats 44
Steering wheel adjustment 48
Mirrors 48
Rear seats 49
Heating and Ventilation 51
Manual air conditioning 52
Dual-zone automatic air conditioning 53
Front demist - defrost 56
Heated windscreen 56
Rear screen demist - defrost 57
Additional heating/ventilation system 57
Temperature pre-conditioning
(Rechargeable hybrid)
59
Front fittings 59
Courtesy lamps 62
Interior ambient lighting 63
Boot fittings 63
4Lighting and visibilityExterior lighting control stalk 67
Direction indicators 68
Daytime running lamps/Sidelamps 68
Parking lamps 68
Automatic illumination of headlamps 69
Guide-me-home and welcome lighting 69
Automatic headlamp dipping 70
Headlamp adjustment 71
Cornering lighting 71
Wiper control stalk 72
Changing a wiper blade 73
Automatic windscreen wipers 74
5SafetyGeneral safety recommendations 75
Hazard warning lamps 75
Horn 76
Pedestrian horn (Rechargeable hybrid) 76
Emergency or assistance 76
Electronic stability control (ESC) 78
Advanced Grip Control 80
Hill Assist Descent Control 81
Seat belts 82
Airbags 85
Child seats 88
Deactivating the front passenger airbag 89
ISOFIX child seats 90
i-Size child seats 92
Installing child seats 93
Child lock 95
6DrivingDriving recommendations 97
Anti-theft protection 98
Starting / Switching off the engine with the key 98
Starting / Switching off the engine with Keyless
Entry and Starting
100
Starting rechargeable hybrid vehicles 100
Electric parking brake 102
Manual gearbox 104
Automatic gearbox EAT6 105
EAT6/EAT8 automatic gearbox 107
e-EAT8 automatic gearbox
(Rechargeable hybrid)
109
Progressive Hydraulic Cushions 111
Driving modes 111
Hill start assist 11 2
Gear shift indicator 11 3
Stop & Start 11 3
Tyre under-inflation detection 11 5
CITROËN ConnectedCAM® 11 6
Driving and manoeuvring aids - General
recommendations
11 7
Speed Limit Recognition and
Recommendation
11 9
Programmable speed limiter 122
Cruise control - particular recommendations 123
Programmable cruise control 124
Page 6 of 276

4
Overview
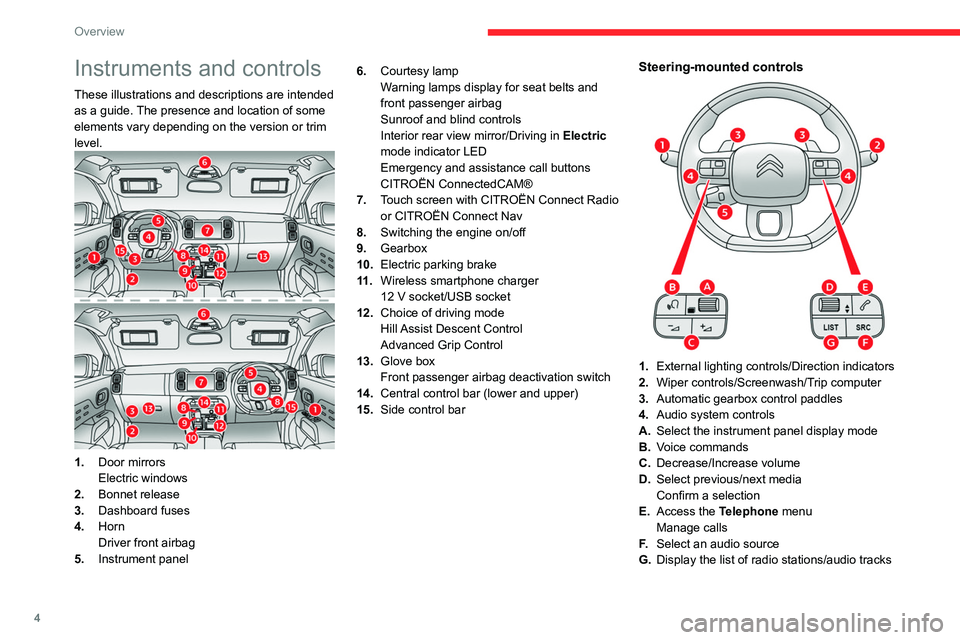
Instruments and controls
These illustrations and descriptions are intended
as a guide. The presence and location of some
elements vary depending on the version or trim
level.
1.Door mirrors
Electric windows
2. Bonnet release
3. Dashboard fuses
4. Horn
Driver front airbag
5. Instrument panel 6.
Courtesy lamp
Warning lamps display for seat belts and
front passenger airbag
Sunroof and blind controls
Interior rear view mirror/Driving in Electric
mode indicator LED
Emergency and assistance call buttons
CITROËN ConnectedCAM®
7. Touch screen with CITROËN Connect Radio
or CITROËN Connect Nav
8. Switching the engine on/off
9. Gearbox
10. Electric parking brake
11 . Wireless smartphone charger
12 V socket/USB socket
12. Choice of driving mode
Hill Assist Descent Control
Advanced Grip Control
13. Glove box
Front passenger airbag deactivation switch
14. Central control bar (lower and upper)
15. Side control bar
Steering-mounted controls
1.External lighting controls/Direction indicators
2. Wiper controls/Screenwash/Trip computer
3. Automatic gearbox control paddles
4. Audio system controls
A. Select the instrument panel display mode
B. Voice commands
C. Decrease/Increase volume
D. Select previous/next media
Confirm a selection
E. Access the Telephone menu
Manage calls
F. Select an audio source
G. Display the list of radio stations/audio tracks
Page 46 of 276

44
Ease of use and comfort
Correct driving position
Before taking to the road and to make the most
of the ergonomic layout of the instruments and
controls, carry out these adjustments in the
following order:
–
the height of the head restraint,
–
the seat backrest angle,
–
the seat cushion height,
–
the longitudinal position of the seat,
–
the height and reach of the steering wheel,
–
the rear view mirror and door mirrors.
Once these adjustments have been
made, check the instrument panel can be
viewed correctly from your driving position.
Front seats
Caution when moving the
front seats
For safety reasons, only adjust seats
when the vehicle is stationary.
Before moving the seat backwards,
ensure that there is no person or object
that might prevent the full travel of the seat.
There is a risk of trapping or pinching
passengers if present in the rear seats or of
jamming the seat if large objects are placed
on the floor behind the seat.
Front head restraints
Adjusting the height
The adjustment is correct when the upper edge of the head restraint is level
with the top of the head.
‘Two-way’ adjustment model
Upwards:
► pull the head restraint up to the desired
position; the head restraint can be felt to click
into position.
Downwards:
►
press lug
A and push the head restraint down
to the desired position.
‘Four-way’ adjustment model
Upwards:
► pull the head restraint up to the desired
position; the head restraint can be felt to click
into position.
Downwards:
► press and hold button B and push the head
restraint down to the desired position.
Adjusting the angle
“Four-way” adjustment model
► press and hold button B and push the lower
part of the head restraint forwards or backwards.
Removing a head restraint
► Pull the head restraint up as far as it will go.
► Press the lug(s) A (depending on version)
to unlock the head restraint and remove it
completely,
► Stow the head restraint securely.
Page 50 of 276

48
Ease of use and comfort
With the engine running, on engaging reverse
gear, the mirror glasses tilt downwards.
They return to their initial position:
– A few seconds after coming out of reverse
gear.
– Once the vehicle speed exceeds 6 mph
(10 km/h).
– When the engine is switched off.
It is set via theDriving/Vehicle touch
screen menu.
Rear view mirror
Equipped with an anti-dazzle system, which
darkens the mirror glass and reduces the
nuisance to the driver caused by the sun,
headlamps of other vehicles, etc.
Manual model
Adjustment
► Adjust the mirror so that the glass is directed
correctly in the "day" position.
Day/night position
Steering wheel
adjustment
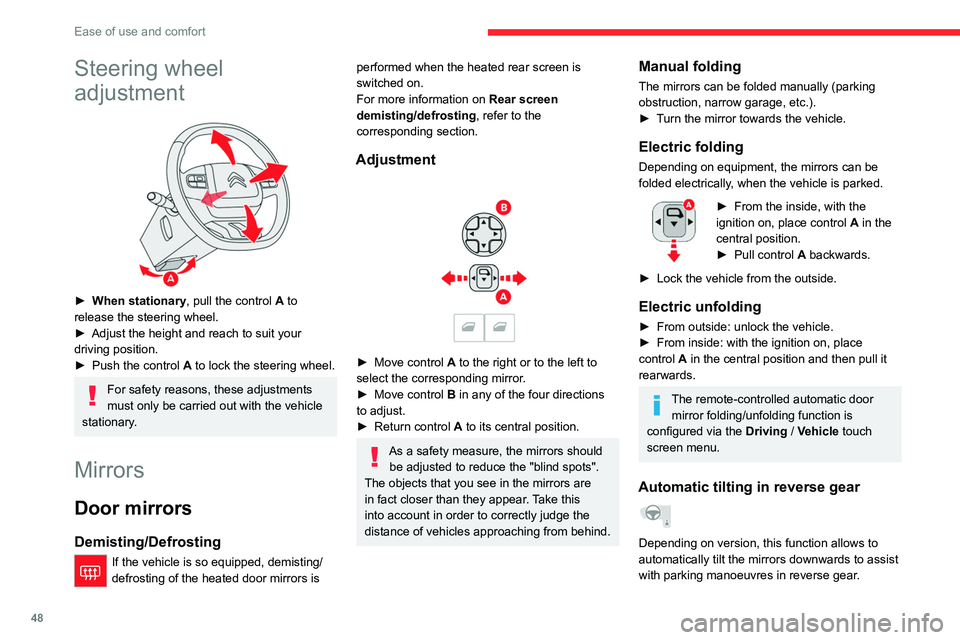
► When stationary , pull the control A to
release the steering wheel.
►
Adjust the height and reach to suit your
driving position.
►
Push the control
A to lock the steering wheel.
For safety reasons, these adjustments
must only be carried out with the vehicle
stationary.
Mirrors
Door mirrors
Demisting/Defrosting
If the vehicle is so equipped, demisting/
defrosting of the heated door mirrors is
performed when the heated rear screen is
switched on.
For more information on Rear screen
demisting/defrosting , refer to the
corresponding section.
Adjustment
► Move control A to the right or to the left to
select the corresponding mirror.
►
Move control
B in any of the four directions
to adjust.
►
Return control A
to its central position.
As a safety measure, the mirrors should be adjusted to reduce the "blind spots".
The objects that you see in the mirrors are
in fact closer than they appear. Take this
into account in order to correctly judge the
distance of vehicles approaching from behind.
Manual folding
The mirrors can be folded manually (parking
obstruction, narrow garage, etc.).
►
T
urn the mirror towards the vehicle.
Electric folding
Depending on equipment, the mirrors can be
folded electrically, when the vehicle is parked.
► From the inside, with the
ignition on, place control A
in the
central position.
►
Pull control A
backwards.
►
Lock the vehicle from the outside.
Electric unfolding
► From outside: unlock the vehicle.
► From inside: with the ignition on, place
control
A in the central position and then pull it
rearwards.
The remote-controlled automatic door mirror folding/unfolding function is
configured via the Driving
/ Vehicle touch
screen menu.
Automatic tilting in reverse gear
Depending on version, this function allows to
automatically tilt the mirrors downwards to assist
with parking manoeuvres in reverse gear.
Page 51 of 276

49
Ease of use and comfort
3With the engine running, on engaging reverse
gear, the mirror glasses tilt downwards.
They return to their initial position:
–
A
few seconds after coming out of reverse
gear.
–
Once the vehicle speed exceeds 6 mph
(10
km/h).
–
When the engine is switched off.
It is set via theDriving/Vehicle touch
screen menu.
Rear view mirror
Equipped with an anti-dazzle system, which
darkens the mirror glass and reduces the
nuisance to the driver caused by the sun,
headlamps of other vehicles, etc.
Manual model
Adjustment
► Adjust the mirror so that the glass is directed
correctly in the "day" position.
Day/night position
► Pull the lever to change to the "night" anti-
dazzle position.
►
Push the lever to change to the normal "day"
position.
Automatic "electrochrome" models
The electrochrome system uses a sensor to
detect the level of exterior brightness, as well as
that coming from the rear of the vehicle, in order
to automatically and gradually switch between
day and night usage.
To ensure optimum visibility while manoeuvring, the mirror automatically
brightens when reverse gear is engaged.
The system is deactivated if the load in the
boot exceeds the height of the load space
cover or if the load space cover has items
placed on it.
Rear seats
The 3 seats of the 2nd row are independent and
of
the same width. Their backrests are adjustable
to adapt the boot load space.
Rear head restraints
They have two positions:
– a high position , for when the seat is in use:
►
pull the head restraint fully up.
–
a low position , for stowing, when the seat is
not in use: ►
press the lugs
A to release the head
restraint and push it fully down.
Page 71 of 276

69
Lighting and visibility
4This is confirmed by an audible signal and
illumination of the corresponding direction
indicator lamp in the instrument panel.
To switch off the parking lamps, return the
lighting control stalk to the central position.
Automatic illumination of headlamps
When the ring is at the “AUTO" position and
a low level of ambient light is detected by the
rain/sunshine sensor, the number plate lamps,
sidelamps and dipped beam headlamps are
switched on automatically, without any action on
the part of the driver. They may also come on if
rain is detected, at the same time as automatic
operation of the windscreen wipers.
As soon as the brightness returns to a sufficient
level or after the windscreen wipers are switched
off, the lamps are switched off automatically.
Malfunction
In the event of a malfunction of the
sunshine sensor, the lighting comes on
and this warning lamp is displayed in the
instrument panel, accompanied by an audible
signal and/or a message.
Contact a CITROËN dealer or a qualified
workshop.
Do not cover the sunshine sensor, linked
with the rain sensor and located at the
top centre of the windscreen behind the
interior rear view mirror; the associated
functions would no longer be controlled.
In fog or snow, the sunshine sensor may
detect sufficient light. In this case, the
lighting will not come on automatically.
Guide-me-home and
welcome lighting
Automatic
With the ring in the "AUTO" position and when
the light is poor, the dipped beam headlamps
come on automatically when the ignition is
switched off.
The activation, deactivation and duration of the guide-me-home lighting are set in
the Driving/Vehicle touch screen menu.
Manual
Switching on / off ►
With the ignition off, "flash" the headlamps
using the lighting control stalk to switch the
function on / off.
Manual guide-me-home lighting goes off
automatically at the end of a given period of
time.
Automatic exterior welcome lighting
With the "Automatic illumination of lamps"
function activated and when the light is poor, the
sidelamps, dipped beam headlamps and door
mirror spotlamps come on automatically when
the vehicle is unlocked.
The activation, deactivation and duration
of the exterior welcome lighting are set in
the Driving/Vehicle
touch screen menu.
Welcome lighting
Availability of this function depends on version.► Make a short press on this remote
control button.
The sidelamps, dipped beam headlamps,
number plate lamps and door mirror spotlamps
come on for 30 seconds.
Pressing again before the end of the timed
period switches off the lighting immediately
.
Door mirror spotlamps
These spotlamps facilitate access to the vehicle
by lighting the ground near the front doors.
Page 76 of 276

74
Lighting and visibility
Do not release them while moving them. Risk
of damaging the windscreen!
►
Clean the windscreen using screenwash
fluid.
Do not apply "Rain X" type water-
repellent products.
►
Unclip the worn wiper blade closest to you
and remove it.
►
Install the new wiper blade and clip it to the
arm.
►
Repeat the procedure for the other wiper
blade.
►
Starting with the wiper blade closest to you,
once again hold each arm by the rigid section,
then guide it carefully onto the windscreen.
Removing/refitting at the rear
► Hold the arm by the rigid section and raise it
as far as possible.
►
Clean the rear screen using screenwash
fluid.
►
Unclip the worn wiper blade and remove it.
►
Install the new wiper blade and clip it to the
arm.
►
Once again hold the arm by the rigid section,
then guide it carefully onto the rear screen.
Automatic windscreen wipers
The windscreen wipers operate automatically,
adapting their speed to the intensity of the
rainfall without any action on the part of the
driver.
Detection of rainfall is by means of a sensor at
the top centre of the windscreen, behind the rear
view mirror.
Do not cover the rain/sunshine sensor.
When using an automatic car wash,
switch off the automatic wipers and the
ignition.
In winter, wait until the windscreen is
completely clear of ice before activating the
automatic wipers.
Switching on
► Give the control stalk a brief push
downwards.
A
wiping cycle confirms that the instruction has
been accepted.
This indicator lamp comes on in the instrument panel, accompanied by the
display of a message.
Switching off
► Give the control stalk a further brief push
downwards or place the control stalk in another
position ( Int
, 1 or 2).
This indicator lamp goes off in the instrument panel, accompanied by a
message.
The automatic windscreen wipers must be reactivated by pushing the control
stalk downwards, if the ignition has been off
for more than one minute.
Malfunction
If a fault occurs with the automatic wipers, the
wipers operate in intermittent mode.
Have them checked by a CITROËN dealer or a
qualified workshop.
Page 113 of 276

111
Driving
6partially recharge the traction battery, without
affecting the charge level indicator.
Progressive Hydraulic
Cushions
This suspension system with progressive hydraulic cushions improves driving comfort by
filtering out the imperfections and demands of
the road surface.
Each shock absorber is equipped with a
hydraulic compression stop (at the base) and a
hydraulic rebound stop (at the top).
Depending on the intensity of the shock to be
absorbed, these stops provide the vehicle with a
greater freedom of movement or gradually slow
down the amount of movement in order to avoid
any sudden jolts at the end of travel.
Unlike conventional suspension which absorbs
the energy but then partially returns some of it,
this active suspension absorbs and dissipates
this energy, without producing any rebound.
Driving modes
The number and type of driving modes available depend on the vehicle’s engine and equipment.
Driving modes are selected using one of the
following controls, depending on version:
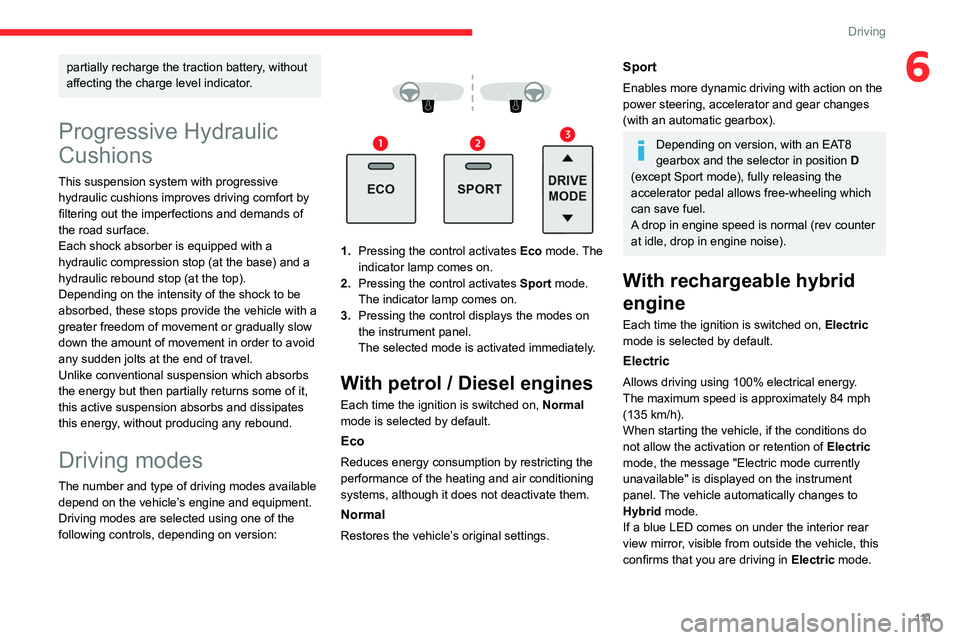
1. Pressing the control activates Eco mode. The
indicator lamp comes on.
2. Pressing the control activates Sport mode.
The indicator lamp comes on.
3. Pressing the control displays the modes on
the instrument panel.
The selected mode is activated immediately.
With petrol / Diesel engines
Each time the ignition is switched on, Normal
mode is selected by default.
Eco
Reduces energy consumption by restricting the
performance of the heating and air conditioning
systems, although it does not deactivate them.
Normal
Restores the vehicle’s original settings.
Sport
Enables more dynamic driving with action on the
power steering, accelerator and gear changes
(with an automatic gearbox).
Depending on version, with an EAT8
gearbox and the selector in position D
(except Sport mode), fully releasing the
accelerator pedal allows free-wheeling which
can save fuel.
A drop in engine speed is normal (rev counter
at idle, drop in engine noise).
With rechargeable hybrid
engine
Each time the ignition is switched on, Electric
mode is selected by default.
Electric
Allows driving using 100% electrical energy.
The maximum speed is approximately 84 mph
(135
km/h).
When starting the vehicle, if the conditions do
not allow the activation or retention of Electric
mode, the message "Electric mode currently
unavailable" is displayed on the instrument
panel. The vehicle automatically changes to
Hybrid mode.
If a blue LED comes on under the interior rear
view mirror, visible from outside the vehicle, this
confirms that you are driving in Electric mode.
Page 119 of 276

11 7
Driving
6► Pair the smartphone with the camera
following the instructions given by the
application.
Pairing is necessary at the first connection.
After
this it will be automatic.
The default pairing code is: “ConnectedCAM”.
On/Off
► Press and hold this button to switch
the camera on/off (confirmed by the
indicator lamp coming on/going off).
When the camera is switched on, video
recording is automatic and permanent.
The status of the function is stored when the
ignition is switched off.
Managing photos and videos
► Press this button briefly to take a
photo.
An audible signal confirms that the request has
been acknowledged.
► Press and hold this button to record a
video.
A
micro USB socket also allows the data from
the camera to be saved onto other media such
as computers, tablets, etc.
Thanks to the CITROËN ConnectedCAM®
application, you can then automatically and
immediately share your photos and videos on
social networks or by email.
An audible signal confirms that the request has
been acknowledged.
Resetting the system
Pressing and holding these two buttons
simultaneously resets the system.
This action erases all data recorded in the
camera and reinitialises the camera’s default
pairing code.
For safety reasons, the driver must not
use the CITROËN ConnectedCAM®
application from a smartphone while driving.
He or she must perform any action requiring
sustained attention when the vehicle is
stationary.
Malfunction
When a system fault occurs, the indicator
lamp in the button flashes.
Have the system checked by a CITROËN dealer
or a qualified workshop.
Driving and manoeuvring
aids - General
recommendations
Driving and manoeuvring aids cannot, in
any circumstances, replace the need for
vigilance on the part of the driver.
The driver must comply with the Highway
Code, must remain in control of the vehicle in
all circumstances and must be able to retake
control of it at all times. The driver must adapt
the speed to climactic conditions, traffic and
the state of the road.
It is the driver's responsibility to constantly
check the traffic, to assess the relative
distances and speeds of other vehicles and to
anticipate their movements before indicating
and changing lane.
The systems cannot exceed the limits of the
laws of physics.
Driving aids
You should hold the steering wheel
with both hands, always use the interior and
exterior rear view mirrors, always keep the
feet close to the pedals and take a break
every two hours.
Manoeuvring aids
The driver must always check the
surroundings of the vehicle before and during
the whole manoeuvre, in particular using the
mirrors.
Radar
The operation of the radar as well as the
associated functions may be impaired through
the accumulation of dirt (mud, frost, etc.), in
certain difficult weather conditions (very heavy
rain, snow) or if the bumper is damaged.
Page 146 of 276

144
Driving
The blue lines 1 represent the width of your
vehicle, with the mirrors unfolded; their direction
changes according to the position of the steering
wheel.
The red line 2 represents a distance of 30 cm
from the rear bumper; the two blue lines 3 and 4
represent 1 m and 2 m, respectively.
This view is available with AUTO mode or in the
view selection menu.
Zoom view
The camera records the vehicle's surroundings
during the manoeuvre in order to create a
view from above the rear of the vehicle in its
near surroundings, allowing the vehicle to be
manoeuvred around nearby obstacles.
This view is available with AUTO mode or in the
view selection menu.
• "Zoom view".
• "AUTO view".
The display is immediately updated with the type
of view selected.
The state of the function is not saved when the
ignition is switched off.
Principle of operation
Using one or two cameras, the close
surroundings of the vehicle are recorded whilst
manoeuvring at low speed.
An image from above your vehicle in its close
surroundings is reconstructed (represented
between the brackets) in real time and as the
manoeuvre progresses.
It facilitates the alignment of your vehicle when
parking and allows obstacles close to the vehicle
to be seen. It is automatically deleted if the
vehicle remains stationary for too long.
With Top 360 Vision, the image is created using
both cameras, when going forward and when
reversing.
When the function is activated, it is possible
that the view from above is not displayed. If the system is activated when the vehicle has
already moved, the view from above can be fully
displayed.
Top Rear Vision
Rear vision
To activate the camera, located near the number
plate lamps, engage reverse and keep the speed
of the vehicle below 6 mph (10
km/h).
The system is deactivated:
–
Automatically
, at speeds above approximately
6 mph (10
km/h),
–
Automatically
, if the tailgate is opened.
–
Upon changing out of reverse gear (the image
remains displayed for 7
seconds).
–
By pressing the white arrow in the upper-left
corner of the touch screen.
AUTO mode
This mode is activated by default.
Using sensors in the rear bumper, the automatic
view changes from the rear view (standard) to
the view from above (zoom) as an obstacle is
approached at the level of the red line (less than
30
cm) during a manoeuvre.
Standard view
The area behind the vehicle is displayed on the
screen.