lock CITROEN C5 AIRCROSS DAG 2020 Handbook (in English)
[x] Cancel search | Manufacturer: CITROEN, Model Year: 2020, Model line: C5 AIRCROSS DAG, Model: CITROEN C5 AIRCROSS DAG 2020Pages: 292, PDF Size: 8.59 MB
Page 199 of 292

197
Warning triangle
As a safety precaution, before leaving your
v ehicle to set up and install the triangle, switch
on the hazard warning lamps and put on your
high visibility vest.
Storage compartment
There is a compartment in the interior trim of
t he tailgate to store a triangle.
F
O
pen the tailgate.
F
R
elease the cover by turning the screw
a
quarter turn anti-clockwise.
Assembling and placing the
triangle
For versions supplied with a triangle as original
e quipment, refer to the illustration above.
For other versions, refer to the assembly
instructions provided with the triangle.
F
P
ut the triangle in place behind the vehicle,
as required by local legislation.
Running out of fuel (Diesel)
On vehicles fitted with Diesel engines, the fuel
system must be primed if you run out of fuel.
If the engine does not start first time, do not
keep trying, but start the procedure again from
the beginning. For more information on Misfuel
prevention (Diesel)
, refer to the
corresponding section.
BlueHDi 130 engines
F Fill the fuel tank with at least 5 litres of
Diesel.
F
S
witch on the ignition (without starting the
engine).
F
W
ait around 1 minute and switch off the
ignition.
F
O
perate the starter to start the engine.
If the engine does not start, repeat the
procedure.
BlueHDi 180 engines
F Fill the fuel tank with at least 5 litres of
Diesel.
F
S
witch on the ignition (without starting the
engine).
F
W
ait around 6 seconds and switch off the
ignition.
F
R
epeat the last two operations 10 times.
F
O
perate the starter to start the engine.
8
In the event of a breakdown
Page 206 of 292

204
Parking the vehicle
Immobilise the vehicle where it does not
block traffic: the ground must be level,
stable and non-slippery.
Apply the parking brake, unless it is
programmed to be in automatic mode;
switch off the ignition and with a manual
gearbox, engage first gear so as to lock
the wheels.
Apply the parking brake, unless it is
programmed to be in automatic mode;
switch off the ignition and with an
automatic gearbox, select mode P so as to
lock the wheels.
Check that the parking brake warning
lamps in the instrument panel are on fixed.
The occupants must get out of the vehicle
and wait where they are safe.
If necessary, place a
chock under the
wheel diagonally opposite the wheel to be
changed.
Never go underneath a
vehicle raised
using a
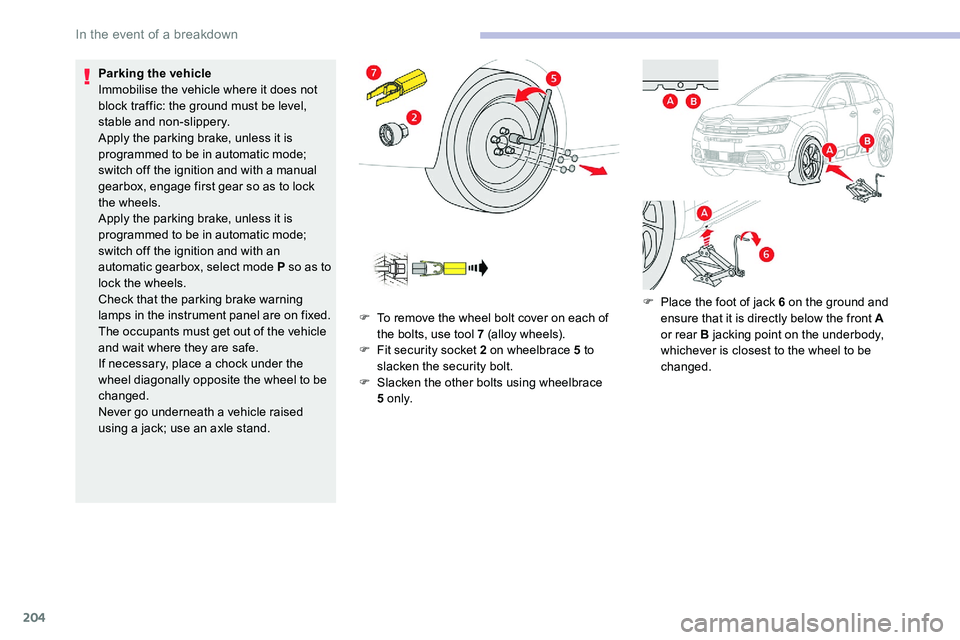
jack; use an axle stand. F
T
o remove the wheel bolt cover on each of
the bolts, use tool 7 (alloy wheels).
F
F
it security socket 2 on wheelbrace 5 to
slacken the security bolt.
F
S
lacken the other bolts using wheelbrace
5
o n l y.F
P
lace the foot of jack 6 on the ground and
ensure that it is directly below the front A
or rear B jacking point on the underbody,
whichever is closest to the wheel to be
changed.
In the event of a breakdown
Page 210 of 292

208
Model C
1.Daytime running lamps/sidelamps (LED).
2. Direction indicators (W Y21W).
3. Dipped beam headlamps (H7-55W).
4. Main beam headlamps (HB3-65W).
5. Front foglamps (P21W).
Opening the bonnet /Access to bulbs
With the engine warm, proceed with
caution – Risk of burns!
Take care with objects or clothing that
could be caught in the blades of the
engine fan – Risk of strangulation!
Direction indicators (halogen
headlamps)
Rapid flashing of a direction indicator
l amp (left or right) indicates that one of
the bulbs on the corresponding side has
failed.
Amber coloured bulbs, such as the
direction indicators, must be replaced
by bulbs with identical colour and
specifications.
Main beam headlamps (halogen
headlamps)
F Turn the bulb holder a quarter turn anti-
clockwise.
F
P
ull the bulb and bulb holder assembly
rearwards.
F
R
eplace the bulb.
To refit, carry out these operations in reverse
o r d e r. F
R
emove the protective cover.
F
D
isconnect the bulb connector.
F
T
urn the bulb holder anti-clockwise.
F
R
emove the bulb and replace it.
To refit, carry out these operations in reverse
order. When refitting, close the protective cover
very carefully to guarantee the sealing of the
lamp.
In the event of a breakdown
Page 211 of 292

209
Dipped beam headlamps (halogen
headlamps)
F Remove the protective cover.
F D isconnect the bulb connector.
F
T
urn the lamp a quarter turn anti-clockwise
and replace it.
To refit, carry out these operations in reverse
order. When refitting, close the protective cover
very carefully to guarantee the sealing of the
lamp.
Daytime running lamps/sidelamps
(LEDs)
For the replacement of this type of diode bulb,
contact a CITROËN dealer or a qualified
workshop.
Changing foglamp bulbsTo replace this type of bulb, you can also
contact a CITROËN dealer or a qualified
workshop.
Direction indicator side repeaters
(LED)
For the replacement of this type of diode bulb,
contact a CITROËN dealer or a qualified
workshop.
Door mirror spotlamps (LED)
For the replacement of this type of diode bulb,
contact a CITROËN dealer or a qualified
workshop.
F
I
ntroduce a
flat screwdriver in the hole in
the trim.
F
P
ull and lever to unclip the foglamp trim.
F
W
ith a
Torx screwdriver, remove the two
module fixing screws.
F
R
emove the module from its housing.
F
D
isconnect the bulb holder connector.
F
T
urn the bulb holder a
quarter turn and pull
it out.
F
C
hange the assembly.
To refit, carry out these operations in reverse
o r d e r.
8
In the event of a breakdown
Page 212 of 292

210
Rear lamps
1.Brake lamps (LED).
2. Sidelamps (LED).
3. Direction indicators (W Y21W).
4. Reversing lamps (W16W).
5. Foglamps (P21W).
Direction indicators (on the
wings)
F Open the tailgate, then unclip the access
cover on the side in question.
F
U
nblock the lamp fixing nut with a 10 mm
box spanner.
F
T
o avoid losing the nut in the wing trim if it
drops, first place a
cloth below it.
F
M
anually unscrew and remove the lamp
fixing nut.
F
D
isengage the retaining clip, while pushing
the lamp out slightly. F
F
rom the outside, carefully remove the lamp
by pulling it to the rear, then up.
F
D
isengage the cable duct from the panel.
F
T
urn the bulb holder a quarter turn using
a universal pair of pliers if necessary and
pull it out.
F
R
emove the bulb and replace it.
To refit, carry out these operations in reverse
o r d e r.
Reversing lamps (on the tailgate)
F Open the tailgate, then insert a flat
screwdriver into the cut-out to unclip the
access cover on the side in question.
F
U
nblock the lamp fixing nut with a 10 mm
box spanner.
F
M
anually unscrew and remove the lamp
fixing nut.
F
D
isengage the retaining clip, while pushing
the lamp out slightly.
In the event of a breakdown
Page 216 of 292

214
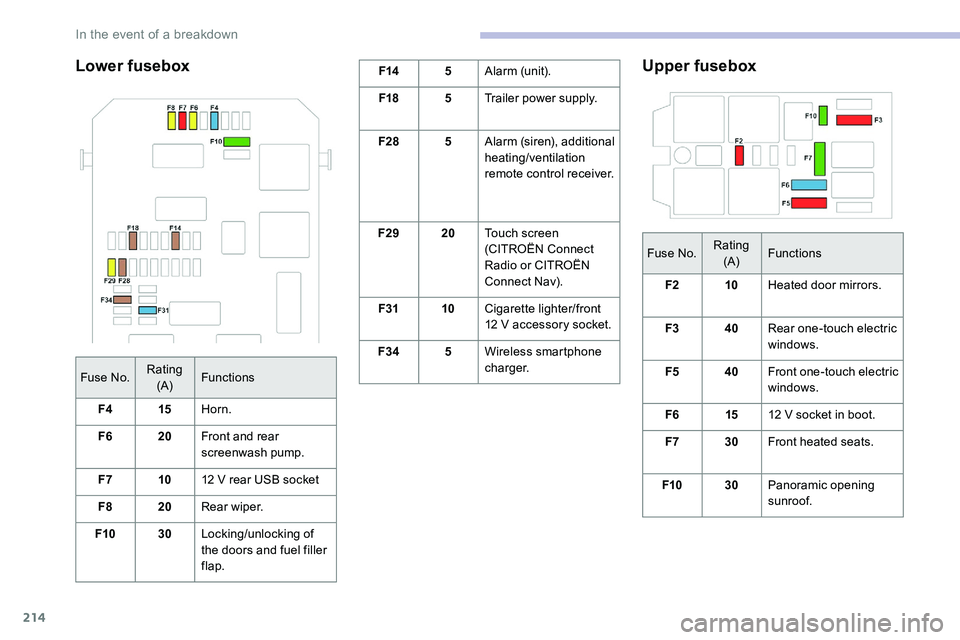
Lower fuseboxF145Alarm (unit).
F18 5Trailer power supply.
F28 5Alarm (siren), additional
heating/ventilation
remote control receiver.
F29 20Touch screen
(CITROËN Connect
Radio or CITROËN
Connect Nav).
F31 10Cigarette lighter/front
12
V accessory socket.
F34 5Wireless smartphone
charger.Upper fusebox
Fuse No. Rating
(A) Functions
F2 10Heated door mirrors.
F3 40Rear one-touch electric
windows.
F5 40Front one-touch electric
windows.
F6 1512
V socket in boot.
F7 30Front heated seats.
F10 30Panoramic opening
sunroof.
Fuse No.
Rating
(A) Functions
F4 15Horn.
F6 20Front and rear
screenwash pump.
F7 1012
V rear USB socket
F8 20Rear wiper.
F10 30Locking/unlocking of
the doors and fuel filler
flap.
In the event of a breakdown
Page 218 of 292

216
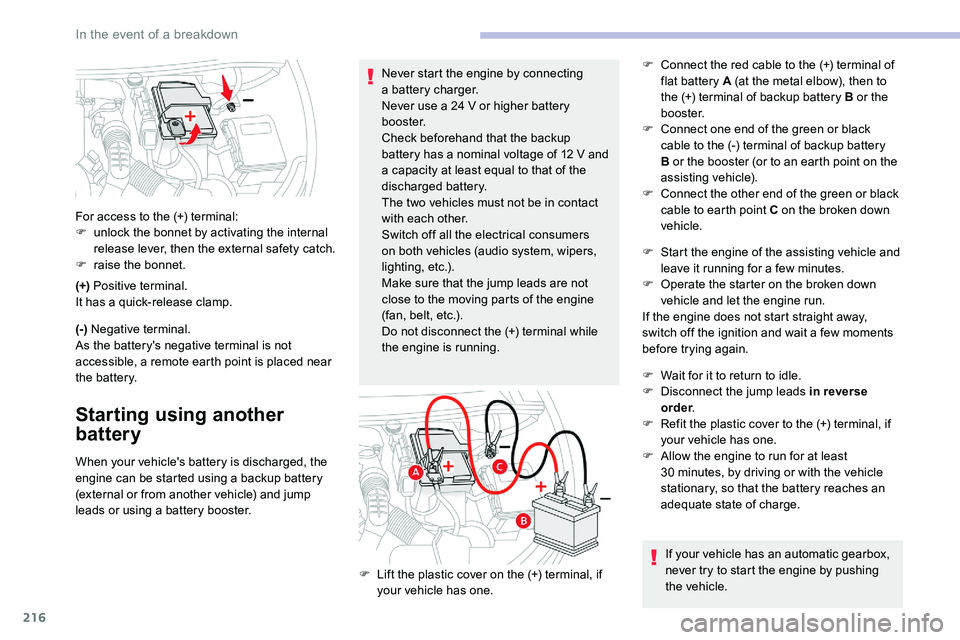
(+) Positive terminal.
It has a quick-release clamp.
(-) Negative terminal.
As the battery's negative terminal is not
accessible, a remote earth point is placed near
the battery.
Starting using another
battery
When your vehicle's battery is discharged, the
engine can be started using a backup battery
(external or from another vehicle) and jump
leads or using a
battery booster.
For access to the (+) terminal:
F
u
nlock the bonnet by activating the internal
release lever, then the external safety catch.
F
r
aise the bonnet.
Never start the engine by connecting
a battery charger.
Never use a 24 V or higher battery
b o o s t e r.
Check beforehand that the backup
battery has a nominal voltage of 12 V and
a capacity at least equal to that of the
discharged battery.
The two vehicles must not be in contact
with each other.
Switch off all the electrical consumers
on both vehicles (audio system, wipers,
lighting, etc.).
Make sure that the jump leads are not
close to the moving parts of the engine
(fan, belt, etc.).
Do not disconnect the (+) terminal while
the engine is running. F
C
onnect the red cable to the (+) terminal of
flat battery A (at the metal elbow), then to
the (+) terminal of backup battery B or the
b o o s t e r.
F
C
onnect one end of the green or black
cable to the (-) terminal of backup battery
B or the booster (or to an earth point on the
assisting vehicle).
F
C
onnect the other end of the green or black
cable to earth point C on the broken down
vehicle.
F
L
ift the plastic cover on the (+) terminal, if
your vehicle has one. F
S
tart the engine of the assisting vehicle and
leave it running for a few minutes.
F
O
perate the starter on the broken down
vehicle and let the engine run.
If the engine does not start straight away,
switch off the ignition and wait a few moments
before trying again.
F
W
ait for it to return to idle.
F
D
isconnect the jump leads in reverse
order .
F
R
efit the plastic cover to the (+) terminal, if
your vehicle has one.
F A llow the engine to run for at least
30 minutes, by driving or with the vehicle
stationary, so that the battery reaches an
adequate state of charge.
If your vehicle has an automatic gearbox,
never try to start the engine by pushing
the vehicle.
In the event of a breakdown
Page 220 of 292

218
F switch off the ignition and wait for four minutes.
At the battery, it is only necessary to
disconnect the (+) terminal.
Quick-release terminal clamp
Disconnecting the (+) terminal Reconnecting the (+) terminal
Do not apply force when pressing the
lever, as if the clamp is not positioned
correctly, locking will be impossible; start
the procedure again.
After reconnecting the battery
F Depending on equipment, lift the plastic
cover on the (+) terminal.
F
Ra
ise the lever A fully to release the clamp B .
F
R
emove the clamp B by lifting it off.
F Raise the lever A fully.
F R eplace the open clamp B on the (+)
terminal.
F
P
ush the clamp B fully down.
F
L
ower the lever A to lock the clamp B .
F
D
epending on equipment, lower the plastic
cover on the (+) terminal. After reconnecting the battery, turn on the
ignition and wait 1
minute before starting
the engine, in order to enable the electronic
systems to initialise.
If minor problems nevertheless persist
following this operation, contact a CITROËN
dealer or a qualified workshop.
Referring to the corresponding section, you
must reinitialise certain systems yourself, such
as:
-
t
he key with remote control or electronic key
(depending on version),
- t he sunroof and its electric blind,
-
t
he electric windows,
-
t
he date and time,
-
t
he preset radio stations.
The Stop & Start system may not be
operational during the trip following the
first engine start.
In this case, the system will only be
available again after a
continuous
period of immobilisation of the vehicle,
a period which depends on the exterior
temperature and the state of charge of the
battery (up to about 8
hours).
In the event of a breakdown
Page 221 of 292

219
Towing the vehicle
Procedure for having your vehicle towed or
for towing another vehicle using a removable
mechanical device.
Access to the tools
The towing eye is stored in a toolbox, under the
bo ot floor.
The opening tool for the rear protective cover is
secured to the towing eye.
For more information on the Vehicle tools ,
refer to the corresponding section.
Towing your vehicle
F On the front bumper, unclip the cover by using the tool fixed on the towing eye.
F
R
elease the cover to the right and then
downwards.
F
S
crew the towing eye in fully.
F
I
nstall the towbar.F
P
ut the gearbox into neutral.
Failure to obser ve this instruction could
result in damage to certain components
(braking, transmission, etc.) and the
absence of braking assistance the next
time the engine is started. Automatic gearbox: never tow the vehicle
with the front wheels on the ground with
the engine off.
F
U
nlock the steering and release the parking
brake.
F
S
witch on the hazard warning lamps on
both vehicles.
F
M
ove off gently, drive slowly and for a short
distance.
Towing another vehicle
F On the rear bumper, unclip the cover by using the tool fixed on the eye.
F
P
ull the cover downwards.
F
S
crew the towing eye in fully.
F
I
nstall the towbar.
8
In the event of a breakdown
Page 222 of 292

220
F Switch on the hazard warning lamps on both vehicles.
F
M
ove off gently, drive slowly and for a short
distance. General recommendations
Obser ve the legislation in force in the
country where you are driving.
Ensure that the weight of the towing
vehicle is higher than that of the towed
vehicle.
The driver must remain at the wheel of
the towed vehicle and must have a
valid
driving licence.
When towing a
vehicle with all four
wheels on the ground, always use an
approved towing arm; rope and straps are
prohibited.
The towing vehicle must move off gently.
When the vehicle is towed with its engine
off, there is no longer braking and steering
assistance.
In the following cases, you must always
call on a
professional recovery ser vice:
-
v
ehicle broken down on a motor way or
main road,
-
f
our-wheel drive vehicle,
-
w
hen it is not possible to put the
gearbox into neutral, unlock the
steering, or release the parking brake,
-
w
hen it is not possible to tow a vehicle
with an automatic gearbox, engine
running,
-
t
owing with only two wheels on the
ground,
-
w
here there is no approved towbar,
etc. available.
In the event of a breakdown