check engine CITROEN C6 2005 User Guide
[x] Cancel search | Manufacturer: CITROEN, Model Year: 2005, Model line: C6, Model: CITROEN C6 2005Pages: 223, PDF Size: 4.26 MB
Page 56 of 223

Downloaded from www.Manualslib.com manuals search engine 50
ENGINE
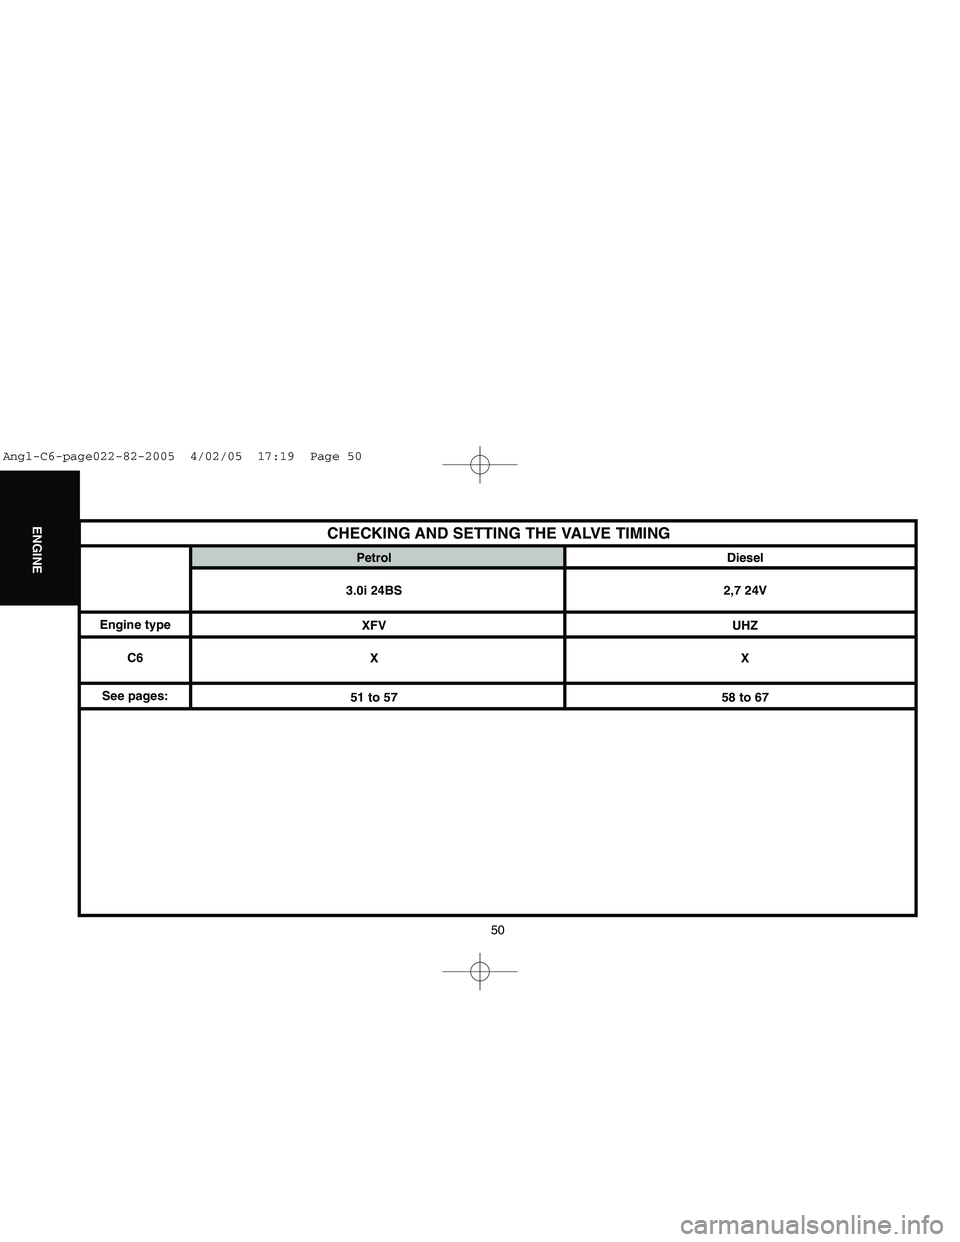
CHECKING AND SETTING THE VALVE TIMING
Engine type
C6
See pages:Petrol Diesel
3.0i 24BS 2,7 24V
XFV UHZ
XX
51 to 57 58 to 67
Angl-C6-page022-82-2005 4/02/05 17:19 Page 50
Page 57 of 223
![CITROEN C6 2005 User Guide Downloaded from www.Manualslib.com manuals search engine 51
ENGINE
51
CHECKING THE VALVE TIMING
Engine: ES9A
Tools.
[1]Camshaft setting pegs: (-).0187.B
[2]Crankshaft setting peg: (-).0187.A
[3]Fuel p CITROEN C6 2005 User Guide Downloaded from www.Manualslib.com manuals search engine 51
ENGINE
51
CHECKING THE VALVE TIMING
Engine: ES9A
Tools.
[1]Camshaft setting pegs: (-).0187.B
[2]Crankshaft setting peg: (-).0187.A
[3]Fuel p](/img/9/57744/w960_57744-56.png)
Downloaded from www.Manualslib.com manuals search engine 51
ENGINE
51
CHECKING THE VALVE TIMING
Engine: ES9A
Tools.
[1]Camshaft setting pegs: (-).0187.B
[2]Crankshaft setting peg: (-).0187.A
[3]Fuel pressure take-off union: 4192-T
[4]Belt retaining pin: (-).0187.J
[5]Exhaust camshaft hubs immobilising tool: (-).0187.F
[6]Inlet camshaft hubs immobilising tool: FACOM D12
[7]SEEM belt tension measuring equipment: 4122-T
Remove components as necessary for this operation.
Remove the auxiliaries drive belt (see corresponding operation).
Checking the valve timing.
Remove:
- The power steering pulley.
- The roller/dynamic tensioner assembly (11).
- The crankshaft pulley (12).
- The upper timing covers (9)and (10).
- The lower timing cover (13).
B1BP2BKC
Angl-C6-page022-82-2005 4/02/05 17:19 Page 51
Page 58 of 223
![CITROEN C6 2005 User Guide Downloaded from www.Manualslib.com manuals search engine 52
ENGINE
CHECKING THE VALVE TIMING
Engine: ES9A
B1EP15UDB1EP08TC
Checking the valve timing (continued).
Peg the crankshaft, using tool [1].
Ch CITROEN C6 2005 User Guide Downloaded from www.Manualslib.com manuals search engine 52
ENGINE
CHECKING THE VALVE TIMING
Engine: ES9A
B1EP15UDB1EP08TC
Checking the valve timing (continued).
Peg the crankshaft, using tool [1].
Ch](/img/9/57744/w960_57744-57.png)
Downloaded from www.Manualslib.com manuals search engine 52
ENGINE
CHECKING THE VALVE TIMING
Engine: ES9A
B1EP15UDB1EP08TC
Checking the valve timing (continued).
Peg the crankshaft, using tool [1].
Check that the tool [2]engages without effort in the cylinder heads at the camshaft pulleys.
Remove the tools [1]and [2].
Refit:
- The lower timing cover (13).
- The upper timing covers (9)and (10).
- The crankshaft pulley (12).
- The roller/dynamic tensioner assembly (11).
- The power steering pulley.
Complete the refitting of components.
Initialise the ignition injection ECU.
Angl-C6-page022-82-2005 4/02/05 17:19 Page 52
Page 59 of 223

Downloaded from www.Manualslib.com manuals search engine 53
ENGINE
CHECKING AND SETTING THE VALVE TIMING
Engine: ES9A
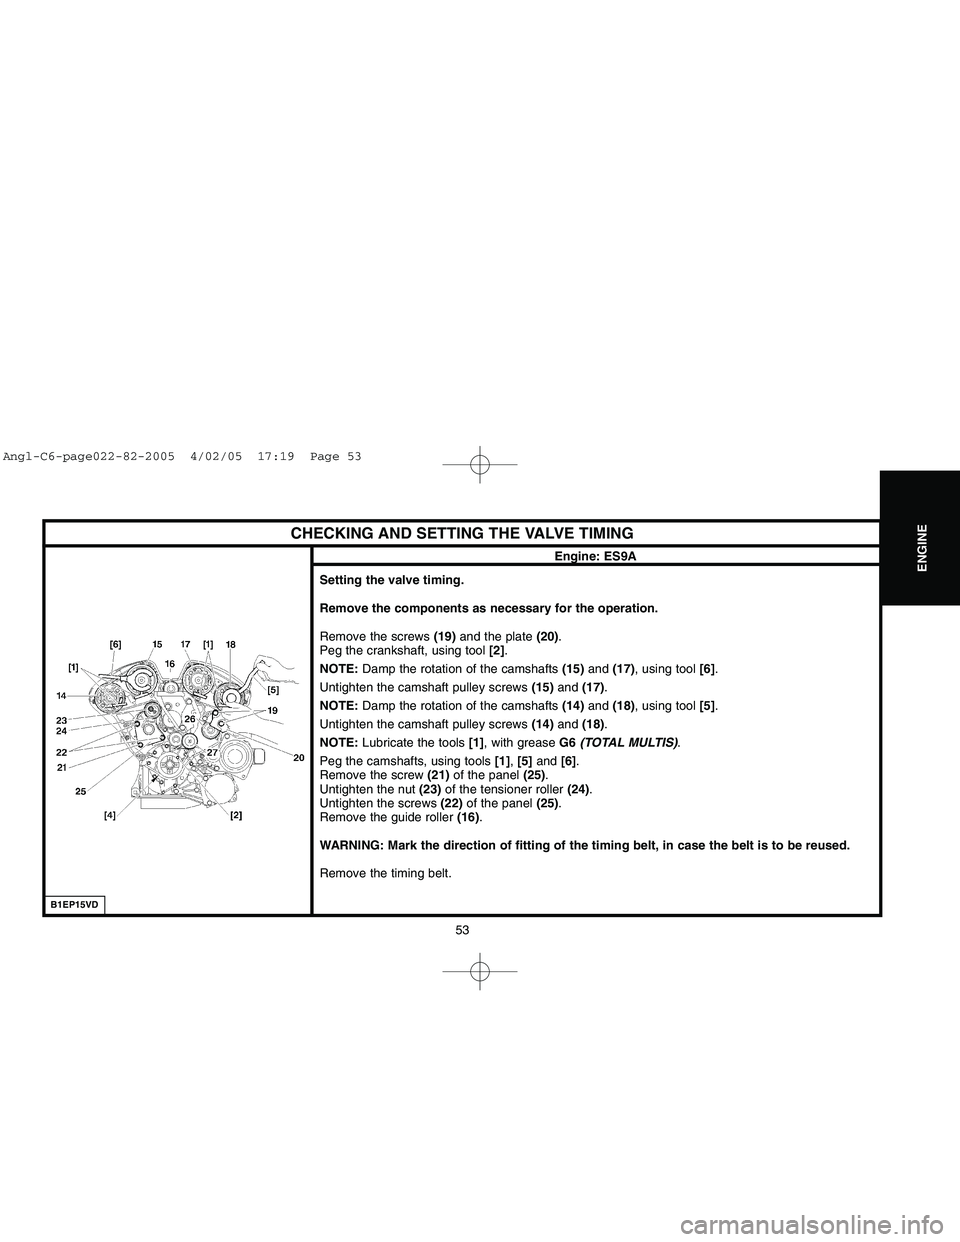
Setting the valve timing.
Remove the components as necessary for the operation.
Remove the screws (19)and the plate (20).
Peg the crankshaft, using tool [2].
NOTE:Damp the rotation of the camshafts (15)and (17), using tool [6].
Untighten the camshaft pulley screws (15)and (17).
NOTE: Damp the rotation of the camshafts (14)and (18), using tool [5].
Untighten the camshaft pulley screws (14)and (18).
NOTE:Lubricate the tools [1], with grease G6 (TOTAL MULTIS).
Peg the camshafts, using tools [1], [5]and[6].
Remove the screw (21)of the panel (25).
Untighten the nut (23)of the tensioner roller (24).
Untighten the screws (22)of the panel (25).
Remove the guide roller (16).
WARNING: Mark the direction of fitting of the timing belt, in case the belt is to be reused.
Remove the timing belt.
B1EP15VD
Angl-C6-page022-82-2005 4/02/05 17:19 Page 53
Page 60 of 223

Downloaded from www.Manualslib.com manuals search engine 54
ENGINE
CHECKING AND SETTING THE VALVE TIMING
Engine: ES9A
Setting the valve timing (continued).
Refitting.
Check that the camshafts and the crankshaft are correctly pegged.
Check that the rollers and the coolant pump pulley are turning freely (no tightness).
Loosen the camshaft pulley screws by a 1/4 turn.
Make sure that the pulleys are turning freely on the camshaft hub.
Turn the camshaft pulleys in a clockwise direction, to end of slots.
WARNING: Respect the direction of fitting of the belt: Facing the timing, the inscriptions on
the belt should be readable the correct way up.
Fit the timing belt on the crankshaft pinion.
Position the tool [6].
Position the timing belt in the following sequence (belt well tensioned):
- The roller (26), the pulley (18), the pulley (17).
WARNING: Keep the timing belt well tensioned.
- Refit the guide roller (16), tighten to 8 ± 0,8 m.daN.
Position the timing in the following sequence:
- The camshaft pulleys (15)and (14), the tensioner roller (24), the coolant pump pulley and the
guide roller (27).
NOTE: When positioning the belt on the camshaft pulleys, turn these clockwise so as to engage the
next tooth. The angular displacement of the pulleys should not be more than the equivalent of one
tooth.
B1EP15VDB1BP2BLC
Angl-C6-page022-82-2005 4/02/05 17:19 Page 54
Page 61 of 223

Downloaded from www.Manualslib.com manuals search engine 55
ENGINE
CHECKING AND SETTING THE VALVE TIMING
Engine: ES9A
Setting the valve timing (continued).
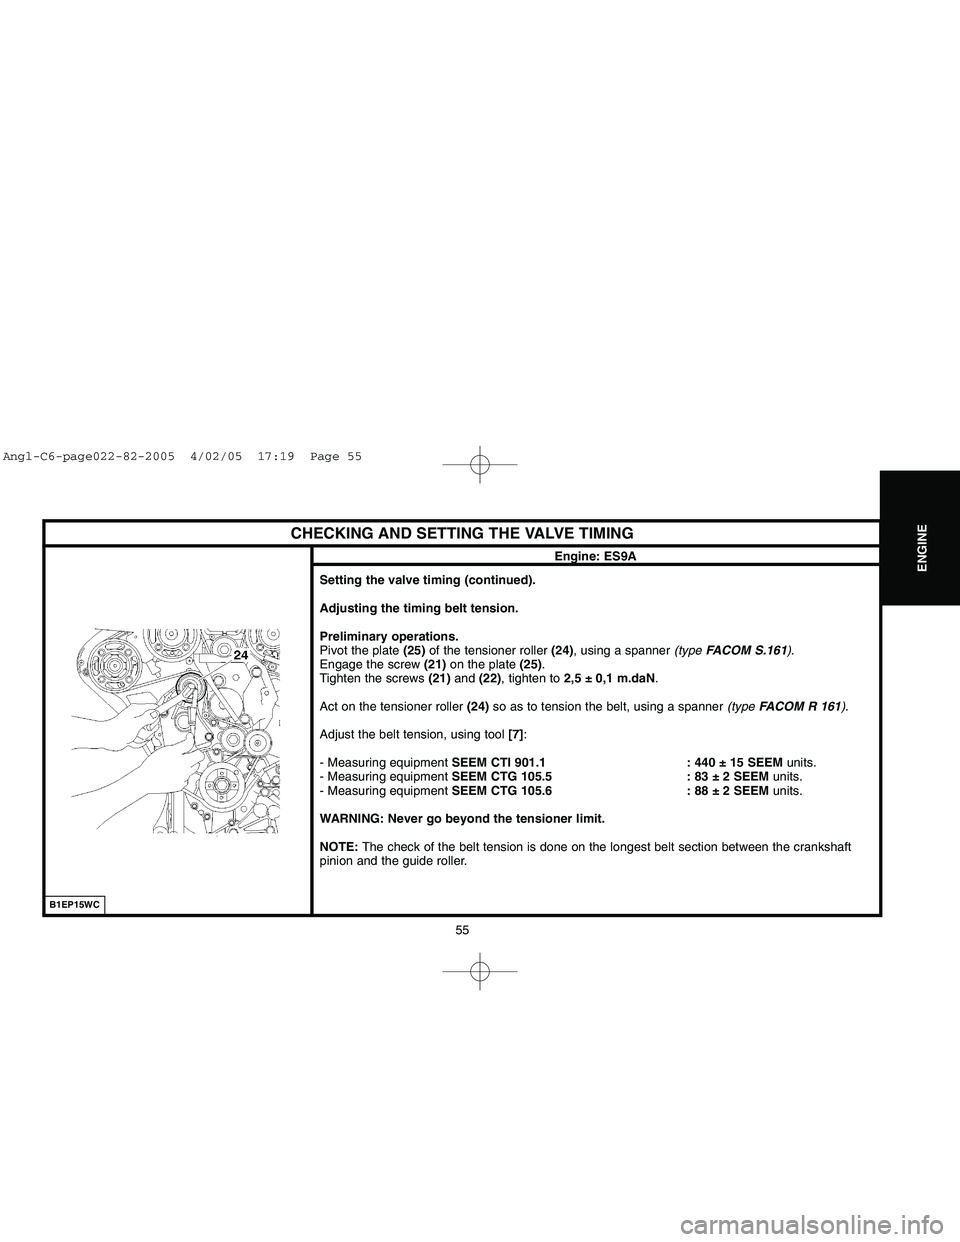
Adjusting the timing belt tension.
Preliminary operations.
Pivot the plate (25)of the tensioner roller (24), using a spanner (type FACOM S.161).
Engage the screw (21)on the plate (25).
Tighten the screws (21)and (22), tighten to 2,5 ± 0,1 m.daN.
Act on the tensioner roller (24)so as to tension the belt, using a spanner (type FACOM R 161).
Adjust the belt tension, using tool [7]:
- Measuring equipment SEEM CTI 901.1 : 440 ± 15 SEEMunits.
- Measuring equipment SEEM CTG 105.5 : 83 ± 2 SEEMunits.
- Measuring equipment SEEM CTG 105.6 : 88 ± 2 SEEMunits.
WARNING: Never go beyond the tensioner limit.
NOTE:The check of the belt tension is done on the longest belt section between the crankshaft
pinion and the guide roller.
B1EP15WC
Angl-C6-page022-82-2005 4/02/05 17:19 Page 55
Page 62 of 223

Downloaded from www.Manualslib.com manuals search engine 56
ENGINE
CHECKING AND SETTING THE VALVE TIMING
Engine: ES9A
Tighten the nut (23)of the tensioner roller (24), tighten to 1 ± 0,1 m.daN.
Check that the exhaust camshaft pulley screws are not at the end of slots (by loosening one screw).
WARNING: Otherwise, restart the operation for positioning the timing belt.
Tighten at least 2 screwsper exhaust camshaft pulley to 1 ± 0,1 m.daN.
Remove the tools [1], [2]and [4].
Rotate the crankshaft 2 turnsin a clockwise direction.
IMPERATIVE: Never turn it back.
Peg the crankshaft, using tool [2].
Peg the camshaft pulleys, using tool [1].
Slacken the nut (23)of the tensioner roller (24).
B1EP15WCB1EP15XC
Angl-C6-page022-82-2005 4/02/05 17:19 Page 56
Page 63 of 223

Downloaded from www.Manualslib.com manuals search engine 57
ENGINE
CHECKING AND SETTING THE VALVE TIMING
Engine: ES9A
Tensioning the timing belt.
Act on the tensioner roller (24)so as to align the marks «c»and «d», without detensioning the timing belt
(failing this, restart the operation of adjusting the belt tension).
Hold the tensioner roller (24).
Tighten the nut (23), tighten to 1 ± 0,1 m.daN.
Check the position of the tensioner roller (the alignment of the marks «c»and «d»should be correct).
Remove the tools [1], [2]and [4].
Turn the crankshaft 2 rotationsclockwise.
IMPERATIVE: Never turn it back.
Peg the crankshaft, using tool [2].
Check the position of the tensioner roller (the alignment of the marks «c»and «d»should be correct).
Peg the camshaft pulleys, using tool [1].
If the peg [1]goes in: Loosen the exhaust camshaft pulley screws by 45°.
If the peg [1]does not go in: Slacken the exhaust camshaft pulley screws by 45°.
Bring the exhaust camshaft hub to the pegging position (5), using tool [5].
WARNING: Check that the exhaust camshaft pulleys are not at the end of slots. Otherwise, restart
the operation to position the timing belt.
Tighten the exhaust camshaft pulley screws to 1 ± 0,1 m.daN.
Remove tools[1] and [2].
Complete the refitting.
Initialise the injection ECU (see corresponding operation).
B1EP15XC
Angl-C6-page022-82-2005 4/02/05 17:19 Page 57
Page 64 of 223
![CITROEN C6 2005 User Guide Downloaded from www.Manualslib.com manuals search engine 58
ENGINE
CHECKING THE VALVE TIMING
Engine: DT17BTED4
Tools.
[1]Set of plugs: (-).0188-T
[2]Flywheel setting peg (double flywheel): (-).0195.K CITROEN C6 2005 User Guide Downloaded from www.Manualslib.com manuals search engine 58
ENGINE
CHECKING THE VALVE TIMING
Engine: DT17BTED4
Tools.
[1]Set of plugs: (-).0188-T
[2]Flywheel setting peg (double flywheel): (-).0195.K](/img/9/57744/w960_57744-63.png)
Downloaded from www.Manualslib.com manuals search engine 58
ENGINE
CHECKING THE VALVE TIMING
Engine: DT17BTED4
Tools.
[1]Set of plugs: (-).0188-T
[2]Flywheel setting peg (double flywheel): (-).0195.K Toolkit 0188-T
[3]Camshaft setting pegs: (-).0195.H Toolkit 0188-T
Checks.
IMPERATIVE: Respect the safety and cleanliness requirements specific to High pressure
Diesel injection (HDi) engines.
Remove the engine cover.
Disconnect the battery negative terminal.
Raise and support the front of the vehicle.
Remove:
- The under-engine sound-deadening.
- The front RH wheel.
- The front RH splash-shield (see corresponding operation).
Remove:
- The air duct between the air/air exchanger and the air inlet housing (4).
- The air inlet housing (4).
Uncouple, plug and move aside the pipes (2)and (3), using tools [1].
Unclip and move aside the electrical harness.
Remove the venting chamber fixing (1).
Move aside the venting chamber (1).
B1BP3BXD
Angl-C6-page022-82-2005 4/02/05 17:19 Page 58
Page 65 of 223

Downloaded from www.Manualslib.com manuals search engine 59
ENGINE
CHECKING THE VALVE TIMING
Engine: DT17BTED4
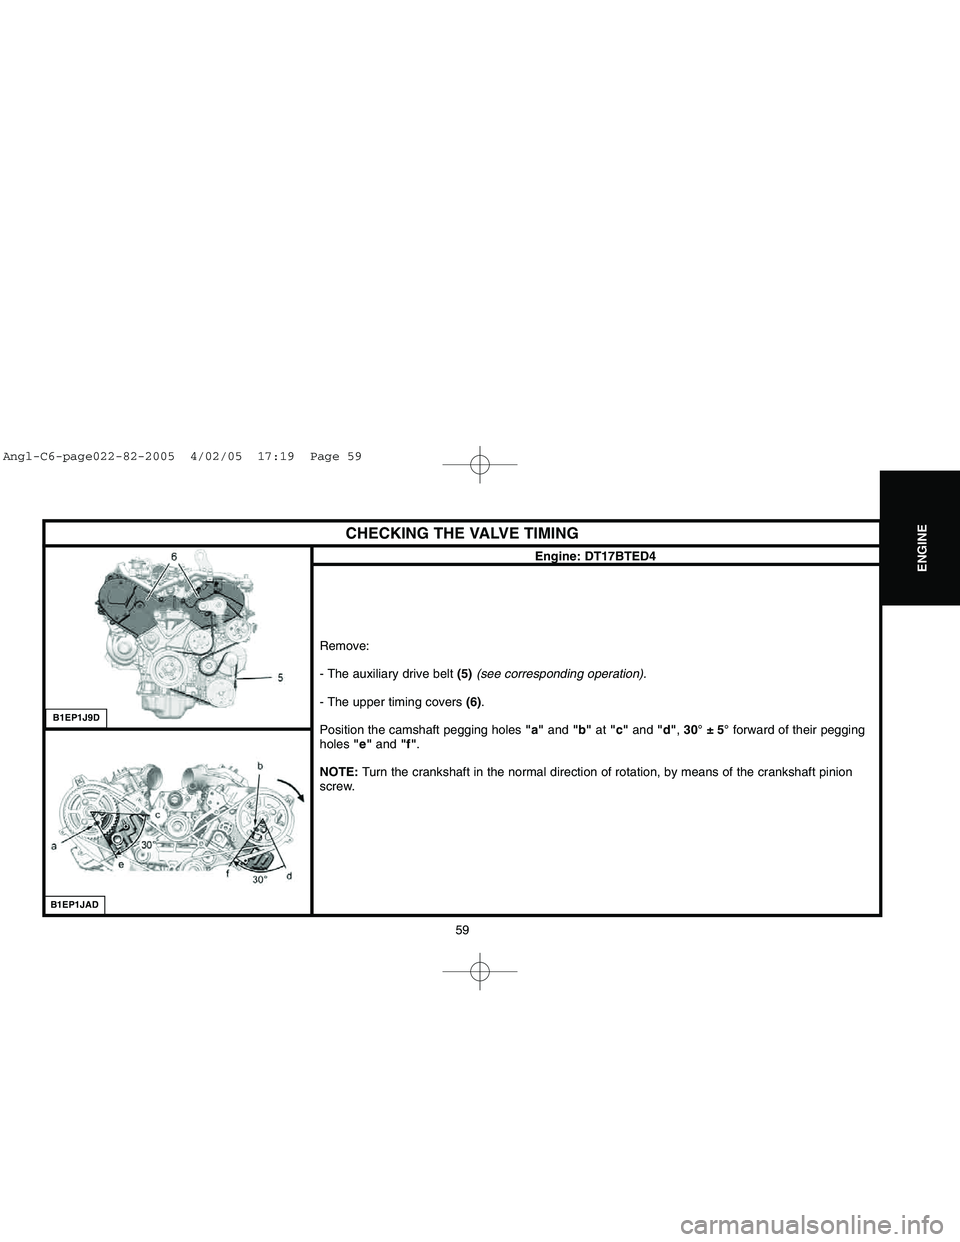
Remove:
- The auxiliary drive belt (5)(see corresponding operation).
- The upper timing covers (6).
Position the camshaft pegging holes "a"and "b"at "c"and "d", 30° ± 5°forward of their pegging
holes "e"and "f".
NOTE:Turn the crankshaft in the normal direction of rotation, by means of the crankshaft pinion
screw.
B1EP1J9DB1EP1JAD
Angl-C6-page022-82-2005 4/02/05 17:19 Page 59