ESP CITROEN C6 2012 Handbook (in English)
[x] Cancel search | Manufacturer: CITROEN, Model Year: 2012, Model line: C6, Model: CITROEN C6 2012Pages: 216, PDF Size: 10.23 MB
Page 75 of 216
73
II
ELECTRONIC STABILITY PROGRAMME
TheESP system offers increased
driving safety but is not in place toencourage the driver to take addi-
tional risks or to drive at excessivespeeds.
The operation of this s
ystem is
assured provided that the manufac-
turer’s recommendations concern-
ing the wheels (tyres and rims),
braking components and electricalcomponents are observed, as wellas the fi tting and repair proceduresused by CITROËN dealers andgpp
qualifi ed workshops.
Following an accident, have thesystem checked by a CITROËNg,
dealer or a qualifi ed workshop.
ELECTRONIC STABILITY PROGRAMME (ESP) AND TRACTION CONTROL (ASR)
These systems are closely associated with ABS and additional to it. In the event of a loss of control of the vehicle by the driver, theESPsystem acts
automatically on one or more wheels and also on the engine to bring the
vehicle back on trajectory. The ASRsystem optimises traction and prevents
wheel spin by acting on the brakes of the driving wheels as well as on the engine. It also improves steering stability during acceleration.
OPERATION
When either the ESPor the ASR system is brought into operation
the warning lamp "ESP/ASR" fl ashes.
DEACTIVATION
In exceptional conditions (vehicle stuck in snow, soft ground, etc.) it mayprove useful to deactivate theESP/ASR systems to allow the wheels tospin and thus regain traction.
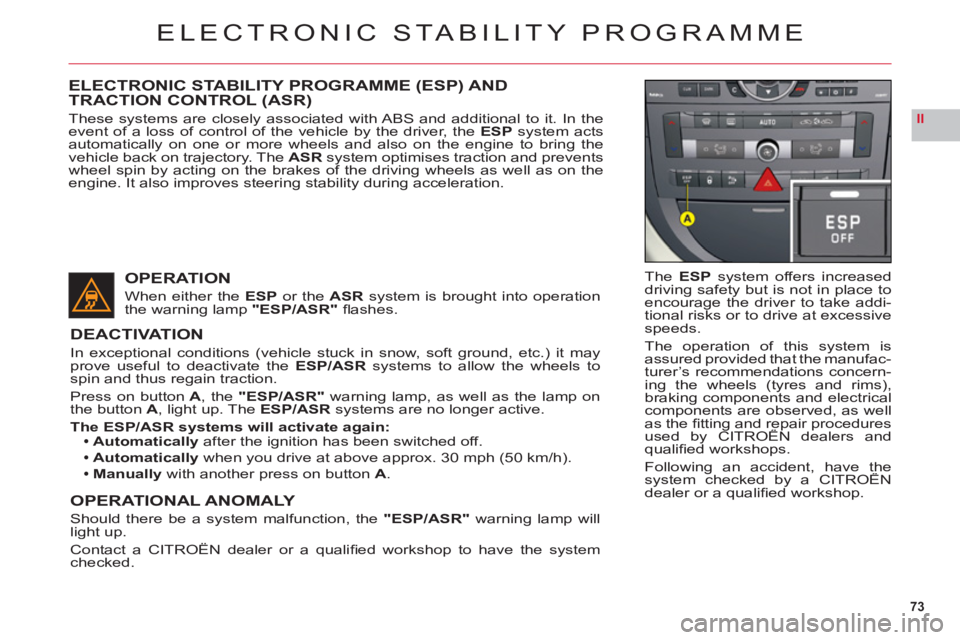
Press on buttonA, the"ESP/ASR" warning lamp, as well as the lamp on
the buttonA, light up. TheESP/ASR systems are no longer active.
The ESP/ASR systems will activate again:Automatically after the ignition has been switched off.
Automatically when you drive at above approx. 30 mph (50 km/h).
Manuallywith another press on button A.
OPERATIONAL ANOMALY
Should there be a system malfunction, the "ESP/ASR"warning lamp willlight up.
Contact a CITROËN dealer or a qualifi ed workshop to have the systemchecked.
Page 80 of 216
78
II
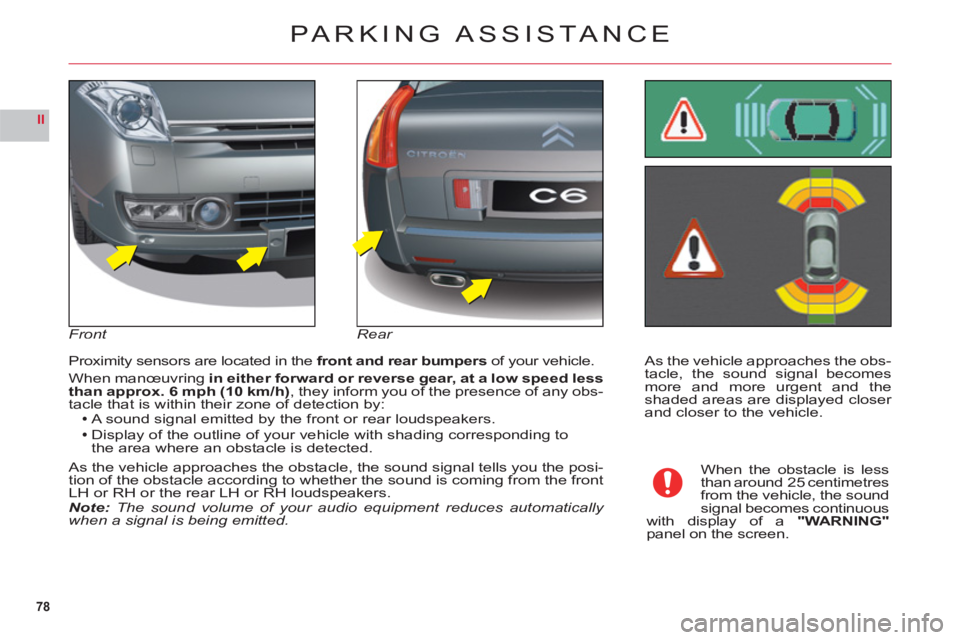
As the vehicle approaches the obs-
tacle, the sound signal becomesmore and more urgent and theshaded areas are displayed closer and closer to the vehicle. Proximit
y sensors are located in the front and rear bumpersof your vehicle.
When manœuvringin either forward or reverse gear, at a low speed less
than approx. 6 mph (10 km/h), they inform you of the presence of any obs-
tacle that is within their zone of detection by: A sound signal emitted by the front or rear loudspeakers.
Display of the outline of your vehicle with shading corresponding to
the area where an obstacle is detected.
As the vehicle approaches the obstacle, the sound signal tells you the posi-
tion of the obstacle according to whether the sound is coming from the front LH or RH or the rear LH or RH loudspeakers.
Note:The sound volume of your audio equipment reduces automatically when a signal is being emitted.
PARKING ASSISTA NCE
FrontRear
When the obstacle is less
than around 25 centimetres
from the vehicle, the sound signal becomes continuous
with display of a"WARNING"panel on the screen.
Page 81 of 216
79
II
ACTIVATION/DEACTIVATION
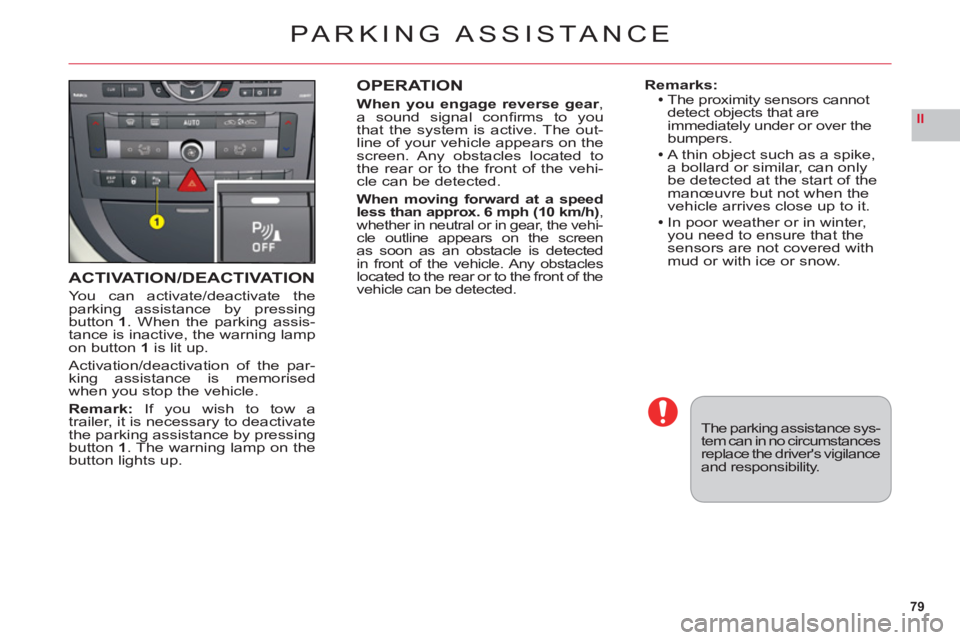
You can activate/deactivate theparking assistance by pressingbutton 1. When the parking assis-
tance is inactive, the warning lampon button1is lit up.
Activation/deactivation of the par-king assistance is memorisedwhen you stop the vehicle.
Remark: If you wish to tow a
trailer, it is necessary to deactivate
the parking assistance by pressing
button 1. The warning lamp on the
button lights up.
OPERATION
When you engage reverse gear,
a sound signal confi rms to you
that the system is active. The out-line of your vehicle appears on the
screen. Any obstacles located to
the rear or to the front of the vehi-cle can be detected.
When moving forward at a speed less than approx. 6 mph (10 km/h),
whether in neutral or in gear, the vehi-cle outline appears on the screen as soon as an obstacle is detected
in front of the vehicle. Any obstacles located to the rear or to the front of the
vehicle can be detected.
Remarks:The proximity sensors cannot
detect objects that are
immediatel
y under or over the
bumpers.
A thin object such as a spike,
a bollard or similar, can only be detected at the start of themanœuvre but not when the
vehicle arrives close up to it.
In poor weather or in winter,you need to ensure that the sensors are not covered with
mud or with ice or snow.
PARKING ASSISTA NCE
The parking assistance sys-tem can in no circumstancesreplace the driver's vigilanceand responsibility.
Page 91 of 216

89
III
3a3b
4
AUTOMATIC AIR CONDITIONING
3. ADJUSTING THE AIR DISTRIBUTION
Successive or continuous presses on buttons3aand 3b direct the fl ow of air to the passenger' side or to the driver's side.
The s
ymbol (arrows) corresponding to the direction chosen is displayed on the multifunction screen:Windscreen and side windows.
Central, lateral and soft diffusion air conditioning
vents (if open).
Passenger footwells."AUTO"automatic distribution.
•
•
••
Rotate the control to increase or decrease the fl ow of air.
The symbol for air fl ow (helix) is displayed on the multifunction screen and fi lls in as the required fl ow increases.
To prevent misting and poor air quality in the passenger compartment, take care to maintain a suffi cient fl ow of air.
4. ADJUSTING THE AIR FLOW
Soft diffusion system
The soft diffusion air conditioning unit situated at thecentre of the front console guaranteesoptimum diffu-sion of air for the front seat positions.r
This unit eliminates annoying draughts and guarantees
an optimum temperature inside the cabin.
Adjusting the air fl ow with soft diffusion air conditioning
The driver and the passenger can adjust the air fl ow for
the soft diffusion air conditioning unit independently.
To a djust the air fl ow, rotate the control to the desiredposition.
To close off the soft diffusion air conditioning, rotate thecontrol as far down as it will go.
In very hot weather, to improve the central and lateralventilation, closing off the soft diffusion air conditioning
is recommended.
Page 92 of 216

90
III
5
6
7
AUTOMATIC AIR CONDITIONING
5. FRONT DEMISTING - DEICING
Press button 5 for rapidclear windows. The warning lamp comes on. This system controls the air condi-
tioning, the air fl ow and the entry of air from outside. It sends the ventilation towards the windscreen and side
windows.
A press on the 1 button returns you to "AUTO"mode.
6. REAR DEMISTING - DEICING
Press button 6, with the engine running, to start a rapid
deicing or demisting of the rear screen and rear view mirrors. The warning lamp comes on.
This mode stops automatically depending on the out-side temperature. It can be paused by pressing again on button6or by stopping the engine.
In the latter case, demisting will resume when the engine is switched on again.Note:The heated rear screen operates independently of the automatic air conditioning.
7. AIR RECIRCULATION – ENTRY OF AIR
FROM OUTSIDE
Press repeatedly on button7 to select the air entrymode. The corresponding warning lamp lights up:Air intake in automatic pollution control mode (on by default, with automatic comfort regulation).
The automatic mode makes use of an air quality sen-sor. It analyses the air and isolates the cabin from theexterior if the presence of pollutants is detected. In thiscase it automatically activates recirculation of the cabinair.
Please note: this function does not detect and there-fore protect the cabin from unpleasant odours. It is not
active when the ambient temperature is below +5 °C so
as to avoid the risk of misting the vehicle’s windows.
Closing the exterior air intake
Press button 7to close the intake of air from the exterior.
While maintaining the other settings, this position allows
the driver to avoid unpleasant odours and smoke out-
side the vehicle at any time.
It should be cancelled as soon as possible to allowexchange of the cabin air and to avoid misting of
the vehicle’s windows.
Exterior air intake
Press button7once to open the exterior air intake.
•
•
•
Page 106 of 216

104
III
ab
ab
Pack Lounge seats
ISOFIX ANCHORINGPOINTS AND THE ISOFIX
FASTENING SYSTEM
Your vehicle is type-approvedaccording to new ISOFIX direc-
tives. The lateral rear seats of your vehicle are each equipped
with regulation ISOFIX anchoringpoints.
In
correct installation of a childseat in a vehicle compromisesprotection of the child in the event
of a collision. The ISOFIX systemenables you to minimise the risksposed by incorrect fi tting. The
ISOFIX fastening system givesyou a convenient, strong andreliable fi tting for a child seat inyour vehicle.
Benchseat
The ISOFIX fastening system
The ISOFIX system features3ringsfor each lateral rear seat position:Two bottom rings a andblocated between the backrestand the seat cushion. These areabout 28 cm apart,concealed
in the case of a benchseat under
a fl ap with the logo ISOFIX.
One top ring c fi xed on the rear shelf,concealedunder a fl apwith the logo
TOP TETHERbehind the head restraint.
•
•
The ISOFIX child seat fasteningsystem
ISOFIX child seats have twolatches which are easy to secure
on the two bottom rings aandb.
Some ISOFIX child seats also have
a top belt which is for attaching on
the ISOFIX top ringc.
To attach the top belt, raise thehead restraint of the vehicle seat,
then pass the buckle between the
two su
pports. Next fi x the buckle
on the top ringc and tension thetop belt.
This fi xing system is intended for children weighingup to 18 kg.
The ISOFIX child seats that can beinstalled in your vehicle are given
in the table opposite.
CHILD RESTRAINTS
Page 111 of 216
109
III221
2
2
INTERIOR LIGHTING
Front
INTERIOR LAMPS
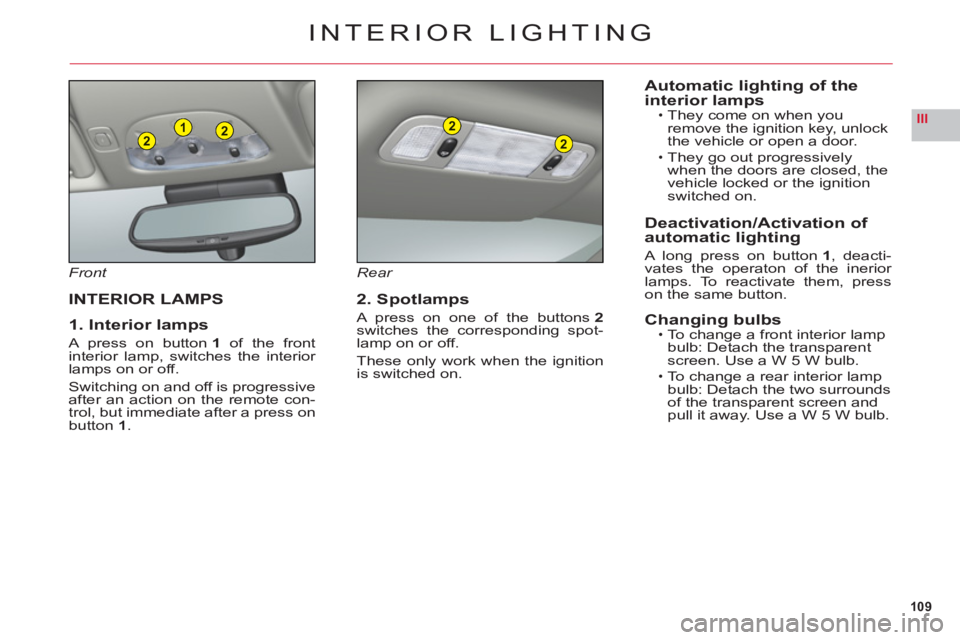
1. Interior lamps
A press on button 1 of the front
interior lamp, switches the interior lamps on or off.
Switching on and off is progressiveafter an action on the remote con-
trol, but immediate after a press on
button 1.
Rear
2. Spotlamps
A press on one of the buttons2switches the corresponding spot-lamp on or off.
These only work when the ignition
is switched on.
Automatic lighting of the
interior lampsThey come on when you
remove the ignition key, unlock
the vehicle or open a door.
They go out progressively
when the doors are closed, the
vehicle locked or the i
gnitionswitched on.
Deactivation/Activation of
automatic lighting
A long press on button1, deacti-
vates the operaton of the inerior lamps. To reactivate them, presson the same button.
Changing bulbsTo change a front interior lamp
bulb: Detach the transparent
screen. Use a W 5 W bulb.
To change a rear interior lamp bulb: Detach the two surroundsof the transparent screen and pull it away. Use a W 5 W bulb.
•
•
•
•
Page 128 of 216

126
IV
BC
A
i
12 V BATTERY
STARTING THE ENGINE WITH AN ASSISTING BATTERY
If the battery is discharged, it is possible to use either
a separate emergency battery or a battery on another
vehicle.
If you use the battery on another vehicle, stop the engine on the latter. The two vehicles must not come
into direct contact with each other.
Check that the assisting battery has suffi cient voltage (12 V).
Connect the cables according to the orderindicated in rthe diagram.
A Pole "+" on the vehicle being assisted (under the
red cover).
B Assisting battery.C Pole"–" on the assisted vehicle (under the bonnet).
Check that the leads are well secured (risk of sparks).
Start the engine of the assisting vehicle. Let the engine
run for around 1 minute at a slightly accelerated idle.
Operate the starter on the vehicle being assisted.
It is essential to follow the indicated sequencecorrectly.
Never approach with a fl ame or create sparks in the vicinity of the battery (explosive gas).
The battery contains dilute sulphuric acid which is highly corrosive.
When handling batteries, always protect your face and especially your eyes.
In the event of any contact with the skin, rinse immediately with copious amounts of fresh water.
ADVICE
Do not touch the leads during the operation.
Do not lean over the batteries.
Disconnect the cables in reverse order, making sure
they do not touch together.
Page 172 of 216
7.22
11
22
11
33
22
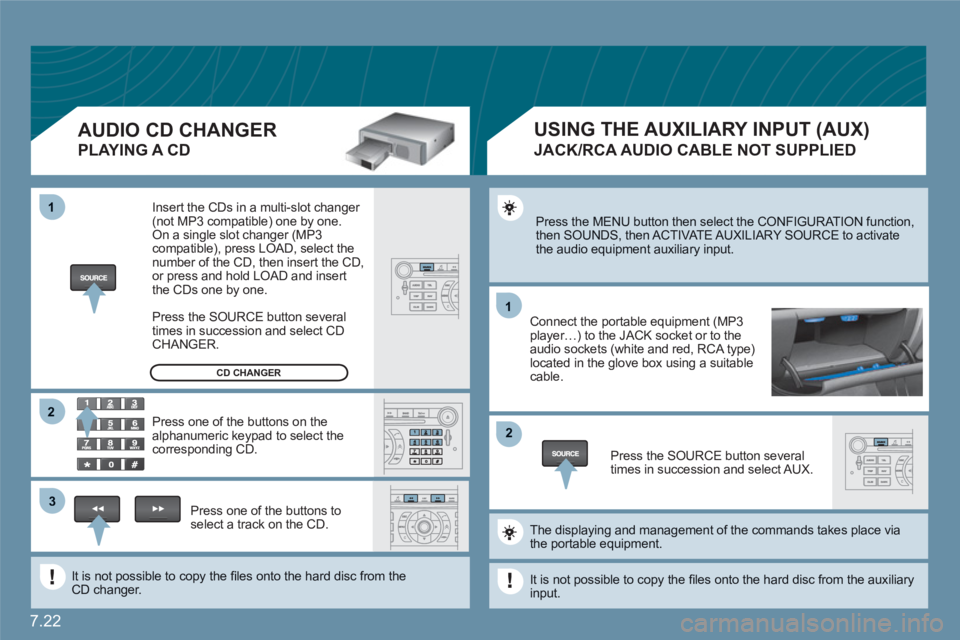
Press the MENU button then select the CONFIGURATION function, then SOUNDS, then ACTIVATE AUXILIARY SOURCE to activatethe audio equipment auxiliary input.
Connect the portable equipment (MP3player…) to the JACK socket or to the audio sockets (white and red, RCA type)located in the glove box using a suitable cable.
Press the SOURCE button severaltimes in succession and select AUX.
The displaying and management of the commands takes place viathe portable equipment.
It is not possible to copy the fi les onto the hard disc from the auxiliaryinput.
USING THE AUXILIARY INPUT (AUX)
JACK/RCA AUDIO CABLE NOT SUPPLIED
AUDIO CD CHANGER
PLAYING A CD
Insert the CDs in a multi-slot changer (not MP3 compatible) one by one. On a single slot changer (MP3compatible), press LOAD, select the number of the CD, then insert the CD,or press and hold LOAD and insert the CDs one by one.
Press the SOURCE button severaltimes in succession and select CD CHANGER.
Press one of the buttons on thealphanumeric keypad to select the corresponding CD.
Press one of the buttons toselect a track on the CD.
It is not possible to copy the fi les onto the hard disc from theCD changer.
CD CHANGER
Page 188 of 216
7.38
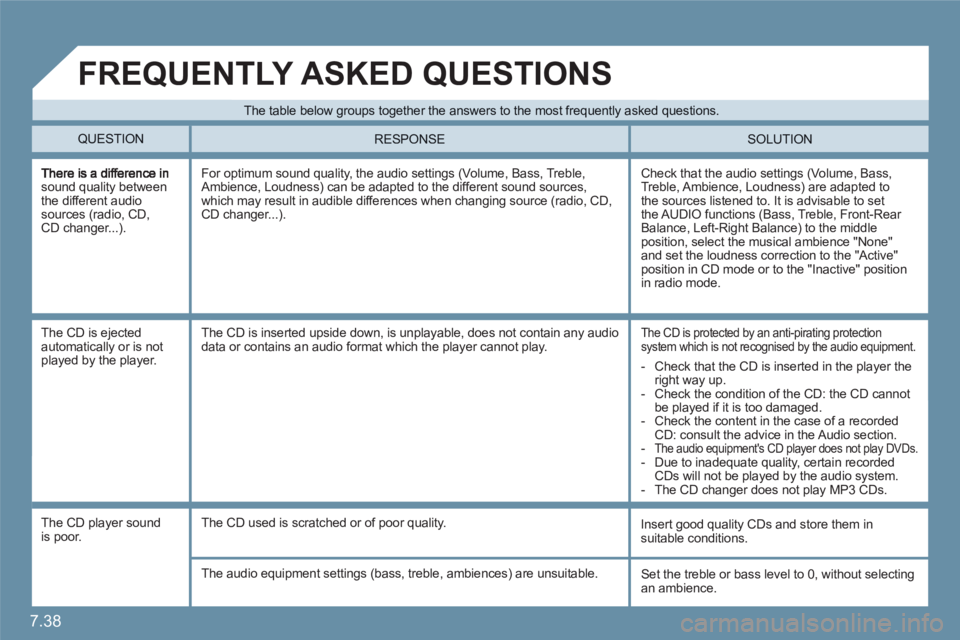
sound quality between the different audio sources (radio, CD,CD changer...).
Check that the audio settings (Volume, Bass, Treble, Ambience, Loudness) are adapted to the sources listened to. It is advisable to set the AUDIO functions (Bass, Treble, Front-Rear Balance, Left-Right Balance) to the middle position, select the musical ambience "None"and set the loudness correction to the "Active" position in CD mode or to the "Inactive" position in radio mode.
For optimum sound quality, the audio settings (Volume, Bass, Treble, Ambience, Loudness) can be adapted to the different sound sources, which may result in audible differences when changing source (radio, CD,CD changer...).
The CD is ejectedautomatically or is notplayed by the player.
The CD is protected by an anti-pirating protectionsystem which is not recognised by the audio equipment.
The CD is inserted upside down, is unplayable, does not contain any audiodata or contains an audio format which the player cannot play.
The CD player sound is poor.
Insert good quality CDs and store them insuitable conditions.
The CD used is scratched or of poor quality.
The audio equipment settings (bass, treble, ambiences) are unsuitable. Set the treble or bass level to 0, without selectingan ambience.
The table below groups together the answers to the most frequently asked questions.
QUESTION SOLUTION
RESPONSE
FREQUENTLY ASKED QUESTIONS
- Check that the CD is inserted in the player the right way up.
- Check the condition of the CD: the CD cannot be played if it is too damaged.
- Check the content in the case of a recordedCD: consult the advice in the Audio section.
-The audio equipment's CD player does not play DVDs.
- Due to inadequate quality, certain recordedCDs will not be played by the audio system.
- The CD changer does not play MP3 CDs.