warning CITROEN C6 2012 Handbook (in English)
[x] Cancel search | Manufacturer: CITROEN, Model Year: 2012, Model line: C6, Model: CITROEN C6 2012Pages: 216, PDF Size: 10.23 MB
Page 27 of 216
25
II
KEYS
It is dangerous to operate the deadlocking when a person is in the vehicle as unlocking is impossible from the inside (without the remote control).
The key number is on the label attached to the key.
Should you lose your key or remote control, a CITROËN dealer can supply replacements.
If you unlock your vehicle using the key because of a problem with the battery, be aware that opening/closing a door with the window closed can seriously damage the glass, even to the point of breaking it. See "Access".
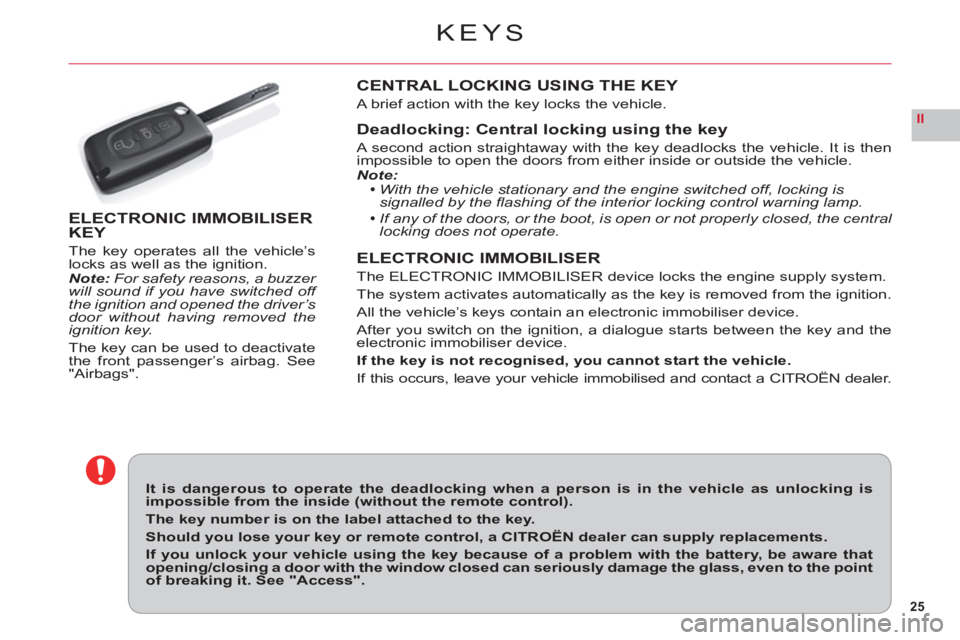
ELECTRONIC IMMOBILISER KEY
The key operates all the vehicle’slocks as well as the ignition.Note:For safety reasons, a buzzer will sound if you have switched off the ignition and opened the driver’s
door without having removed the
ignition key.
The ke
y can be used to deactivate
the front passenger’s airbag. See"Airbags".
CENTRAL LOCKING USING THE KEY
A brief action with the key locks the vehicle.
Deadlocking: Central locking using the key
A second action straightaway with the key deadlocks the vehicle. It is then
impossible to open the doors from either inside or outside the vehicle.Note:With the vehicle stationary and the engine switched off, locking is
signalled by the fl ashing of the interior locking control warning lamp.
If any of the doors, or the boot, is open or not properly closed, the central locking does not operate.
ELECTRONIC IMMOBILISER
The ELECTRONIC IMMOBILISER device locks the engine supply system.
The s
ystem activates automatically as the key is removed from the ignition.
All the vehicle
’s keys contain an electronic immobiliser device.
A
fter you switch on the ignition, a dialogue starts between the key and theelectronic immobiliser device.
If the ke
y is not recognised, you cannot start the vehicle.
If this occurs, leave your vehicle immobilised and contact a CITROËN dealer.
Page 28 of 216
26
II
A
ANTI-INTRUSION ALARM
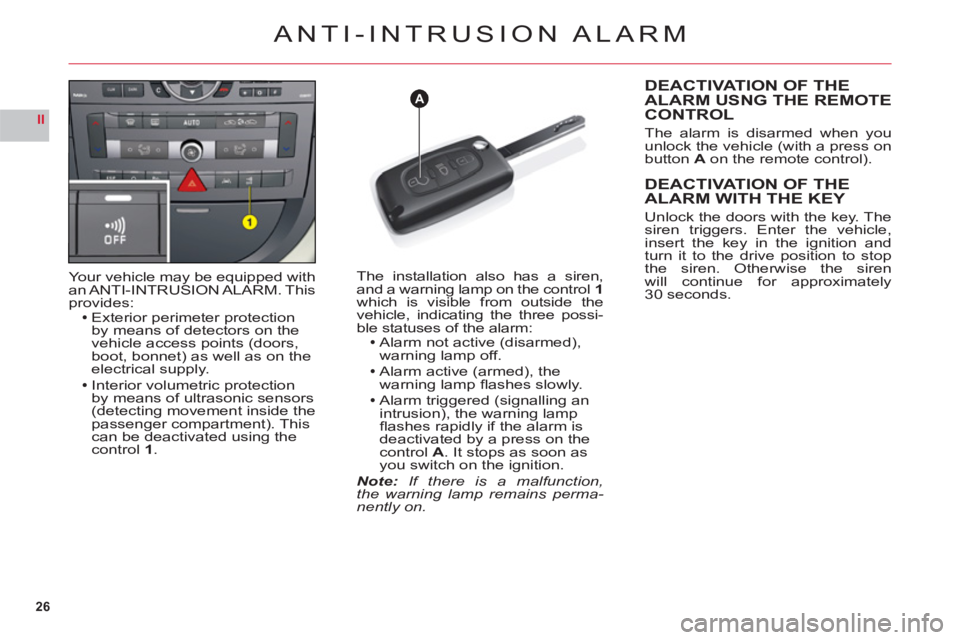
Your vehicle may be equipped with
an ANTI-INTRUSION ALARM. Thisprovides:Exterior perimeter protection
by means of detectors on the
vehicle access points (doors,
boot, bonnet) as well as on the electrical supply.
Interior volumetric protection
by means of ultrasonic sensors (detecting movement inside thepassenger compartment). This can be deactivated using thecontrol1.
The installation also has a siren,
and a warning lamp on the control1which is visible from outside the
vehicle, indicating the three possi-ble statuses of the alarm:Alarm not active (disarmed),
warning lamp off.
Alarm active
(armed), the
warning lamp fl ashes slowly.
Alarm tri
ggered (signalling an
intrusion), the warning lamp
fl ashes rapidly if the alarm is deactivated by a press on thecontrol A. It stops as soon as you switch on the ignition.Note: If there is a malfunction,
the warning lamp remains perma-nently on.
DEACTIVATION OF THE
ALARM USNG THE REMOTE
CONTROL
The alarm is disarmed when youunlock the vehicle (with a press onbutton Aon the remote control).
DEACTIVATION OF THEALARM WITH THE KEY
Unlock the doors with the key. Thesiren triggers. Enter the vehicle,
insert the key in the ignition and
turn it to the drive position to stopthe siren. Otherwise the siren
will continue for approximately30 seconds.
Page 29 of 216
27
II
AB
ANTI-INTRUSION ALARM
OPERATING THE ALARM
First make sure all the doors are closed.
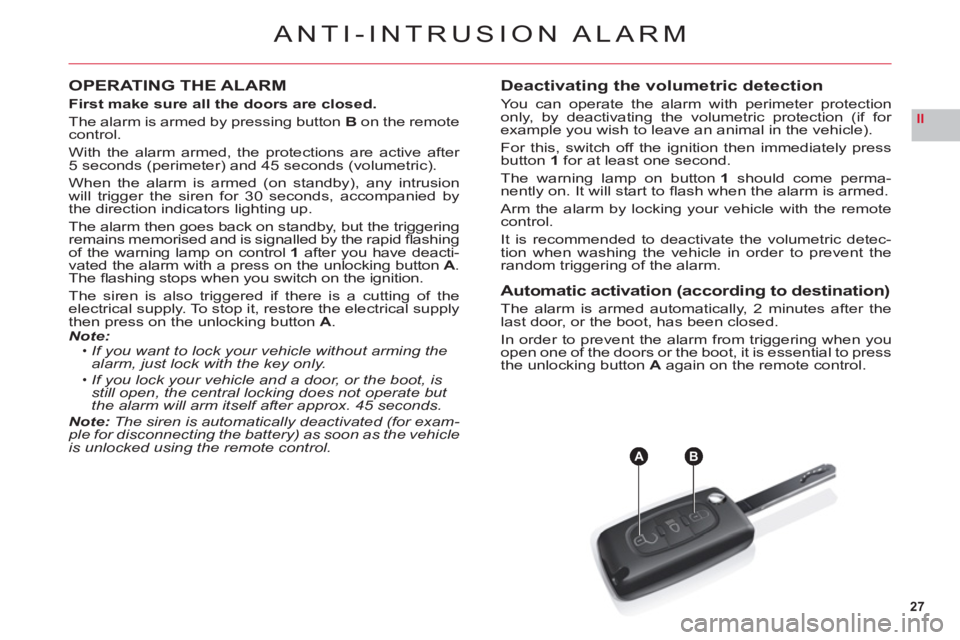
The alarm is armed by pressing button Bon the remote control.
With the alarm armed, the protections are active after 5 seconds (perimeter) and 45 seconds (volumetric).
When the alarm is armed (on standby), any intrusion
will trigger the siren for 30 seconds, accompanied by
the direction indicators lighting up.
The alarm then
goes back on standby, but the triggering remains memorised and is signalled by the rapid fl ashing
of the warning lamp on control1 after you have deacti-
vated the alarm with a press on the unlocking button A.The fl ashing stops when you switch on the ignition.
The siren is also triggered if there is a cutting of the electrical supply. To stop it, restore the electrical supply
then press on the unlocking button A.Note:If you want to lock your vehicle without arming the
alarm, just lock with the key only.
If you lock your vehicle and a door, or the boot, is still open, the central locking does not operate but the alarm will arm itself after approx. 45 seconds.Note:The siren is automatically deactivated (for exam-ple for disconnecting the battery) as soon as the vehicle is unlocked using the remote control.
•
•
Deactivating the volumetric detection
You can operate the alarm with perimeter protection
only, by deactivating the volumetric protection (if for example you wish to leave an animal in the vehicle).
For this, switch o
ff the ignition then immediately pressbutton1 for at least one second.
The warning lamp on button1should come perma-nently on. It will start to fl ash when the alarm is armed.
Arm the alarm b
y locking your vehicle with the remotecontrol.
It is recommended to deactivate the volumetric detec-
tion when washing the vehicle in order to prevent the
random triggering of the alarm.
Automatic activation (according to destination)
The alarm is armed automatically, 2 minutes after the
last door, or the boot, has been closed.
In order to prevent the alarm from triggering when you
open one of the doors or the boot, it is essential to press
the unlocking button A again on the remote control.
Page 30 of 216
28
II
STEERING LOCK – IGNITION – STA R T ER
NEVER REMOVE THE IGNITION KEY BEFORE THE ENGINE HAS COME TO A COMPLETE STOP.
IT IS ESSENTIAL ALWAYS TO DRIVE WITH THE ENGINE RUNNING, SO AS TO RETAIN STEERING AND BRAKING ASSISTANCE (risk of the steering lock engaging and loss of safety features).
Do not hang a heavy object on the key; it could pull the key out of alignment in the switch and could cause a malfunction.
When stationary, having removed the key, carefully turn the steering wheel if you wish to lock the steering.
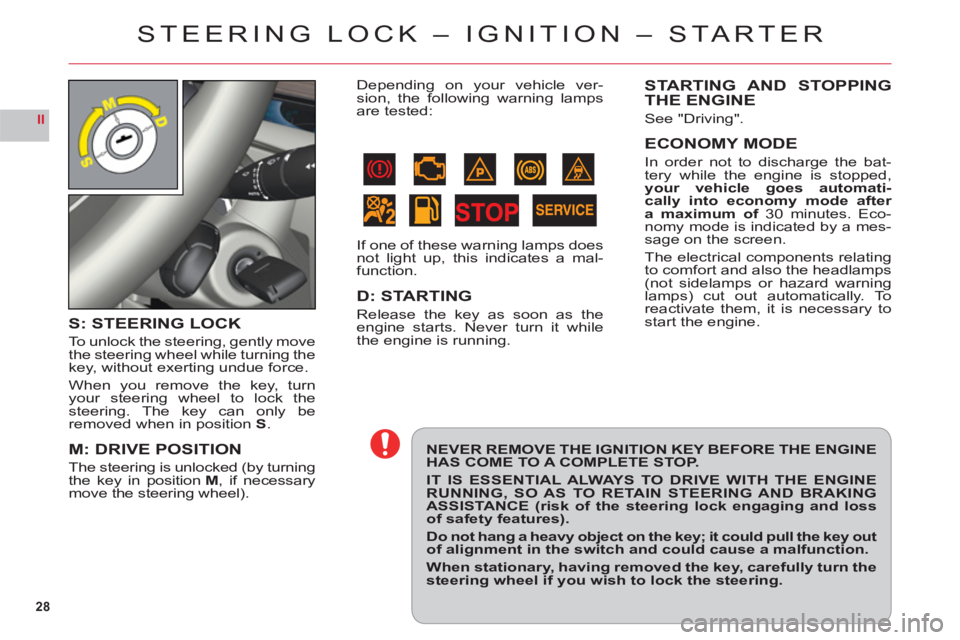
S: STEERING LOCK
To unlock the steering, gently move
the steering wheel while turning the
ke
y, without exerting undue force.
When you remove the key, turn
your steering wheel to lock the
steering. The key can only beremoved when in positionS.
M: DRIVE POSITION
The steering is unlocked (by turningthe key in positionM, if necessarymove the steering wheel).
STARTING AND STOPPINGTHE ENGINE
See "Driving".
ECONOMY MODE
In order not to discharge the bat-
tery while the engine is stopped,your vehicle goes automati-cally into economy mode after
a maximum of 30 minutes. Eco-nomy mode is indicated by a mes-sage on the screen.
The electrical components relatin
gto comfort and also the headlamps(not sidelamps or hazard warninglamps) cut out automatically. Toreactivate them, it is necessary tostart the engine.
Depending on your vehicle ver-
sion, the following warning lamps are tested:
If one of these warning lamps does
not light up, this indicates a mal-
function.
D: STARTING
Release the key as soon as the engine starts. Never turn it while
the engine is running.
Page 31 of 216
29
II
i
DO NOT RUN THE ENGINE IN A CLOSED SPACE OR IN ONETHAT IS INSUFFICIENTLY VENTILATED.
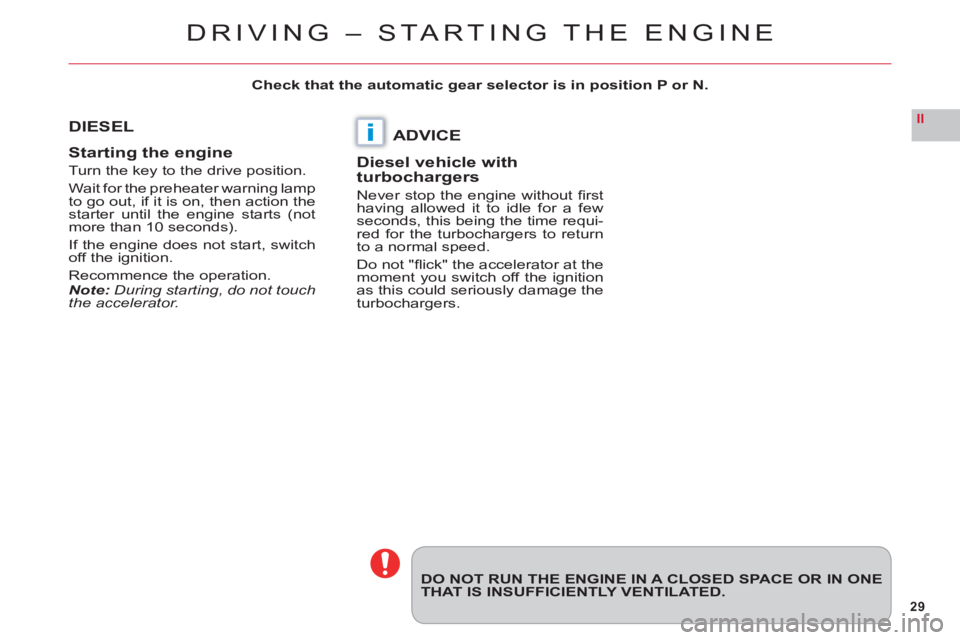
DIESEL
Startin
g the engine
Turn the key to the drive position.
Wait for the preheater warning lamp
to go out, if it is on, then action thestarter until the engine starts (notmore than 10 seconds).
If the engine does not start, switch
off the ignition.
Recommence the operation.Note:During starting, do not touchthe accelerator.
ADVICE
Diesel vehicle with turbochargers
Never stop the engine without fi rst
having allowed it to idle for a few
seconds, this being the time requi-
red for the turbochargers to return
to a normal speed.
Do not "fl ick" the accelerator at the
moment you switch off the ignition
as this could seriously damage the
turbochargers. Check that the automatic
gear selector is in position P or N.
DRIVING – STARTING THE ENGINE
Page 32 of 216
30
II
0
STOP STOP
KJIHGFEB
CAB
SS
DA
B
INSTRUMENT PANEL
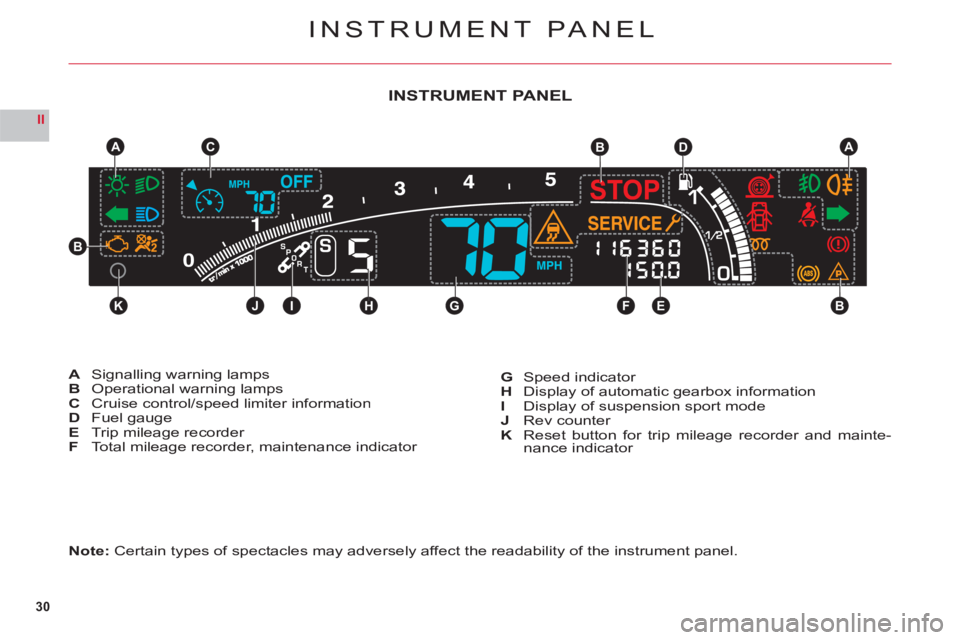
Note: Certain types of spectacles may adversely affect the readability of the instrument panel.
ASignalling warning lampsBOperational warning lampsC Cruise control/speed limiter informationDFuel gaugeETrip mileage recorderFTotal mileage recorder, maintenance indicator
GSpeed indicator
H Display of automatic gearbox informationI Display of suspension sport modeJRev counterKReset button for trip mileage recorder and mainte-
nance indicator
INSTRUMENT PANEL
Page 33 of 216
31
II
INSTRUMENT PANEL
WARNING LAMPS
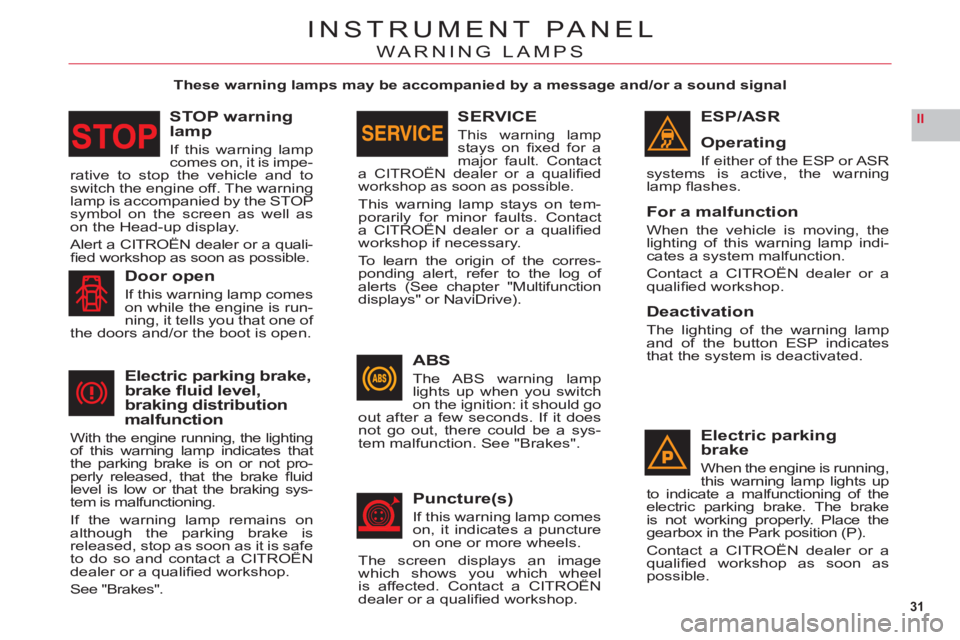
These warning lamps may be accompanied by a message and/or a sound signal
ESP/ASR
Operatin
g
If either of the ESP or ASR systems is active, the warning lamp fl ashes.
For a malfunction
When the vehicle is moving, the lighting of this warning lamp indi-cates a system malfunction.
Contact a CITROËN dealer or a qualifi ed workshop.
Deactivation
The lighting of the warning lamp and of the button ESP indicates
that the system is deactivated.
Electric parkingbrake
When the engine is running,
this warning lamp lights up
to indicate a malfunctioning of the electric parking brake. The brake is not working properly. Place the gearbox in the Park position (P).
Contact a CITROËN dealer or a qualifi ed workshop as soon as possible.
ABS
The ABS warning lamplights up when you switchon the ignition: it should goout after a few seconds. If it doesnot go out, there could be a sys-
tem malfunction. See "Brakes".
Puncture(s)
If this warning lamp comes
on, it indicates a punctureon one or more wheels.
The screen displa
ys an imagewhich shows you which wheelis affected. Contact a CITROËNy
dealer or a qualifi ed workshop.
Door open
If this warning lamp comes
on while the engine is run-ning, it tells you that one of
the doors and/or the boot is open.
Electric parking brake,brake fl uid level,braking distributionmalfunction
With the engine running, the lighting
of this warning lamp indicates that
the parking brake is on or not pro-
perly released, that the brake fl uid level is low or that the braking sys-
tem is malfunctioning.
If the warning lamp remains on although the parking brake is released, stop as soon as it is safe to do so and contact a CITROÀN ,p
dealer or a qualifi ed workshop.
See "Brakes".
SERVICE
This warning lampstays on fi xed for a
major fault. Contacta CITROËN dealer or a qualifi edj
workshop as soon as possible.
This warning lamp stays on tem-porarily for minor faults. Contacta CITROËN dealer or a qualifi edpy
workshop if necessary.
To learn the ori
gin of the corres-
ponding alert, refer to the log of
alerts (See chapter "Multifunction
displays" or NaviDrive).
STOP warning lamp
If this warning lamp comes on, it is impe-rative to stop the vehicle and to switch the engine off. The warning lamp is accompanied by the STOP symbol on the screen as well as
on the Head-up display.
Alert a CITROËN dealer or a quali-fi ed workshop as soon as possible.
Page 34 of 216
32
II
INSTRUMENT PANEL
WARNING LAMPS
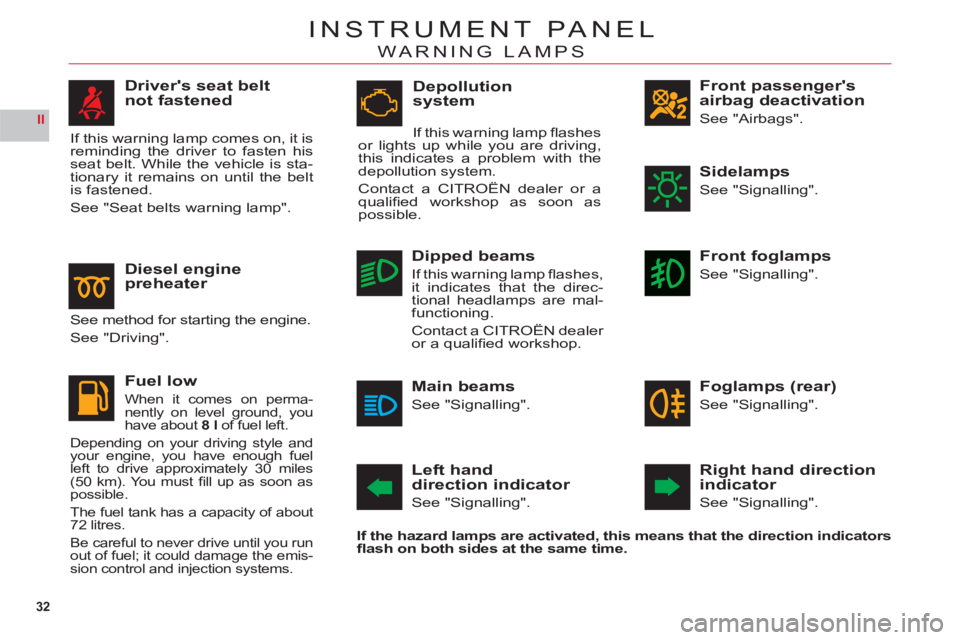
Front passenger'sairbag deactivation
See "Airbags".
Left handdirection indicator
See "Signalling".
Right hand directionindicator
See "Signalling".
If the hazard lam
ps are activated, this means that the direction indicatorsfl ash on both sides at the same time.
Sidelamps
See "Signalling".
Front foglamps
See "Signalling".
Dipped beams
If this warning lamp fl ashes, it indicates that the direc-
tional headlamps are mal-functioning.
Contact a CITROËN dealer
or a qualifi ed workshop.
Foglamps (rear)
See "Signalling".
Main beams
See "Signalling".
Driver's seat belt
not fastened
If this warning lamp comes on, it is reminding the driver to fasten his seat belt. While the vehicle is sta-
tionary it remains on until the belt
is fastened.
See "Seat belts warning lamp".
Depollution
system
If this warning lamp fl ashesor lights up while you are driving,
this indicates a problem with the
depollution system.
Contact a CITROËN dealer or a
qualifi ed workshop as soon as
possible.
Diesel enginepreheater
See method for starting the engine.
See "Driving".
Fuel low
When it comes on perma-
nently on level ground, you
have about 8 l of fuel left.
Depending on your driving style and your engine, you have enough fuel
left to drive approximately 30 miles (50 km). You must fi ll up as soon as
possible.
The fuel tank has a capacity of about
72 litres.
Be careful to never drive until you run
out of fuel; it could damage the emis-
sion control and injection systems.
Page 37 of 216
35
II
00
00A
A
INSTRUMENT PANEL
Maintenance intervals
If you use your vehicle in particu-larly diffi cult conditions, it is essen-
tialto use the service schedule for "severe conditions" comprisingshorter intervals between services.See "Maintenance and WarrantyGuide".
Reset to zero
It is reset by your CITROËN dealer
or a qualifi ed workshop after eachservice. However, if you do your
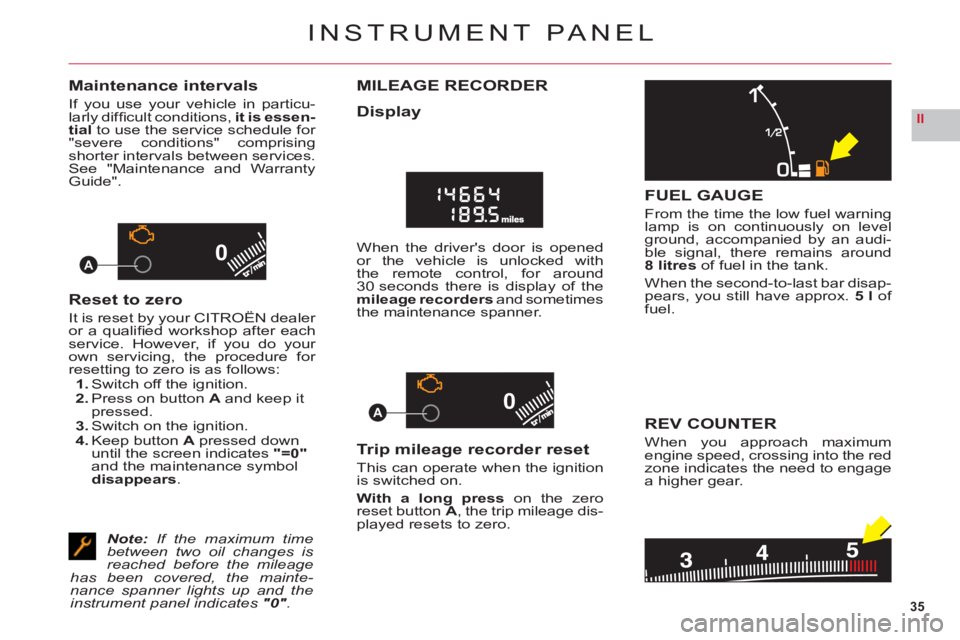
own servicing, the procedure for resetting to zero is as follows:1. Switch off the ignition.2. Press on button A and keep it pressed.3. Switch on the ignition.4. Keep buttonA pressed down until the screen indicates"=0"
and the maintenance symboldisappears.
Note:If the maximum time between two oil changes is reached before the mileage has been covered, the mainte-nance spanner lights up and the instrument panel indicates "0".
MILEAGE RECORDER
Display
When the driver's door is opened or the vehicle is unlocked with
the remote control, for around
30 seconds there is display of the mileage recorders and sometimes
the maintenance spanner.
Trip mileage recorder reset
This can operate when the ignition is switched on.
With a long press on the zero
reset buttonA, the trip mileage dis-
played resets to zero.
FUEL GAUGE
From the time the low fuel warninglamp is on continuously on levelground, accompanied by an audi-
ble signal, there remains around8 litresof fuel in the tank.
When the second-to-last bar disap-pears, you still have approx. 5 l of
fuel.
REV COUNTER
When you approach maximumengine speed, crossing into the redzone indicates the need to engage
a higher gear.
Page 40 of 216
38
II
CB
DG
FE
A
i
HEAD-UP DISPLAY
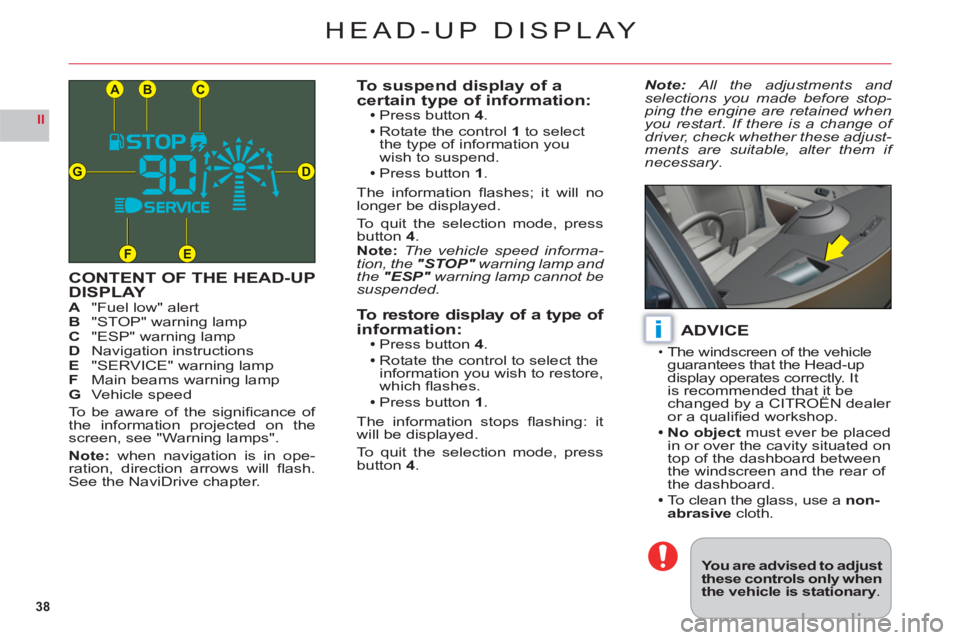
CONTENT OF THE HEAD-UPDISPLAYA"Fuel low" alertB"STOP" warning lampC "ESP" warning lampDNavigation instructionsE "SERVICE" warning lampFMain beams warning lampG Vehicle speed
To be aware of the signifi cance of
the information projected on thescreen, see "Warning lamps".
Note: when navigation is in ope-
ration, direction arrows will fl ash.See the NaviDrive chapter.
To suspend display of acertain type of information:Press button 4.
Rotate the control1 to select
the type of information you
wish to suspend.
Press button 1.
The information fl ashes; it will no longer be displayed.
To
quit the selection mode, press button4.Note: The vehicle speed informa-tion, the "STOP" warning lamp and
the "ESP" warning lamp cannot be "suspended.
To restore display of a type of information:Press button 4.
Rotate the control to select theinformation you wish to restore,
which fl ashes.
Press button 1.
The information stops fl ashing: it
will be displayed.
To quit the selection mode, press
button4.
ADVICE
The windscreen of the vehicleguarantees that the Head-up
display operates correctly. It
is recommended that it be changed by a CITROËN dealer
or a qualifi ed workshop.
No ob
ject must ever be placed
in or over the cavity situated on
top of the dashboard between
th
e windscreen and the rear of
the dashboard.To clean the glass, use anon-abrasivecloth.
•
Note: All the adjustments and selections you made before stop-ping the engine are retained whenyou restart. If there is a change of
driver, check whether these adjust-ments are suitable, alter them if necessary.
You are advised to adjustthese controls only whenthe vehicle is stationary.