light CITROEN C6 2012 Handbook (in English)
[x] Cancel search | Manufacturer: CITROEN, Model Year: 2012, Model line: C6, Model: CITROEN C6 2012Pages: 216, PDF Size: 10.23 MB
Page 111 of 216
109
III221
2
2
INTERIOR LIGHTING
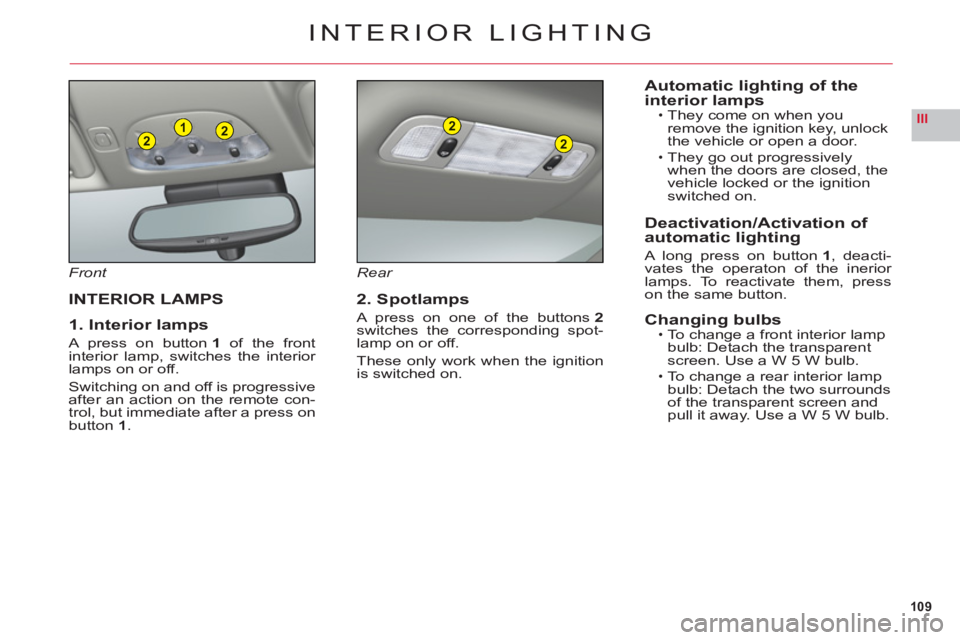
Front
INTERIOR LAMPS
1. Interior lamps
A press on button 1 of the front
interior lamp, switches the interior lamps on or off.
Switching on and off is progressiveafter an action on the remote con-
trol, but immediate after a press on
button 1.
Rear
2. Spotlamps
A press on one of the buttons2switches the corresponding spot-lamp on or off.
These only work when the ignition
is switched on.
Automatic lighting of the
interior lampsThey come on when you
remove the ignition key, unlock
the vehicle or open a door.
They go out progressively
when the doors are closed, the
vehicle locked or the i
gnitionswitched on.
Deactivation/Activation of
automatic lighting
A long press on button1, deacti-
vates the operaton of the inerior lamps. To reactivate them, presson the same button.
Changing bulbsTo change a front interior lamp
bulb: Detach the transparent
screen. Use a W 5 W bulb.
To change a rear interior lamp bulb: Detach the two surroundsof the transparent screen and pull it away. Use a W 5 W bulb.
•
•
•
•
Page 112 of 216
110
III
C
D
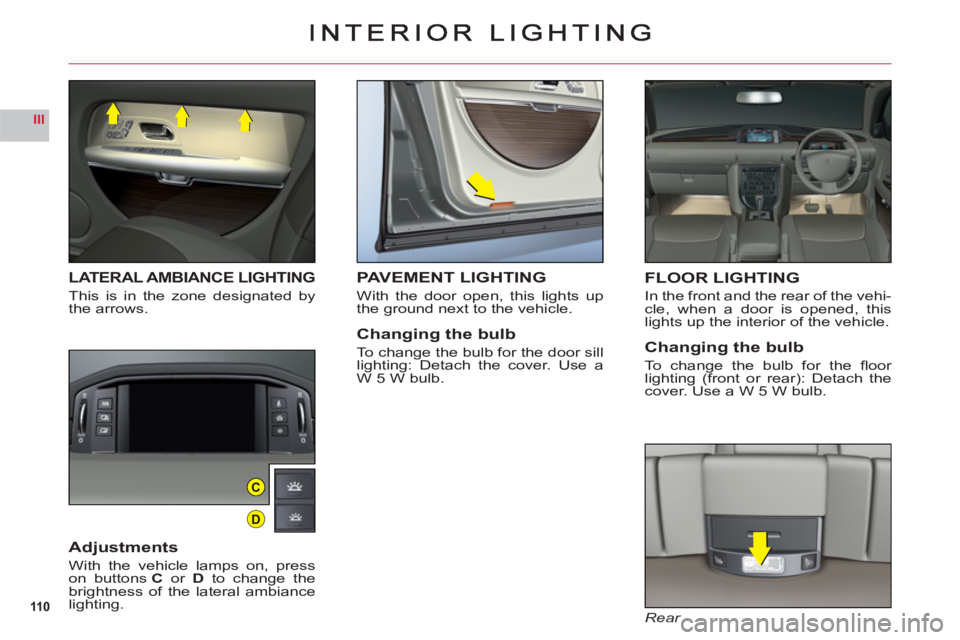
LATERAL AMBIANCE LIGHTING
This is in the zone designated bythe arrows.
Adjustments
With the vehicle lamps on, presson buttonsC or D to change the
brightness of the lateral ambiancelighting.
FLOOR LIGHTING
In the front and the rear of the vehi-cle, when a door is opened, thislights up the interior of the vehicle.
Changing the bulb
To change the bulb for the fl oor lighting (front or rear): Detach thecover. Use a W 5 W bulb.
Rear
PAVEMENT LIGHTING
With the door open, this lights up
the ground next to the vehicle.
Changing the bulb
To change the bulb for the door sill lighting: Detach the cover. Use a
W 5 W bulb.
Page 115 of 216
113
III
INTERIOR COMFORT
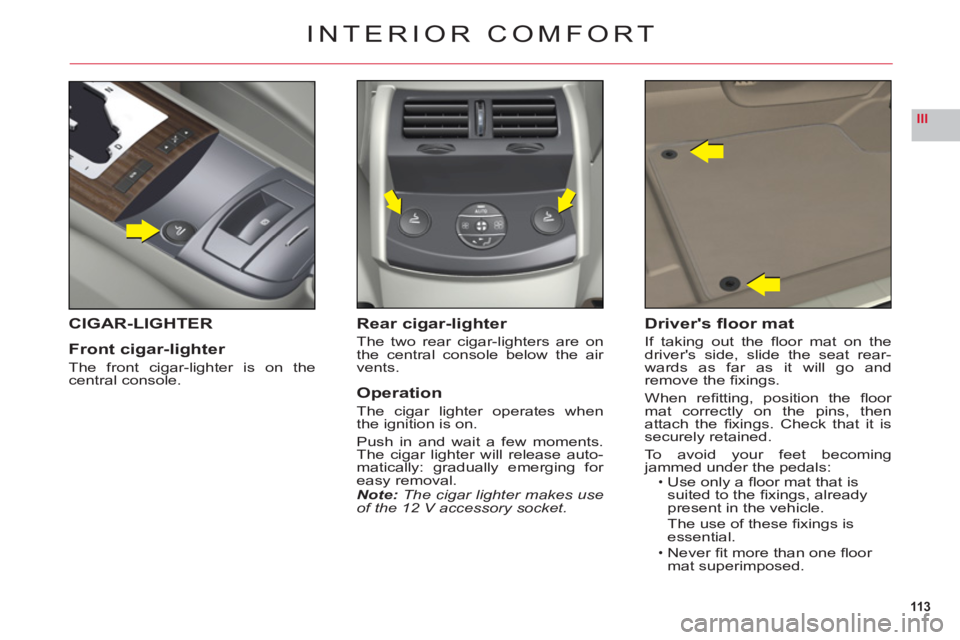
CIGAR-LIGHTER
Front ci
gar-lighter
The front cigar-lighter is on thecentral console.
Rear cigar-lighter
The two rear cigar-lighters are on
the central console below the air
vents.
Operation
The cigar lighter operates when
the ignition is on.
Push in and wait a few moments.
The cigar lighter will release auto-
matically: gradually emerging for easy removal.Note: The cigar lighter makes use
of the 12 V accessory socket.
Driver's fl oor mat
If taking out the fl oor mat on the
driver's side, slide the seat rear-
wards as
far as it will go andremove the fi xings.
When re
fi tting, position the fl oor mat correctly on the pins, then
attach the fi xings. Check that it issecurely retained.
To avoid
your feet becomingjammed under the pedals:Use only a fl oor mat that issuited to the fi xings, already present in the vehicle.
The use o
f these fi xings isessential.
Never fi t more than one fl oor
mat superimposed.
ï
ï
Page 128 of 216

126
IV
BC
A
i
12 V BATTERY
STARTING THE ENGINE WITH AN ASSISTING BATTERY
If the battery is discharged, it is possible to use either
a separate emergency battery or a battery on another
vehicle.
If you use the battery on another vehicle, stop the engine on the latter. The two vehicles must not come
into direct contact with each other.
Check that the assisting battery has suffi cient voltage (12 V).
Connect the cables according to the orderindicated in rthe diagram.
A Pole "+" on the vehicle being assisted (under the
red cover).
B Assisting battery.C Pole"–" on the assisted vehicle (under the bonnet).
Check that the leads are well secured (risk of sparks).
Start the engine of the assisting vehicle. Let the engine
run for around 1 minute at a slightly accelerated idle.
Operate the starter on the vehicle being assisted.
It is essential to follow the indicated sequencecorrectly.
Never approach with a fl ame or create sparks in the vicinity of the battery (explosive gas).
The battery contains dilute sulphuric acid which is highly corrosive.
When handling batteries, always protect your face and especially your eyes.
In the event of any contact with the skin, rinse immediately with copious amounts of fresh water.
ADVICE
Do not touch the leads during the operation.
Do not lean over the batteries.
Disconnect the cables in reverse order, making sure
they do not touch together.
Page 131 of 216
129
IV
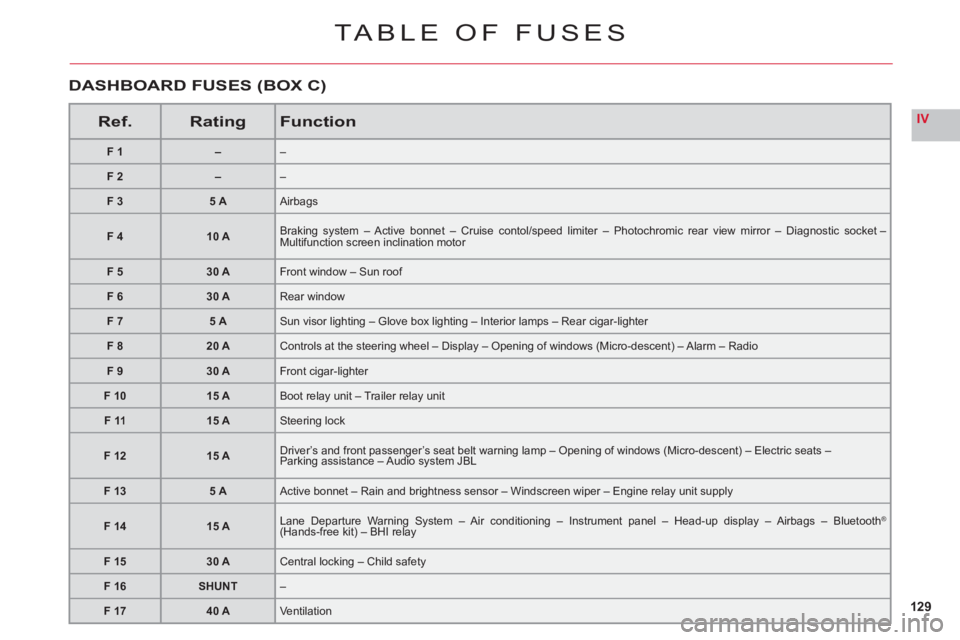
TABLE OF FUSES
Ref.RatingFunction
F1––
F2––
F 35 AAirbags
F 410 ABraking system – Active bonnet – Cruise contol/speed limiter – Photochromic rear view mirror – Diagnostic socket – Multifunction screen inclination motor
F 530 AFront window – Sun roof
F 630 ARear window
F 75 ASun visor lighting – Glove box lighting – Interior lamps – Rear cigar-lighter
F 820 AControls at the steering wheel – Display – Opening of windows (Micro-descent) – Alarm – Radio
F 930 AFront cigar-lighter
F 1015 ABoot relay unit – Trailer relay unit
F 1115 ASteering lock
F1215 ADriver’s and front passenger’s seat belt warning lamp – Opening of windows (Micro-descent) – Electric seats –Parking assistance – Audio system JBL
F 135 AActive bonnet – Rain and brightness sensor – Windscreen wiper – Engine relay unit supply
F 1415 ALane Departure Warning System – Air conditioning – Instrument panel – Head-up display – Airbags – Bluetooth® (Hands-free kit) – BHI relaygg
F 1530 ACentral locking – Child safety
F 16SHUNT–
F 1740 AVentilation
DASHBOARD FUSES (BOX C)
Page 133 of 216

131
IV
53412
G36G37G38G39G40
FUSES IN THE BOOT
FUSEBOX
To access the fusebox locatedunder the left hand wing trim:1. Move aside the trim on theLH side. See "12 V battery:Changing the battery".2. Move aside the electricalcables connecting to the
fusebox.3. Open the fusebox.
RatingFunction
F 115 AFuel fl ap
F 2––
F 3––
F 415 ASpeed-sensitive rear spoiler (defl ector)
F 540 AHeated rear screen
G 3615 A/25 ARear LH electric heated seat (Pack Lounge)/Benchseat
G 3715 A/25 ARear RH electric heated seat (Pack Lounge)/Benchseat
G 3830 ARear electric seat adjustments (Pack Lounge)
G 3930 ACigar-lighter – Rear accessory socket
G 4025 AElectric parking brake
Page 136 of 216
134
V
DEF
ACB
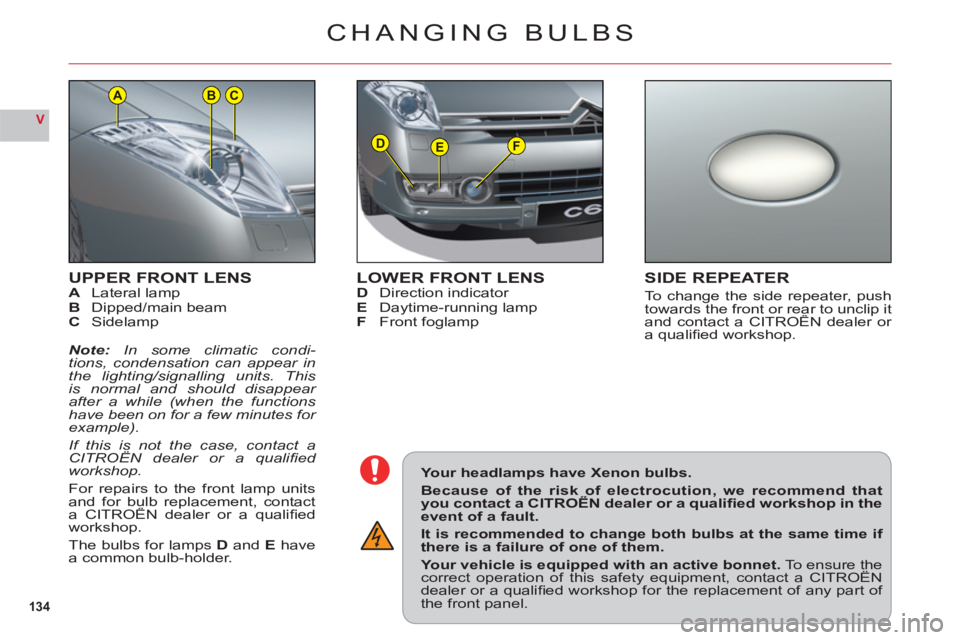
UPPER FRONT LENSALateral lampBDipped/main beamC Sidelamp
Note:In some climatic condi-tions, condensation can appear inthe lighting/signalling units. This is normal and should disappear
after a while (when the functions have been on for a few minutes for example).
If this is not the case, contact aCITROËN dealer or a qualifi ed ,
workshop.
For repairs to the front lamp unitsand for bulb replacement, contacta CITROËN dealer or a qualifi edp,
workshop.
The bulbs
for lampsD and E havea common bulb-holder.
CHANGING BULBS
Your headlamps have Xenon bulbs.
Because of the risk of electrocution, we recommend thatyou contact a CITROËN dealer or a qualifi ed workshop in the,
event of a fault.
It is recommended to change both bulbs at the same time if there is a failure of one of them.
Your vehicle is equipped with an active bonnet. To ensure thecorrect operation of this safety equipment, contact a CITROËNqpp
dealer or a qualifi ed workshop for the replacement of any part of the front panel.
LOWER FRONT LENSDDirection indicatorEDaytime-running lampFFront foglamp
SIDE REPEATER
To change the side repeater, pushtowards the front or rear to unclip itand contact a CITROËN dealer or p
a qualifi ed workshop.
Page 153 of 216
7.3
02
°
> COLOUR SCREEN
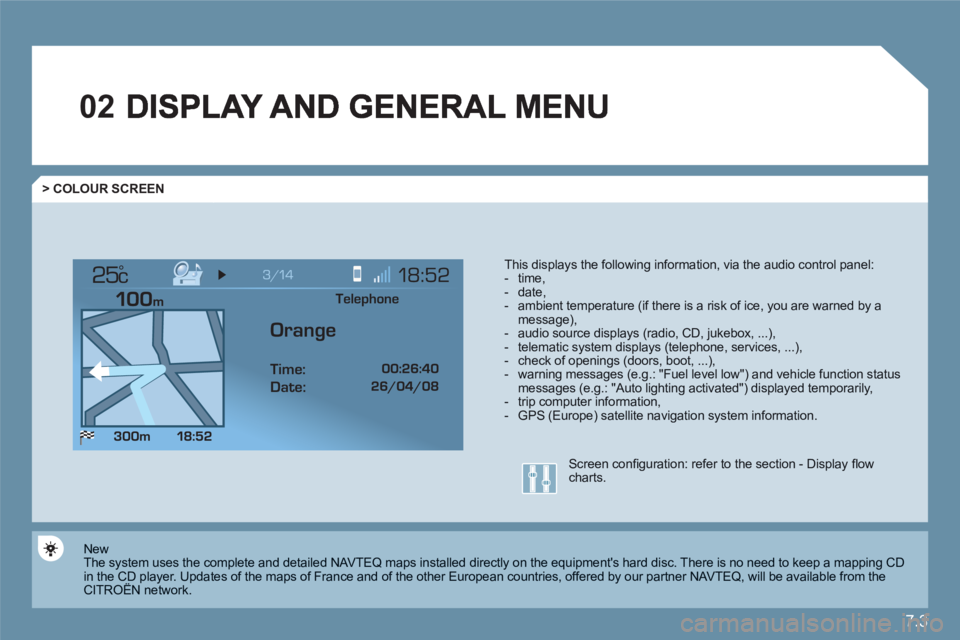
This displays the following information, via the audio control panel: - time,- date, - ambient temperature (if there is a risk of ice, you are warned by amessage),- audio source displays (radio, CD, jukebox, ...), - telematic system displays (telephone, services, ...),- check of openings (doors, boot, ...),- warning messages (e.g.: "Fuel level low") and vehicle function statusmessages (e.g.: "Auto lighting activated") displayed temporarily,- trip computer information,- GPS (Europe) satellite navigation system information.
New
The system uses the complete and detailed NAVTEQ maps installed directly on the equipment's hard disc. There is no need to keep a mapping CD in the CD player. Updates of the maps of France and of the other European countries, offered by our partner NAVTEQ, will be available from theCITROËN network. y
Screen confi guration: refer to the section - Display fl owcharts.
Telephone
Orange
Time:
Date:
Page 182 of 216
7.32
2 1
VOICE COMMANDS
DISPLAYING THE LIST AND USING THEM
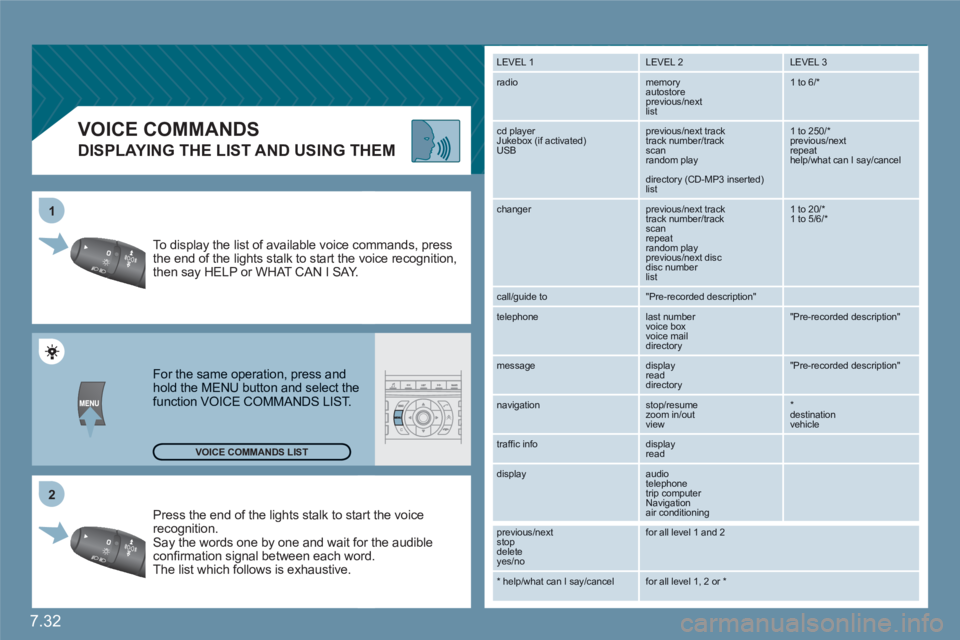
Press the end of the lights stalk to staart the voicerecognition. Say the words one by one and wait foor the audibleconfi rmation signal between each woord.
The list which follows is exhaustive.
To display the list of available voice coommands, press the end of the lights stalk to start the vvoice recognition,then say HELP or WHAT CAN I SAY.
For the same operation, press and hold the MENU button and select the function VOICE COMMANDS LIST.
LEVEL 1
LEVEL 2 LEVEL 3
radio memory autostore
previous/next list
1 to 6/*
cd player
Jukebox (if activated) USB
previous/next track
track number/track scan
random play
directory (CD-MP3 inserted) list
1 to 250/* previous/next repeat help/what can I say/cancel
changer
previous/next track
track number/track scan
repeat
random play previous/next disc disc number list
1 to 20/* 1 to 5/6/*
call/guide to
"Pre-recorded description"
telephone
last number
voice box
voice mail
directory
"Pre-recorded description"
message
display
read directory
"Pre-recorded description"
navigation
stop/resume
zoom in/out
view
*destination vehicle
traffi c info display
read
display audio
telephone
trip computer
Navigation
air conditioning
previous/next
stop delete
yes/no
for all level 1 and 2
* help/what can I say/cancel for all level 1, 2 or * VOICE COMMANDS LIST
Page 193 of 216
7.43
11
223344
55
6677
1010
111
1212131314141515
88
99
01 FIRST STEPS
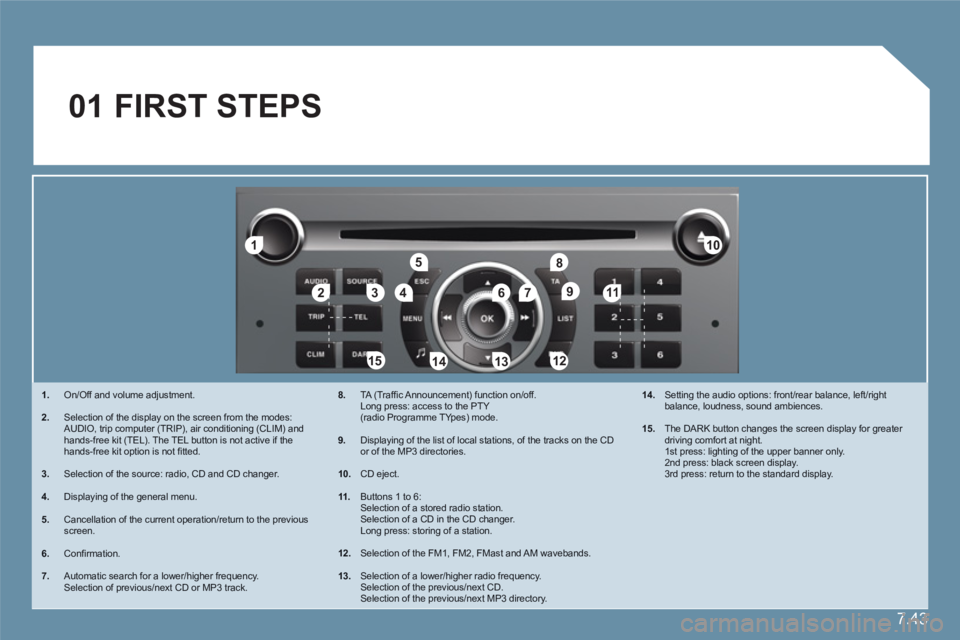
1.On/Off and volume adjustment.
2.Selection of the display on the screen from the modes:AUDIO, trip computer (TRIP), air conditioning (CLIM) and hands-free kit (TEL). The TEL button is not active if the hands-free kit option is not fi tted.
3.Selection of the source: radio, CD and CD changer.
4.Displaying of the general menu.
5.Cancellation of the current operation/return to the previous screen.
6.Confi rmation.
7.Automatic search for a lower/higher frequency. Selection of previous/next CD or MP3 track.
8. TA (Traffi c Announcement) function on/off.Long press: access to the PTY(radio Programme TYpes) mode.
9.Displaying of the list of local stations, of the tracks on the CD or of the MP3 directories.
10.
CD eject.
11 .
Buttons 1 to 6: Selection of a stored radio station. Selection of a CD in the CD changer. Long press: storing of a station.
12. Selection of the FM1, FM2, FMast and AM wavebands.
13.
Selection of a lower/higher radio frequency. Selection of the previous/next CD. Selection of the previous/next MP3 directory.
14.
Setting the audio options: front/rear balance, left/rightbalance, loudness, sound ambiences.
15.
The DARK button changes the screen display for greater driving comfort at night.1st press: lighting of the upper banner only.2nd press: black screen display.3rd press: return to the standard display.