change time CITROEN DISPATCH SPACETOURER DAG 2020 Handbook (in English)
[x] Cancel search | Manufacturer: CITROEN, Model Year: 2020, Model line: DISPATCH SPACETOURER DAG, Model: CITROEN DISPATCH SPACETOURER DAG 2020Pages: 324, PDF Size: 10.89 MB
Page 152 of 324

150
Operating fault
When the ignition is on, a message appears
in the instrument panel screen to indicate a
gearbox fault.
In this case, the gearbox switches to back-up
mode and is locked in 3
rd gear. You may feel
a substantial knock when changing from P
to R and from N to R. This will not cause any
damage to the gearbox.
Do not exceed 60 mph (100
km/h), local speed
restrictions permitting.
Have it checked by a CITROËN dealer or a
qualified workshop.
There is a risk of damage to the gearbox:
-
i
f you press the accelerator and brake
pedals at the same time (braking or
acceleration must be done only with
the right foot),
-
i
f you force the selector from position P
to another position when the battery is
flat.
To reduce fuel consumption when
stationary for long periods with the
engine running (traffic jam, etc.), position
the selector on N and apply the parking
brake. If your vehicle has an automatic gearbox,
do not try to start the engine by pushing
the vehicle.
Electronic gearbox
Electronic gearbox with 6 speeds, with
electronic management of gear changes. It
also offers a manual mode with sequential gear
changes via control paddles situated behind
the steering wheel.
Gear selector
To safely operate the gear selector, it is
recommended that you keep your foot on
the brake pedal.
Steering mounted controls
R.
Reverse.
N. Neutral. A.
Auto (automatic operation).
M. Manual (manual operation with sequential
changing of gears).
F
P
ull the right-hand "
+" or left-hand " -"
control paddle towards you to change up or
down.
The steering mounted controls do not
allow neutral to be selected and reverse
gear to be engaged or disengaged.
Driving
Page 156 of 324

154
Engine restarting (START mode)
The engine automatically restarts as soon as
the driver indicates the intention of moving off
again.
With a manual gearbox: with the clutch pedal
fully depressed.
With an automatic gearbox :
-
W
ith the selector in position D or M : with the
brake pedal released.
-
W
ith the selector in position N and the brake
pedal released: with the selector at D or M .
-
W
ith the selector in position P and the brake
pedal depressed: with the selector at R , N,
D or M .
-
R
everse gear engaged.
With an electronic gearbox :
-
W
ith the selector in position A or M : with the
brake pedal released.
-
W
ith the selector in position N and the brake
pedal released: with the selector at A or M .
-
R
everse gear engaged.
Special cases
The engine restarts automatically if all the
operating conditions are met again and in the
following cases.
-
W
ith a manual gearbox : vehicle speed
exceeds 16
mph (25 km/h) or 2 mph
(3
km/h) (depending on engine).
-
W
ith an automatic gearbox : vehicle speed
exceeds 2.5
mph (3 km/h). In these cases, this indicator lamp
flashes for a few seconds, then goes
of f.
Malfunctions
Depending on the vehicle’s equipment:
F
H
ave the vehicle checked by a CITROËN
dealer or a qualified workshop.
The vehicle stalls in STOP mode
All of the instrument panel warning lamps come
on if this fault occurs.
Depending on version, a warning message may
also be displayed, asking you to place the gear
selector in position N and to press the brake
pedal.
F
Switch off the ignition then start the engine again with the key or the " START/STOP"
button. The Stop & Start system requires a
12
V battery of specific technology and
specification.
All work concerning the battery must be
carried out only by a CITROËN dealer or a
qualified workshop.
In the event of a fault with the system,
this warning lamp flashes in the
instrument panel.
The warning lamp in this button
flashes and a message appears,
accompanied by an audible signal.
Tyre under-inflation
detection
This system automatically checks the
pressures of the tyres while driving.
It compares the information given by the wheel
speed sensors with reference values, which
must be reinitialised ever y time the tyre
pressures are adjusted or a wheel changed .
The system triggers an alert as soon as it
detects a drop in the inflation pressure of one
or more tyres.
Driving
Page 166 of 324

164
Temporarily exceeding the
programmed speed
F To temporarily exceed the programmed speed threshold, fully depress the
accelerator pedal.
The speed limiter is deactivated temporarily
and the displayed programmed speed flashes.
If it is exceeded for a prolonged period of time,
an audible warning is triggered.
Simply release the accelerator pedal to return
to below the programmed speed. When the limit speed is exceeded but this is not
due to action by the driver (in case of a steep
slope, for example), an audible signal triggers
immediately.
Once the speed of the vehicle returns to
the programmed setting, the speed limiter
functions again: the display of the programmed
speed setting becomes fixed again.
Switching off
F Turn the thumbwheel 1 to the " 0" position:
the display of information on the speed
limiter disappears.
Malfunction
To modify the limit speed setting from the
speed suggested by the vehicle Speed Limit
recognition and recommendation:
F
t
he speed suggested is displayed in the
instrument panel,
F
m
ake a first press on button 5 ; a message
is displayed to confirm the memorisation
request,
F
p
ress button 5 again to save the suggested
speed.
The speed displays immediately in the
instrument panel as the new speed setting.
The display of dashes (flashing then fixed)
indicates a fault with the speed limiter.
Have it checked by a CITROËN dealer or a
qualified workshop.
The selection screen closes after a few
moments.
This setting becomes the new limit speed.
Cruise control - particular
recommendations
For the safety of everyone, only use the
cruise control where the driving conditions
allow running at a constant speed and
keeping an adequate safety distance.
Remain vigilant
when the cruise control
is activated. If you hold one of the speed
setting modification buttons, a very rapid
change in the speed of your vehicle may
o c c u r.
When descending a steep hill , the cruise
control system cannot prevent the vehicle
from exceeding the set speed. Brake if
necessary to control the speed of your
vehicle.
On steep climbs or when towing, the set
speed may not be reached or maintained.
Driving
Page 183 of 324

181
As soon as reverse gear is engaged with the
engine running, this system displays views of
your vehicle’s close surroundings on the touch
screen using a camera located at the rear of
the vehicle.
The screen is divided into two parts: on the left,
a contextual view ; on the right, a view from
above the vehicle in its close surroundings. Different contextual views can be displayed in
the left-hand part:
-
s
tandard view,
-
1
80° view,
-
z
oom view.
AUTO mode is activated by default.
In this mode, the system chooses the best view
to display (standard or zoom) according to the
information transmitted by the parking sensors.
You can change the type of view at any time
during a manoeuvre.
The state of the function is not saved when the
ignition is switched off.
Principle of operation
An image from above your vehicle in its close
surroundings is reconstructed (represented
between the blue brackets) in real time and as
the manoeuvre progresses.
This representation facilitates the alignment of
your vehicle when parking and allows obstacles
close to the vehicle to be seen.
This image is automatically deleted if the
vehicle remains stationary for too long.
The parking sensors supplement the
information on the view from above the vehicle.
The display disappears above
approximately 6 mph (10
km/h).
The system is automatically deactivated
about 7 seconds after coming out of
reverse or on opening a door or the boot.
Activation
Activation is automatic on engaging reverse at
a speed lower than 6 mph (10 km/h).
Using the rear camera, the vehicle's
surroundings are recorded during manoeuvres
at low speed.
6
Driving
Page 184 of 324

182
When the sub-menu is displayed, select one of
the four views: You can choose the display mode at any time
by pressing on this area."Standard view".
"180° view".
"Zoom view".
"AUTO m o de".
The function will be deactivated:
-
I
f a trailer is attached or a bicycle
carrier is fitted on a towing device
(vehicle fitted with a towing device
installed in line with the manufacturer's
recommendations).
-
A
bove about 6 mph (10 km/h).
-
O
n opening the tailgate.
-
W
hen shifting out of reverse (the image
remains displayed for 7 seconds).
-
B
y pressing the red cross or the white
arrow in the top left-hand corner of the
touch screen.
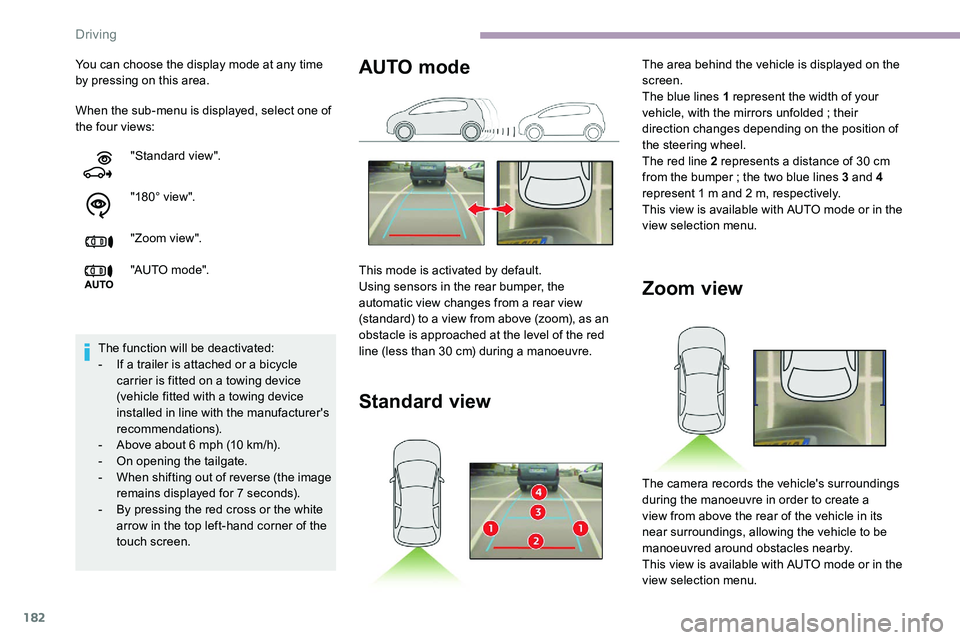
Zoom view
The camera records the vehicle's surroundings
during the manoeuvre in order to create a
view from above the rear of the vehicle in its
near surroundings, allowing the vehicle to be
manoeuvred around obstacles nearby.
This view is available with AUTO mode or in the
view selection menu.
AUTO mode
This mode is activated by default.
Using sensors in the rear bumper, the
automatic view changes from a rear view
(standard) to a view from above (zoom), as an
obstacle is approached at the level of the red
line (less than 30
cm) during a manoeuvre.
Standard view
The area behind the vehicle is displayed on the
screen.
The blue lines 1 represent the width of your
vehicle, with the mirrors unfolded ; their
direction changes depending on the position of
the steering wheel.
The red line 2 represents a distance of 30
cm
from the bumper
; the two blue lines 3 and 4
represent 1
m and 2 m, respectively.
This view is available with AUTO mode or in the
view selection menu.
Driving
Page 194 of 324

192
The fluids must comply with the
manufacturer's requirements and with the
vehicle's engine.
Take care when working under the bonnet,
as certain areas of the engine may be
extremely hot (risk of burns) and the
cooling fan could start at any time (even
with the ignition off).
Used products
Avoid prolonged contact of used oil or
fluids with the skin.
Most of these fluids are harmful to health
and very corrosive.Do not discard used oil or fluids into
sewers or onto the ground.
Empty used oil into the containers
reser ved for this purpose at a CITROËN
dealer or a qualified workshop.
Engine oil
The oil level is checked on a level
sur face with the engine stopped for
at least 30 minutes, either using the
oil level indicator in the instrument
panel when the ignition is switched
on (for vehicles equipped with an
electric gauge), or using the dipstick.
It is normal to top up the oil level between two
ser vices (or oil changes). It is recommended
that you check the level, and top up if
necessary, every 3,000
miles (5,000 km).
In order to maintain the reliability of the
engine and emissions control system,
never use additives in the engine oil.
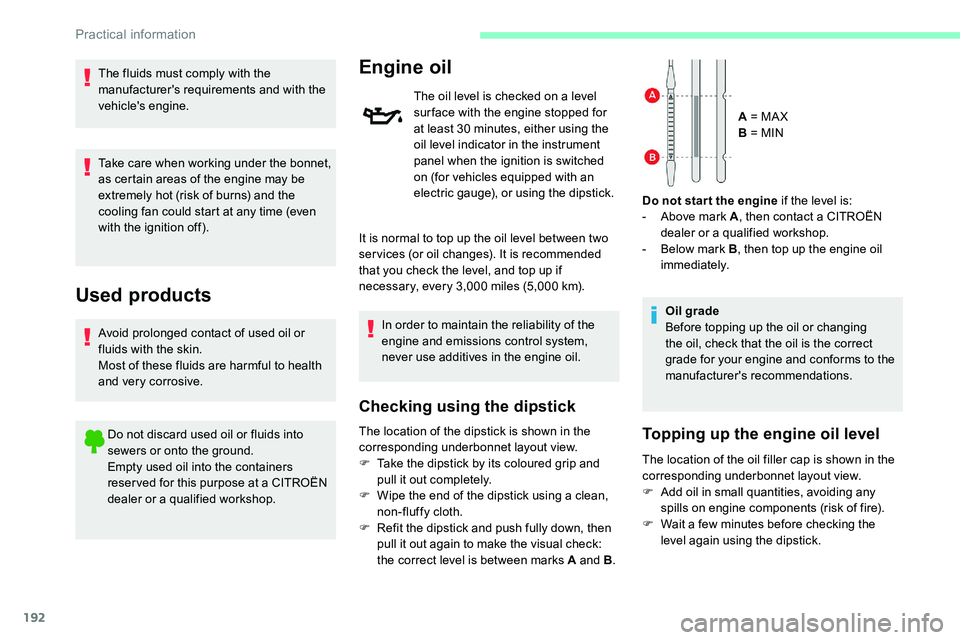
Checking using the dipstick
The location of the dipstick is shown in the
corresponding underbonnet layout view.
F
T
ake the dipstick by its coloured grip and
pull it out completely.
F
W
ipe the end of the dipstick using a clean,
non-fluffy cloth.
F
R
efit the dipstick and push fully down, then
pull it out again to make the visual check:
the correct level is between marks A and B .A = MA X
B = MIN
Do not star t the engine if the level is:
-
A
bove mark A
, then contact a CITROËN
dealer or a qualified workshop.
-
B
elow mark B
, then top up the engine oil
immediately.
Oil grade
Before topping up the oil or changing
the oil, check that the oil is the correct
grade for your engine and conforms to the
manufacturer's recommendations.Topping up the engine oil level
The location of the oil filler cap is shown in the
corresponding underbonnet layout view.
F
A
dd oil in small quantities, avoiding any
spills on engine components (risk of fire).
F
W
ait a few minutes before checking the
level again using the dipstick.
Practical information
Page 196 of 324

194
To p p i n g u p
This additive must be topped up without delay
by a CITROËN dealer or a qualified workshop.
AdBlue (BlueHDi)
An alert is triggered once the reser ve level is
reached.
For more information on the Indicators and in
particular the AdBlue range indicators, refer to
the corresponding section.
To avoid the vehicle being immobilised as per
regulations, you must top up the AdBlue tank.
For more information on AdBlue
® (BlueHDi) ,
and in particular on the supply of AdBlue, refer
to the corresponding section.
Checks
Unless otherwise indicated, check these
components in accordance with the
manufacturer's service schedule and according
to your engine.
Other wise, have them checked by a CITROËN
dealer or a qualified workshop. Only use products recommended by
CITROËN or products of equivalent quality
and specification.
In order to optimise the operation of
components as important as those in the
braking system, CITROËN selects and
offers very specific products.
12 V battery
The battery does not require any
maintenance.
However, check regularly that the
terminals are correctly tightened
(versions without quick release
terminals) and that the connections
are clean.
For more information on the precautions to
take before any work on the 12
V batter y,
refer to the corresponding section.
Versions equipped with Stop & Start are
fitted with a 12
V lead-acid battery of
specific technology and specification.
Its replacement should be carried out
only by a CITROËN dealer or a qualified
workshop.
Passenger compartment filter
Depending on the environment and
the use of the vehicle (e.g. dusty
atmosphere, city driving), change it
twice as often if necessar y .
A clogged passenger compartment
filter may have an adverse effect on
the per formance of the air conditioning
system and generate undesirable odours.
Air filter
Depending on the environment and
the use of the vehicle (e.g. dusty
atmosphere, city driving), change it
twice as often if necessar y .
Oil filter
Change the oil filter each time the
engine oil is changed.
Practical information
Page 214 of 324

212
Access to bulbs
Dipped beam headlamps
When refitting the connector and bulb
in the lamp, correctly reposition the
assembly in its housing until it clicks into
place.
Daytime running lamps
SidelampsMain beam headlamps
Direction indicators
Rapid flashing of a direction indicator
lamp (left or right) indicates that one of
the bulbs on the corresponding side has
failed.
F
P
ress the upper clip on the cover then tip it
rear wards to remove it.
F
P
ress the lower clip on the connector and
remove the connector and bulb assembly.
F
R
emove the bulb by pulling it and change it. F
P
ress the two side clips on the connector
and remove the assembly of connector and
bulb.
F
R
emove the bulb by pulling it and change it.
F
P
ress the two side clips on the connector
and remove the assembly of connector and
bulb.
F
R
emove the bulb by pulling it and change it. F
P
ress the lower clip on the connector and
remove the connector and bulb assembly.
F
R
emove the bulb by pulling it and change it.
F
T
urn the bulb holder a quarter turn anti-
clockwise.
F
P
ull out the bulb holder and replace the
faulty bulb.
In the event of a breakdown
Page 215 of 324

213
Headlamps (xenon)
1.Main beam headlamps (H1-55W).
2. Dipped beam headlamps (D8S-25W).
3. Direction indicators (PY21W-21W amber).
Be aware of the zone behind the right
lamp (vehicle direction), which may be hot
with a risk of burning (degassing hoses).
Access to bulbs Dipped beam headlamps
Replacement of D8S xenon bulbs must
be carried out by a CITROËN dealer or
a qualified workshop as there is a risk of
electrocution.
It is recommended that both D8S bulbs be
changed at the same time, in the event of
the failure of one of them.
Main beam headlamps
When refitting the connector and bulb
in the lamp, correctly reposition the
assembly in its housing until it clicks into
place.
F
P
ress the upper clip on the cover then tip it
rear wards to remove it. F
P
ress the lower clip on the connector and
remove the connector and bulb assembly.
F
R
emove the bulb by pulling it and change it.
Direction indicators
Rapid flashing of a direction indicator
lamp (left or right) indicates that one of
the bulbs on the corresponding side has
failed.
Daytime running lamps/
sidelamps
F Turn the bulb holder a quarter turn anti-
clockwise.
F
P
ull out the bulb holder and replace the
faulty bulb.
8
In the event of a breakdown
Page 241 of 324

7
DAB / FM station tracking
"DAB" does not have 100% coverage of
the country.
When the digital signal is weak,
"DAB / FM auto tracking" allows you to
continue listening to the same station,
by automatically switching to the
corresponding analogue FM station (if it
ex i st s).
When the "DAB
/ FM auto tracking" is
active, the DAB station will be selected
automatically.
Press the MENU button.
Select " Multimedia " and confirm.
Select " DAB
/ FM auto tracking"
and confirm.
If "DAB
/ FM auto tracking" tracking is
enabled, there is a lag of a few seconds
when the system switches to the analogue
FM station sometimes with a change in
volume. If the "DAB" station you are listening to
is not available on FM ("
DAB/FM" option
struck out), or if "DAB / FM auto tracking"
is not on, the sound will be cut when the
digital signal is too weak.
Media
USB port
To protect the system, do not use a USB
hub. Any additional equipment connected to
the system must conform to the standard
of the product or standard IEC 60950 -1.
Insert the USB memory stick into the USB port
or connect the USB device to the USB port
using a suitable cable (not supplied).
The system changes automatically to "USB"
source. The system builds playlists (in temporary
memory), an operation which can take from
a few seconds to several minutes at the first
connection.
Reduce the number of non-music files and the
number of folders to reduce the waiting time.
Playlists are updated every time a new USB
memory stick is connected.
When the USB port is used, the portable
device charges automatically.
Play mode
The play modes available are:
- No rmal: the tracks are played in order,
depending on the classification of the
selected files.
-
Ra
ndom: the tracks in an album or folder
are played in a random order.
-
R
andom on all media: all of the tracks
saved in the media are played in random
o r d e r.
.
Bluetooth® audio system