check CITROEN DISPATCH SPACETOURER DAG 2020 Handbook (in English)
[x] Cancel search | Manufacturer: CITROEN, Model Year: 2020, Model line: DISPATCH SPACETOURER DAG, Model: CITROEN DISPATCH SPACETOURER DAG 2020Pages: 324, PDF Size: 10.89 MB
Page 204 of 324

202
Opening
Storage
F Refit the cover on the box and clip fixings B.
F
P
osition the box with the front inclined
upwards.
F
T
o take it past bar 2 , push the box in and
down.
F
T
o take it past bar 1 , raise the box slightly
then push it fully in. F
O
nce the box is fully home
in its housing,
push it against the floor carpet then slide
latches A outwards to secure it.
Pull on the box to check that it is secure in
its housing.
Temporary puncture
repair kit
Scan the QR code on page 3 to view
explanatory videos.
Comprising a compressor and a sealant
cartridge, it allows the temporary repair of
a tyre so that you can drive to the nearest
garage. It is designed to repair most punctures
which could affect the tyre, located on the
tyre tread or shoulder.
Its compressor can be used to check and
adjust the pressure of the tyre.
Access to the kit
This kit is stowed in a tool box.
For more information on the Tool box ,
refer to the corresponding section.
List of tools
These tools are specific to the vehicle and may
vary according to the level of equipment. Do
not use them for any other purpose.
F
U
nclip fixings B on the cover, then open it
for access to the tools.
In the event of a breakdown
Page 206 of 324

204
F Connect the compressor's electrical plug to the vehicle's 12 V socket.
F
A
ffix the speed limit sticker.
The speed limit sticker must be secured
to the interior of the vehicle in the driver's
field of vision, to remind you that a wheel
is in temporary use.
F
S
tart the vehicle and leave the engine
running.
Do not start the compressor before
connecting the white pipe to the tyre valve:
the sealant product would be expelled
through the pipe.
F
S
witch on the compressor by moving
switch B to position I until the tyre pressure
reaches 2.0 bars. The sealant product is
injected under pressure into the tyre
; do not
disconnect the pipe from the valve during
this operation (risk of blowback). If after approximately seven
minutes this
pressure is not reached, this indicates
that the tyre is not repairable
; contact a
CITROËN dealer or a qualified workshop
for assistance.
F
R
emove the kit and screw the cap back
on the white pipe. Take care to avoid
contaminating the vehicle with traces of
fluid. Keep the kit to hand.
Take care, the sealant product is harmful
if swallowed and causes irritation to the
eyes.
Keep this product out of the reach of
children.
The use-by date of the fluid is marked on
the bottle.
After use, do not discard the bottle in
standard waste, take it to a CITROËN
dealer or an authorised waste disposal
site.
Do not forget to obtain a new bottle of
sealant, available from a CITROËN dealer
or a qualified workshop.
Inflation, occasional
inflation and checking
pressure
F Drive immediately for approximately three miles (five kilometres), at reduced
speed (between 12 and 37
mph (20 and
60
km/h)), to plug the puncture.
F
S
top to check the repair and measure the
tyre pressure using the kit.
In the event of a breakdown
Page 207 of 324
205
F Turn selector A to the "Inflation" position.
F
U
ncoil the white pipe G fully.
F
C
onnect the white pipe to the
valve of the repaired wheel.
F
C
onnect the compressor's electrical plug to
the vehicle's 12
V socket again.
F
S
tart the vehicle and leave the engine
running.
As soon as possible, go to a CITROËN
dealer or a qualified workshop.
You must inform the technician that this kit
was used. After inspection, the technician
will tell you whether the tyre can be
repaired or if it must be replaced.
F
A
djust the pressure using the compressor
(to inflate: switch B in position " I"
; to
deflate: switch B
in position " O" and press
button
C ), in accordance with the vehicle's
tyre pressure label, located on the driver’s
door aperture.
A significant loss of pressure indicates that
the puncture has not been fully plugged
;
contact a CITROËN dealer or a qualified
workshop for assistance.
F
R
emove the kit and stow it. F
D rive at reduced speed (50 mph
(80
km/h) max.) limiting the distance
travelled to approximately 125
miles
(2 0 0
k m).
It is also possible to use the compressor,
without injecting sealant, to check and, if
necessary, adjust the tyre pressures.
If after 7
minutes this pressure is not
reached, this indicates that the tyre is not
repairable
; contact a CITROËN dealer or
a qualified workshop for assistance.
Do not drive more than 125
miles (200 km)
with a repaired tyre
; contact a CITROËN
dealer or a qualified workshop to change
the tyre.
Should the pressure of one or more tyres
be adjusted, it is necessary to reinitialise
the under-inflation detection system.
For more information on Tyre under-
inflation detection , refer to the
corresponding section.Removing the pipe and
cartridge
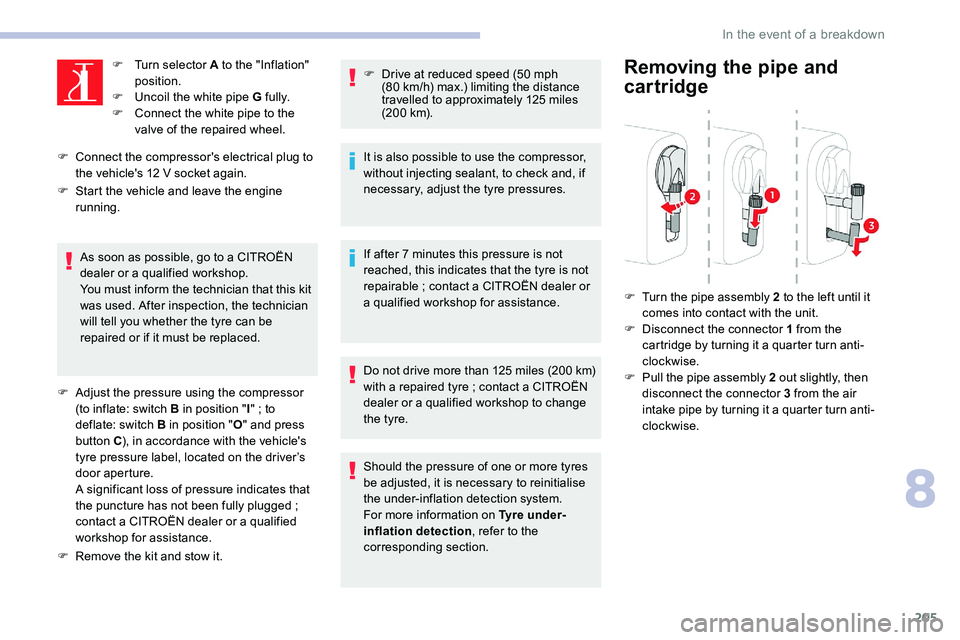
F Turn the pipe assembly 2 to the left until it comes into contact with the unit.
F
D
isconnect the connector 1 from the
cartridge by turning it a quarter turn anti-
clockwise.
F
P
ull the pipe assembly 2 out slightly, then
disconnect the connector 3 from the air
intake pipe by turning it a quarter turn anti-
clockwise.
8
In the event of a breakdown
Page 210 of 324

208
Tyre in the carrier
If you want to change the size of the tyre on the
spare wheel, follow the instructions below.A punctured tyre of size 215 or 225 can be
placed in the carrier.
Removing a wheel
Parking the vehicle
Immobilise the vehicle where it does not
block traffic: the ground must be level,
stable and non-slippery.
With a manual gearbox, engage first gear
then switch off the ignition to block the
wheels.
With an automatic gearbox, place the gear
selector in position
P then switch off the
ignition to block the wheels.
With an electronic gearbox, place the gear
selector in position
A then switch off the
ignition to block the wheels.
Apply the parking brake and check that
the warning lamp is on in the instrument
panel.
The occupants must get out of the vehicle
and wait where they are safe.
Never go underneath a vehicle raised
using a jack
; use an axle stand.
F
E
ngage the carrier on the hook, then tighten
the bolt using the wheelbrace until the bolt
is fully tightened.
Original tyre size XS - M XL
215/65 R16 Placing a
225 wheel in the carrier is prohibited.
There is no restriction.
215/60 R17
215/60 R17 M&S
2 2 5 / 5 5 R17
Placing a
215 wheel
in the
carrier is not
recommended (risk of noise).
F With a steel wheel, remove the bolt cover using tool 3 or the trim by hand.
F
W
ith an alloy wheel, remove the cap from
each of the bolts using tool
3.
F
I
f the vehicle is so equipped, fit security
bolt socket
4 to wheelbrace 1 to slacken the
security bolt.
F
S
lacken (without removing) the other wheel
bolts using just wheelbrace
1.
F
P
lace the foot of the jack on the ground
and ensure that it is directly below jacking
point
A or B provided on the underbody,
whichever is closest to the wheel to be
changed.
In the event of a breakdown
Page 212 of 324

210
F Lower the vehicle again fully.
F F old the jack 2 and detach it.
F
I
f the vehicle is so equipped, tighten the
security bolt using the wheelbrace 1 fitted
with the security socket 4 .
F
T
ighten the other bolts using wheelbrace 1
o n l y.
F
S
tow the tools in the tool box. After changing a wheel
Stow the punctured wheel in the carrier.
Go to a CITROËN dealer or a qualified
workshop as soon as possible.
Have the punctured tyre examined. After
inspection, the technician will advise you
on whether the tyre can be repaired or if it
must be replaced. Fitting a steel or "space-saver" spare
wheel
If your vehicle is fitted with alloy wheels,
when tightening the bolts on fitting it is
normal to notice that the washers do not
come into contact with the steel or "space-
saver" spare wheel. The wheel is secured
by the conical contact of each bolt.
Some driving aid functions should be
disabled, e.g. the Active Safety Brake. If your vehicle has tyre under-inflation
detection, check the tyre pressures and
reinitialise the system.
For more information on Under-inflation
detection
, refer to the corresponding
section.
Tyre under-inflation detection
The steel spare wheel does not have a
sensor.
Wheel with hub cap
When refitting the wheel , refit the hub
cap starting by placing its notch facing the
valve and press around its edge with the
palm of your hand.
In the event of a breakdown
Page 213 of 324
211
Changing a bulb
The headlamps have polycarbonate
lenses with a protective coating:
F
d
o not clean them using a dr y or
abrasive cloth, nor with a detergent
or solvent product,
F
u
se a sponge and soapy water or a pH
neutral product,
F
w
hen using a high pressure washer
on persistent marks, do not keep the
lance directed towards the lamps or
their edges for too long, so as not to
damage their protective coating and
seals.
Changing a bulb must only be done with
the ignition off and after the lamp has
been switched off for several
minutes -
Risk of serious burns!
F
D
o not touch the bulb directly with your
fingers, use a lint-free cloth.
It is essential only to use anti-ultraviolet
(UV) type bulbs, so as not to damage the
headlamp.
Always replace a failed bulb with a new
bulb with the same type and specification. Halogen bulbs
To ensure good quality lighting, check
that the bulb is correctly positioned in its
housing.
After changing a bulb
To refit, carry out the operations in reverse
order to removal.
Close the protective cover very carefully to
guarantee the sealing of the lamps. Opening the bonnet /Access to bulbs
With the engine warm, proceed with
caution - risk of burns!
Take care with objects or clothing that
could be caught in the blades of the
engine cooling fan - risk of strangulation!
In some weather conditions (e.g. low
temperature or humidity), the presence
of misting on the internal sur face of the
glass of the headlamps and rear lamps is
normal
; it disappears after the lamps have
been on for a few
minutes.
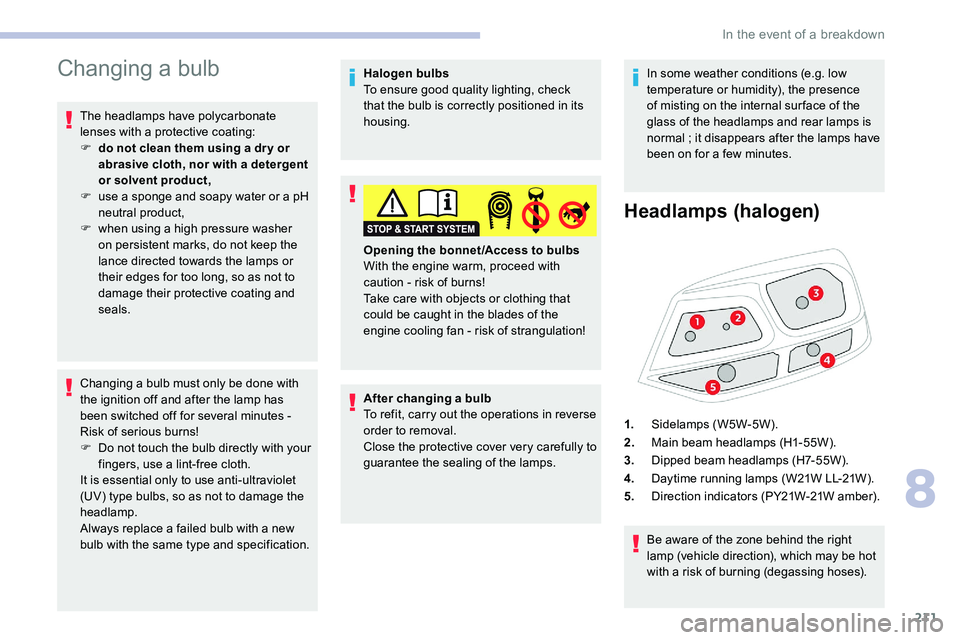
Headlamps (halogen)
Be aware of the zone behind the right
lamp (vehicle direction), which may be hot
with a risk of burning (degassing hoses).
1.
Sidelamps (W5W-5W).
2. Main beam headlamps (H1-55W).
3. Dipped beam headlamps (H7-55W).
4. Daytime running lamps (W21W LL-21W).
5. Direction indicators (PY21W-21W amber).
8
In the event of a breakdown
Page 219 of 324
217
Changing a fuse
Access to tools and to the
dashboard fusebox
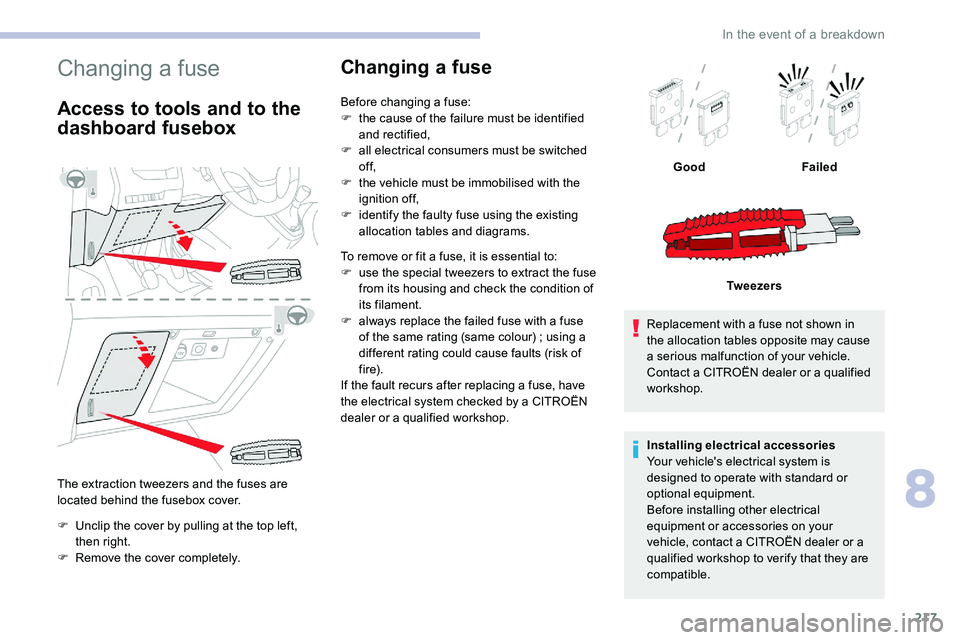
The extraction tweezers and the fuses are
located behind the fusebox cover.
F
U
nclip the cover by pulling at the top left,
then right.
F
R
emove the cover completely.
Changing a fuse
Before changing a fuse:
F t he cause of the failure must be identified
and rectified,
F
a
ll electrical consumers must be switched
of f,
F
t
he vehicle must be immobilised with the
ignition off,
F
i
dentify the faulty fuse using the existing
allocation tables and diagrams.
To remove or fit a fuse, it is essential to:
F
u
se the special tweezers to extract the fuse
from its housing and check the condition of
its filament.
F
a
lways replace the failed fuse with a fuse
of the same rating (same colour)
; using a
different rating could cause faults (risk of
f i r e).
If the fault recurs after replacing a fuse, have
the electrical system checked by a CITROËN
dealer or a qualified workshop. Replacement with a fuse not shown in
the allocation tables opposite may cause
a serious malfunction of your vehicle.
Contact a CITROËN dealer or a qualified
workshop.
Installing electrical accessories
Your vehicle's electrical system is
designed to operate with standard or
optional equipment.
Before installing other electrical
equipment or accessories on your
vehicle, contact a CITROËN dealer or a
qualified workshop to verify that they are
compatible.Good
Failed
Tw e e z e r s
8
In the event of a breakdown
Page 222 of 324

220
The battery is located under the bonnet.
F O pen the bonnet using the interior release
lever, then the exterior safety catch.
F
S
ecure the bonnet stay.
For more information on the Bonnet and
the Engine , refer to the corresponding
sections.
Starting using another
battery
When your vehicle's battery is discharged, the
engine can be started using a backup battery
(external or from another vehicle) and jump
leads or using a battery booster.
Never start the engine by connecting a
battery charger.
Never use a 24
V or higher battery
b o o s t e r.
Check beforehand that the backup
battery has a nominal voltage of 12
V and
a capacity at least equal to that of the
discharged battery.
The two vehicles must not be in contact
with each other.
Switch off all the electrical consumers
on both vehicles (audio system, wipers,
lighting, etc.).
Make sure that the jump leads are not
close to the moving parts of the engine
(fan, belt, etc.).
Do not disconnect the (+) terminal while
the engine is running.
Always replace the battery with one of
equivalent specification.
Access to the battery
F Remove the plastic cover to access the (+)
terminal, if your vehicle has one.
The battery (-) terminal is not accessible.
A remote earth point is provided at the front of
the vehicle. F
L
ift the plastic cover on the (+) terminal, if
your vehicle has one.
F
C
onnect the red cable to the (+) terminal of
flat battery A (at the metal elbow), then to
the (+) terminal of backup battery B or the
b o o s t e r.
F
C
onnect one end of the green or black
cable to the (-) terminal of backup battery B
or the booster (or to an earth point on the
assisting vehicle).
F
C
onnect the other end of the green or black
cable to earth point C on the broken down
vehicle.
F
S
tart the engine of the assisting vehicle and
leave it running for a few
minutes.
F
O
perate the starter on the broken down
vehicle and let the engine run.
If the engine does not start straight away,
switch off the ignition and wait a few moments
before trying again.
In the event of a breakdown
Page 223 of 324

221
24v 12v
F Wait for it to return to idle.
F D isconnect the jump leads in reverse
order .
F
R
efit the plastic cover to the (+) terminal, if
your vehicle has one.
F
A
llow the engine to run for at least
30
minutes, by driving or with the vehicle
stationary, so that the battery reaches an
adequate state of charge.
To disconnect, proceed in reverse order.
Some functions, including Stop & Start,
are not available if the battery is not
sufficiently charged.
Charging the battery using
a battery charger
For optimum ser vice life of the battery, it is
essential to maintain an adequate state of
charge.
In some circumstances, it may be necessary to
charge the battery:
-
i
f you only use your vehicle for short
journeys,
-
i
f the vehicle is to be taken off the road for
several weeks.
Contact a CITROËN dealer or a qualified
workshop. If you wish to charge your vehicle's battery
yourself, use only a charger compatible
with lead-acid batteries with a nominal
voltage of 12
V.
Follow the instructions provided by the
manufacturer of the charger.
Never reverse polarities.
It is not necessary to disconnect the
battery.
F
S
witch off the ignition.
F
S
witch off all electrical consumers (audio
system, lighting, wipers, etc.). F
E
nsure that the charger cables are in good
condition.
F
I
f your vehicle has one, lift the plastic cover
on the (+) terminal.
F
C
onnect the cables of charger B as follows:
-
t
he positive (+) red cable to the (+)
terminal of battery A ,
-
t
he negative (-) black cable to earth
point C on the vehicle.
F
A
t the end of the charging operation, switch
off charger B before disconnecting the
cables from battery A .
F
S
witch off charger B before connecting the
cables to the battery, so as to avoid any
dangerous sparks. If this label is present, it is essential to
use only a 12
V charger to avoid causing
irreversible damage to the electrical
components related to the Stop & Start
system.
Never try to charge a frozen battery - risk
of explosion!
If the battery has frozen, have it checked
by a CITROËN dealer or by a qualified
workshop who will check that the internal
components have not been damaged and
that the container has not cracked, which
would mean a risk of toxic and corrosive
acid leaking.
8
In the event of a breakdown
Page 244 of 324
10
Connecting Apple® players
Connect the Apple® player to the USB port
using a suitable cable (not supplied).
Play starts automatically.
Control is via the audio system.
The classifications available are those of the
portable device connected (artists
/ albums /
genres
/ playlists).
The version of software in the audio system
may not be compatible with the generation of
your Apple
® p l aye r.
Information and advice
The CD player can play files with “.mp3”,
“.wma”, “.wav” and “.aac” file extensions, with a
bit rate of 32 to 320 Kbps.
It also supports TAG mode (ID3 tag, WMA
TAG) .
No other file types (“.mp”4, etc.) can be read.
Files of the ".wma" type should be to the wma
9 standard.
The sampling rates supported are 11, 22, 44
and 48 kHz. No other file types (“.mp4”, etc.) can be read.
Files of the ".wma" type should be to the wma
9 standard.
The sampling rates supported are 11, 22, 44
and 48 kHz.
File names should have fewer than 20
characters, avoiding special characters (e.g.
«
? ; ù) so as to avoid any reading or display
problems.
In order to be able to play a burned CDR or
CDRW, select standards ISO 9660 level 1, 2, or
Joliet, if possible, when burning the CD.
If the disc is burned in another format, it may
not be played correctly.
It is recommended that the same burning
standard be always used on an individual disc,
with the lowest speed possible (4x maximum)
for the best acoustic quality.
In the particular case of a multi-session CD, the
Joliet standard is recommended.
To protect the system, do not use a USB hub.
Use only USB memory sticks formatted
FAT 32 (File Allocation Table).
Via the USB port, the system can play audio
files with the extension ".mp3”, “.wma”, “.wav”,
“.cbr”, “.vbr" with a bit rate of 32 to 320 Kbps. It is recommended that you use genuine
Apple
® USB cables for correct operation.
Telephone
Pairing a Bluetooth®
telephone
As a safety measure and because they
require prolonged attention on the part
of the driver, the operations for pairing
of the Bluetooth mobile telephone with
the Bluetooth hands-free system of your
audio system must be carried out with the
vehicle stationary and the ignition on.
Activate the telephone's Bluetooth
function and ensure that it is "visible to all"
(telephone configuration).
The services available depend on
the network, the SIM card and the
compatibility of the Bluetooth telephone
used.
Check the instructions for your telephone
and with your ser vice provider for the
ser vices to which you have access.
Bluetooth® audio system