CITROEN DISPATCH SPACETOURER DAG 2021 Handbook (in English)
Manufacturer: CITROEN, Model Year: 2021, Model line: DISPATCH SPACETOURER DAG, Model: CITROEN DISPATCH SPACETOURER DAG 2021Pages: 324, PDF Size: 10.52 MB
Page 201 of 324
199
Practical information
7In wintry conditions, ensure that the temperature
of the vehicle is above -11°C. Otherwise the
AdBlue
® may be frozen and so cannot be poured
into the tank. Park the vehicle in a warmer area
for a few hours to allow the top-up to be carried
out.
Never pour the AdBlue® into the Diesel
fuel tank.
If any AdBlue® is splashed, or if there are
any spillages on the bodywork, rinse
immediately with cold water or wipe with a
damp cloth.
If the fluid has crystallised, clean it off using a
sponge and hot water.
Important: in the event of a top-up after
a breakdown because of a lack of
AdBlue, it is essential to wait around 5
minutes before switching on the ignition,
without opening the driver’s door,
unlocking the vehicle, inserting the key
into the ignition switch, or bringing the
key for the "Keyless Entry and Starting"
system into the passenger compartment.
Switch on the ignition, then wait for 10
seconds before starting the engine.
►
Switch off the ignition and remove the key
from the switch to switch off the engine.
or ►
With Keyless Entry and Starting, press the
"
START/STOP" button to switch off the engine.
Accessing the AdBlue® tank
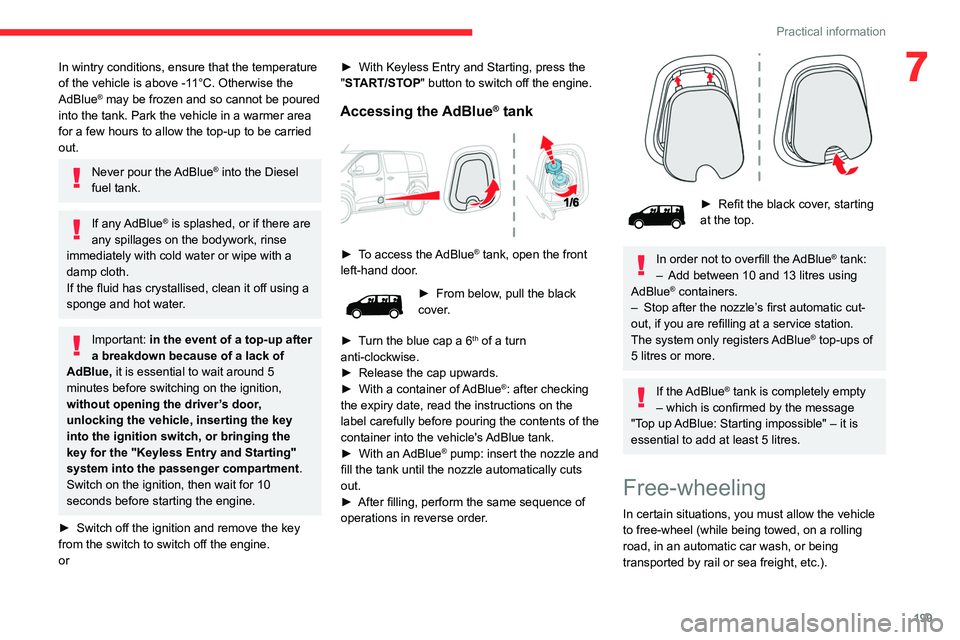
► To access the AdBlue® tank, open the front
left-hand door.
► From below , pull the black
cover.
►
T
urn the blue cap a 6
th of a turn
anti-clockwise.
►
Release the cap upwards.
►
With a container of
AdBlue
®: after checking
the expiry date, read the instructions on the
label carefully before pouring the contents of the
container into the vehicle's AdBlue tank.
►
With an
AdBlue® pump: insert the nozzle and
fill the tank until the nozzle automatically cuts
out.
►
After filling, perform the same sequence of
operations in reverse order
.
► Refit the black cover , starting
at the top.
In order not to overfill the AdBlue® tank:
–
Add between 10 and 13 litres using
AdBlue® containers.
–
Stop after the nozzle’ s first automatic cut-
out, if you are refilling at a service station.
The system only registers AdBlue
® top-ups of
5
litres or more.
If the AdBlue® tank is completely empty
– which is confirmed by the message
"Top up
AdBlue: Starting impossible" – it is
essential to add at least 5 litres.
Free-wheeling
In certain situations, you must allow the vehicle
to free-wheel (while being towed, on a rolling
road, in an automatic car wash, or being
transported by rail or sea freight, etc.).
Page 202 of 324

200
Practical information
Keyless Entry and Starting
You must not depress the brake pedal
while switching the ignition on again, then
switching it off. If you do, the engine will start,
requiring you to restart the procedure.
Advice on care and maintenance
General recommendations
Observe the following recommendations to avoid
damaging the vehicle.
Exterior
Never use a high-pressure jet wash in
the engine compartment - risk of
damaging the electrical components!
Do not wash the vehicle in bright sunshine or
extremely cold conditions.
When washing the vehicle in an
automatic roller-brush car wash, be sure
to lock the doors and, depending on version,
move the electronic key away and deactivate
the “hands-free” function (Hands-Free
Access).
When using a pressure washer, hold the
lance at least 30 cm from the vehicle
(particularly when cleaning areas containing
chipped paint, sensors or seals).
The procedure varies according to the type of
gearbox and parking brake.
With manual or automatic
gearbox and manual parking
brake
/
To release them
► With the vehicle stationary and engine
running, depress the brake pedal.
►
With a manual gearbox, place the gear lever
into neutral.
►
With an automatic gearbox, place the gear
selector to mode
N.
►
Release the parking brake.
►
Release the brake pedal, then switch off the
ignition.
With a manual gearbox and
electric parking brake
/
To release them
► With the engine running and while depressing
the brake pedal, move the gear selector to the
neutral position.
►
While depressing the brake pedal, switch off
the ignition. ►
Release the brake pedal, then switch on the
ignition again.
►
While depressing the brake pedal, press the
control lever to release the parking brake.
►
Release the brake pedal, then switch off the
ignition.
Reverting to normal operation
► While depressing the brake pedal, restart the
engine.
With an automatic gearbox
and electric parking brake
/
To release them
► With the engine running and while depressing
the brake pedal, set the gear selector to N
.
►
While depressing the brake pedal, switch off
the ignition.
►
Release the brake pedal, then switch on the
ignition again.
►
While depressing the brake pedal, press the
control lever to release the parking brake.
►
Release the brake pedal, then switch off the
ignition.
Reverting to normal operation
► While depressing the brake pedal, restart the
engine.
With drive selector (Electric)
and electric parking brake
/
Release procedure
► With the vehicle stationary and the engine
running, depress the brake pedal and select
mode
N.
Within 5
seconds:
►
Depress and hold the brake pedal, then
observe this order: switch off the ignition and
move the push selector forwards or backwards.
►
Release the brake pedal, then switch on the
ignition again.
►
Place your foot on the brake and press the
electric parking brake control to release it.
►
Release the brake pedal, then switch off the
ignition.
A message is displayed on the instrument panel to confirm the unlocking
of the wheels for 15 minutes.
In Wash mode, a message may appear on
the instrument panel to indicate that the audio
system cannot be updated.
Reverting to normal operation
► While depressing the brake pedal, restart the
engine.
Page 203 of 324
201
Practical information
7Keyless Entry and Starting
You must not depress the brake pedal
while switching the ignition on again, then
switching it off. If you do, the engine will start,
requiring you to restart the procedure.
Advice on care and maintenance
General recommendations
Observe the following recommendations to avoid
damaging the vehicle.
Exterior
Never use a high-pressure jet wash in
the engine compartment - risk of
damaging the electrical components!
Do not wash the vehicle in bright sunshine or
extremely cold conditions.
When washing the vehicle in an
automatic roller-brush car wash, be sure
to lock the doors and, depending on version,
move the electronic key away and deactivate
the “hands-free” function (Hands-Free
Access).
When using a pressure washer, hold the
lance at least 30 cm from the vehicle
(particularly when cleaning areas containing
chipped paint, sensors or seals).
Promptly clean up any stains containing
chemicals liable to damage the vehicle's paint
(including tree resin, bird droppings, insect
secretions, pollen and tar).
If justified by the environment, clean the
vehicle frequently to remove salty deposits (in
coastal areas), soot (in industrial areas) and
mud (in wet or cold areas). These substances
can be highly corrosive.
Contact a CITROËN dealer or a qualified
workshop for advice on removing stubborn
stains requiring special products (such as tar
or insect removers).
Preferably, have paint touch-ups performed
by a CITROËN dealer or a qualified
workshop.
Interior
When washing the vehicle, never use a
water hose or high-pressure jet to clean
the interior.
Liquids carried in cups or other open
containers can spill, presenting a risk of
damage to the instruments and controls and
the controls located on the centre console. Be
vigilant!
Bodywork
High-gloss paint
Do not use abrasive products, solvents,
petrol or oil to clean the bodywork.
Never use an abrasive sponge to clean
stubborn stains - risk of scratching the
paintwork!
Do not apply polish in strong sunshine, or to
plastic or rubber parts.
Use a soft cloth and soapy water or a pH
neutral product.
Gently wipe the bodywork with a clean
microfibre cloth.
Apply polish with the vehicle clean and dry.
Comply with the instructions for use stated on
the product.
Textured paint
This type of paint reacts under the effect of
light, through variations in appearance and
finish that highlight the lines and contours of the
vehicle. Its varnish is enriched with particles that
remain visible and create a unique satin effect
with relief. Its slightly granular texture gives it a
surprising touch.
Never attempt to clean without water.
Never clean your vehicle in an automatic
roller-brush car wash.
Page 204 of 324
202
Practical information
Never select the programme with hot wax
finish.
Never use high-pressure lances equipped
with brushes - risk of scratching paint!
Never apply glossy polish or preservatives to
the bodywork or alloy wheels; these products
irreversibly reveal glossy or spotted areas.
Choose high-pressure wash, or at least
high-flow water jet.
Rinse the vehicle with demineralised water.
Only a clean microfibre cloth
is recommended
for wiping the vehicle; pass it over the vehicle
without rubbing.
Carefully wipe off any fuel spilt on the
bodywork using a soft cloth, then allow to dry.
Clean off minor marks (for example, finger
marks), using a maintenance product
recommended by CITROËN.
Decals
(Depending on version)
Do not use a high-pressure washer to
clean the vehicle - risk of damaging or
detaching the decals!
Use a high-flow hose (temperature
between 25°C and 40°C).
Place the jet of water perpendicular to the
surface to be cleaned.
Rinse the vehicle with demineralised water.
Leather
Leather is a natural product. Appropriate regular
care is essential for its durability.
It must be protected and nourished using a
specific leather product, to keep it supple and
preserve its original appearance.
Do not clean leather using unsuitable
cleaning agents such as solvents,
detergents, petrol or pure alcohol.
When cleaning items partly made from
leather, take care not to damage the other
materials with the specific leather product.
Before cleaning greasy stains or liquids,
quickly mop up any surplus.
Before cleaning, wipe off any residues liable
to scuff the leather, using a cloth that has
been dampened with demineralised water
and thoroughly wrung out.
Clean leather using a soft cloth moistened
with soapy water or a pH-neutral product.
Dry with a soft, dry cloth.
Page 205 of 324
203
In the event of a breakdown
8Warning triangle
This reflective and dismantlable device is to be
installed on the side of the road when a vehicle
is broken down or damaged.
Before getting out of the vehicle
Turn on the hazard warning lamps, then
put on the safety vest to assemble and install
the triangle.
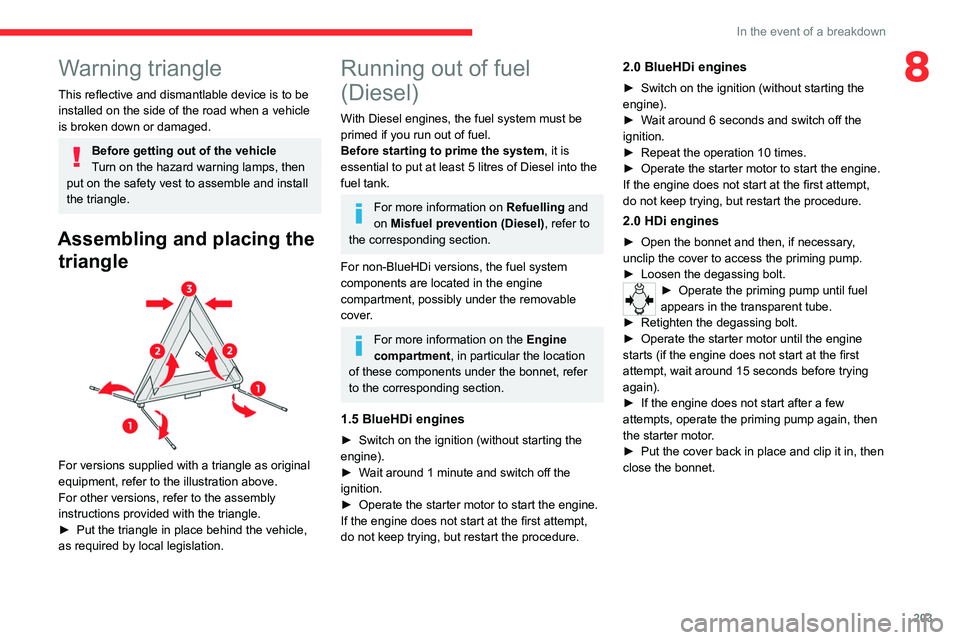
Assembling and placing the triangle
For versions supplied with a triangle as original
equipment, refer to the illustration above.
For other versions, refer to the assembly
instructions provided with the triangle.
►
Put the triangle in place behind the vehicle,
as required by local legislation.
Running out of fuel
(Diesel)
With Diesel engines, the fuel system must be
primed if you run out of fuel.
Before starting to prime the system, it is
essential to put at least 5 litres of Diesel into the
fuel tank.
For more information on Refuelling and
on Misfuel prevention (Diesel), refer to
the corresponding section.
For non-BlueHDi versions, the fuel system
components are located in the engine
compartment, possibly under the removable
cover.
For more information on the Engine
compartment, in particular the location
of these components under the bonnet, refer
to the corresponding section.
1.5 BlueHDi engines
► Switch on the ignition (without starting the
engine).
►
W
ait around 1 minute and switch off the
ignition.
►
Operate the starter motor to start the engine.
If the engine does not start at the first attempt,
do not keep trying, but restart the procedure.
2.0 BlueHDi engines
► Switch on the ignition (without starting the
engine).
►
W
ait around 6 seconds and switch off the
ignition.
►
Repeat the operation 10
times.
►
Operate the starter motor to start the engine.
If the engine does not start at the first attempt,
do not keep trying, but restart the procedure.
2.0 HDi engines
► Open the bonnet and then, if necessary ,
unclip the cover to access the priming pump.
►
Loosen the degassing bolt.
► Operate the priming pump until fuel
appears in the transparent tube.
►
Retighten the degassing bolt.
►
Operate the starter motor until the engine
starts (if the engine does not start at the first
attempt, wait around 15
seconds before trying
again).
►
If the engine does not start after a few
attempts, operate the priming pump again, then
the starter motor
.
►
Put the cover back in place and clip it in, then
close the bonnet.
Page 206 of 324

204
In the event of a breakdown
► Once the box is fully home in its housing,
push it against the floor carpet then slide latches
A outwards to secure it.
Pull on the box to check that it is secure
in its housing.
Temporary puncture repair kit
Scan the QR Code on page 3 to view
explanatory videos.
Made up of a compressor and a sealant
cartridge, it allows you to carry out a temporary
repair of the tyre so that you can drive to the
nearest garage.
It is designed to repair most punctures located
on the tyre tread.
Its compressor can be used to check and
adjust the pressure of the tyre.
Tool box
Access
The tool box is located under the left-hand front
seat.
As a safety measure, bars 1 and 2 prevent the box escaping from its
housing, if it is not correctly secured.
Removing
► Press latches A and slide them inwards to
release the box.
►
T
o take it past bar 1, raise the box slightly
then pull it as far as it will go.
► Then, lift the box upwards to take it past bar
2 .
Opening
► Unclip fixings B on the cover, then open it for
access to the tools.
Storage
► Refit the cover on the box and clip fixings B .
► Position the box with the front inclined
upwards.
►
T
o take it past bar 2, push the box in and
down.
►
T
o take it past bar 1, raise the box slightly
then push it fully in.
Page 207 of 324

205
In the event of a breakdown
8
► Once the box is fully home in its housing,
push it against the floor carpet then slide latches
A outwards to secure it.
Pull on the box to check that it is secure
in its housing.
Temporary puncture repair kit
Scan the QR Code on page 3 to view
explanatory videos.
Made up of a compressor and a sealant
cartridge,
it allows you to carry out a temporary
repair of the tyre so that you can drive to the
nearest garage.
It is designed to repair most punctures located
on the tyre tread.
Its compressor can be used to check and
adjust the pressure of the tyre.
Access to the kit
This kit is stowed in a tool box.
For more information on the Tool box,
refer to the corresponding section.
List of tools
These tools are specific to the vehicle and may
vary according to the level of equipment. Do not
use them for any other purpose.
1. 12 V compressor.
Contains a sealant cartridge for the
temporary repair of a tyre and can also be
used for adjusting tyre pressures.
2. Towing eye.
For more information on Towing, please
refer to the corresponding section.
Tyre inflation pressures are indicated on this label.
For more information on Identification
markings, particularly this label, refer to the
corresponding section.
Composition of the kit
A. "Repair" or "Inflation" position selector.
B. On I/off O switch.
C. Deflation button.
D. Pressure gauge (in bars and psi).
Page 208 of 324
206
In the event of a breakdown
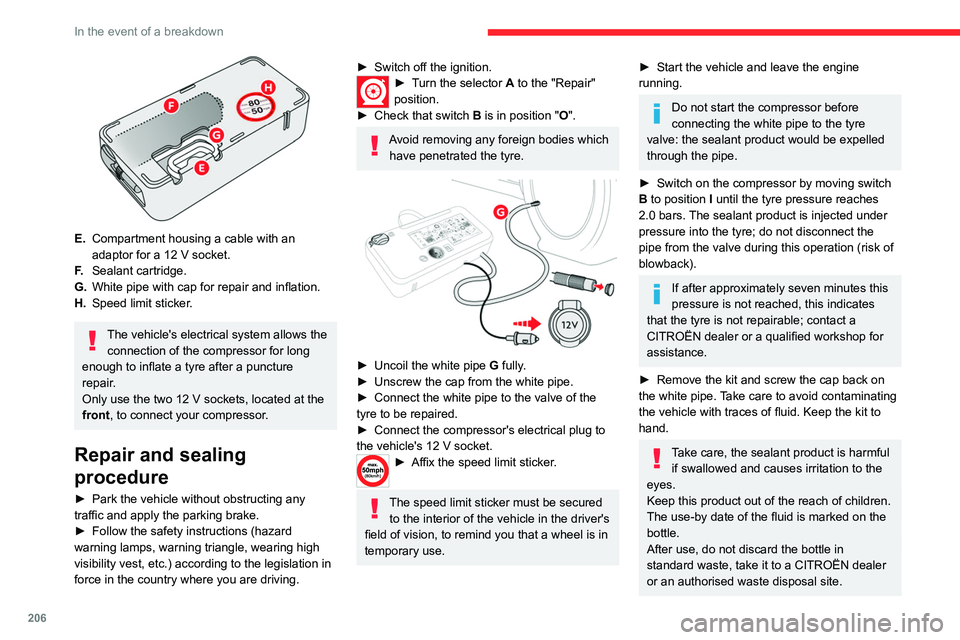
E.Compartment housing a cable with an
adaptor for a 12
V socket.
F. Sealant cartridge.
G. White pipe with cap for repair and inflation.
H. Speed limit sticker.
The vehicle's electrical system allows the
connection of the compressor for long
enough to inflate a tyre after a puncture
repair.
Only use the two 12 V sockets, located at the
front, to connect your compressor.
Repair and sealing
procedure
► Park the vehicle without obstructing any
traffic and apply the parking brake.
►
Follow the safety instructions (hazard
warning lamps, warning triangle, wearing high
visibility vest, etc.) according to the legislation in
force in the country where you are driving.
► Switch off the ignition.► Turn the selector A to the "Repair"
position.
►
Check that switch
B is in position " O".
Avoid removing any foreign bodies which
have penetrated the tyre.
► Uncoil the white pipe G fully.
► Unscrew the cap from the white pipe.
►
Connect the white pipe to the valve of the
tyre to be repaired.
►
Connect the compressor's electrical plug to
the vehicle's 12 V socket.
► Affix the speed li mit sticker.
The speed limit sticker must be secured
to the interior of the vehicle in the driver's
field of vision, to remind you that a wheel is in
temporary use.
► Start the vehicle and leave the engine
running.
Do not start the compressor before
connecting the white pipe to the tyre
valve: the sealant product would be expelled
through the pipe.
►
Switch on the compressor by moving switch
B
to position I until the tyre pressure reaches
2.0 bars. The sealant product is injected under
pressure into the tyre; do not disconnect the
pipe from the valve during this operation (risk of
blowback).
If after approximately seven minutes this
pressure is not reached, this indicates
that the tyre is not repairable; contact a
CITROËN dealer or a qualified workshop for
assistance.
►
Remove the kit and screw the cap back on
the white pipe.
Take care to avoid contaminating
the vehicle with traces of fluid. Keep the kit to
hand.
Take care, the sealant product is harmful if swallowed and causes irritation to the
eyes.
Keep this product out of the reach of children.
The use-by date of the fluid is marked on the
bottle.
After use, do not discard the bottle in
standard waste, take it to a CITROËN dealer
or an authorised waste disposal site.
Page 209 of 324
207
In the event of a breakdown
8Do not forget to obtain a new bottle of
sealant, available from a CITROËN dealer or
a qualified workshop.
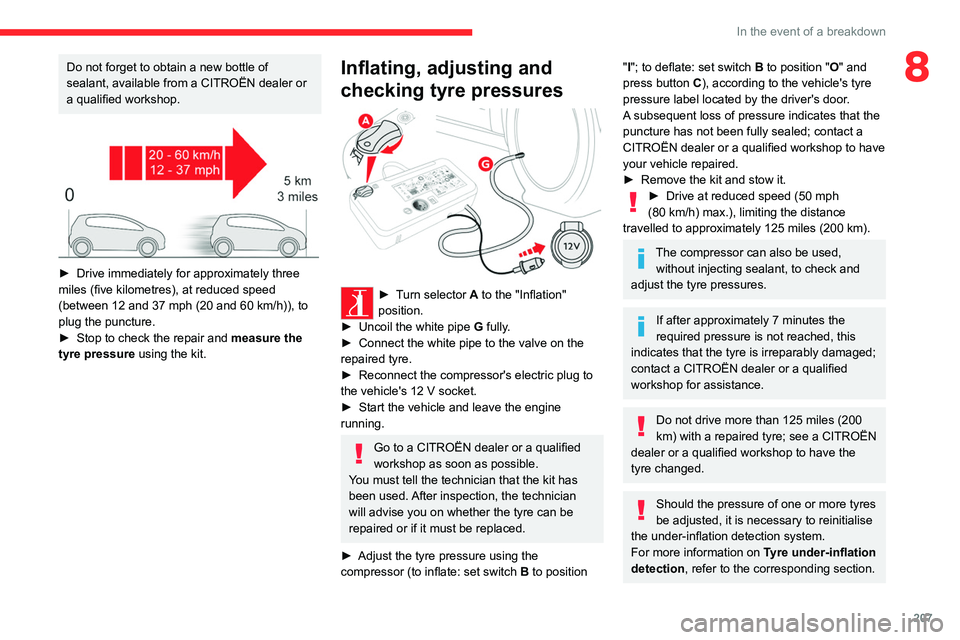
► Drive immediately for approximately three
miles (five kilometres), at reduced speed
(between 12 and 37
mph (20 and 60 km/h)), to
plug the puncture.
►
Stop to check the repair and measure the
tyre pressure using the kit.
Inflating, adjusting and
checking tyre pressures
► Turn selector A to the "Inflation"
position.
►
Uncoil the white pipe G
fully.
►
Connect the white pipe to the valve on the
repaired tyre.
►
Reconnect the compressor's electric plug to
the vehicle's 12
V socket.
►
Start the vehicle and leave the engine
running.
Go to a CITROËN dealer or a qualified
workshop as soon as possible.
You must tell the technician that the kit has
been used. After inspection, the technician
will advise you on whether the tyre can be
repaired or if it must be replaced.
►
Adjust the tyre pressure using the
compressor (to inflate: set switch
B to position
"I"; to deflate: set switch B to position "O" and
press button C), according to the vehicle's tyre
pressure label located by the driver's door.
A subsequent loss of pressure indicates that the
puncture has not been fully sealed; contact a
CITROËN dealer or a qualified workshop to have
your vehicle repaired.
►
Remove the kit and stow it.
► Drive at reduced speed (50 mph
(80 km/h) max.), limiting the distance
travelled to approximately 125 miles (200
km).
The compressor can also be used, without injecting sealant, to check and
adjust the tyre pressures.
If after approximately 7 minutes the
required pressure is not reached, this
indicates that the tyre is irreparably damaged;
contact a CITROËN dealer or a qualified
workshop for assistance.
Do not drive more than 125 miles (200
km) with a repaired tyre; see a CITROËN
dealer or a qualified workshop to have the
tyre changed.
Should the pressure of one or more tyres
be adjusted, it is necessary to reinitialise
the under-inflation detection system.
For more information on Tyre under-inflation
detection, refer to the corresponding section.
Page 210 of 324

208
In the event of a breakdown
These tools are specific to the vehicle and may vary according to the level of
equipment.
Do not use them for any other purpose.
The jack must only be used to change a wheel with a damaged or punctured tyre.
Do not use any jack other than the one
supplied with the vehicle.
If the vehicle does not have its original jack,
contact a CITROËN dealer or a qualified
workshop to obtain the one that was intended
by the manufacturer.
The jack meets European standards, as
defined in the Machinery Directive 2006/42/
CE.
The jack does not require any maintenance.
Access to the spare wheel
► Access to the spare wheel is from the rear.
► Depending on version, open the side-hinged
doors or the tailgate.
To avoid any unwanted opening of the electric side door(s), deactivate the
Hands-Free Access function in the vehicle
configuration menu.
For more information on the Hands-Free
Sliding Side Door , refer to the corresponding
section.
Removing the pipe and
cartridge
► Turn the pipe assembly 2 to the left until it
comes into contact with the unit.
►
Disconnect the connector 1
from the cartridge
by turning it a quarter turn anti-clockwise.
►
Pull the pipe assembly 2
out slightly, then
disconnect the connector 3 from the air intake
pipe by turning it a quarter turn anti-clockwise.
► Remove the pipe assembly 2 .
► Hold the compressor up vertically .
►
Unscrew the cartridge 4
from the bottom.
To fit the new cartridge and new pipe, carry out
these operations in reverse order.
Beware of fluid discharge.
The expiry date of the fluid is indicated
on the cartridge.
The sealant cartridge is designed for single
use; it must be replaced even if only partly
used.
After use, do not discard the cartridge in
standard waste, take it to a CITROËN dealer
or an authorised waste disposal site.
Do not forget to obtain a new cartridge,
available from a CITROËN dealer or a
qualified workshop.
Spare wheel
Scan the QR Code on page 3 to view
explanatory videos.
Access to the tools
The tools are stowed in a tool box.
For more information on the Tool box,
refer to the corresponding section.
List of tools
1. Wheelbrace.
Used to remove the wheel bolts and raise/
lower the jack.
2. Jack.
Used to raise the vehicle.
3. Wheel bolt cover/wheel trim removal tool.
Depending on the vehicle's equipment, this is
used to remove the wheel bolt covers on alloy
wheels or the wheel trim on steel wheels.
4. Socket for "anti-theft" wheel bolts.
Used to adapt the wheelbrace to the special
"anti-theft" bolts.
5. Towing eye.
For more information on Towing, please
refer to the corresponding section.