high beam CITROEN DS3 2018 Handbook (in English)
[x] Cancel search | Manufacturer: CITROEN, Model Year: 2018, Model line: DS3, Model: CITROEN DS3 2018Pages: 248, PDF Size: 8.79 MB
Page 89 of 248

87
Operating fault
In the event of a fault with the
s unshine sensor, the lighting comes
on, this warning lamp is displayed
in the instrument panel and/or
a
message appears in the screen,
accompanied by an audible signal.
Contact the dealer network or a
qualified
workshop.
Do not cover the sunshine sensor, linked
with the rain sensor and located in the
centre of the windscreen behind the
interior mirror, as this would disable the
associated functions.
In fog or snow, the sunshine sensor may
detect sufficient light. In this case, the
lighting will not come on automatically.
Automatic guide-me-home
lighting
When the automatic illumination of headlamps
is activated, if the ambient light level is low,
the dipped beam headlamps remain lit when
switching off the ignition.
Programming
Activation, deactivation and the
duration of the guide-me-home
lighting are set in the vehicle
configuration or parameters menu
(except monochrome screen A
where the duration is fixed: 60
s).
LED daytime running
lamps
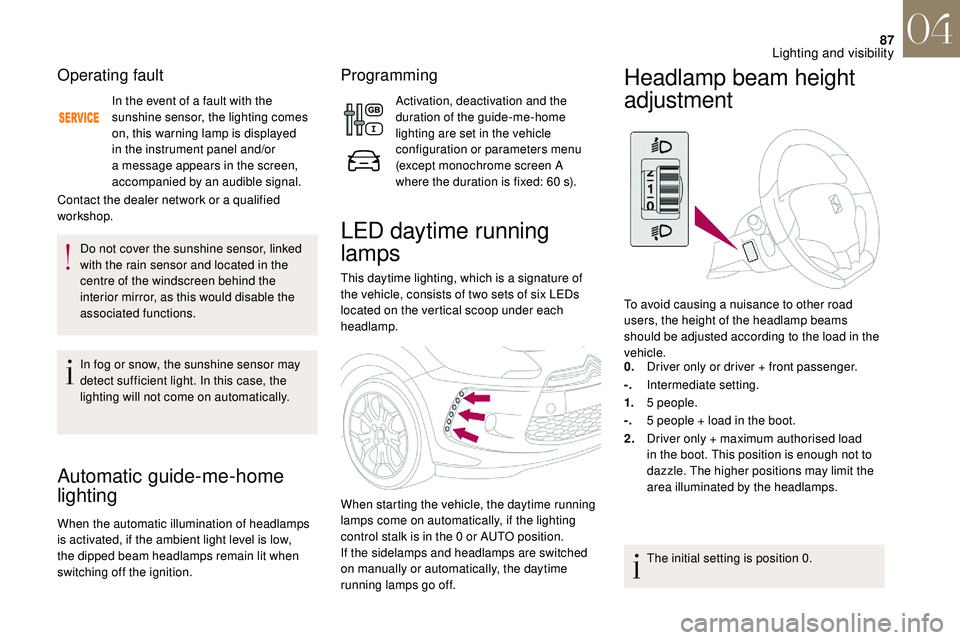
This daytime lighting, which is a signature of
t he vehicle, consists of two sets of six LEDs
located on the vertical scoop under each
headlamp.
When starting the vehicle, the daytime running
lamps come on automatically, if the lighting
control stalk is in the 0
or AUTO position.
If the sidelamps and headlamps are switched
on manually or automatically, the daytime
running lamps go off.
Headlamp beam height
adjustment
To avoid causing a nuisance to other road
u sers, the height of the headlamp beams
should be adjusted according to the load in the
vehicle.
0. Driver only or driver + front passenger.
-. Intermediate setting.
1. 5
people.
-. 5
people + load in the boot.
2. Driver only + maximum authorised load
in the boot. This position is enough not to
dazzle. The higher positions may limit the
area illuminated by the headlamps.
The initial setting is position 0.
04
Lighting and visibility
Page 119 of 248

11 7
In case of towing
Driving with a trailer places greater
d emands on the towing vehicle and
requires extra care from the driver.
Distribution of loads
F Distribute the load in the trailer so that the heaviest items are as close as possible to
the axle and the nose weight approaches
the maximum permitted without exceeding
it.
Air density decreases with altitude, thus
reducing engine performance. The maximum
towed load must be reduced by 10% for every
1,000
metres of altitude.
Please respect the maximum towable
weights.
Side wind
F Take into account the increased sensitivity to wind.
Cooling
Towing a trailer on a slope increases the
t emperature of the coolant.
As the fan is electrically controlled, its cooling
capacity is not dependent on the engine speed.
F
T
o lower the engine speed, reduce your
speed.
The maximum towable load on an incline
depends on the gradient and the exterior
temperature.
In all cases, keep a
check on the coolant
temperature.
F
I
f this warning lamp and the
STOP warning lamp come on,
stop the vehicle and switch off
the engine as soon as possible.
New vehicle
Do not pull a trailer before having driven at least
approximately 600
miles (1,000
kilometres).
Braking
Towing a trailer increases the braking distance.
T o avoid overheating of the brakes, the use of
engine braking is recommended.
Ty r e s
F Check the tyre pressures of the towing vehicle and of the trailer, observing the
recommended pressures.
Lighting
F Check the electrical lighting and signalling on the trailer and the headlamp beam height
of your vehicle.
For more information on Headlamp
beam height adjustment , refer to the
corresponding section.
The rear parking sensors will be
deactivated automatically to avoid
the audible signal if a
genuine
DS
AUTOMOBILES towbar is used.
If the exterior temperature is high, it is
recommended that the engine be allowed
to idle for 1
to 2 minutes after the vehicle
comes to a
stop, to facilitate its cooling.
06
Driving
Page 176 of 248

174
Changing a bulb
The headlamps have polycarbonate
lenses with a
protective coating:
F
d
o not clean them using a dr y or
abrasive cloth, nor with a
detergent
or solvent product,
F
u
se a sponge and soapy water or a pH
neutral product,
F
w
hen using a high pressure washer
on persistent marks, do not keep the
lance directed towards the lamps or
their edges for too long, so as not to
damage their protective coating and
seals.
Changing a
bulb must only be done with
the ignition off and after the headlamp has
been switched off for several minutes –
Risk of serious burns!
F
D
o not touch the bulb directly with your
fingers, use a
lint-free cloth.
It is essential only to use anti-ultraviolet
(UV) type bulbs, so as not to damage the
headlamp.
Always replace a
failed bulb with a new
bulb with the same type and specification.
Front lamps
Halogen headlamps
1. Direction indicators (PY21W amber).
2. Sidelamps (W5W).
3. Main beam headlamps (H1-55W).
4. Dipped beam headlamps (H7-55W).
5. LED foglamps.
6. LED daytime running lamps.
Direction indicators
Rapid flashing of the direction indicator
lamp (left or right) indicates that one of
the bulbs on the corresponding side has
failed.
F
T
urn the bulb holder a quarter turn and
remove it.
F
P
ull the bulb out and change it.
To refit, carry out these operations in reverse
o r d e r.
Amber colour bulbs, such as the direction
indicators, must be replaced by bulbs with
identical colour and specifications.
To refit, close the protective cover very
carefully to guarantee the leak-tightness
of the lamp.
08
In the event of a breakdown