run flat CITROEN DS3 2018 Handbook (in English)
[x] Cancel search | Manufacturer: CITROEN, Model Year: 2018, Model line: DS3, Model: CITROEN DS3 2018Pages: 248, PDF Size: 8.79 MB
Page 129 of 248

127
F Pull the selector towards the – sign to change down a gear.
It is only possible to change from one gear to
another if the vehicle speed and engine speed
permit; otherwise, the gearbox will operate
temporarily in automatic mode.
Invalid value during manual
operation
This symbol is displayed if a gear
i s not engaged correctly (selector
between two positions).
Stopping the vehicle
Before switching off the engine, you can
engage position P or N to place the gearbox in
neutral.
In both cases, apply the parking brake to keep
the vehicle stationary.
If the selector is not in position P , when the
driver's door is opened or approximately
45
seconds after the ignition is switched
off, a warning message appears on the
screen.
F
R
eturn the selector to position P ; the
message disappears.
When driving on flooded roads or when
crossing a
ford, proceed at walking pace.
Operating fault
D disappears and the gears
engaged appear in succession in
the instrument panel.
If the engine speed is too low or too high, the
gear selected flashes for a
few seconds, then
the actual gear engaged is displayed.
It is possible to change from position D
(automatic) to position M (manual) at any time.
When the vehicle is stationary or moving
very slowly, the gearbox selects gear
M1
automatically.
The sport and snow programmes are inactive
in manual operation. When the ignition is on, the lighting
of this warning lamp, associated with
an audible signal and a
message
on the screen, indicates a
gearbox
fault.
In this case, the gearbox switches to back-up
mode and is locked in 3
rd gear. You may then
feel a
substantial jolt when changing from P to
R and from N to R . This jolt will not cause any
damage to the gearbox. Do not exceed 60
mph (100 km/h), local speed
restrictions permitting.
Contact a dealer approved by
DS AUTOMOBILES or a qualified workshop as
soon as possible.
There is a risk of damage to the gearbox:
-
i
f you press the accelerator and brake
pedals at the same time,
-
i
f you force the selector from position P
to another position when the battery is
flat.
To reduce fuel consumption when at
a prolonged standstill with the engine
running (traffic jam, etc.), put the
selector in position N and apply the
parking brake.
Automatic gearbox (EAT6)
Six speed automatic gearbox which offers
a choice between the comfort of fully automatic
operation or manual gear changing.
Two driving modes are available:
-
a
utomatic operation for electronic
management of the gears by the gearbox,
-
man
ual operation for sequential changing
of the gears by the driver.
06
Driving
Page 132 of 248

130
D disappears and the gears
engaged appear in succession in
the instrument panel.
If the engine speed is too low or too high, the
gear selected flashes for a
few seconds, then
the actual gear engaged is displayed.
It is possible to change from position D
(automatic) to position M (manual) at any time.
When the vehicle is stationary or moving
very slowly, the gearbox engages first gear
automatically.
Invalid value during manual
operation
This symbol is displayed if a gear
i s not engaged correctly (selector
between two positions).
Stopping the vehicle Operating fault
When the ignition is on, the lighting
of this warning lamp, associated with
an audible signal and a
message
on the screen, indicates a
gearbox
fault. There is a
risk of damage to the gearbox:
-
i
f you press the accelerator and brake
pedals at the same time,
-
i
f you force the selector from position P
to another position when the battery is
flat.
Before switching off the engine, you can engage
either position P or N to place the gearbox in neutral.
In both cases, apply the parking brake to immobilise
the vehicle.
If the selector is not in position P , when the
driver's door is opened or approximately
45
seconds after the ignition is switched
off, a warning message appears in the
screen.
F
R
eturn the selector to position P ; the
message disappears.
When driving on flooded roads or when
crossing a
ford, proceed at walking pace. To reduce fuel consumption when at
a
prolonged standstill with the engine
running (traffic jam, etc.), put the
selector in position N and apply the
parking brake.
Gear efficiency indicator
System which reduces fuel consumption by
advising the driver when to change up.
Operation
Depending on the driving situation and your
vehicle's equipment, the system may advise
you to skip one (or more) gear(s). You can
follow this instruction without engaging the
intermediate gears.
It is only possible to change from one gear to
another if the vehicle speed and engine speed
permit; otherwise, the gearbox will operate
temporarily in automatic mode.
In this case, the gearbox switches to back-up
mode and is locked in 3
rd gear. You may then
feel a
substantial jolt when changing from P to
R and from N to R . This jolt will not cause any
damage to the gearbox.
Do not exceed 60
mph (100 km/h), local speed
restrictions permitting.
Contact the dealer network or a
qualified
workshop as soon as possible.
06
Driving
Page 167 of 248

165
Running out of fuel
(Diesel)
On vehicles fitted with Diesel engines, the fuel
system must be primed if you run out of fuel.For more information on Misfuel
prevention (Diesel) , refer to the
corresponding section.
If the engine does not start first time, do
not keep trying, but start the procedure
again from the beginning.
BlueHDi engines
F Fill the fuel tank with at least five litres of Diesel fuel.
F
S
witch on the ignition (without starting the
engine).
F
W
ait around 6 seconds and switch off the
ignition.
F
R
epeat the operation 10
times.
F
O
perate the starter to run the engine.
Other HDi engines
(except BlueHDi version)
F
F
ill the fuel tank with at least five litres of
Diesel.
F
O
pen the bonnet.
F
I
f necessary, unclip the cover to access the
priming pump.
F
O
perate the priming pump repeatedly until
resistance is felt (there may be resistance at
the first press).
F
O
perate the starter to start the engine (if the
engine does not start at the first attempt,
wait around 15
seconds before trying
again).
F
I
f the engine does not start after a few
attempts, operate the priming pump again
then start the engine.
F
P
ut the cover in place and clip it in.
F
C
lose the bonnet again.
Temporary puncture
repair kit
Scan the QR code on page 3 to view
e xplanatory videos.
Comprising a
compressor and a sealant
cartridge, it allows the temporary repair of
a
tyre so that you can drive to the nearest
garage.
It is designed to repair most punctures which
could affect the tyre, located on the tyre tread
or shoulder.
The vehicle's electrical system allows the
connection of the compressor for long
enough to inflate a
tyre after a puncture
repair.
Under-inflation detection
After repair of the tyre, the warning
lamp will remain on until the system is
reinitialised.
For more information on Under-inflation
detection , refer to the corresponding
section.
08
In the event of a breakdown
Page 191 of 248

189
Access to the battery
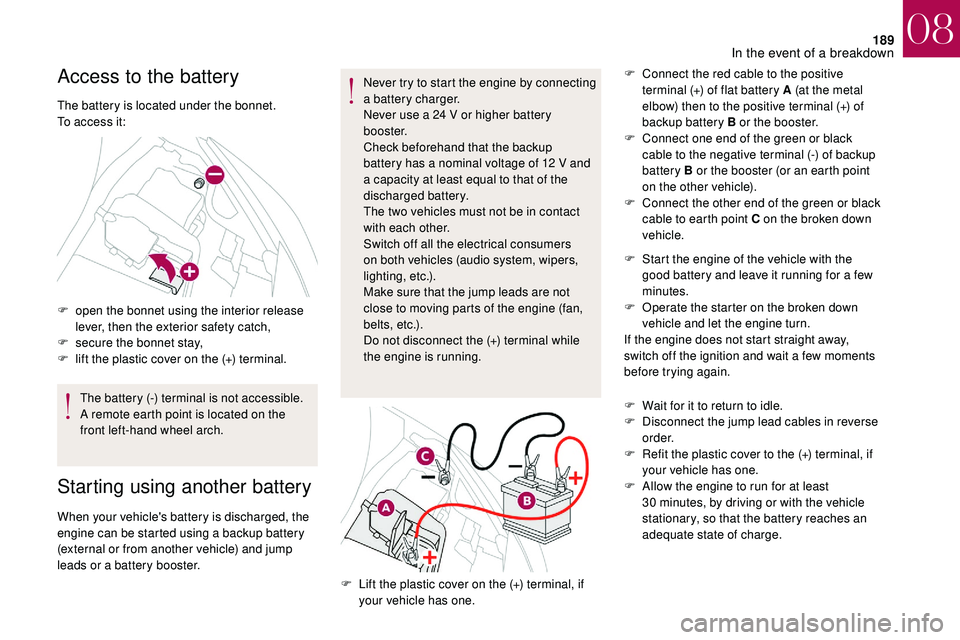
The battery is located under the bonnet.
To access it:
F
o
pen the bonnet using the interior release
lever, then the exterior safety catch,
F
s
ecure the bonnet stay,
F
l
ift the plastic cover on the (+) terminal.The battery (-) terminal is not accessible.
A remote earth point is located on the
front left-hand wheel arch.
Starting using another battery
When your vehicle's battery is discharged, the
engine can be started using a backup battery
(external or from another vehicle) and jump
leads or a
battery booster. Never try to start the engine by connecting
a
battery charger.
Never use a 24 V or higher battery
b o o s t e r.
Check beforehand that the backup
battery has a nominal voltage of 12 V and
a capacity at least equal to that of the
discharged battery.
The two vehicles must not be in contact
with each other.
Switch off all the electrical consumers
on both vehicles (audio system, wipers,
lighting, etc.).
Make sure that the jump leads are not
close to moving parts of the engine (fan,
belts, etc.).
Do not disconnect the (+) terminal while
the engine is running. F
C
onnect the red cable to the positive
terminal (+) of flat battery A (at the metal
elbow) then to the positive terminal (+) of
backup battery B or the booster.
F
C
onnect one end of the green or black
cable to the negative terminal (-) of backup
battery B or the booster (or an earth point
on the other vehicle).
F
C
onnect the other end of the green or black
cable to earth point C on the broken down
vehicle.
F
L
ift the plastic cover on the (+) terminal, if
your vehicle has one. F
S
tart the engine of the vehicle with the
good battery and leave it running for a few
minutes.
F
O
perate the starter on the broken down
vehicle and let the engine turn.
If the engine does not start straight away,
switch off the ignition and wait a few moments
before trying again.
F
W
ait for it to return to idle.
F
D
isconnect the jump lead cables in reverse
o r d e r.
F
R
efit the plastic cover to the (+) terminal, if
your vehicle has one.
F
A
llow the engine to run for at least
30 minutes, by driving or with the vehicle
stationary, so that the battery reaches an
adequate state of charge.
08
In the event of a breakdown