ECU Citroen DS4 2010.5 1.G User Guide
[x] Cancel search | Manufacturer: CITROEN, Model Year: 2010.5, Model line: DS4, Model: Citroen DS4 2010.5 1.GPages: 341, PDF Size: 10.59 MB
Page 140 of 341

163Child safety
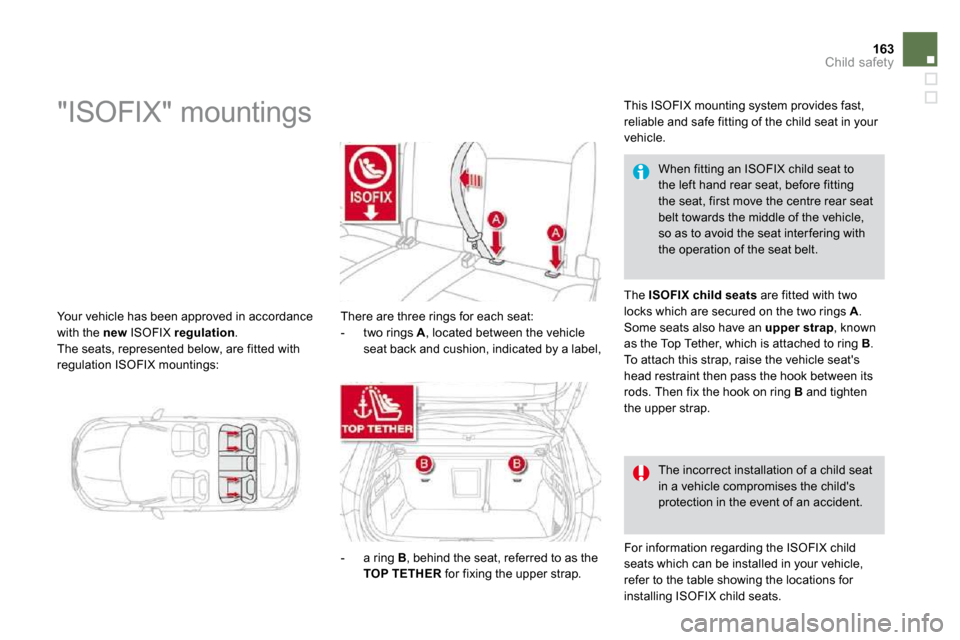
Your vehicle has been approved in accordance with the new ISOFIX regulation . The seats, represented below, are fitted with regulation ISOFIX mountings:
"ISOFIX" mountings
There are three rings for each seat: - two rings A , located between the vehicle seat back and cushion, indicated by a label,
- a ring B , behind the seat, referred to as the TOP TETHER for fixing the upper strap.
This ISOFIX mounting system provides fast, reliable and safe fitting of the child seat in your vehicle.
The incorrect installation of a child seat
in a vehicle compromises the child's protection in the event of an accident.
For information regarding the ISOFIX child seats which can be installed in your vehicle, refer to the table showing the locations for
installing ISOFIX child seats.
When fitting an ISOFIX child seat to the left hand rear seat, before fitting the seat, first move the centre rear seat belt towards the middle of the vehicle, so as to avoid the seat inter fering with the operation of the seat belt.
The ISOFIX child seats are fitted with two locks which are secured on the two rings A . Some seats also have an upper strap , known as the Top Tether, which is attached to ring B . To attach this strap, raise the vehicle seat's head restraint then pass the hook between its rods. Then fix the hook on ring B and tighten the upper strap.
Page 141 of 341

ISOFIX child seat recommended by CITROËN and approved for
your vehicle
This child seat can also be used on seats which are not fitted with ISOFIX mountings. In this case, it must be attached to the vehicle seat using the three point seat belt. Follow the instructions for fitting the child seat g iven in the seat manufacturer's installation guide.
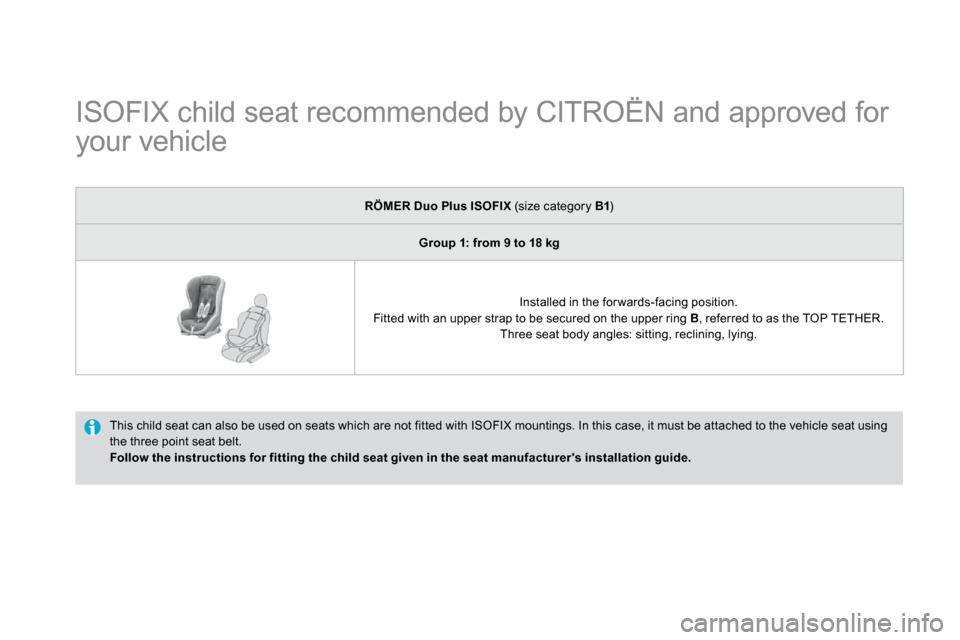
RÖMER Duo Plus ISOFIX (size category B1 )
Group 1: from 9 to 18 kg
Installed in the for wards-facing position. Fitted with an upper strap to be secured on the upper ring B , referred to as the TOP TETHER. Three seat body angles: sitting, reclining, lying.
Page 142 of 341

165Child safety
Locations for ISOFIX child seats
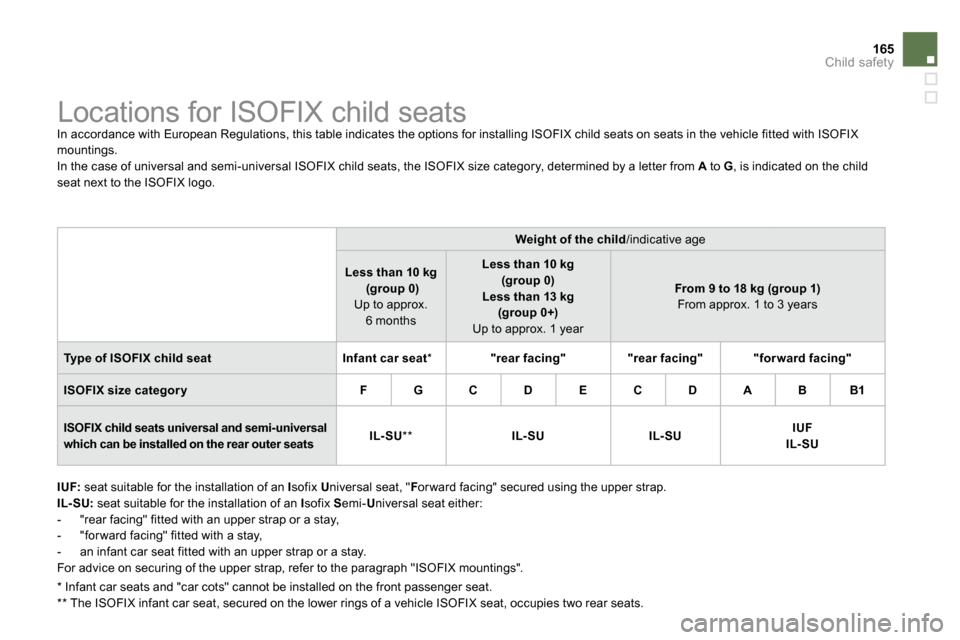
In accordance with European Regulations, this table indicates the options for installing ISOFIX child seat s on seats in the vehicle fitted with ISOFIX mountings. In the case of universal and semi-universal ISOFIX child seats, the ISOFIX size category, determined by a letter from A to G , is indicated on the child seat next to the ISOFIX logo.
IUF: seat suitable for the installation of an I sofix U niversal seat, " F or ward facing" secured using the upper strap. IL- SU: seat suitable for the installation of an I sofix S emi- U niversal seat either: - "rear facing" fitted with an upper strap or a stay, - "for ward facing" fitted with a stay, - an infant car seat fitted with an upper strap or a stay. For advice on securing of the upper strap, refer to the paragraph "ISOFIX mountings".
* Infant car seats and "car cots" cannot be installed on the front passenger seat. ** The ISOFIX infant car seat, secured on the lower rings of a vehicle ISOFIX seat, occupies two rear sea ts.
Weight of the child /indicative age
Less than 10 kg (group 0)Up to approx. 6 months
Less than 10 kg(group 0) Less than 13 kg(group 0+)Up to approx. 1 year
From 9 to 18 kg (group 1)�F�r�o�m� �a�p�p�r�o�x�.� �1� �t�o� �3� �y�e�a�r�s� �
Type of ISOFIX child seatInfant car seat * "rear facing""rear facing""for ward facing"
ISOFIX size categor yFGCDECDABB1
ISOFIX child seats universal and semi-universal which can be installed on the rear outer seats IL- SU ** IL- SUIL- SUIUFIL- SU
Page 157 of 341

The driver must ensure that passengers use the seat belts correctly and that they are all restrained securely before setting off. Wherever you are seated in the vehicle, always fasten your seat belt, even for shor t journeys. Do not interchange the seat belt buckles as they will not fulfil their role fully. The seat belts are fitted with an iner tia reel permitting automatic adjustment of the length of the strap to your size. The seat belt is stowed automatically when not in use. Before and after use, ensure that the seat belt is reeled in correctly. The lower par t of the strap must be positioned as low as possible on the pelvis. The upper par t must be positioned in the hollow of the shoulder. The iner tia reels are fitted with an automatic locking device which comes into operation in
the event of a collision, emergency braking or if the vehicle rolls over. You can release the device by pulling firmly on the strap and
releasing it so that it reels in slightly.
In order to be effective, a seat belt must: - be tightened as close to the body as possible, - be pulled in front of you with a smooth movement, checking that it does not twist, - be used to restrain only one person, - not bear any trace of cuts or fraying, - not be conver ted or modified to avoid affecting its per formance. In accordance with current safety regulations, for all repairs on your vehicle, go to a qualified workshop with the skills and equipment needed, which a CITROËN dealer is able to provide. Have your seat belts checked regularly by a CITROËN dealer or a qualified workshop, par ticularly if the straps show signs of damage. Clean the seat belt straps with soapy water or
a textile cleaning product, sold by CITROËN dealers. After folding or moving a seat or rear bench seat, ensure that the seat belt is positioned and reeled in correctly.
Recommendations for children
Use a suitable child seat if the passenger is less than 12 years old or shor ter than one and a half metres. Never use the same seat belt to secure more than one person. Never allow a child to travel on your lap.
In the event of an impact
Depending on the nature and seriousness of the impact , the pretensioning device may be deployed before and independently of the airbags. Deployment of the pretensioners is accompanied by a slight discharge of harmless smoke and a noise, due to the activation of the pyrotechnic car tridge incorporated in the system. In all cases, the airbag warning lamp comes on. Following an impact, have the seat belts system checked, and if necessary replaced, by a CITROËN dealer or a qualified workshop.
Page 161 of 341

For the airbags to be fully effective, observe the following safety rules:
Front airbags
Do not drive holding the steering wheel by its spokes or resting your hands on the centre par t of the wheel.
Passengers must not place their feet on the dashboard. If possible, do not smoke as deployment of the airbags can cause burns or the risk of injury from a cigarette or pipe. Never remove or pierce the steering wheel or hit it violently.
Lateral airbags
Use only approved covers on the seats, compatible with the deployment the lateral airbags. For information on the range of seat covers suitable for your vehicle, you can contact a CITROËN dealer (see "Practical information - § Accessories"). Do not fix or attach anything to the seat backs (clothing...). This could cause injury to the chest or arms if the lateral airbag is deployed. Do not sit with the upper par t of the body any nearer to the door than necessary.
Curtain airbags
Do not fix or attach anything to the roof. This could cause injury to the head if the cur tain airbag is deployed.
Do not remove the grab handles installed on the roof, they play a par t in securing the cur tain airbags.
Sit in a normal upright position. Wear a correctly adjusted seat belt. Do not leave anything between the occupants and the airbags (a child, pet, object...). This could hamper the operation of the airbags or injure the occupants. After an accident or if the vehicle has been stolen or broken into, have the airbag systems checked. All work on the airbag system must be carried out by a CITROËN dealer or a qualified workshop. Even if all of the precautions mentioned are obser ved, a risk of injury or of minor burns to the head, chest or arms when an airbag is deployed cannot be ruled out. The
bag inflates almost instantly (within a few milliseconds) then deflates within the same time discharging the hot gas via openings provided for this purpose.
Page 165 of 341

For the airbags to be fully effective, observe the following safety rules:
Front airbags
Do not drive holding the steering wheel by its spokes or resting your hands on the centre par t of the wheel.
Passengers must not place their feet on the dashboard. If possible, do not smoke as deployment of the airbags can cause burns or the risk of injury from a cigarette or pipe. Never remove or pierce the steering wheel or hit it violently.
Lateral airbags
Use only approved covers on the seats, compatible with the deployment the lateral airbags. For information on the range of seat covers suitable for your vehicle, you can contact a CITROËN dealer (see "Practical information - § Accessories"). Do not fix or attach anything to the seat backs (clothing...). This could cause injury to the chest or arms if the lateral airbag is deployed. Do not sit with the upper par t of the body any nearer to the door than necessary.
Curtain airbags
Do not fix or attach anything to the roof. This could cause injury to the head if the cur tain airbag is deployed.
Do not remove the grab handles installed on the roof, they play a par t in securing the cur tain airbags.
Sit in a normal upright position. Wear a correctly adjusted seat belt. Do not leave anything between the occupants and the airbags (a child, pet, object...). This could hamper the operation of the airbags or injure the occupants. After an accident or if the vehicle has been stolen or broken into, have the airbag systems checked. All work on the airbag system must be carried out by a CITROËN dealer or a qualified workshop. Even if all of the precautions mentioned are obser ved, a risk of injury or of minor burns to the head, chest or arms when an airbag is deployed cannot be ruled out. The
bag inflates almost instantly (within a few milliseconds) then deflates within the same time discharging the hot gas via openings provided for this purpose.
Page 198 of 341

Closing
Running out of fuel
(Diesel)
If your vehicle is fitted with an HDI engine, the fuel system must be primed if you run out of fuel; refer to the engine compar tment view on the "Diesel engine" page.
1.6 litre Turbo HDI engine
� Fill the fuel tank with at least five litres of diesel. � Open the bonnet. � Squeeze and release the priming pump repeatedly until it hardens (it may be hard at the first press). � Operate the star ter until the engine star ts. � Close the bonnet.
If the engine does not star t first time, don't keep trying. Operate the priming pump again, then the star ter motor.
� Take the stay out of the suppor t notch. � Clip the stay in its housing. � Lower the bonnet and release it at the end of its travel. � Pull on the bonnet to check that it is secured correctly.
2 litre Turbo HDI engine
� Fill the fuel tank with at least five litres of
Diesel. � Open the bonnet. � Unclip the style cover for access to the priming pump. � Slacken the bleed screw. � Squeeze and release the priming pump repeatedly until fuel appears in the transparent pipe with the green connector. � Retighten the bleed screw. � Operate the star ter until the engine star ts. � Put the style cover back in position and clip it in place. � Close the bonnet.
Page 199 of 341

Closing
Running out of fuel
(Diesel)
If your vehicle is fitted with an HDI engine, the fuel system must be primed if you run out of fuel; refer to the engine compar tment view on the "Diesel engine" page.
1.6 litre Turbo HDI engine
� Fill the fuel tank with at least five litres of diesel. � Open the bonnet. � Squeeze and release the priming pump repeatedly until it hardens (it may be hard at the first press). � Operate the star ter until the engine star ts. � Close the bonnet.
If the engine does not star t first time, don't keep trying. Operate the priming pump again, then the star ter motor.
� Take the stay out of the suppor t notch. � Clip the stay in its housing. � Lower the bonnet and release it at the end of its travel. � Pull on the bonnet to check that it is secured correctly.
2 litre Turbo HDI engine
� Fill the fuel tank with at least five litres of
Diesel. � Open the bonnet. � Unclip the style cover for access to the priming pump. � Slacken the bleed screw. � Squeeze and release the priming pump repeatedly until fuel appears in the transparent pipe with the green connector. � Retighten the bleed screw. � Operate the star ter until the engine star ts. � Put the style cover back in position and clip it in place. � Close the bonnet.
Page 204 of 341

231Checks
Additive level (Diesel with
particle emissions filter)
Topping up
The reser voir must be topped up without delay by a CITROËN dealer or a qualified workshop.
Used products
Avoid prolonged contact of used oil or fluids with the skin. Most of these fluids are harmful to health or indeed very corrosive.
Do not discard used oil or fluids into sewers or onto the ground. Take used oil to a CITROËN dealer or a qualified workshop (France) or to an authorised waste disposal site.
� Open the bonnet and secure it with the stay. � Open the screenwash reser voir filler cap. � Take and pinch the level gauge to block its breather. � Remove the gauge completely from the reser voir to read the level in the transparent section. � Top up if necessary. � Refit the filler cap to the reser voir and close the bonnet.
� � �S�p�e�c�i�fi� �c�a�t�i�o�n� �o�f� �t�h�e� �fl� �u�i�d�
To ensure optimum cleaning and to avoid freezing, the fluid should never be topped up or replaced by plain water.
According to your version of instrument panel, the additive reser voir low level is indicated by:
- fixed illumination of the particle emissions filter warning lamp, accompanied by an audible signal and a message that the particle emissions filter additive level is too low,
or
- fixed illumination of the ser vice warning lamp, accompanied by
an audible signal and a message that the par ticle emissions filter additive level is too low.
Page 213 of 341

243Practical information
Changing a wheel
Procedure for changing a faulty wheel for the spare w heel using the tools provided with the vehicle.
The tools are installed in the boot under the floor. To gain access to them: � open the boot, � raise the floor, � secure it by hooking its cord on the hook on the rear shelf suppor t, � with a standard size spare wheel, unclip and remove the box in the middle of the wheel containing the tools,
or � with a "space-saver" spare wheel; lift the wheel at the rear towards you for access to the storage box containing the tools.
Access to the tools
List of tools
All of these tools are specific to your vehicle. Do not use them for other purposes.
Wheel with trim
When removing the wheel , detach the trim first using the wheelbrace 1 pulling at the valve passage hole. When refitting the wheel , refit the trim star ting by placing its notch facing the valve and press around its edge with the palm of your hand.
3. "Bolt cover" tool.
For removing the bolt protectors (covers) on alloy wheels. 4. Socket for the security bolts (located in the glove box).
For adapting the wheelbrace to the special "security" bolts.
1. Wheelbrace.
For removing the wheel trim and the wheel fixing bolts. 2. Jack with integral handle. For raising the vehicle.