Citroen DS4 RHD 2015.5 1.G Owner's Manual
DS4 RHD 2015.5 1.G
Citroen
Citroen
https://www.carmanualsonline.info/img/9/4402/w960_4402-0.png
Citroen DS4 RHD 2015.5 1.G Owner's Manual
Trending: roof rack, keyless entry, fog light bulb, tailgate, key, transmission, apple carplay
Page 111 of 436
Page 112 of 436
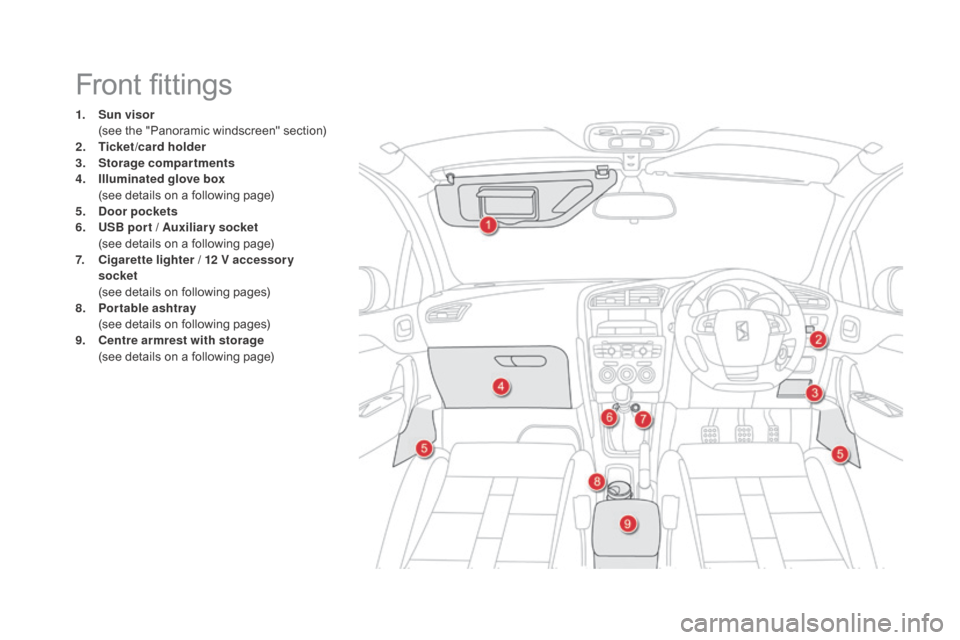
Front fittings
1. Sun visor (
see the "Panoramic windscreen" section)
2.
T
icket/card holder
3.
S
torage compartments
4.
I
lluminated glove box
(
see details on a following page)
5.
d
oor pocket s
6.
U
SB por t / Auxiliar y socket
(
see details on a following page)
7.
C
igarette lighter / 12 V accessor y
socket
(
see details on following pages)
8.
P
ortable ashtray
(
see details on following pages)
9.
C
entre armrest with storage
(
see details on a following page)
Page 113 of 436
111
Illuminated glove boxPortable ashtray
F Pull the cover to open the ashtray.
F
T o empty it, remove the ashtray by pulling it
upwards.
To avoid any problem of inter ference
or risk of overturning, do not place the
ashtray near the gear lever.
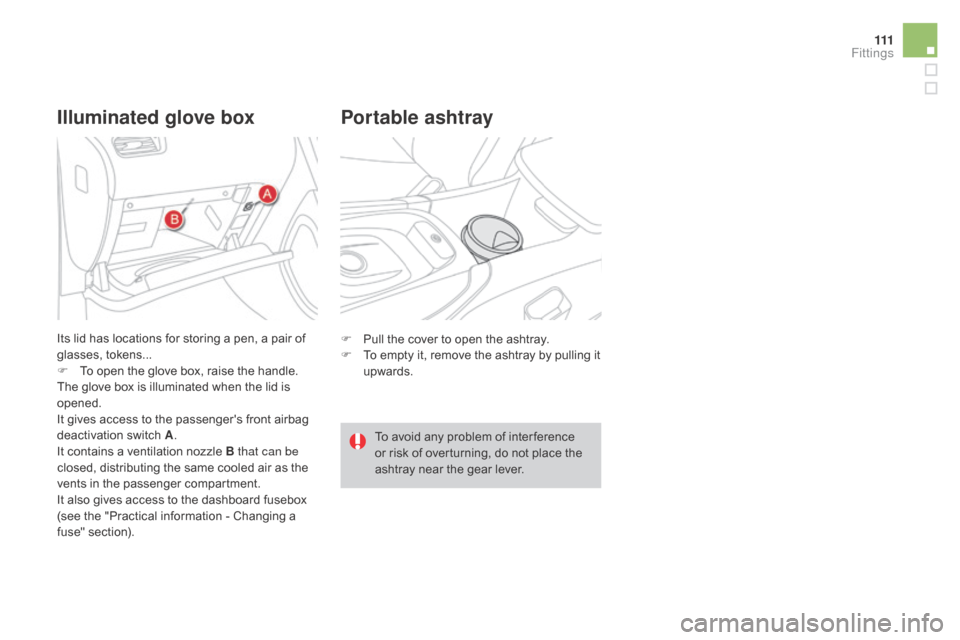
Its lid has locations for storing a pen, a pair of
glasses, tokens...
F
T
o open the glove box, raise the handle.
The glove box is illuminated when the lid is
opened.
It gives access to the passenger's front airbag
deactivation switch A.
It contains a ventilation nozzle B that can be
closed, distributing the same cooled air as the
vents in the passenger compartment.
It also gives access to the dashboard fusebox
(see the "Practical information - Changing a
fuse" section).
Fittings
Page 114 of 436

This connection box comprises a USB port and
a Jack auxiliary socket.For more information, refer to the
corresponding part of the "Audio and
telematics" section.
USB port
The USB port allows the connection of a
portable device, such as a digital audio player
of the iPod
® type or a USB memory stick.
The USB player reads your audio files, which
are transmitted to your audio system and
played via the vehicle's speakers.
The management of these files is from the
steering mounted controls or the audio system.
USB Player
When connected to the USB port, the
portable device charges automatically.
While charging, a message is displayed
if the power consumption of the
portable device exceeds the current
delivered by the vehicle.
Jack auxiliary socket
The Jack auxiliary socket allows the connection
of a portable device, such as a digital audio
player, so that your audio files can be heard
through the vehicle's speakers.
The management of these files is from the
portable device. The USB also allows a telephone to be
connected by a MirrorLink™ connection, so
that use can be made in the touch screen tablet
of certain applications on the telephone.
The connection of an electrical device
not approved by CITROËN, such as a
USB charger, may adversely affect the
operation of vehicle electrical systems,
causing faults such as poor telephone
reception or inter ference with displays
in the screens.
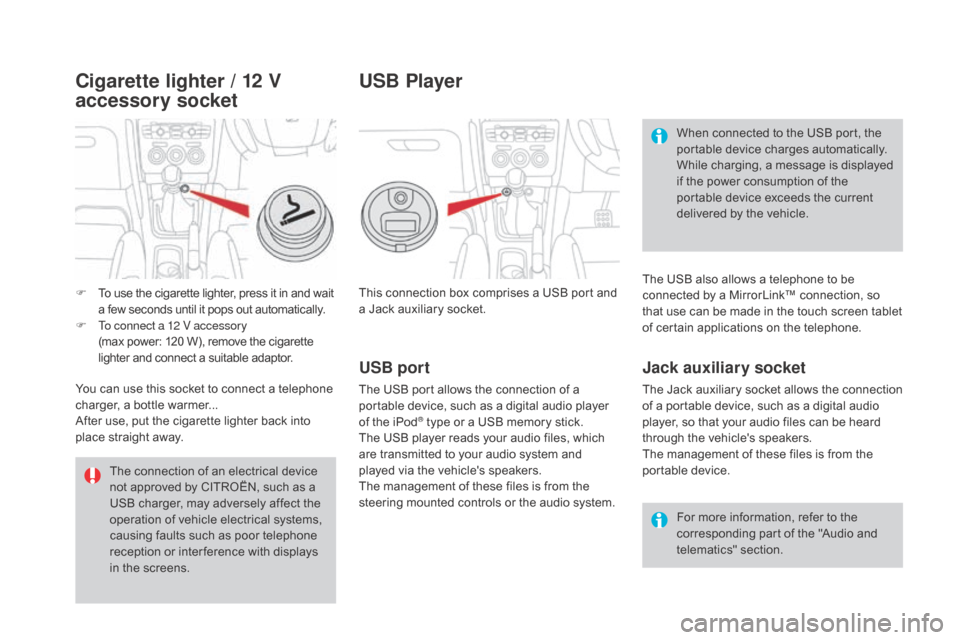
F
T
o use the cigarette lighter, press it in and wait
a few seconds until it pops out automatically.
F
T
o connect a 12 V accessory
(max power:
120 W), remove the cigarette
lighter and connect a suitable adaptor.
You can use this socket to connect a telephone
charger, a bottle warmer...
After use, put the cigarette lighter
back into
place straight away.
Cigarette lighter / 12 V
accessory socket
Page 115 of 436
11 3
Panoramic windscreen
A tinted panoramic windscreen that increases brightness and vision in the cabin. Fitted on each side with a blind to improve temperature control and a
sun visor to avoid dazzle.F
T
o open the blind, pull it by its central grip
to the desired position.
F
T
o close or stow the blind, pull it for ward by
its central grip then guide it to the desired
position.
The sun visor must be in the folded position
before moving the blind.
Blind
Fitted with a vanity mirror and ticket holder.
F L ower the sun visor to avoid dazzle from
the front.
F
D
isengage the sun visor from its central
fixing and turn it towards the door glass to
avoid dazzle from the side.
Sun visor
Do not attach or hang heavy objects on
the blinds or their slide rails.
Fittings
Page 116 of 436
Semi-raised version
1. Front armrest (
see details on following pages)
2.
O
pen storage
3.
C
up holder
4.
Sto
rage pocket
Tall version
1. Front armrest (
see details on following pages)
2.
1
2 V accessory socket
(
see details on following pages)
3.
Sto
rage box
4.
C
up holder / Bottle holder
5.
S
torage pocket or START/STOP button
(depending on version)
Centre consoles
Page 117 of 436
11 5
Front armrest
Comfort and storage system for the driver and front passenger.
The height and length of the armrest cover can be adjusted.
Height adjustment
F Raise the cover to the required position (low, intermediate or high).
F
I
f you raise the cover slightly beyond the
high position, guide it when lowering it to
the low position.
Longitudinal adjustment
F Slide the cover fully for wards or rear wards.
Storage
A storage space is arranged below the armrest
cover. It houses the back-up reader for the
electronic key of the "Keyless Entry and
Starting" system, if the vehicle is so equipped.
F
Ra
ise the lever.
F
R
aise the cover fully.
Fittings
Page 118 of 436
Front armrest
Comfort and storage system for the driver and front passenger.
The length of the armrest cover can be adjusted.
Storage
There is a storage space below the cover of
the armrest. Depending on equipment, this can
contain the back-up reader for the electronic
key of the Keyless Entry and Starting system.
F
R
aise the cover fully.
Longitudinal adjustment
F To move for wards, raise the lever. The armrest slides for wards to its stop.
F
T
o stow it, slide it fully back and press
down to lock it.
Page 119 of 436
11 7
Mats
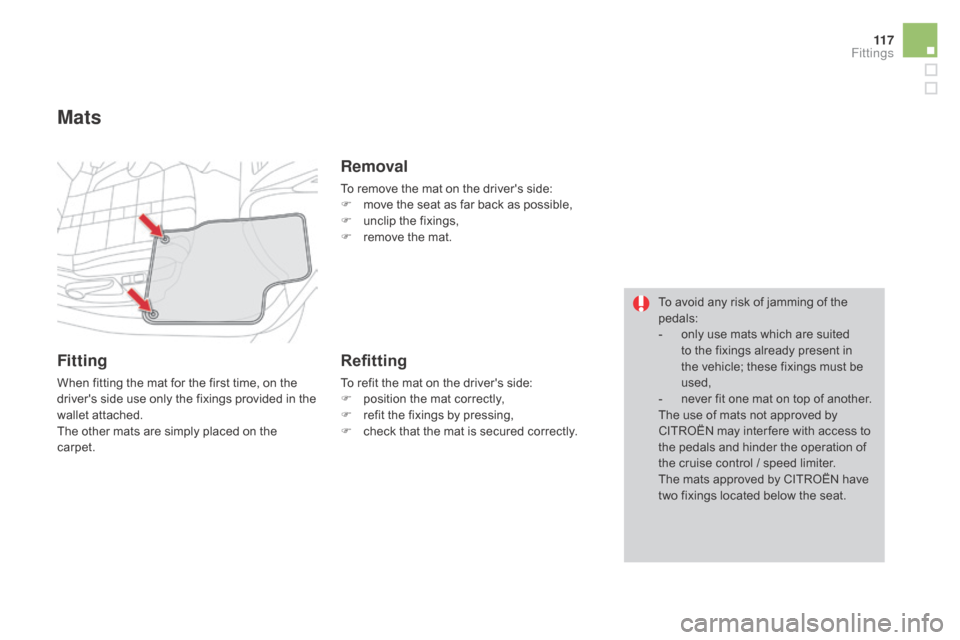
Fitting
When fitting the mat for the first time, on the
driver's side use only the fixings provided in the
wallet attached.
The other mats are simply placed on the
carpet.
Removal
To remove the mat on the driver's side:
F m ove the seat as far back as possible,
F
u
nclip the fixings,
F
r
emove the mat.
Refitting
To refit the mat on the driver's side:
F p osition the mat correctly,
F
r
efit the fixings by pressing,
F
c
heck that the mat is secured correctly. To avoid any risk of jamming of the
pedals:
-
o
nly use mats which are suited
to the fixings already present in
the vehicle; these fixings must be
used,
- n ever fit one mat on top of another.
The use of mats not approved by
CITROËN may inter fere with access to
the pedals and hinder the operation of
the cruise control / speed limiter.
The mats approved by CITROËN have
two fixings located below the seat.
Fittings
Page 120 of 436
Opening
F Raise the front of the drawer and pull it open.
Storage drawers
Located under each front seat, except for the driver's seat on versions with electric seat.
On the passenger's side, the drawer holds the vehicle handbook pack.
Removal
Avoid removing the drawer completely, as
refitting it is not easy.
F
O
pen the drawer fully.
F
P
ull the drawer upwards to disengage it.
Refitting
However, if it has been completely removed, to
refit it:
F
u
se the torch to illuminate the area under
the seat,
F
e
ngage the drawer in its runners,
F
l
ift the retaining tongues and slide the
drawer under these tongues,
F
a
t the end of its travel, press down on the
drawer to engage it.
Do not place heavy objects in the
drawer.
Trending: glove box, USB port, seat adjustment, wheel size, oil change, wiring, gas mileage


