CITROEN E-MEHARI 2017 Handbook (in English)
Manufacturer: CITROEN, Model Year: 2017, Model line: E-MEHARI, Model: CITROEN E-MEHARI 2017Pages: 81, PDF Size: 2.46 MB
Page 51 of 81

49
e-mehari_en_Chap03_confort_ed02-2016
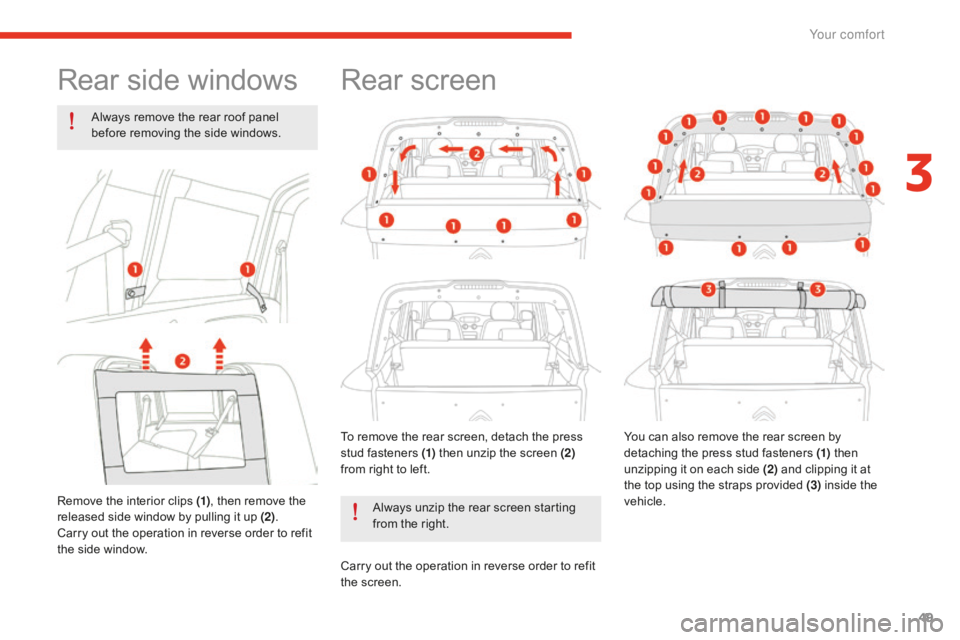
Rear side windows
Always remove the rear roof panel
before removing the side windows.
Remove the interior clips (1) , then remove the
released side window by pulling it up (2) .
Carry out the operation in reverse order to refit
the side window.
Rear screen
To remove the rear screen, detach the press
stud fasteners (1) then unzip the screen (2)
from right to left.
Always unzip the rear screen starting
from the right.
Carry out the operation in reverse order to refit
the screen. You can also remove the rear screen by
detaching the press stud fasteners (1)
then
unzipping it on each side (2) and clipping it at
the top using the straps provided (3) inside the
vehicle.
3
Your comfort
Page 52 of 81

50
e-mehari_en_Chap03_confort_ed02-2016
Boot flap
When the flap is lowered, it can support
a maximum load of 100 kg. Precautions
Once raised, check that the boot flap is
closed and fully latched home so that it
cannot open on its own when the vehicle is
moving.
Always drive with the boot flap closed.
If objects carried extend beyond the boot
flap, you should never use the boot flap to
jam or retain them.
Opening the boot flap
The boot flap on your E-MEHARI is opened
by press the grip (1)
located in the central flap
recess.
Locking your E-MEHARI with your personal
RFID key ring does not affect the locking of the
boot flap.Closing the boot flap
● Raise the boot flap and guide it home.
● P ress l ightly o n t he o uter s ur face o f t he b oot fl
ap to close it.
Your comfort
Page 53 of 81

51
e-mehari_en_Chap03_confort_ed02-2016
Fabric roof
Removing and refitting the
roof panels
The front and rear parts are removed and
refitted in the same way.
Removing a roof panel
Press with your hand on one of the four corners
of t he roof panel and remove the clip (1) .
Repeat the operation at the other three
corners. Detach the four press stud fasteners (2)
in turn
and roll the fabric as you go.
Repeat the procedure with the other panel if
you want to remove it.
Refitting a roof panel
Lay the panel out flat in position.
An arrow indicates the direction of the front of
the vehicle.
Attach the roof panel in a corner at the
tensioner and press firmly with your hand, as
when removing it, then engage the clip.
Repeat the operation at the other three
corners, finish by fixing the panel with the four
press stud fasteners from inside the vehicle.
Stowing a roof panel
The rolled-up roof panels can be stowed under
the boot floor hatch.
For opening the boot floor, see page 10.
Detaching and attaching the fabric roof
must only be done with the vehicle
stationary.
3
Your comfort
Page 54 of 81

52
e-mehari_en_Chap03_confort_ed02-2016
Front windows
Slacken the interior door knobs (1), then
remove the released window by pulling it up (2) .
Tighten the knobs after removing the window. Reverse the operation to refit the window.
You can also raise the window by unzipping
each side (1)
and securing it at the top with the
straps provided (2) .
Your comfort
Page 55 of 81

53
e-mehari_en_Chap04_entretien_ed02-2016
The drive train is powered directly
by the LMP® battery fitted to your
E-MEHARI.
Never try to do anything to the high
voltage components of your vehicle.
A mistake in handling these
components could cause an electric
shock and serious or fatal injuries.
The underbonnet of the vehicle is a
dangerous area that could cause serious
injuries.
Always keep children well away from
the underbonnet and never leave them
unsupervised.
Under the bonnet
Under the bonnet of your E-MEHARI can
be found the vehicle's drive train and the
reservoirs containing the fluid needed for the
correct operation of your E-MEHARI (brake
fluid, coolant and screenwash fluid).
Opening the bonnet
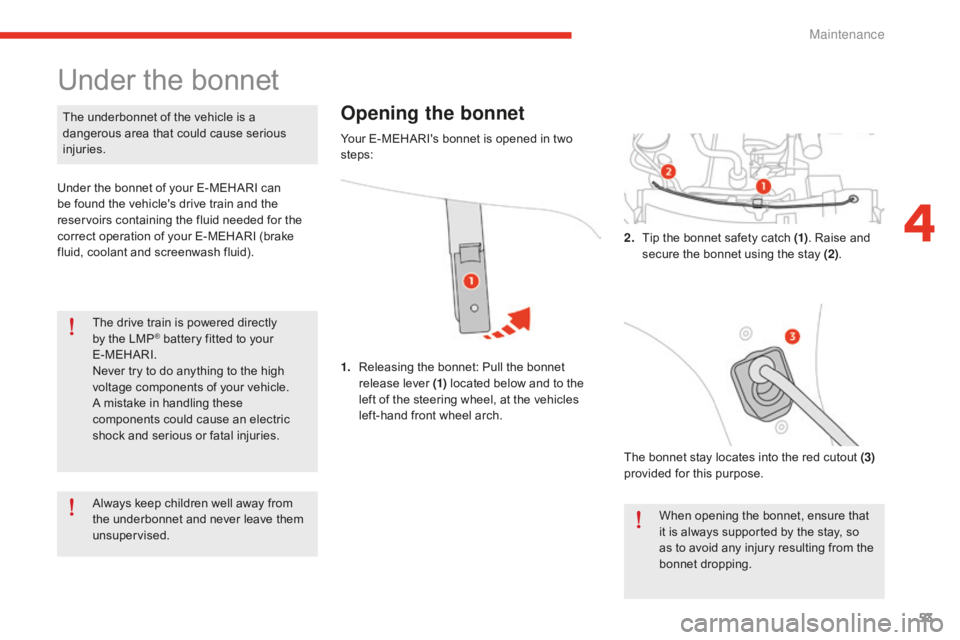
1. Releasing the bonnet: Pull the bonnet
release lever (1) located below and to the
left of the steering wheel, at the vehicles
left-hand front wheel arch.
Your E-MEHARI's bonnet is opened in two
steps:
The bonnet stay locates into the red cutout (3)
provided for this purpose.
When opening the bonnet, ensure that
it is always supported by the stay, so
as to avoid any injury resulting from the
bonnet dropping.
2.
Ti
p the bonnet safety catch (1)
. Raise and
secure the bonnet using the stay (2) .
4
Maintenance
Page 56 of 81

54
e-mehari_en_Chap04_entretien_ed02-2016
If you notice when driving that the
bonnet is not closed correctly, slow
down and stop where it is safe to do so,
and then close the bonnet correctly.There are high voltage components
under the bonnet of your E-MEHARI.
We recommend that you should not
try to carry out the maintenance and
servicing of your vehicle yourself.
A mistake in handling these
components could cause an electric
shock and serious or fatal injuries.If work is needed on your vehicle,
contact a CITROËN
a
uthorised repairer
or
a qual
ified
pr
ofessional
wit
hout
de
lay.
Closing the bonnet
Disengage the stay while holding the bonnet
with one hand to avoid it suddenly dropping.
Return the stay to its original position and allow
the bonnet to drop and latch home.
Check that the bonnet has latched correctly.
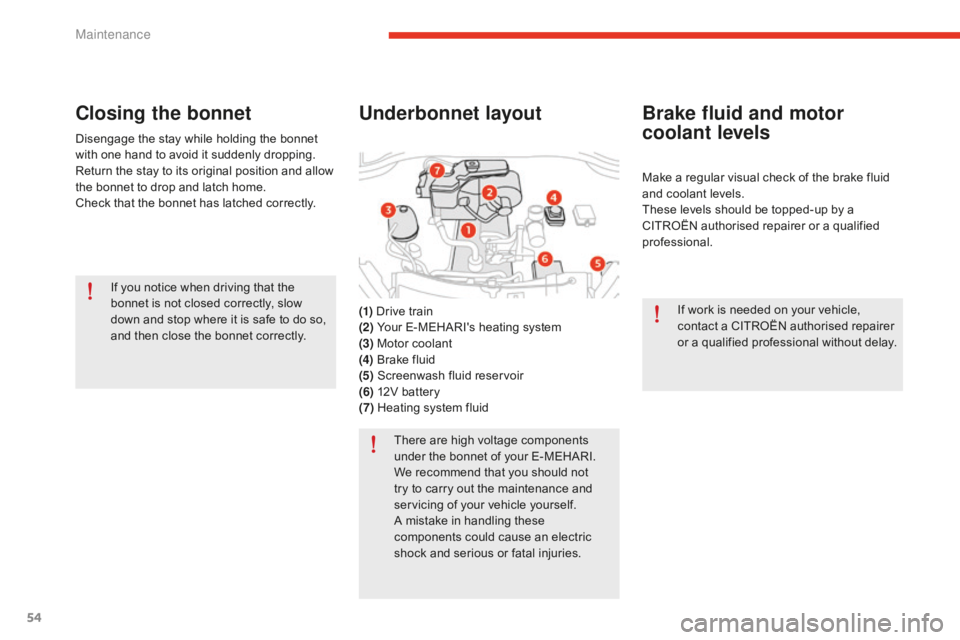
Underbonnet layout
(1) Drive train
(2) Your E-MEHARI's heating system
(3) Motor coolant
(4) Brake fluid
(5) Screenwash fluid reservoir
(6) 12V battery
(7) Heating system fluid
Brake fluid and motor
coolant levels
Make a regular visual check of the brake fluid
and coolant levels.
These levels should be topped-up by a
CITROËN
a
uthorised
r
epairer
o
r
a q
ualified
pr
ofessional.
Maintenance
Page 57 of 81

55
e-mehari_en_Chap04_entretien_ed02-2016
Screenwash fluid level
Before doing anything under the bonnet of your
E-MEHARI, to top-up the screenwash fluid,
carry out the following operations in the order
indicated:
1.
Pa
rk the vehicle in a safe place
2.
Pr
ess and hold the brake pedal in this
position until you have switched off the
ignition
3.
Ap
ply the parking brake fully
4.
Mov
e the drive selector to position
"
N"
5.
Sw
itch off the ignition and remove the key
from the switch
6.
Ke
ep children and other persons away from
the underbonnet
7.
En
sure that the vehicle is correctly
immobilised
Failure to follow the list of operations
above risks causing serious injury. Always carry out the operations in the
order given and always observe the
safety recommendations.
In low temperatures, use a screenwash
fluid with sufficient protection against
freezing.
Always be extremely vigilant when
filling the screenwash reservoir and
take account of the general safety
recommendations mentioned in this
handbook.
To top-up the screenwash fluid: remove the cap
from the reservoir, place a funnel in the neck
of the reservoir and fill the reservoir up to the
"MAX" mark.
4
Maintenance
Page 58 of 81

56
e-mehari_en_Chap04_entretien_ed02-2016
Servicing your
E-MEHARI
The maintenance and servicing of your vehicle
must be carried out by a CITROËN authorised
repairer
o
r
a q
ualified
p
rofessional
a
nd
i
n
l
ine
wit
h the principles stated in the maintenance
and warranty guide.
Tyres / Tyre pressures
Tyres fitted to your E- MEHARI
Tyre pressures Front 2
b
ar /
Rear 2
b
ar
Check the tyre pressures regularly and
always observe the inflation pressures
indicated above.
Low tyre pressures can cause
premature wear of the tyres and
introduce the risk of the tyres bursting.
The tyre pressures must be checked
with the tyres cold and adjusted if
necessary. Replace worn tyres only by tyres of
same model as the original fitment, or
equivalent,
a
nd
f
itted
b
y
a t
yre
f
itting
spe
cialist.
The responsibility for having the correct
tyre pressures lies with the driver.
Never exceed the speed rating or load
index of the tyres fitted to the vehicle.
It is for the driver to check the wear of
the tyres using the wear indicators in
the tyre tread.
Maintenance
Page 59 of 81

57
e-mehari_en_Chap04_entretien_ed02-2016
Never wash the underbonnet, the
charging socket or the traction battery
using a high pressure jet wash: risk of
damage to the electrical system.
Never wash the vehicle while it is
charging: risk of electric shock that
could cause death.
Cleaning the vehicle by the regular
use of a high pressure car wash with
rotating brushes is not recommended.
Washing precautions
Not recommended for care
of the bodywork
● Degreasing or cleaning the mechanical components under the body, parts with
hinges, exterior plastic panels using a high
pressure jet wash or spraying products not
intended for this purpose, such as solvents
● Washing
t
he
v
ehicle
i
n
d
irect
s
unlight
● Removing
m
ud
o
r
s
tains
w
ithout
f
irst
soa
king with water
Recommended for care of
the bodywork
● Wash your E-MEHARI regularly using car shampoo created for the care of vehicles
with plastic body parts (never with abrasive
products)
● As
s
oon
a
s
p
ossible,
r
inse
a
nd
h
ose
o
ff
re
sinous deposits from trees, fallout from
industrial pollution, bird droppings that
produce a chemical reaction with the
bodywork causing rapid discoloration
Care of interior trim
Stains should always be dealt with quickly.
Wh atever the nature of the stain, use cold or
warm water with natural soap.
Detergents
(
washing
u
p
l
iquid,
p
owder
prod
ucts, alcohol-based products…) should not
be used.
● Use
a s
oft
c
loth.
● Rinse
a
nd
a
bsorb
t
he
e
xcess.
● Finish
b
y
w
iping
g
ently
w
ith
a d
ry
s
oft
c
loth.
Never wash your E-MEHARI while the
vehicle is charging.
4
Maintenance
Page 60 of 81

58
e-mehari_en_Chap05_conseils-pratiques_ed02-2016
Temporary puncture repair kit
Access to the repair kit
You E-MEHARI's puncture repair kit (1) is
located under the boot floor hatch.
The boot floor hatch is opened with the grip (2)
(only if your E-MEHARI is only unlocked using
your personal RFID key ring). Never remove from a tyre the foreign
body that has caused the puncture.
The sealant product held in the
compressor is toxic and is an irritant.
Never ingest it, never spray it onto the
body, face or eyes.
In the event of ingestion, call the
emergency services (fire, ambulance...)
or go to Accident & Emergency
services.
If it enters the eyes, wash with abundant
clean water and consult a doctor
without delay.
If the symptoms persist, consult a
specialist.
Keep the sealant product out of the
reach of children.
Using the puncture repair kit
Refer to the instructions provided with the
compressor.
Do not simply throw the old cartridge
away
a
fter
u
se;
t
ake
i
t
t
o
y
our
C
ITROËN
au
thorised repairer or to a waste
recovery organisation that specialises
in this type of product.
Once the tyre has been repaired, go
to a CITROËN authorised repairer or
a
q
ualified
p
rofessional
a
s
s
oon
a
s
po
ssible.
If you are unable to obtain the desired
pressure after a few minutes of
operation of the compressor, this
means that the tyre cannot be repaired.
Contact CITRÖEN ASSISTANCE who
will send a roadside recovery agent.
Practical advice