CITROEN E-MEHARI 2023 User Guide
Manufacturer: CITROEN, Model Year: 2023, Model line: E-MEHARI, Model: CITROEN E-MEHARI 2023Pages: 84, PDF Size: 3.48 MB
Page 11 of 84
9
In the menu, you have several choices:
Advanced settings
-
Sel
ection of the language.
-
S
peed units: km/h or mph
-
T
emperature units: °C or °F
-
R
einitialisation of the under-inflation
detection system
Setting the clock
-
Auto/Manual
-
D
isplay format: 12 or 24 hour format
Automatic locking
-
A
ctivation/Deactivation of the locking the
openings while driving function
Brightness
Setting the brightness in night mode.
Extended dormancy (Hibernation)
For more information on the Hibernation
mode , refer to the corresponding section.Consumption, charging,
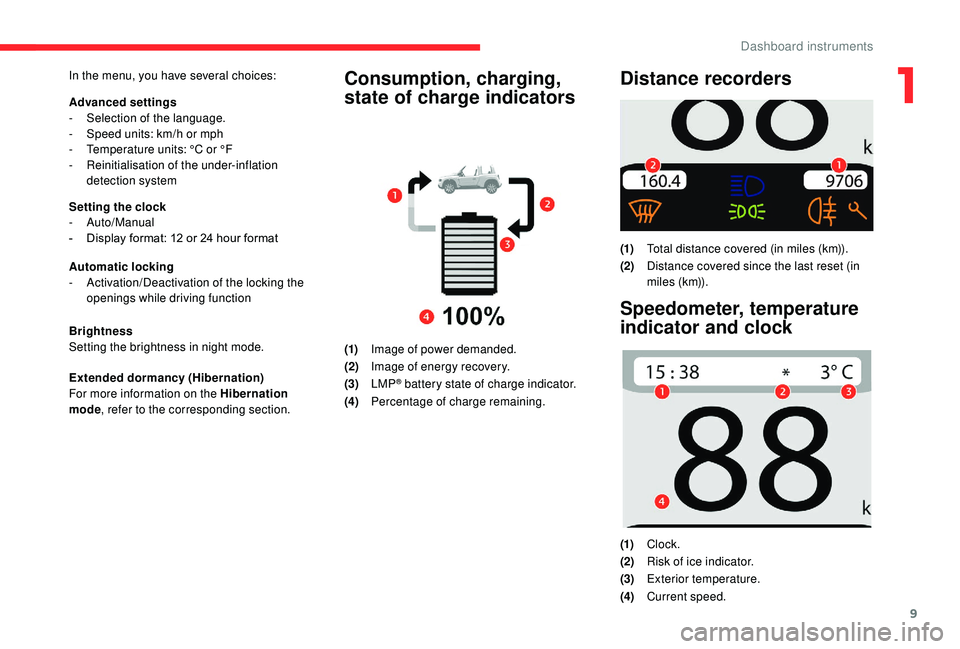
state of charge indicators
(1)Image of power demanded.
(2) Image of energy recovery.
(3) LMP
® battery state of charge indicator.
(4) Percentage of charge remaining.
Distance recorders
(1)Total distance covered (in miles (km)).
(2) Distance covered since the last reset (in
miles (km)).
Speedometer, temperature
indicator and clock
(1)Clock.
(2) Risk of ice indicator.
(3) Exterior temperature.
(4) Current speed.
1
Dashboard instruments
Page 12 of 84
10
RFID (Radio Frequency
IDentification) personal
key ring
The personal RFID key ring is supplied to you
on handover of your E-MEHARI.
It is used to:
-
L
ock or unlock all the openings: the driver's
door, the passenger's door and the boot
flap.
-
A
ctivate or deactivate driving rights by
operating the electronic immobiliser
installed in your E-MEHARI.
-
L
ock or unlock the charging nozzle, as well
as the secure compartment located in the
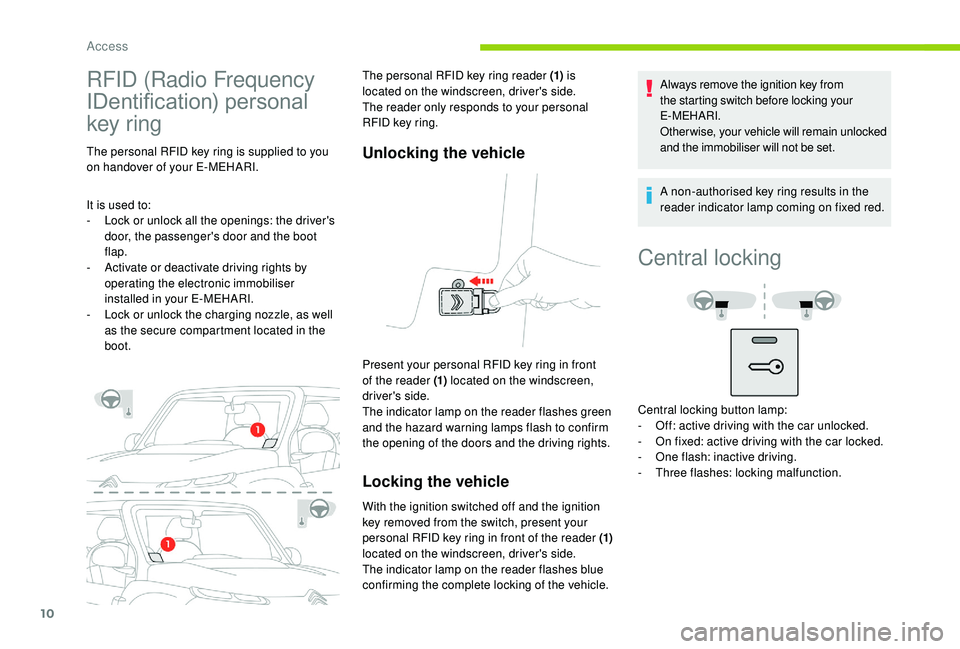
boot. The personal RFID key ring reader (1)
is
located on the windscreen, driver's side.
The reader only responds to your personal
RFID key ring.Unlocking the vehicle
Present your personal RFID key ring in front
of the reader (1) located on the windscreen,
driver's side.
The indicator lamp on the reader flashes green
and the hazard warning lamps flash to confirm
the opening of the doors and the driving rights.
Locking the vehicle
With the ignition switched off and the ignition
key removed from the switch, present your
personal RFID key ring in front of the reader (1)
located on the windscreen, driver's side.
The indicator lamp on the reader flashes blue
confirming the complete locking of the vehicle. Always remove the ignition key from
the starting switch before locking your
E-MEHARI.
Otherwise, your vehicle will remain unlocked
and the immobiliser will not be set.
A non-authorised key ring results in the
reader indicator lamp coming on fixed red.
Central locking
Central locking button lamp:
-
O ff: active driving with the car unlocked.
-
O
n fixed: active driving with the car locked.
-
O
ne flash: inactive driving.
-
T
hree flashes: locking malfunction.
Access
Page 13 of 84
11
Manual central locking
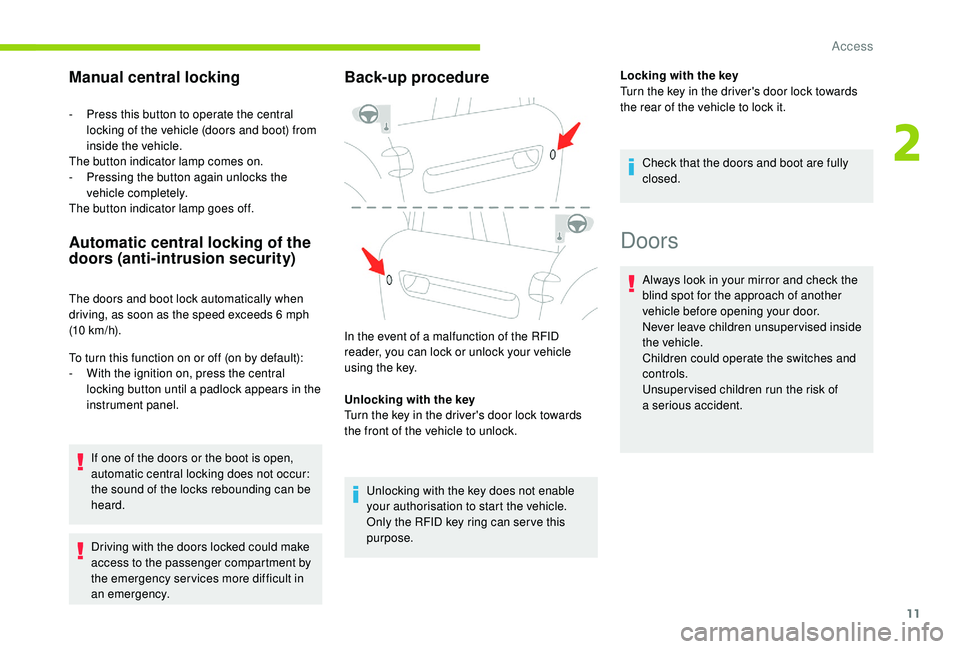
- Press this button to operate the central locking of the vehicle (doors and boot) from
inside the vehicle.
The button indicator lamp comes on.
-
P
ressing the button again unlocks the
vehicle completely.
The button indicator lamp goes off.
Automatic central locking of the
doors (anti-intrusion security)
The doors and boot lock automatically when
driving, as soon as the speed exceeds 6 mph
(10
km/h).
To turn this function on or off (on by default):
-
W
ith the ignition on, press the central
locking button until a
padlock appears in the
instrument panel.
If one of the doors or the boot is open,
automatic central locking does not occur:
the sound of the locks rebounding can be
heard.
Driving with the doors locked could make
access to the passenger compartment by
the emergency services more difficult in
an emergency.
Back-up procedure
In the event of a malfunction of the RFID
r eader, you can lock or unlock your vehicle
using the key.
Unlocking with the key
Turn the key in the driver's door lock towards
the front of the vehicle to unlock.
Unlocking with the key does not enable
your authorisation to start the vehicle.
Only the RFID key ring can ser ve this
purpose. Locking with the key
Turn the key in the driver's door lock towards
the rear of the vehicle to lock it.
Check that the doors and boot are fully
closed.
Doors
Always look in your mirror and check the
blind spot for the approach of another
vehicle before opening your door.
Never leave children unsuper vised inside
the vehicle.
Children could operate the switches and
controls.
Unsuper vised children run the risk of
a
serious accident.
2
Access
Page 14 of 84
12
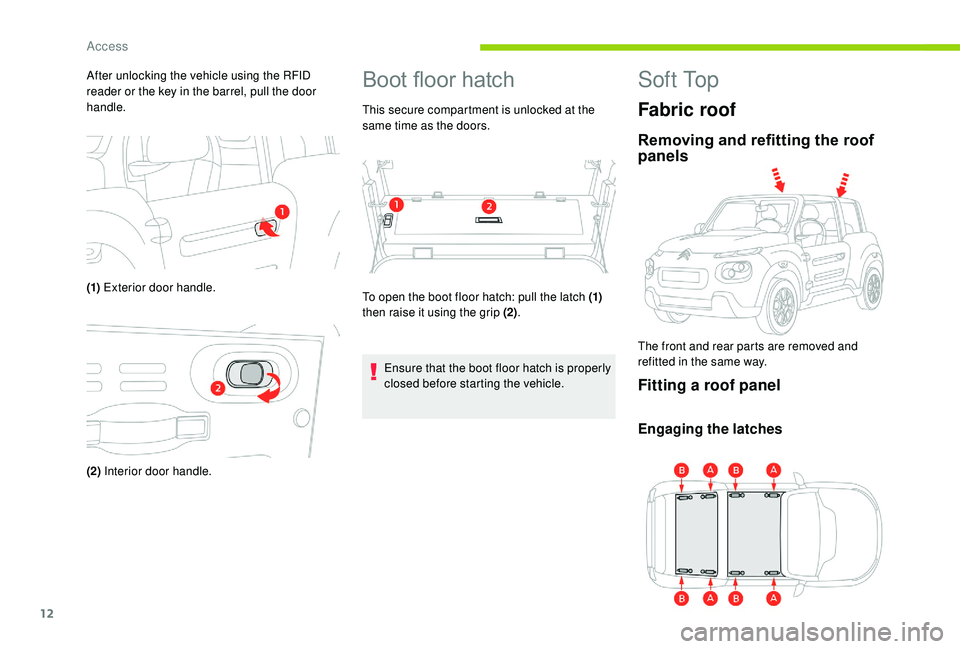
After unlocking the vehicle using the RFID
reader or the key in the barrel, pull the door
handle.
(1) Exterior door handle.
(2) Interior door handle.Boot floor hatch
This secure compartment is unlocked at the
same time as the doors.
To open the boot floor hatch: pull the latch (1)
then raise it using the grip (2) .
Ensure that the boot floor hatch is properly
closed before starting the vehicle.
S o f t To p
Fabric roof
Removing and refitting the roof
panels
The front and rear parts are removed and
refitted in the same way.
Fitting a roof panel
Engaging the latches
Access
Page 15 of 84
13
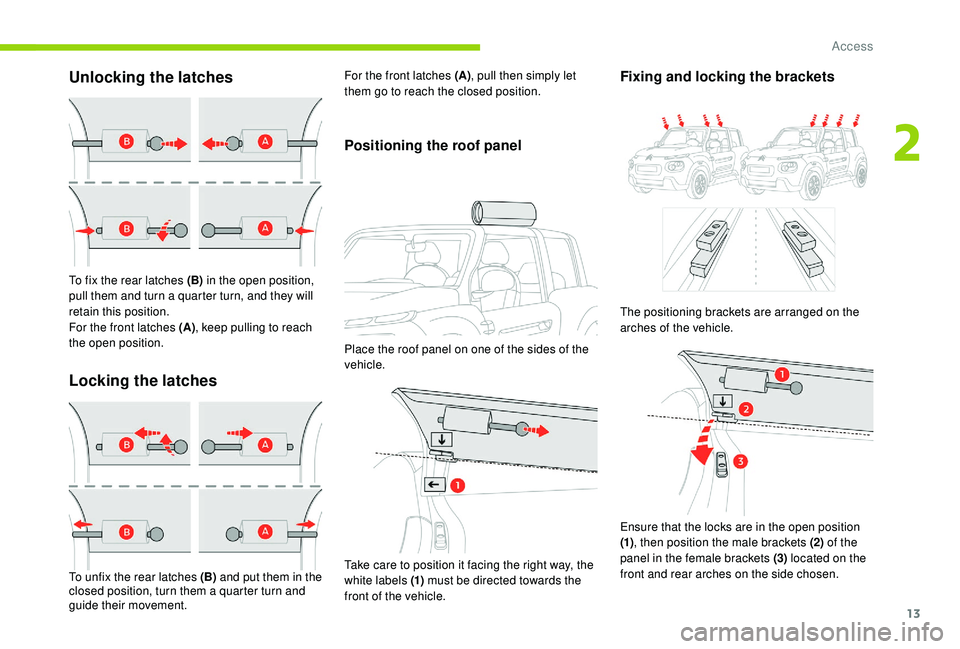
Unlocking the latches
To fix the rear latches (B) in the open position,
pull them and turn a quarter turn, and they will
retain this position.
For the front latches (A) , keep pulling to reach
the open position.
Locking the latches
For the front latches (A) , pull then simply let
them go to reach the closed position.
Positioning the roof panel
To unfix the rear latches (B) and put them in the
closed position, turn them a quarter turn and
guide their movement. Place the roof panel on one of the sides of the
vehicle.
Take care to position it facing the right way, the
white labels (1)
must be directed towards the
front of the vehicle.
Fixing and locking the brackets
The positioning brackets are arranged on the
arches of the vehicle.
Ensure that the locks are in the open position
(1) , then position the male brackets (2) of the
panel in the female brackets (3) located on the
front and rear arches on the side chosen.
2
Access
Page 16 of 84
14
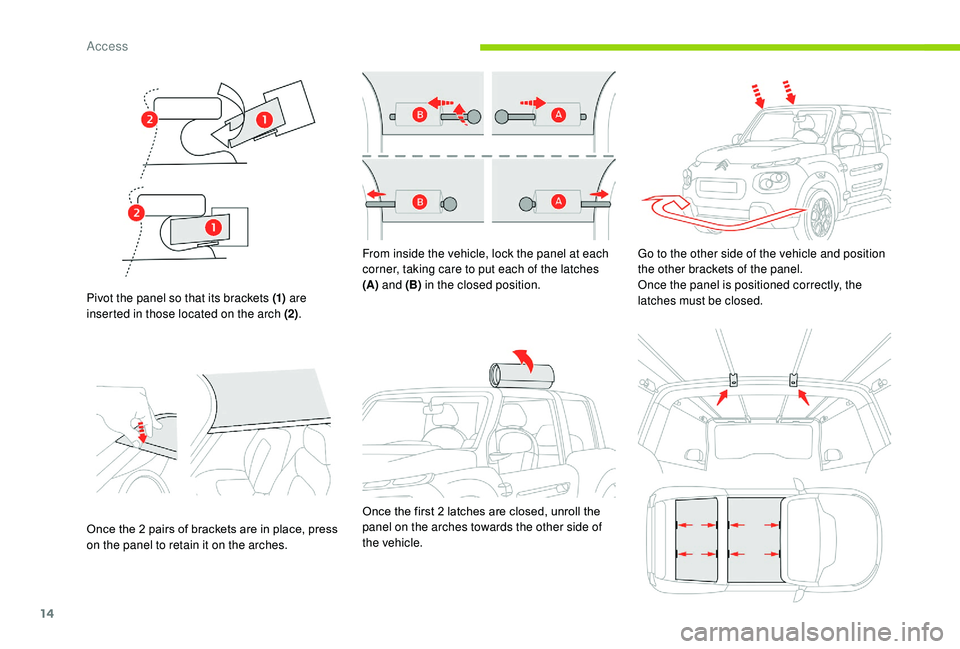
Pivot the panel so that its brackets (1) are
inserted in those located on the arch (2) .
Once the 2
pairs of brackets are in place, press
on the panel to retain it on the arches. From inside the vehicle, lock the panel at each
corner, taking care to put each of the latches
(A)
and (B) in the closed position.
Once the first 2 latches are closed, unroll the
panel on the arches towards the other side of
the vehicle. Go to the other side of the vehicle and position
the other brackets of the panel.
Once the panel is positioned correctly, the
latches must be closed.
Access
Page 17 of 84
15
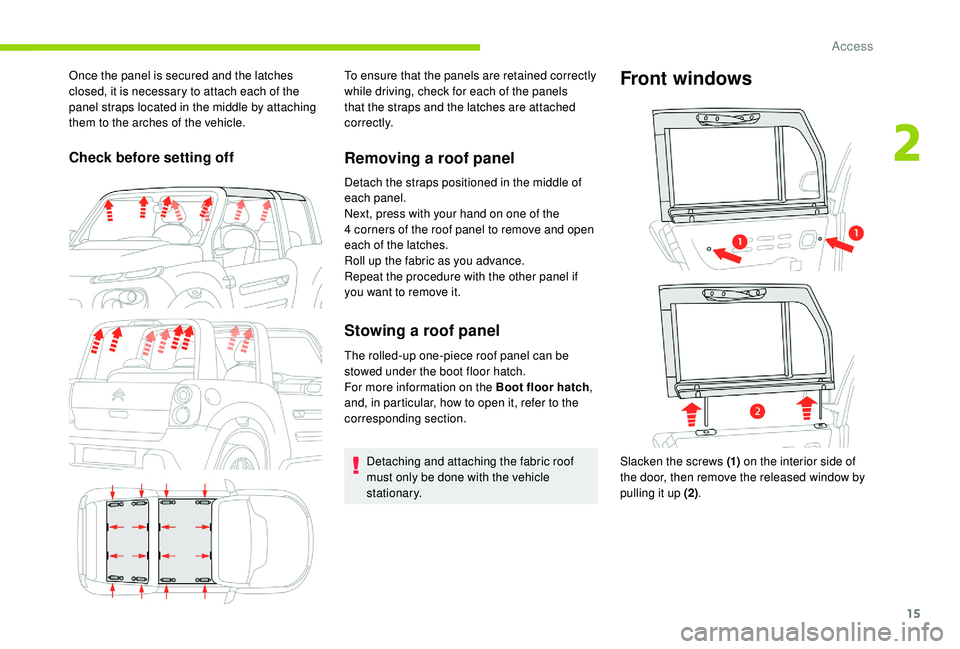
Once the panel is secured and the latches
closed, it is necessary to attach each of the
panel straps located in the middle by attaching
them to the arches of the vehicle.
Check before setting off
To ensure that the panels are retained correctly
while driving, check for each of the panels
that the straps and the latches are attached
c o r r e c t l y.
Removing a roof panel
Detach the straps positioned in the middle of
each panel.
Next, press with your hand on one of the
4 corners of the roof panel to remove and open
each of the latches.
Roll up the fabric as you advance.
Repeat the procedure with the other panel if
you want to remove it.
Stowing a roof panel
The rolled-up one-piece roof panel can be
stowed under the boot floor hatch.
For more information on the Boot floor hatch ,
and, in particular, how to open it, refer to the
corresponding section.
Detaching and attaching the fabric roof
must only be done with the vehicle
stationary.
Front windows
Slacken the screws (1) on the interior side of
the door, then remove the released window by
pulling it up (2) .
2
Access
Page 18 of 84
16
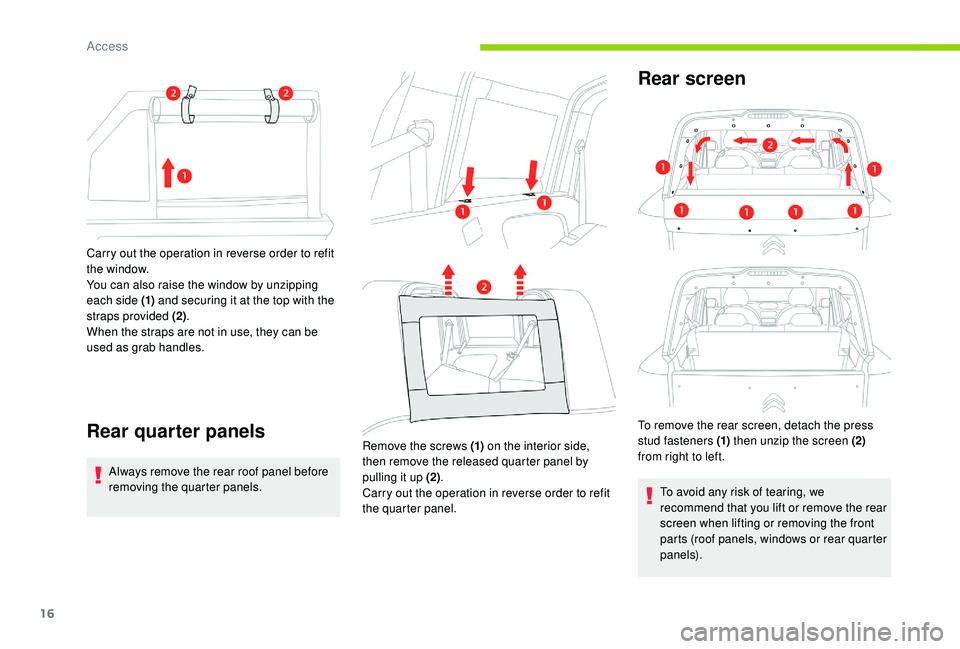
Carry out the operation in reverse order to refit
the window.
You can also raise the window by unzipping
each side (1) and securing it at the top with the
straps provided (2) .
When the straps are not in use, they can be
used as grab handles.
Rear quarter panels
Always remove the rear roof panel before
removing the quarter panels. Remove the screws (1)
on the interior side,
then remove the released quarter panel by
pulling it up (2) .
Carry out the operation in reverse order to refit
the quarter panel.
Rear screen
To remove the rear screen, detach the press
stud fasteners (1) then unzip the screen (2)
from right to left.
To avoid any risk of tearing, we
recommend that you lift or remove the rear
screen when lifting or removing the front
parts (roof panels, windows or rear quarter
panels).
Access
Page 19 of 84
17
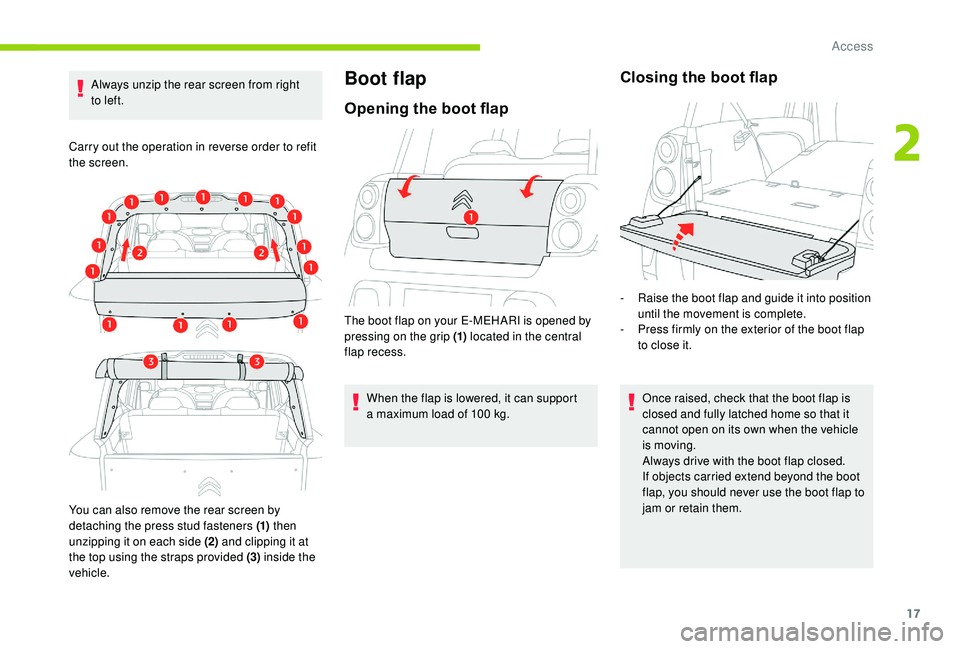
Always unzip the rear screen from right
to left.
Carry out the operation in reverse order to refit
the screen.
You can also remove the rear screen by
detaching the press stud fasteners (1) then
unzipping it on each side (2) and clipping it at
the top using the straps provided (3) inside the
vehicle.Boot flap
Opening the boot flap
The boot flap on your E-MEHARI is opened by
pressing on the grip (1) located in the central
flap recess.
When the flap is lowered, it can support
a
maximum load of 100 kg.
Closing the boot flap
- Raise the boot flap and guide it into position until the movement is complete.
-
P
ress firmly on the exterior of the boot flap
to close it.
Once raised, check that the boot flap is
closed and fully latched home so that it
cannot open on its own when the vehicle
is moving.
Always drive with the boot flap closed.
If objects carried extend beyond the boot
flap, you should never use the boot flap to
jam or retain them.
2
Access
Page 20 of 84
18
H a r d To p
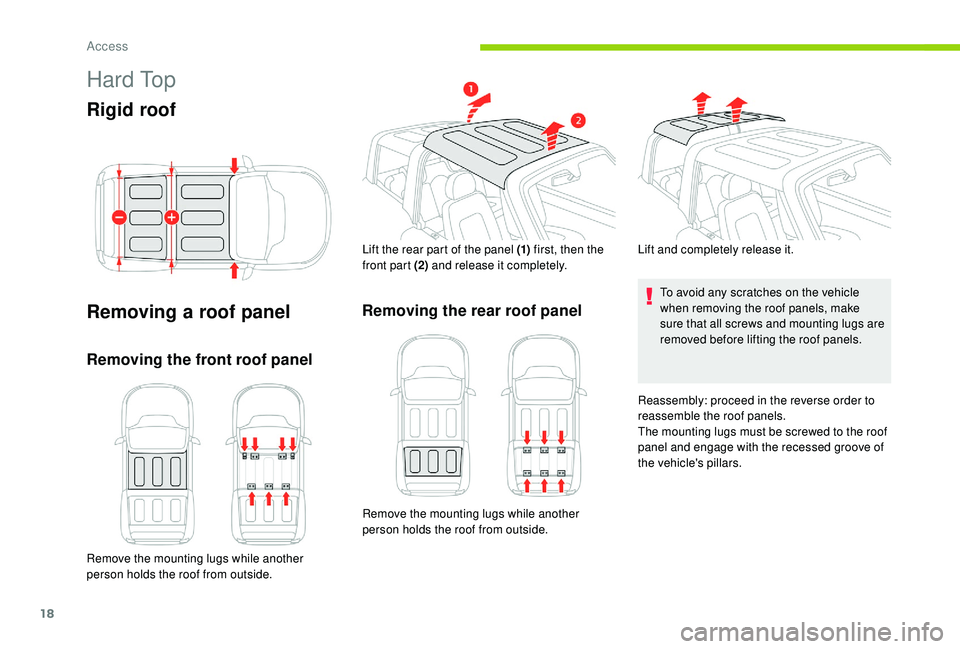
Rigid roof
Removing a roof panel
Removing the front roof panel
Remove the mounting lugs while another
person holds the roof from outside. Lift the rear part of the panel (1)
first, then the
front part (2) and release it completely.
Removing the rear roof panel
Remove the mounting lugs while another
person holds the roof from outside. Lift and completely release it.
To avoid any scratches on the vehicle
when removing the roof panels, make
sure that all screws and mounting lugs are
removed before lifting the roof panels.
Reassembly: proceed in the reverse order to
reassemble the roof panels.
The mounting lugs must be screwed to the roof
panel and engage with the recessed groove of
the vehicle's pillars.
Access