Screen Citroen GRAND C4 PICASSO 2017 2.G Owner's Manual
[x] Cancel search | Manufacturer: CITROEN, Model Year: 2017, Model line: GRAND C4 PICASSO, Model: Citroen GRAND C4 PICASSO 2017 2.GPages: 527, PDF Size: 12.91 MB
Page 483 of 527
130
1
Audio and Telematics
Transversal-Citroen_en_Chap02_RCC-2-2-0_ed01-2016
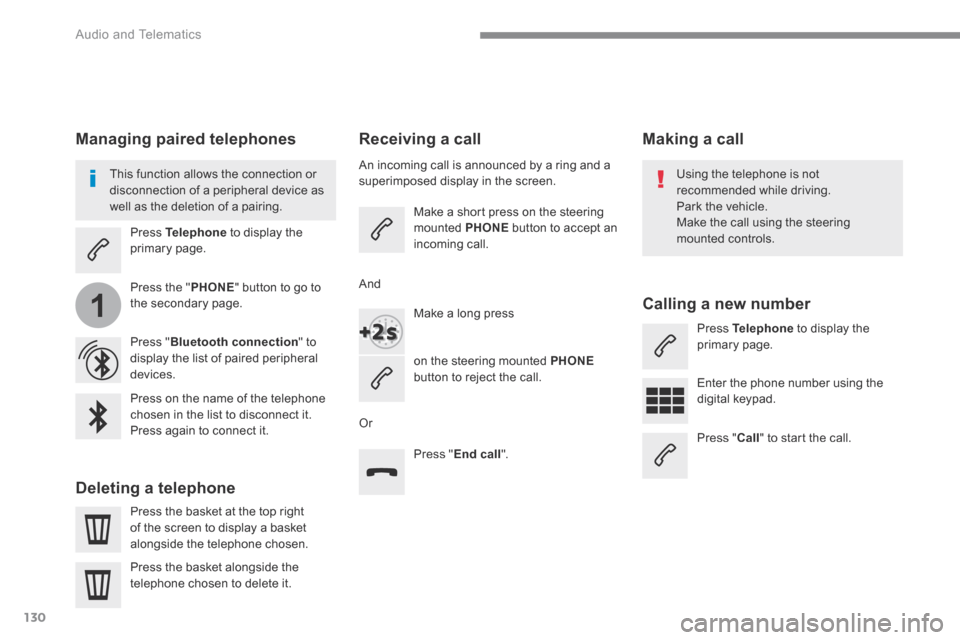
Receiving a call
An incoming call is announced by a ring and a superimposed display in the screen.
Make a short press on the steering mounted PHONE button to accept an incoming call.
Make a long press
on the steering mounted PHONEbutton to reject the call.
Or
And
Press " End call ".
Press on the name of the telephone chosen in the list to disconnect it. Press again to connect it.
Press the basket at the top right of the screen to display a basket
alongside the telephone chosen.
Press the basket alongside the telephone chosen to delete it.
Managing paired telephones
This function allows the connection or disconnection of a peripheral device as well as the deletion of a pairing.
Press Telephone to display the primary page.
Press the " PHONE " button to go to the secondary page.
Press " Bluetooth connection " to display the list of paired peripheral devices.
Deleting a telephone
Using the telephone is not recommended while driving. Park the vehicle. Make the call using the steering
mounted controls.
Making a call
Calling a new number
Press Telephone to display the primary page.
Enter the phone number using the digital keypad.
Press " Call " to start the call.
Page 486 of 527
133
.
1
2
3
4
Audio and Telematics
Transversal-Citroen_en_Chap02_RCC-2-2-0_ed01-2016
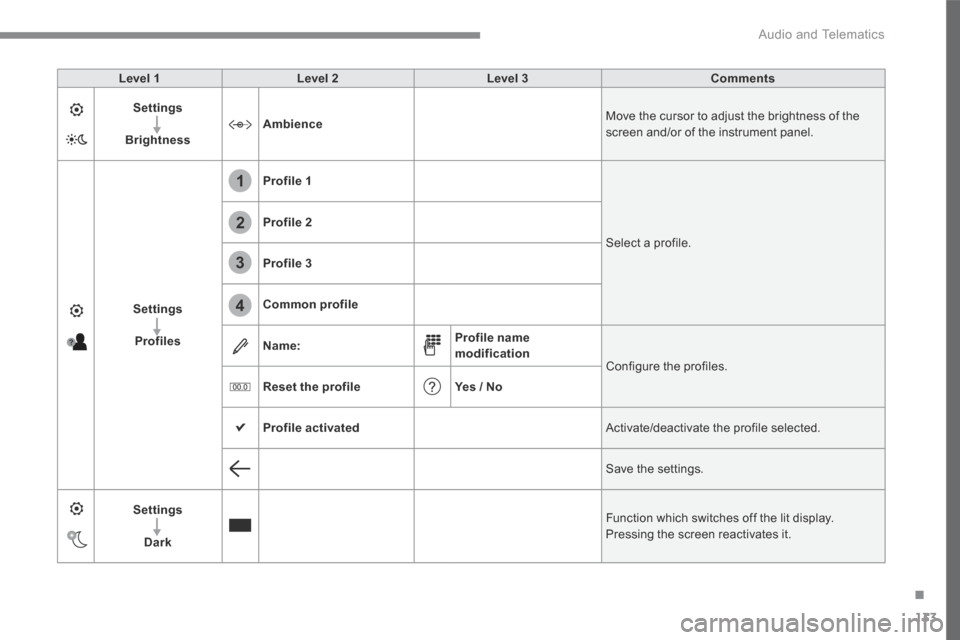
Level 1Level 2Level 3Comments
Settings
BrightnessAmbience Move the cursor to adjust the brightness of the screen and/or of the instrument panel.
Settings
Profiles
Profile 1
Select a profile.
Profile 2
Profile 3
Common profile
Name:Profile name modification Configure the profiles.
Reset the profileYes / No
Profile activated Activate/deactivate the profile selected.
Save the settings.
Settings
Dark
Function which switches off the lit display. Pressing the screen reactivates it.
Page 488 of 527
135
.
Audio and Telematics
Transversal-Citroen_en_Chap02_RCC-2-2-0_ed01-2016
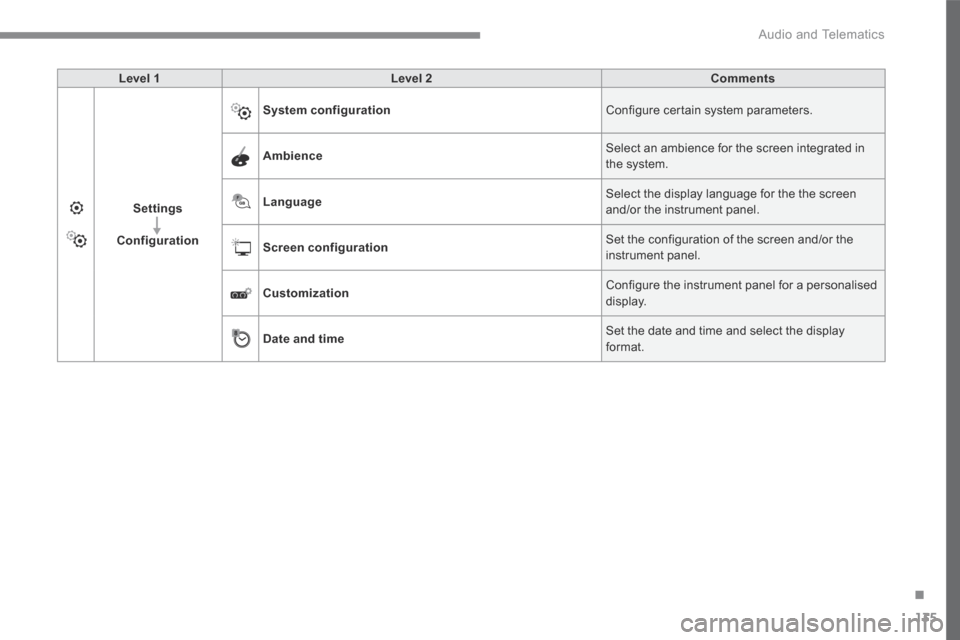
Level 1Level 2Comments
Settings
Configuration
System configuration Configure certain system parameters.
Ambience Select an ambience for the screen integrated in the system.
Language Select the display language for the the screen and/or the instrument panel.
Screen configuration Set the configuration of the screen and/or the instrument panel.
Customization Configure the instrument panel for a personalised display.
Date and time Set the date and time and select the display format.
Page 490 of 527
137
.
6
5
7
8
9
10
11
Audio and Telematics
Transversal-Citroen_en_Chap02_RCC-2-2-0_ed01-2016
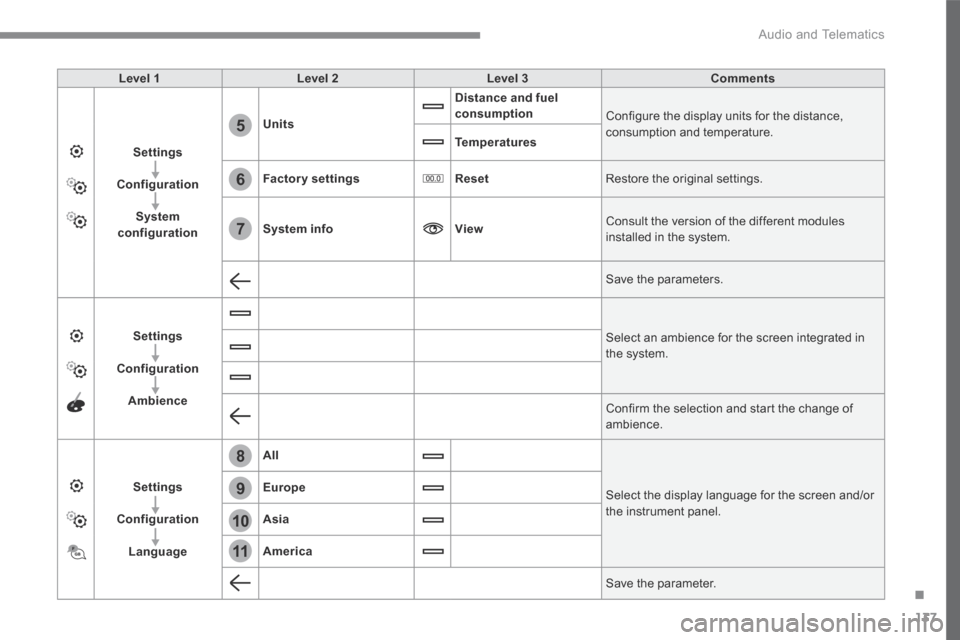
Level 1Level 2Level 3Comments
Settings
Configuration
System configuration
Units
Distance and fuel consumption Configure the display units for the distance, consumption and temperature. Temperatures
Factory settingsReset Restore the original settings.
System infoView Consult the version of the different modules installed in the system.
Save the parameters.
Settings
Configuration
Ambience
Select an ambience for the screen integrated in the system.
Confirm the selection and start the change of ambience.
Settings
Configuration
Language
All
Select the display language for the screen and/or the instrument panel.
Europe
Asia
America
Save the parameter.
Page 492 of 527
139
.
12
13
14
15
Audio and Telematics
Transversal-Citroen_en_Chap02_RCC-2-2-0_ed01-2016
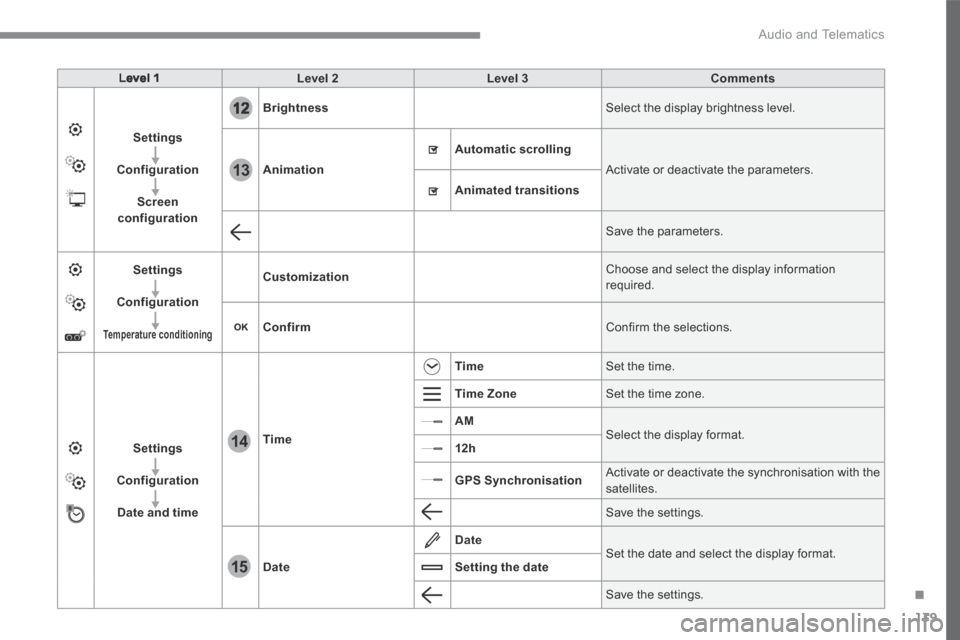
Level 1Level 2Level 3Comments
Settings
Configuration
Screen configuration
Brightness Select the display brightness level.
Animation
Automatic scrolling
Activate or deactivate the parameters.
Animated transitions
Save the parameters.
Settings
Configuration
Temperature conditioning
Customization Choose and select the display information required.
Confirm Confirm the selections.
Settings
Configuration
Date and time
Time
Time Set the time.
Time Zone Set the time zone.
AM Select the display format. 12h
GPS Synchronisation Activate or deactivate the synchronisation with the satellites.
Save the settings.
Date
Date Set the date and select the display format. Setting the date
Save the settings.
Page 493 of 527
140
1
Audio and Telematics
Transversal-Citroen_en_Chap02_RCC-2-2-0_ed01-2016
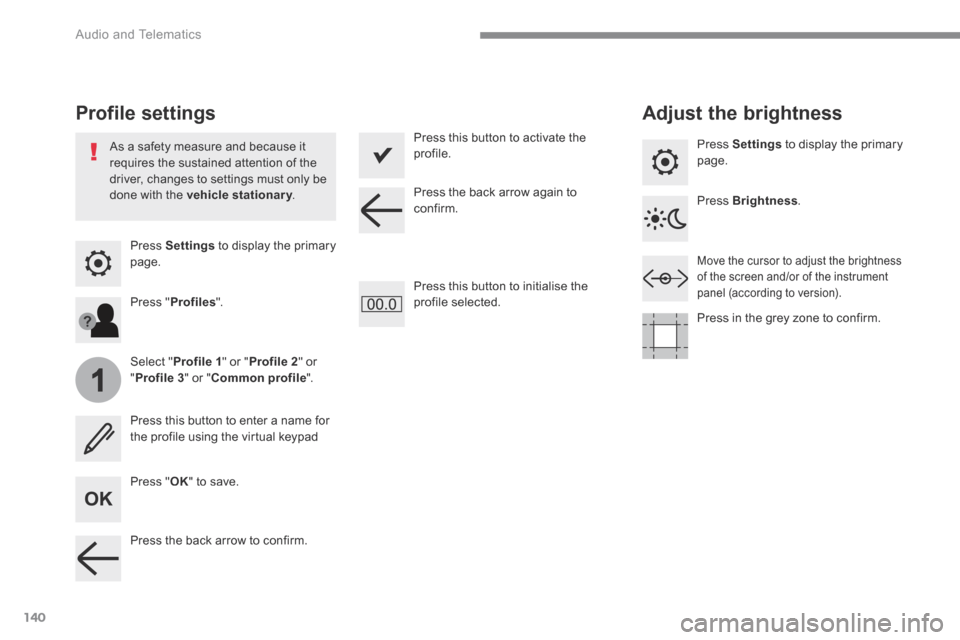
Press Settings to display the primary page.
Profile settings Adjust the brightness
Press " OK " to save.
Select " Profile 1 " or " Profile 2 " or " Profile 3 " or " Common profile ".
Press " Profiles ".
Press this button to enter a name for the profile using the virtual keypad
As a safety measure and because it requires the sustained attention of the driver, changes to settings must only be done with the vehicle stationary . vehicle stationary . vehicle stationary
Press this button to activate the profile.
Press this button to initialise the profile selected.
Press Settings to display the primary page.
Move the cursor to adjust the brightness of the screen and/or of the instrument panel (according to version).
Press Brightness .
Press in the grey zone to confirm.
Press the back arrow to confirm.
Press the back arrow again to confirm.
Page 494 of 527
141
.
5
6
7
12
13
Audio and Telematics
Transversal-Citroen_en_Chap02_RCC-2-2-0_ed01-2016
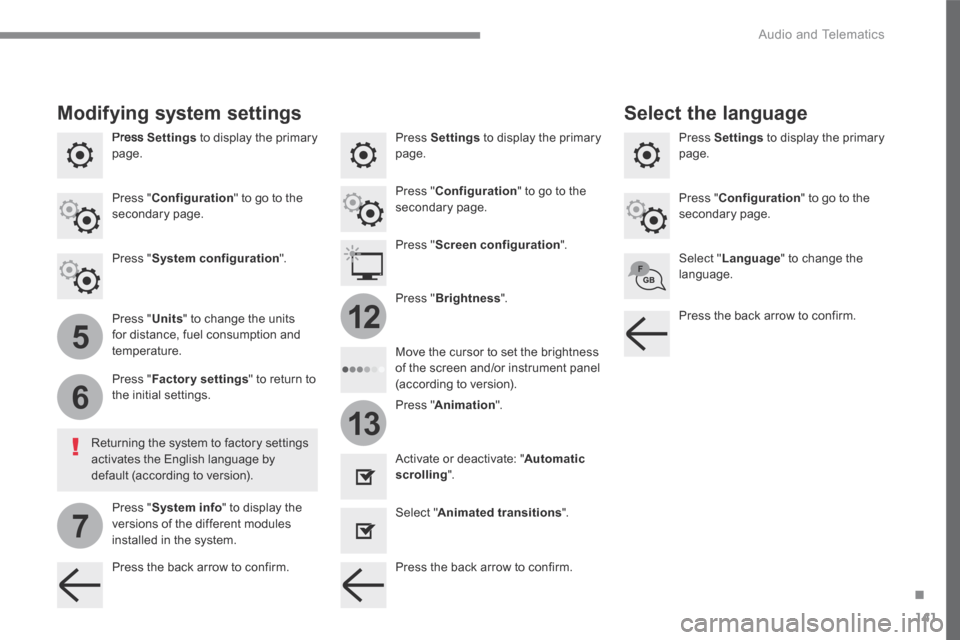
Press Settings to display the primary page. Press Settings to display the primary page. Press Settings to display the primary page.
Press " Configuration " to go to the secondary page. Press " Configuration " to go to the secondary page.
Press " Configuration " to go to the secondary page.
Press " System configuration ". Press " Screen configuration ".
Press " Units " to change the units for distance, fuel consumption and temperature.
Select " Language " to change the language.
Activate or deactivate: " Automatic scrolling ".
Select " Animated transitions ".
Move the cursor to set the brightness of the screen and/or instrument panel (according to version). Press " Factory settings " to return to the initial settings.
Press " System info " to display the versions of the different modules installed in the system.
Modifying system settings
Returning the system to factory settings activates the English language by default (according to version).
Pres s " Animation ".
Press " Brightness ".
Select the language
Press the back arrow to confirm. Press the back arrow to confirm.
Press the back arrow to confirm.
Page 497 of 527
144
Audio and Telematics
Transversal-Citroen_en_Chap02_RCC-2-2-0_ed01-2016
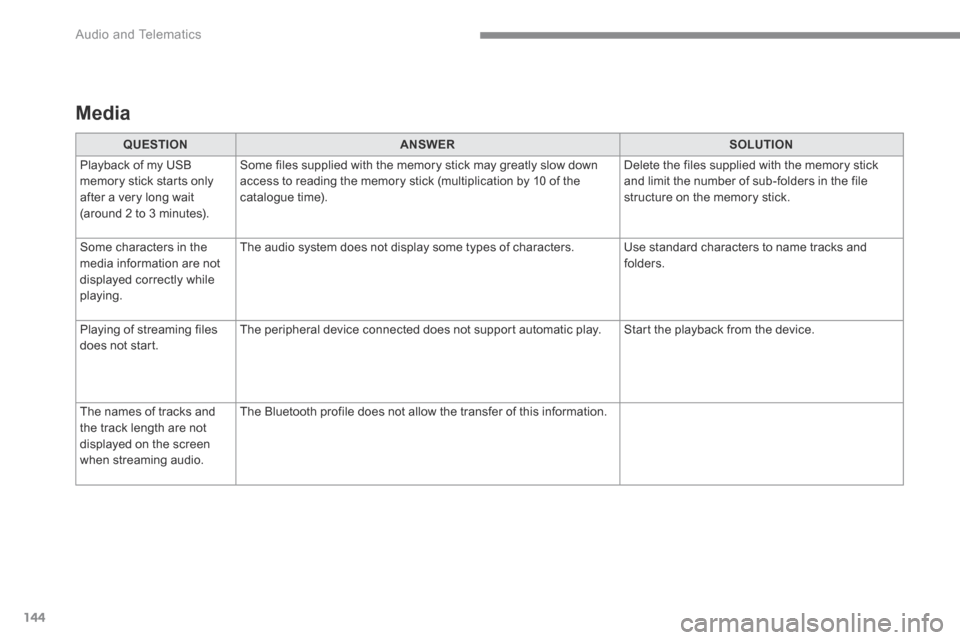
Media
QUESTIONANSWERSOLUTION
Playback of my USB memory stick starts only after a very long wait (around 2 to 3 minutes).
Some files supplied with the memory stick may greatly slow down access to reading the memory stick (multiplication by 10 of the catalogue time).
Delete the files supplied with the memory stick and limit the number of sub-folders in the file structure on the memory stick.
Some characters in the media information are not displayed correctly while playing.
The audio system does not display some types of characters. Use standard characters to name tracks and folders.
Playing of streaming files does not start. The peripheral device connected does not support automatic play. Start the playback from the device.
The names of tracks and the track length are not displayed on the screen when streaming audio.
The Bluetooth profile does not allow the transfer of this information.
Page 501 of 527
148
Audio and Telematics
First steps
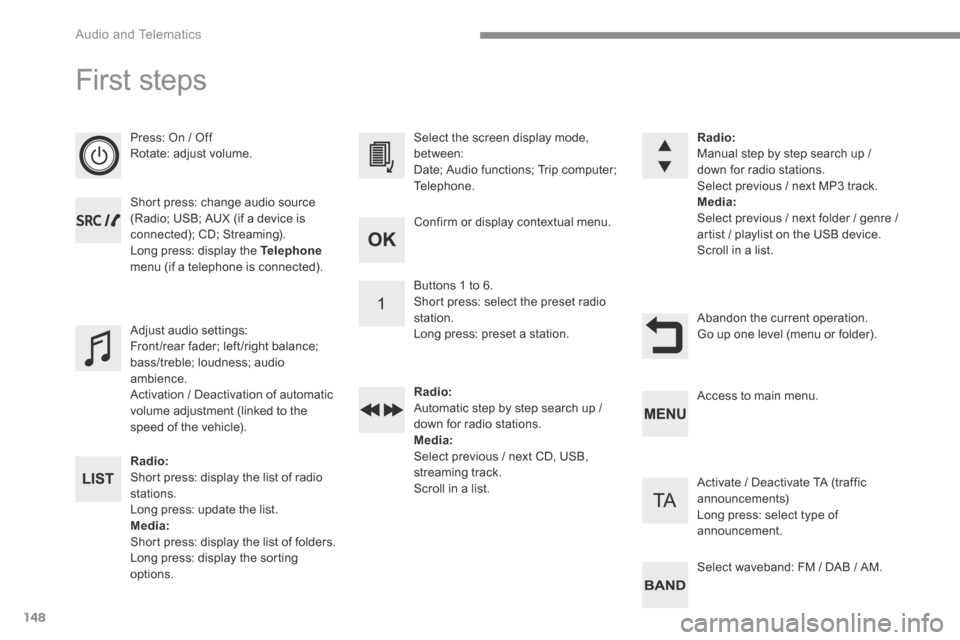
Press: On / Off Rotate: adjust volume.
Short press: change audio source (Radio; USB; AUX (if a device is connected); CD; Streaming). Long press: display the Telephonemenu (if a telephone is connected).
Radio: Short press: display the list of radio stations. Long press: update the list. Media: Short press: display the list of folders. Long press: display the sorting options.
Select the screen display mode, between: Date; Audio functions; Trip computer; Telephone.
Adjust audio settings: Front /rear fader; left /right balance; bass/treble; loudness; audio ambience. Activation / Deactivation of automatic volume adjustment (linked to the speed of the vehicle).
Radio: Manual step by step search up / down for radio stations. Select previous / next MP3 track. Media: Select previous / next folder / genre / artist / playlist on the USB device. Scroll in a list.
Abandon the current operation. Go up one level (menu or folder).
Confirm or display contextual menu.
Buttons 1 to 6. Short press: select the preset radio station. Long press: preset a station.
Radio: Automatic step by step search up / down for radio stations. Media: Select previous / next CD, USB, streaming track. Scroll in a list.
Access to main menu.
Activate / Deactivate TA (traffic announcements) Long press: select type of announcement.
Select waveband: FM / DAB / AM.
Page 505 of 527
152
Audio and Telematics
RDS
Short procedure
Long procedure
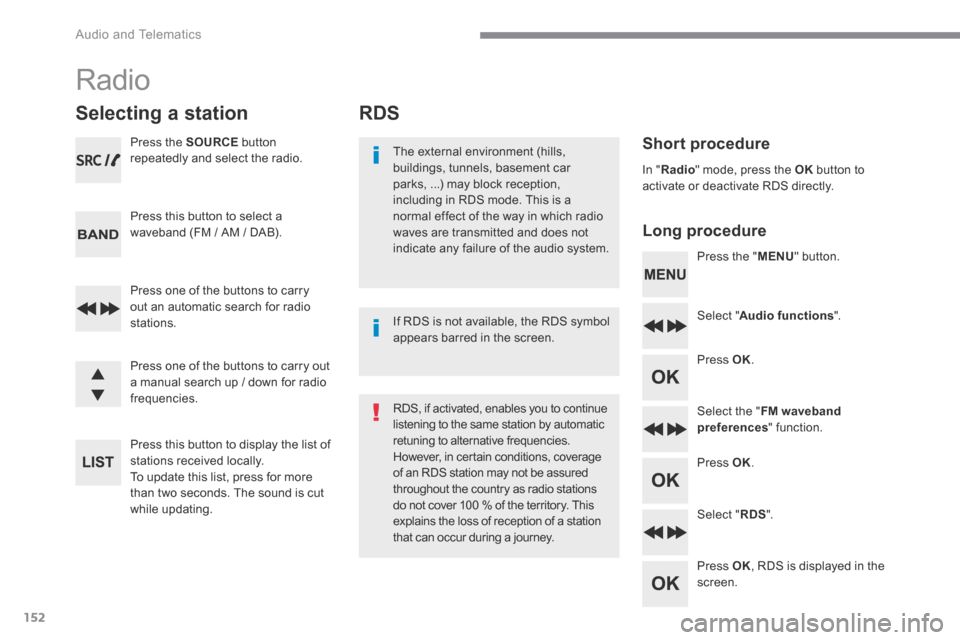
The external environment (hills, buildings, tunnels, basement car parks, ...) may block reception, including in RDS mode. This is a normal effect of the way in which radio waves are transmitted and does not indicate any failure of the audio system. Press the " MENU " button.
Select " Audio functions ".
Press OK .
Select the " FM waveband preferences " function.
Press OK .
Select " RDS ".
Press OK , RDS is displayed in the screen.
In " Radio " mode, press the OK button to activate or deactivate RDS directly.
RDS, if activated, enables you to continue listening to the same station by automatic retuning to alternative frequencies. However, in certain conditions, coverage of an RDS station may not be assured throughout the country as radio stations do not cover 100 % of the territory. This explains the loss of reception of a station that can occur during a journey.
If RDS is not available, the RDS symbol appears barred in the screen.
Radio
Selecting a station
Press the SOURCE button repeatedly and select the radio.
Press this button to select a waveband (FM / AM / DAB).
Press one of the buttons to carry out an automatic search for radio stations.
Press one of the buttons to carry out a manual search up / down for radio frequencies.
Press this button to display the list of stations received locally. To update this list, press for more than two seconds. The sound is cut while updating.