Time Citroen GRAND C4 PICASSO 2017 2.G Owner's Guide
[x] Cancel search | Manufacturer: CITROEN, Model Year: 2017, Model line: GRAND C4 PICASSO, Model: Citroen GRAND C4 PICASSO 2017 2.GPages: 527, PDF Size: 12.91 MB
Page 83 of 527
81
C4-Picasso-II_en_Chap03_ergonomie-confort_ed02-2016
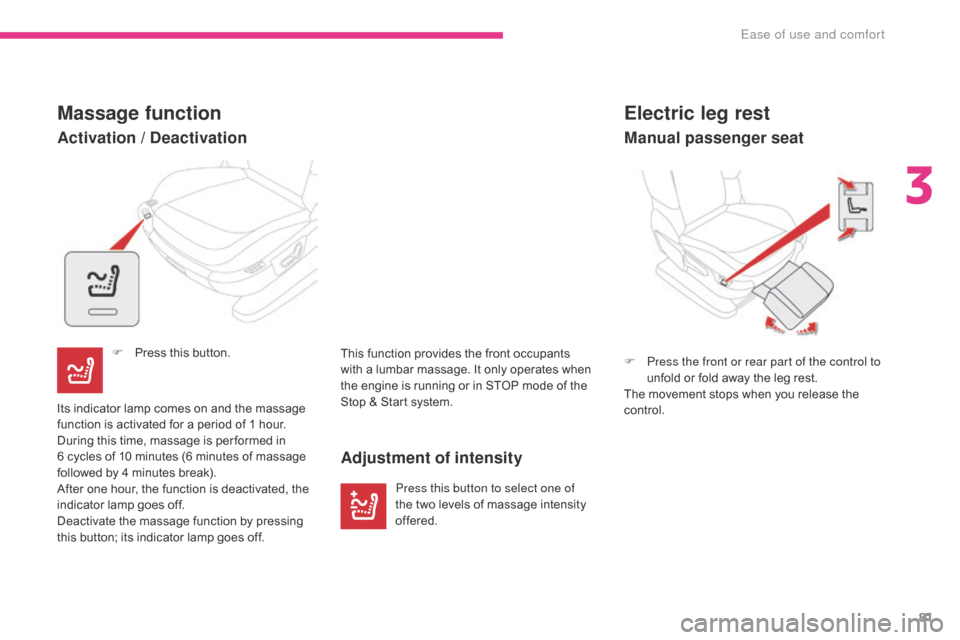
Electric leg rest
F Press the front or rear part of the control to unfold or fold away the leg rest.
The movement stops when you release the
control.
Activation / Deactivation
Massage function
This function provides the front occupants
with a lumbar massage. It only operates when
the engine is running or in STOP mode of the
Stop
& Start system.
F
P
ress this button.
Adjustment of intensity
Press this button to select one of
the two levels of massage intensity
offered.
Its indicator lamp comes on and the massage
function is activated for a period of 1 hour.
During this time, massage is per formed in
6
cycles of 10 minutes (6 minutes of massage
followed by 4 minutes break).
After one hour, the function is deactivated, the
indicator lamp goes off.
Deactivate the massage function by pressing
this button; its indicator lamp goes off.
Manual passenger seat
3
Ease of use and comfort
Page 87 of 527
85
C4-Picasso-II_en_Chap03_ergonomie-confort_ed02-2016
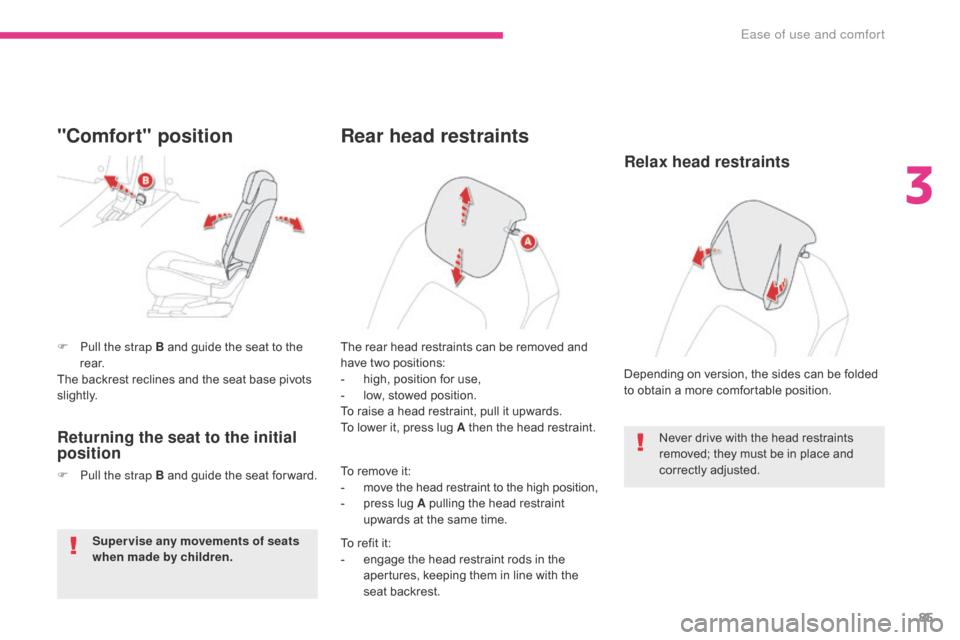
F Pull the strap B and guide the seat to the r e a r.
The backrest reclines and the seat base pivots
s li g ht l y.
"Comfort" position
Returning the seat to the initial
position
F Pull the strap B and guide the seat for ward.
Super vise any movements of seats
when made by children. To remove it:
- m
ove the head restraint to the high position,
-
p
ress lug A pulling the head restraint
upwards at the same time.
The rear head restraints can be removed and
have two positions:
-
h
igh, position for use,
-
l
ow, stowed position.
To raise a head restraint, pull it upwards.
To lower it, press lug A then the head restraint.
Rear head restraints
Never drive with the head restraints
removed; they must be in place and
correctly adjusted.
To refit it:
-
e
ngage the head restraint rods in the
apertures, keeping them in line with the
seat backrest. Depending on version, the sides can be folded
to obtain a more comfortable position.
Relax head restraints
3
Ease of use and comfort
Page 108 of 527
106
C4-Picasso-II_en_Chap03_ergonomie-confort_ed02-2016
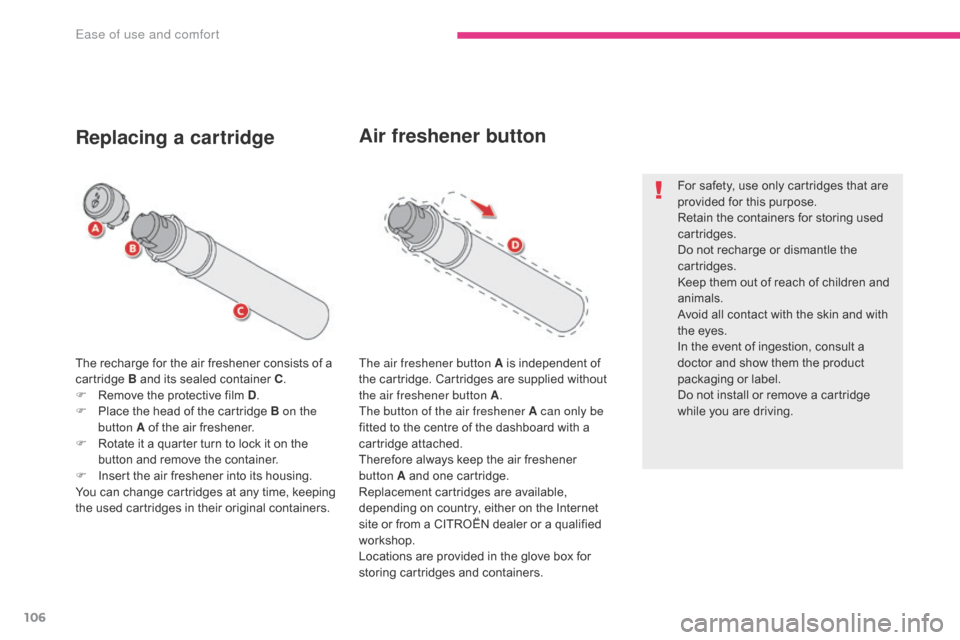
The recharge for the air freshener consists of a
cartridge B and its sealed container C.
F
R
emove the protective film D .
F
P
lace the head of the cartridge B on the
button A of the air freshener.
F
R
otate it a quarter turn to lock it on the
button and remove the container.
F
I
nsert the air freshener into its housing.
You can change cartridges at any time, keeping
the used cartridges in their original containers.
Replacing a cartridge
The air freshener button A is independent of
the cartridge. Cartridges are supplied without
the air freshener button A .
The button of the air freshener A can only be
fitted to the centre of the dashboard with a
cartridge attached.
Therefore always keep the air freshener
button
A and one cartridge.
Replacement cartridges are available,
depending on country, either on the Internet
site or from a CITROËN dealer or a qualified
workshop.
Locations are provided in the glove box for
storing cartridges and containers.
Air freshener button
For safety, use only cartridges that are
provided for this purpose.
Retain the containers for storing used
cartridges.
Do not recharge or dismantle the
cartridges.
Keep them out of reach of children and
animals.
Avoid all contact with the skin and with
the eyes.
In the event of ingestion, consult a
doctor and show them the product
packaging or label.
Do not install or remove a cartridge
while you are driving.
Ease of use and comfort
Page 112 of 527
110
C4-Picasso-II_en_Chap03_ergonomie-confort_ed02-2016
Central storage compartment
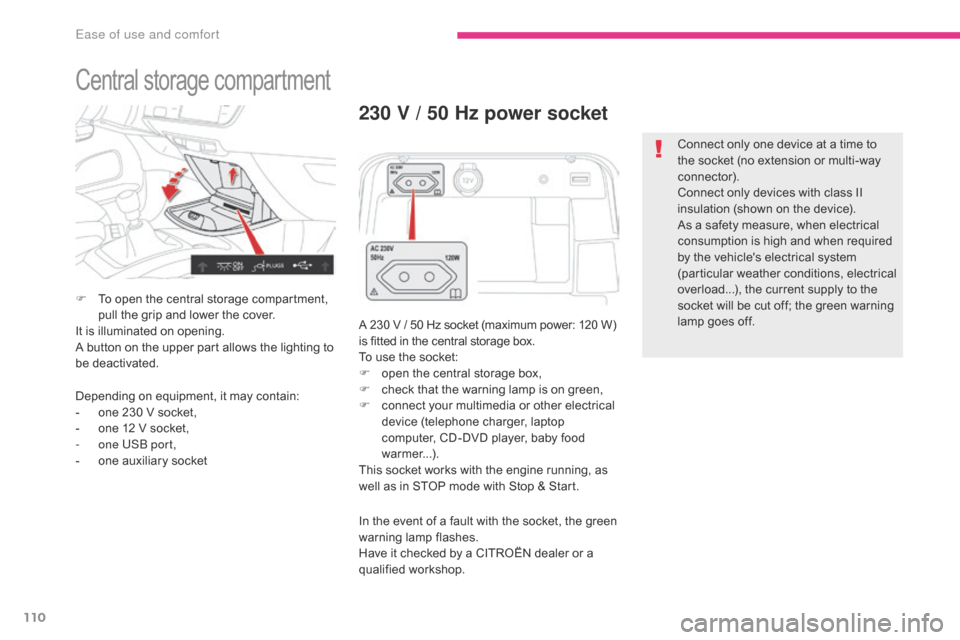
F To open the central storage compartment, pull the grip and lower the cover.
It is illuminated on opening.
A button on the upper part allows the lighting to
be deactivated.
230 V / 50 Hz power socket
A 230 V / 50 Hz socket (maximum power: 120 W)
i s fitted in the central storage box.
To use the socket:
F
o
pen the central storage box,
F
c
heck that the warning lamp is on green,
F
c
onnect your multimedia or other electrical
device (telephone charger, laptop
computer, CD-DVD player, baby food
warmer...).
This socket works with the engine running, as
well as in STOP mode with Stop & Start.
Depending on equipment, it may contain:
-
o
ne 230 V socket,
-
o
ne 12 V socket,
-
o
ne USB port,
-
o
ne auxiliary socket In the event of a fault with the socket, the green
warning lamp flashes.
Have it checked by a CITROËN dealer or a
qualified workshop. Connect only one device at a time to
the socket (no extension or multi-way
connector).
Connect only devices with class II
insulation (shown on the device).
As a safety measure, when electrical
consumption is high and when required
by the vehicle's electrical system
(particular weather conditions, electrical
overload...), the current supply to the
socket will be cut off; the green warning
lamp goes off.
Ease of use and comfort
Page 114 of 527
112
C4-Picasso-II_en_Chap03_ergonomie-confort_ed02-2016
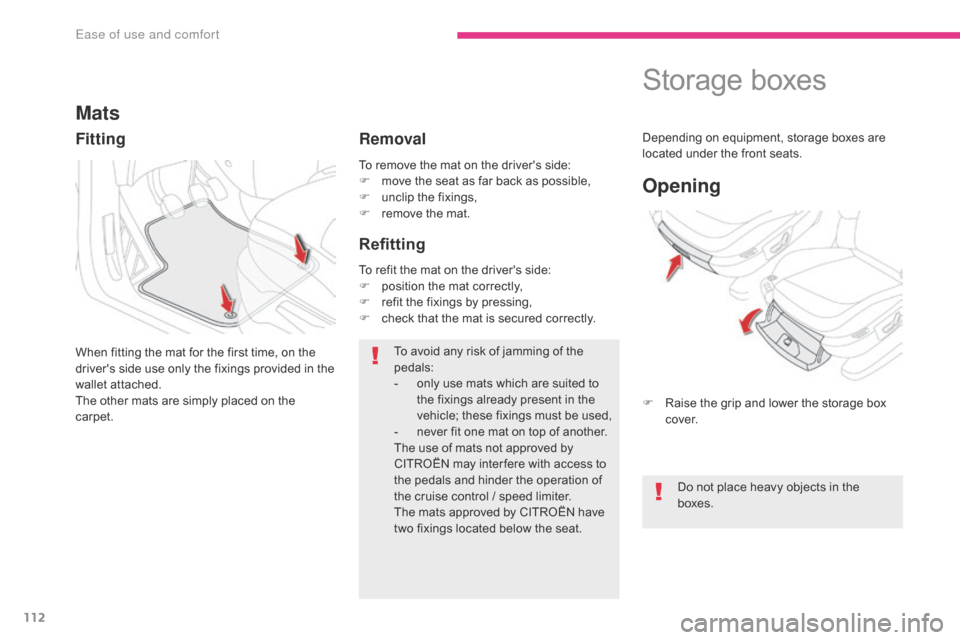
To remove the mat on the driver's side:
F m ove the seat as far back as possible,
F
u
nclip the fixings,
F
r
emove the mat.
Mats
When fitting the mat for the first time, on the
driver's side use only the fixings provided in the
wallet attached.
The other mats are simply placed on the
carpet. To avoid any risk of jamming of the
pedals:
-
o
nly use mats which are suited to
the fixings already present in the
vehicle; these fixings must be used,
-
n
ever fit one mat on top of another.
The use of mats not approved by
CITROËN may inter fere with access to
the pedals and hinder the operation of
the cruise control / speed limiter.
The mats approved by CITROËN have
two fixings located below the seat.
To refit the mat on the driver's side:
F
p
osition the mat correctly,
F
r
efit the fixings by pressing,
F
c
heck that the mat is secured correctly.
Fitting
Removal
Refitting
Storage boxes
F Raise the grip and lower the storage box
c ove r.
Opening
Do not place heavy objects in the
boxes.
Depending on equipment, storage boxes are
located under the front seats.
Ease of use and comfort
Page 117 of 527
115
C4-Picasso-II_en_Chap03_ergonomie-confort_ed02-2016
Rear multimedia
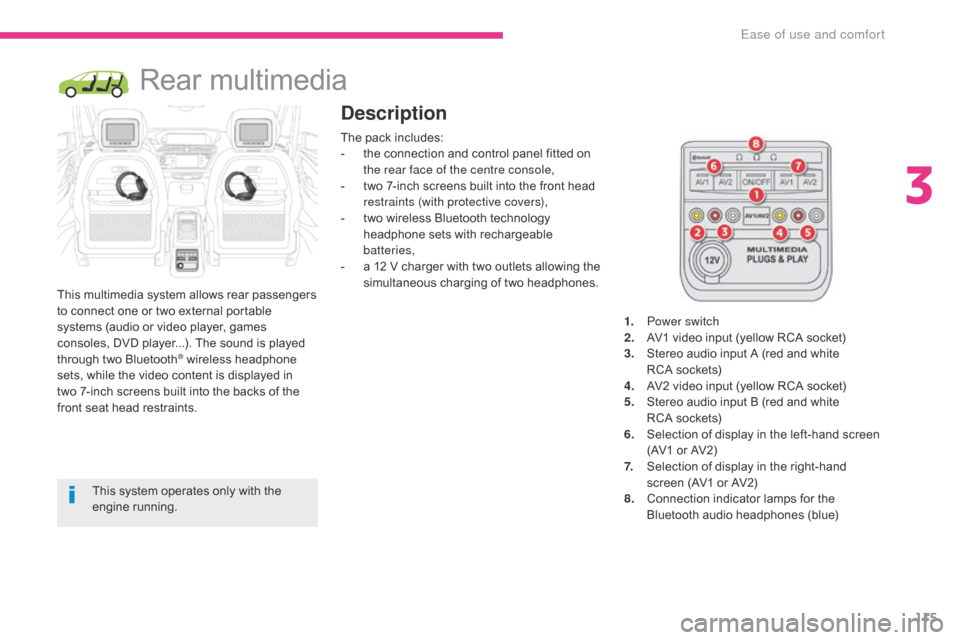
This multimedia system allows rear passengers
to connect one or two external portable
systems (audio or video player, games
consoles, DVD player...). The sound is played
through two Bluetooth
® wireless headphone
sets, while the video content is displayed in
two
7-inch screens built into the backs of the
front seat head restraints.
Description
This system operates only with the
engine running. The pack includes:
-
t
he connection and control panel fitted on
the rear face of the centre console,
-
t
wo 7-inch screens built into the front head
restraints (with protective covers),
-
t
wo wireless Bluetooth technology
headphone sets with rechargeable
batteries,
-
a 1
2 V charger with two outlets allowing the
simultaneous charging of two headphones.
1.
P
ower switch
2.
A
V1 video input (yellow RCA socket)
3.
S
tereo audio input A (red and white
RCA sockets)
4.
A
V2 video input (yellow RCA socket)
5.
S
tereo audio input B (red and white
RCA sockets)
6.
S
election of display in the left-hand screen
(AV1 or AV2)
7.
S
election of display in the right-hand
screen (AV1 or AV2)
8. C onnection indicator lamps for the
Bluetooth audio headphones (blue)
3
Ease of use and comfort
Page 118 of 527
116
C4-Picasso-II_en_Chap03_ergonomie-confort_ed02-2016
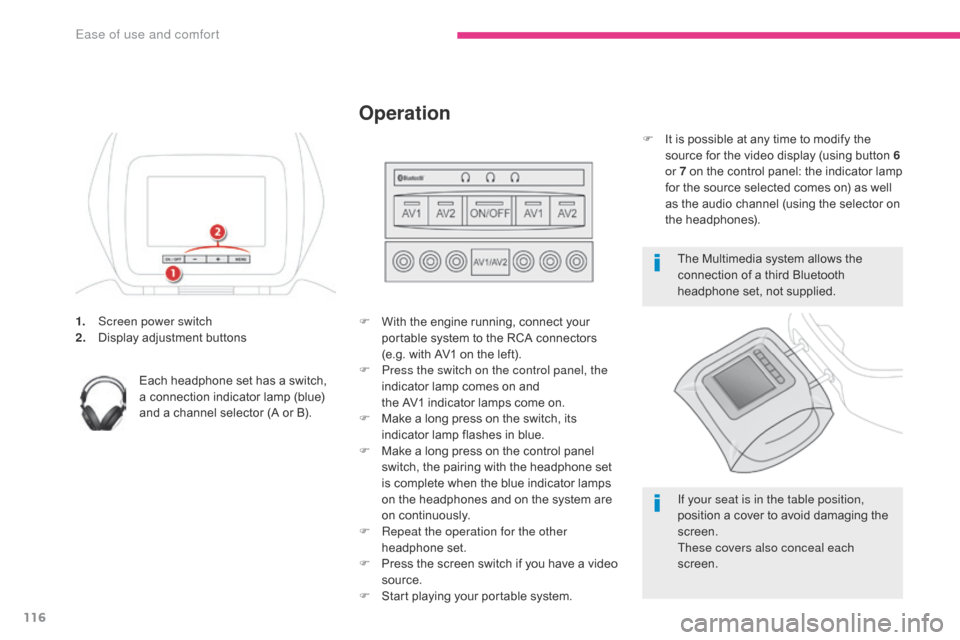
1. Screen power switch
2. Display adjustment buttons
Each headphone set has a switch,
a connection indicator lamp (blue)
and a channel selector (A or B). F
W ith the engine running, connect your
portable system to the RCA connectors
(e.g. with AV1 on the left).
F
P
ress the switch on the control panel, the
indicator lamp comes on and
the AV1 indicator lamps come on.
F
M
ake a long press on the switch, its
indicator lamp flashes in blue.
F
M
ake a long press on the control panel
switch, the pairing with the headphone set
is complete when the blue indicator lamps
on the headphones and on the system are
on continuously.
F
R
epeat the operation for the other
headphone set.
F
P
ress the screen switch if you have a video
source.
F
S
tart playing your portable system.
Operation
The Multimedia system allows the
connection of a third Bluetooth
headphone set, not supplied.
If your seat is in the table position,
position a cover to avoid damaging the
screen.
These covers also conceal each
screen.
F
I
t is possible at any time to modify the
source for the video display (using button 6
or 7 on the control panel: the indicator lamp
for the source selected comes on) as well
as the audio channel (using the selector on
the headphones).
Ease of use and comfort
Page 125 of 527
123
C4-Picasso-II_en_Chap03_ergonomie-confort_ed02-2016
Courtesy lamps
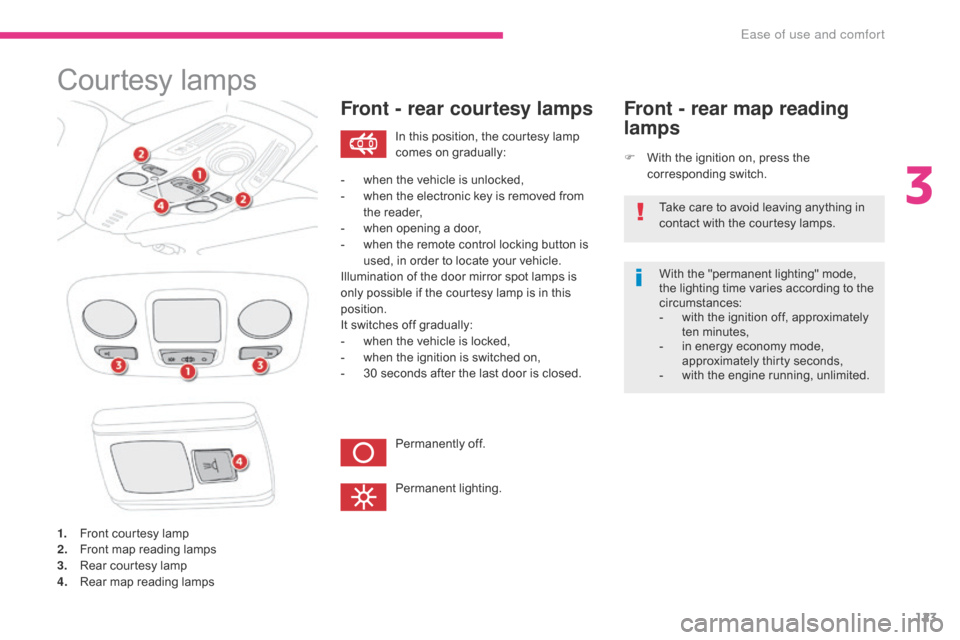
1. Front courtesy lamp
2. Front map reading lamps
3.
R
ear courtesy lamp
4.
R
ear map reading lamps
Front - rear courtesy lamps
F With the ignition on, press the corresponding switch.
Front - rear map reading
lamps
With the "permanent lighting" mode,
the lighting time varies according to the
circumstances:
-
w
ith the ignition off, approximately
ten minutes,
-
i
n energy economy mode,
approximately thirty seconds,
-
w
ith the engine running, unlimited.
In this position, the courtesy lamp
comes on gradually:
Permanently off.
Permanent lighting.
-
w
hen the vehicle is unlocked,
-
w
hen the electronic key is removed from
the reader,
-
w
hen opening a door,
-
w
hen the remote control locking button is
used, in order to locate your vehicle.
Illumination of the door mirror spot lamps is
only possible if the courtesy lamp is in this
position.
It switches off gradually:
-
w
hen the vehicle is locked,
-
w
hen the ignition is switched on,
-
3
0 seconds after the last door is closed. Take care to avoid leaving anything in
contact with the courtesy lamps.
3
Ease of use and comfort
Page 127 of 527
125
C4-Picasso-II_en_Chap04_conduite_ed02-2016
Driving recommendations
Observe the driving regulations and remain
vigilant whatever the traffic conditions.
Pay close attention to the traffic and keep your
hands on the wheel so that you are ready to
react at any time to any eventuality.
On a long journey, a break every two hours is
strongly recommended.
In difficult weather, drive smoothly, anticipate
the need to brake and increase the distance
from other vehicles.
Driving on flooded roads
We strongly advise against driving on flooded
roads, as this could cause serious damage
to the engine or gearbox, as well as to the
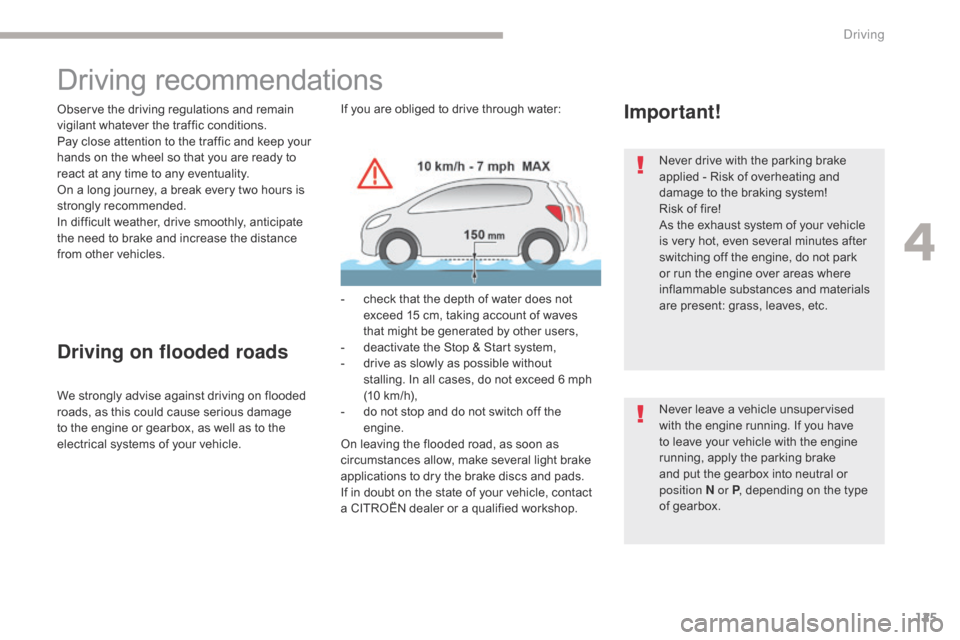
electrical systems of your vehicle.If you are obliged to drive through water:
-
c
heck that the depth of water does not
exceed 15 cm, taking account of waves
that might be generated by other users,
-
d
eactivate the Stop & Start system,
-
d
rive as slowly as possible without
stalling. In all cases, do not exceed 6 mph
(10 km/h),
- d o not stop and do not switch off the
engine.
On leaving the flooded road, as soon as
circumstances allow, make several light brake
applications to dry the brake discs and pads.
If in doubt on the state of your vehicle, contact
a CITROËN dealer or a qualified workshop.
Important!
Never drive with the parking brake
applied - Risk of overheating and
damage to the braking system!
Risk of fire!
As the exhaust system of your vehicle
is very hot, even several minutes after
switching off the engine, do not park
or run the engine over areas where
inflammable substances and materials
are present: grass, leaves, etc.
Never leave a vehicle unsupervised
with the engine running. If you have
to leave your vehicle with the engine
running, apply the parking brake
and put the gearbox into neutral or
position
N or P, depending on the type
of gearbox.
4
Driving
Page 135 of 527
133
C4-Picasso-II_en_Chap04_conduite_ed02-2016
Electric parking brake
In the event of a battery failure, the
electric parking brake no longer works.
As a safety measure, if the parking
brake is not applied, immobilise the
vehicle by engaging a gear (with a
manual gearbox) or placing a chock at
one of the wheels.
Contact a CITROËN dealer or a
qualified workshop.
Indicator lamp
This indicator lamp comes on in the
instrument panel and in the control
lever to confirm the application of the
parking brake.
The system provides, in automatic operation,
the application of the parking brake on
switching off the engine and release as the
vehicle moves off.
The driver can take over at any time to apply
or release the parking brake, by operating the
control lever:
-
b
y briefly pulling the control lever to apply
the brake,
-
b
y briefly pushing the control lever, while
pressing the foot brake, to release.
Automatic mode is activated by default.
The technology adopted for the electric
parking brake does not allow the fitment
of 15 inch wheels. It goes off to confirm the release of the parking
brake.
The indicator lamp in the control lever flashes
during manual application or release.
After the parking brake has been applied, the
simultaneous flashing of the two indicator
lamps in the instrument panel and the control
lever alerts you to the need to fully secure your
vehicle by engaging a gear (with a manual
gearbox) or by placing the gear selector
in position P with an automatic gearbox,
or by fitting a chock to one of the wheels.
(E.g.
parking on a very steep slope or on a
slope with a low battery).
4
Driving