ESP Citroen GRAND C4 PICASSO RHD 2016 2.G Owner's Manual
[x] Cancel search | Manufacturer: CITROEN, Model Year: 2016, Model line: GRAND C4 PICASSO RHD, Model: Citroen GRAND C4 PICASSO RHD 2016 2.GPages: 523, PDF Size: 13.63 MB
Page 14 of 523
12
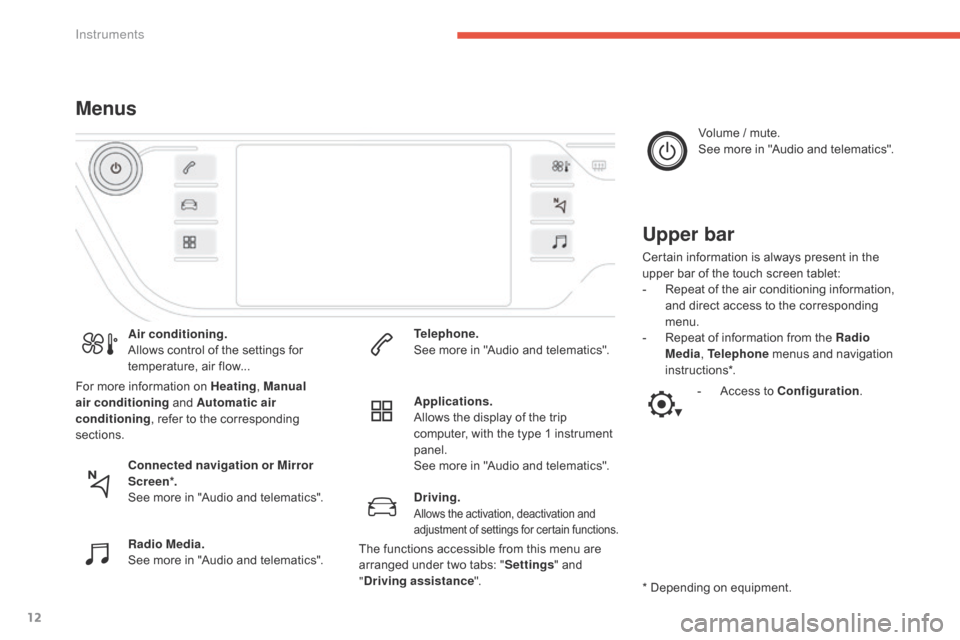
MenusUpper bar
Certain information is always present in the upper bar of the touch screen tablet:
-
R
epeat of the air conditioning information,
a
nd direct access to the corresponding
m
enu.
-
R
epeat of information from the Radio
Media , Telephone
menus and navigation
i
nstructions*.
*
Depending on equipment.
Air conditioning.
Allows
control
of
the
settings
for
t
emperature,
air
flow...
Connected navigation or Mirror
Scre en*.
See
more
in
"Audio
and
telematics".
Radio Media.
See
more
in
"Audio
and
telematics". Telephone.
See
more
in
"Audio
and
telematics".
Driving.
Allows the activation, deactivation and a djustment of settings for certain functions.
Applications.
Allows the display of the trip
c
omputer, with the type 1 instrument
pan
el.
See
more in "Audio and telematics". Volume
/ mute.
See more in "Audio and telematics".
- A ccess to Configuration
.
For
more
information
on
Heating
, Manual
air conditioning
and
Automatic air
conditioning ,
refer
to
the
corresponding
s
ections.
The
functions accessible from this menu are
a
rranged
under two tabs: "Settings "
and
"D
riving assistance ".
Instruments
Page 15 of 523
13
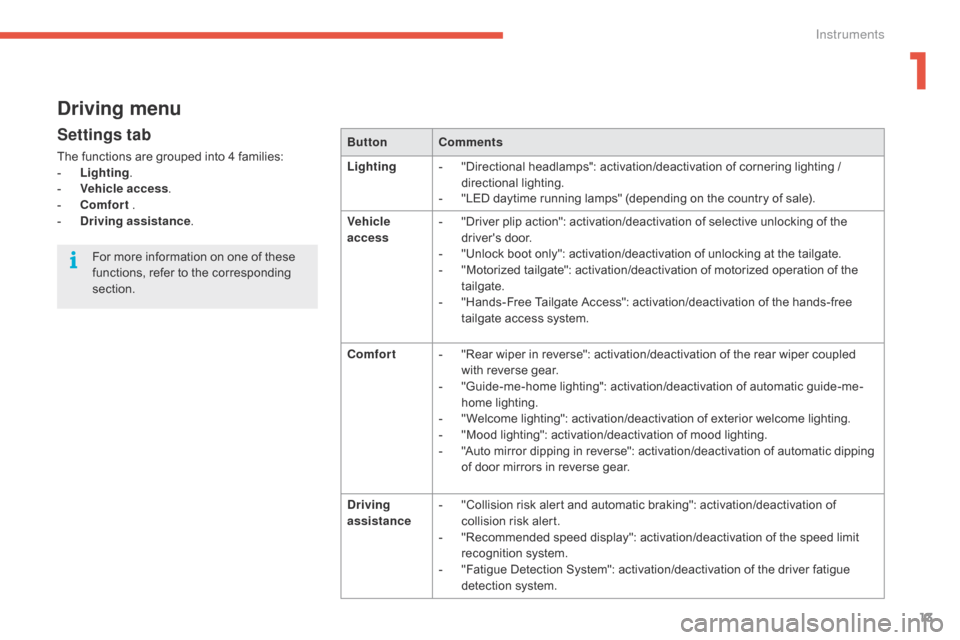
Driving menu
Settings tab
The functions are grouped into 4 families:
- L ighting .
-
V
ehicle access .
-
C
omfort
.
-
D
riving assistance . Button
Comments
Lighting -
" Directional headlamps": activation/deactivation of cornering lighting /
d
irectional
l
ighting.
-
"
LED daytime running lamps" (depending on the country of sale).
Vehicle
access -
"
Driver plip action": activation/deactivation of selective unlocking of the
d
river's
do
or.
-
"
Unlock boot only": activation/deactivation of unlocking at the tailgate.
-
"
Motorized tailgate": activation/deactivation of motorized operation of the
t
ailgate.
-
"
Hands-Free Tailgate Access": activation/deactivation of the hands-free
t
ailgate access system.
Comfort -
"
Rear wiper in reverse": activation/deactivation of the rear wiper coupled
w
ith reverse gear.
-
"
Guide-me-home lighting": activation/deactivation of automatic guide-me-
home
lighting.
-
"
Welcome lighting": activation/deactivation of exterior welcome lighting.
-
"
Mood lighting": activation/deactivation of mood lighting.
-
"
Auto mirror dipping in reverse": activation/deactivation of automatic dipping
o
f door mirrors in reverse gear.
Driving
assistance -
"
Collision risk alert and automatic braking": activation/deactivation of
c
ollision risk alert.
-
"
Recommended speed display": activation/deactivation of the speed limit
r
ecognition system.
-
"
Fatigue Detection System": activation/deactivation of the driver fatigue
d
etection system.
For
more information on one of these
f
unctions, refer to the corresponding
s
ection.
1
Instruments
Page 16 of 523
14
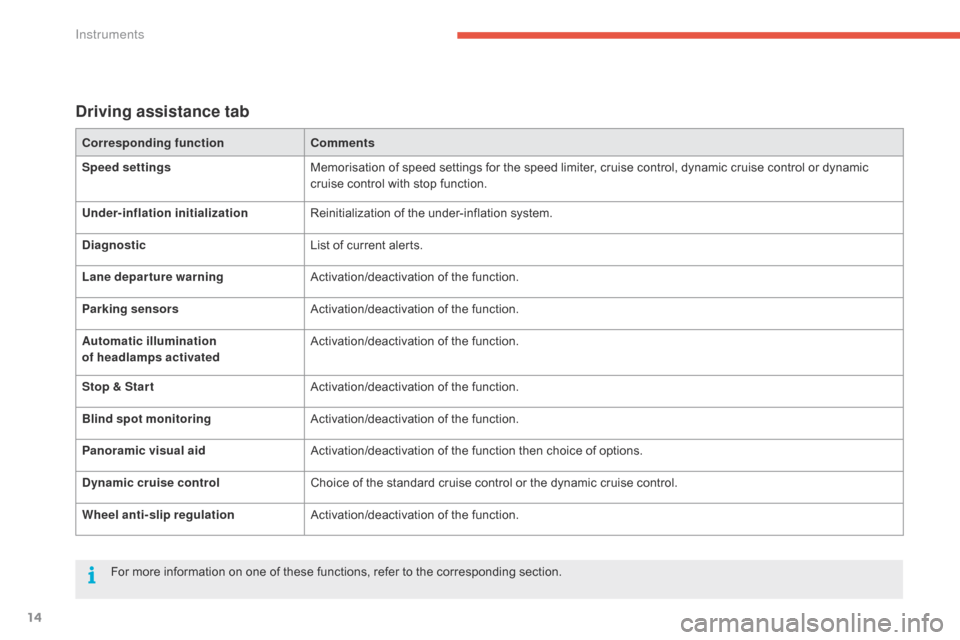
Driving assistance tab
Corresponding functionComments
Speed settings Memorisation
of speed settings for the speed limiter, cruise control, dynamic cruise control or dynamic
c
ruise control with stop function.
Under-inflation initialization Reinitialization
of the under-inflation system.
Diagnostic List
of current alerts.
Lane departure warning Activation/deactivation
o
f
th
e
f
unction.
Parking sensors Activation/deactivation
o
f
th
e
f
unction.
Automatic illumination
of headlamps activated Activation/deactivation
o
f
th
e
f
unction.
Stop & Star t Activation/deactivation
o
f
th
e
f
unction.
Blind spot monitoring Activation/deactivation
o
f
th
e
f
unction.
Panoramic visual aid Activation/deactivation
of the function then choice of options.
Dynamic cruise control Choice
of the standard cruise control or the dynamic cruise control.
Wheel anti-slip regulation Activation/deactivation
o
f
th
e
f
unction.
For
more information on one of these functions, refer to the corresponding section.
Instruments
Page 18 of 523
16
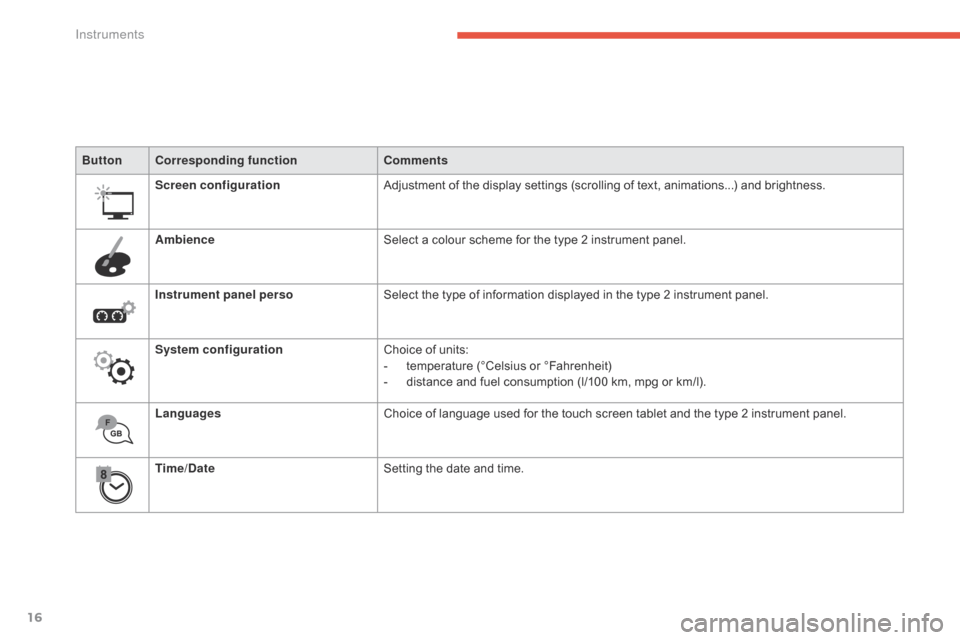
ButtonCorresponding function Comments
Screen configuration Adjustment
of the display settings (scrolling of text, animations...) and brightness.
Ambience Select
a colour scheme for the type 2 instrument panel.
Instrument panel perso Select
the type of information displayed in the type 2 instrument panel.
System configuration Choice
of units:
-
t
emperature (°Celsius or °Fahrenheit)
-
d
istance and fuel consumption (l/100 km, mpg or km/l).
Languages Choice
of language used for the touch screen tablet and the type 2 instrument panel.
Time/Date Setting
the date and time.
Instruments
Page 21 of 523
19
You can modify the appearance of the instrument panel, by choosing:
-
a
colour scheme,
-
a
display mode.
Choosing the language
This depends on the setting in the touch screen tablet.
Certain
languages are not available for the type 2
i
nstrument panel; English is selected by default.Each
mode corresponds to the type of
i
nformation displayed in the configurable area.
Personalisation of the type 2 instrument panel
Choice of display mode
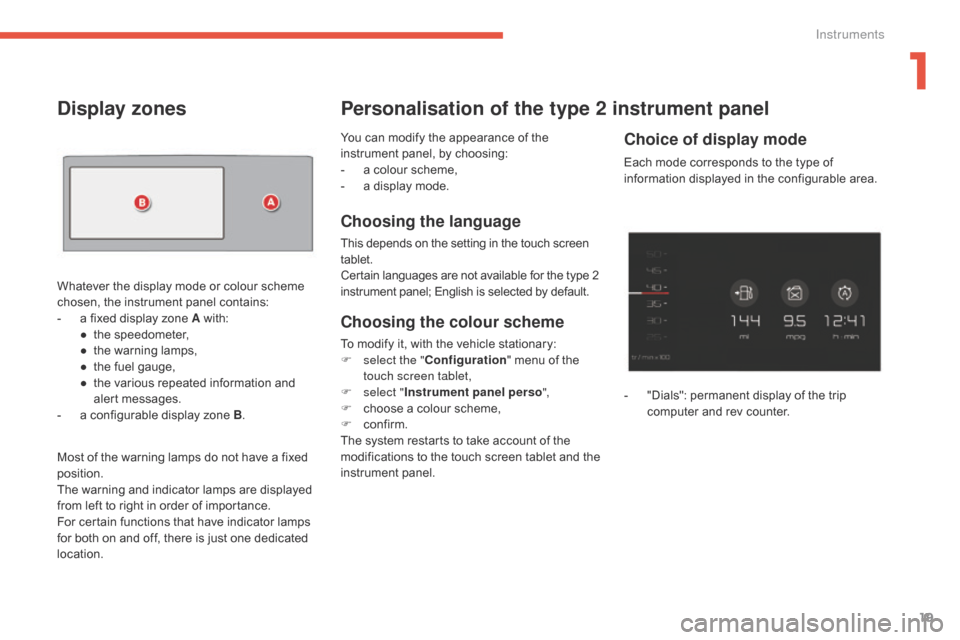
- "Dials":
permanent display of the trip c
omputer and rev counter.
Display zones
Whatever the display mode or colour scheme chosen, the instrument panel contains:
-
a
fixed display zone A
w
ith:
●
t
he speedometer,
●
t
he warning lamps,
●
t
he fuel gauge,
●
t
he various repeated information and
a
lert
m
essages.
-
a
configurable display zone B.
Most
of the warning lamps do not have a fixed
p
osition.
The
warning and indicator lamps are displayed
f
rom left to right in order of importance.
For
certain functions that have indicator lamps
f
or both on and off, there is just one dedicated
lo
cation.
Choosing the colour scheme
To modify it, with the vehicle stationary:
F s elect the " Configuration "
menu of the
t
ouch screen tablet,
F
s
elect " Instrument panel perso ",
F
c
hoose a colour scheme,
F
c
onfirm.
The
system restarts to take account of the
m
odifications to the touch screen tablet and the
in
strument
pan
el.
1
Instruments
Page 24 of 523
22
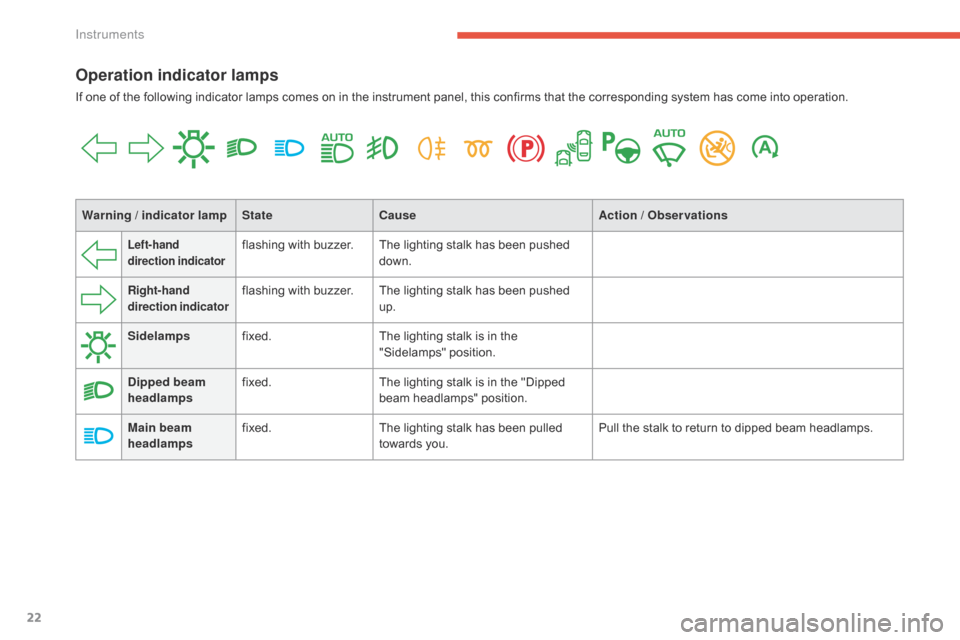
Operation indicator lamps
If one of the following indicator lamps comes on in the instrument panel, this confirms that the corresponding system has come into operation.
W arning / indicator lamp StateCause Action / Observations
Left-hand
direction indicatorflashing with buzzer.The lighting stalk has been pushed d
own.
Right-hand
direction indicatorflashing with buzzer.The lighting stalk has been pushed u
p.
Sidelamps fixed. The
lighting stalk is in the
"
Sidelamps"
p
osition.
Dipped beam
headlamps fixed.
The
lighting stalk is in the "Dipped
b
eam headlamps" position.
Main beam
headlamps fixed.
The
lighting stalk has been pulled
t
owards you.Pull
the stalk to return to dipped beam headlamps.
Instruments
Page 25 of 523
23
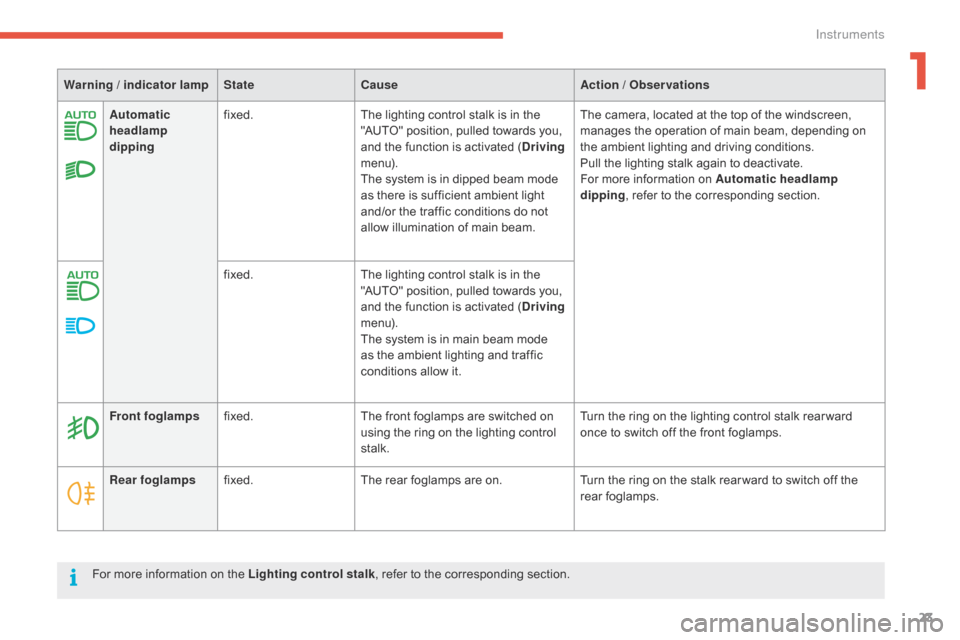
Automatic
headlamp
dippingfixed.
The lighting control stalk is in the "
AUTO" position, pulled towards you,
a
nd the function is activated (Driving
m e n u).
The
system is in dipped beam mode
a
s there is sufficient ambient light
a
nd/or the traffic conditions do not
a
llow illumination of main beam.The
camera, located at the top of the windscreen, m
anages the operation of main beam, depending on
t
he ambient lighting and driving conditions.
Pull
the lighting stalk again to deactivate.
For
more information on Automatic headlamp
dipping ,
refer to the corresponding section.
fixed. The
lighting control stalk is in the
"
AUTO" position, pulled towards you,
a
nd the function is activated (Driving
m e n u).
The
system is in main beam mode
a
s the ambient lighting and traffic
c
onditions allow it.
Warning / indicator lamp
StateCause Action / Observations
Rear foglamps fixed. The
rear foglamps are on.Turn
the ring on the stalk rear ward to switch off the
r
ear
fo
glamps.
Front foglamps
fixed. The
front foglamps are switched on
u
sing the ring on the lighting control
st
alk.Turn
the ring on the lighting control stalk rear ward
o
nce to switch off the front foglamps.
For
more information on the Lighting control stalk,
refer to the corresponding section.
1
Instruments
Page 26 of 523
24
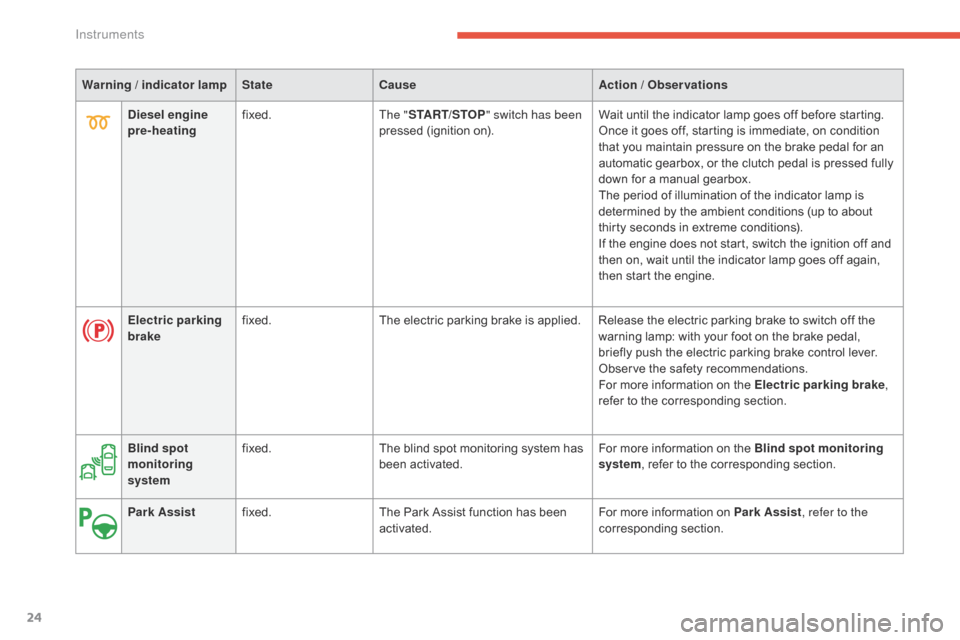
Warning / indicator lampStateCause Action / Observations
Electric parking
brake fixed.
The
electric parking brake is applied. Release the electric parking brake to switch off the
w
arning lamp: with your foot on the brake pedal,
b
riefly push the electric parking brake control lever.
Observe
the safety recommendations.
For
more information on the Electric parking brake,
refer
to the corresponding section.
Diesel engine
pre-heating
fixed.
The "START/STOP " switch has been
pressed
(ignition on).Wait
until the indicator lamp goes off before starting.
Once
it goes off, starting is immediate, on condition
t
hat you maintain pressure on the brake pedal for an
a
utomatic gearbox, or the clutch pedal is pressed fully
d
own for a manual gearbox.
The
period of illumination of the indicator lamp is
d
etermined by the ambient conditions (up to about
t
hirty seconds in extreme conditions).
If
the engine does not start, switch the ignition off and
t
hen on, wait until the indicator lamp goes off again,
t
hen start the engine.
Blind spot
monitoring
system fixed.
The
blind spot monitoring system has
b
een activated.For
more information on the Blind spot monitoring
system,
refer to the corresponding section.
Park Assist fixed. The
Park Assist function has been
a
ctivated.For
more information on Park Assist, refer to the
corresponding
s
ection.
Instruments
Page 27 of 523
25
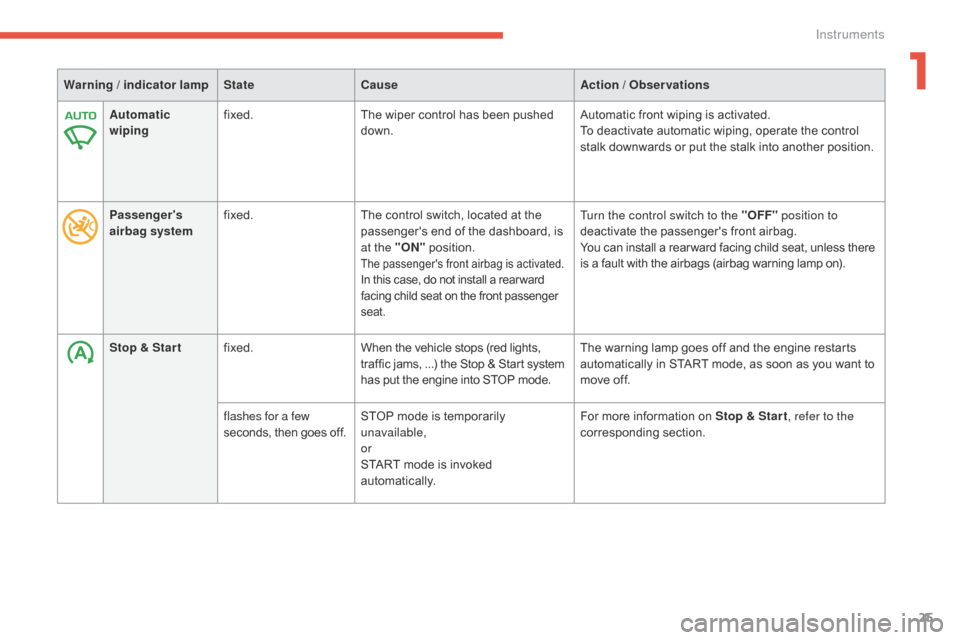
Warning / indicator lampStateCause Action / Observations
Automatic
wiping fixed.
The
wiper control has been pushed
d
own.Automatic
front wiping is activated.
To
deactivate automatic wiping, operate the control
s
talk downwards or put the stalk into another position.
Passenger 's
airbag system fixed.
The
control switch, located at the
p
assenger's end of the dashboard, is
a
t the "ON"
p
osition.
The passenger's front airbag is activated.In this case, do not install a rear ward facing child seat on the front passenger sea
t.
Turn the control switch to the "OFF " position to
deactivate the passenger's front airbag.
You
can install a rear ward facing child seat, unless there
i
s a fault with the airbags (airbag warning lamp on).
Stop & Star t fixed. When
the
vehicle
stops
(red
lights,
t
raffic
jams,
...)
the
Stop
&
Start
system
h
as
put
the
engine
into
STOP
mode. The
warning lamp goes off and the engine restarts
a
utomatically in START mode, as soon as you want to
m
ove off.
flashes for a few
seconds,
then
goes
off. STOP
mode
is
temporarily
u
navailable,
or
START
mode
is
invoked
au
tomatically. For
more information on Stop & Star t, refer to the
corresponding
s
ection.
1
Instruments
Page 28 of 523
26
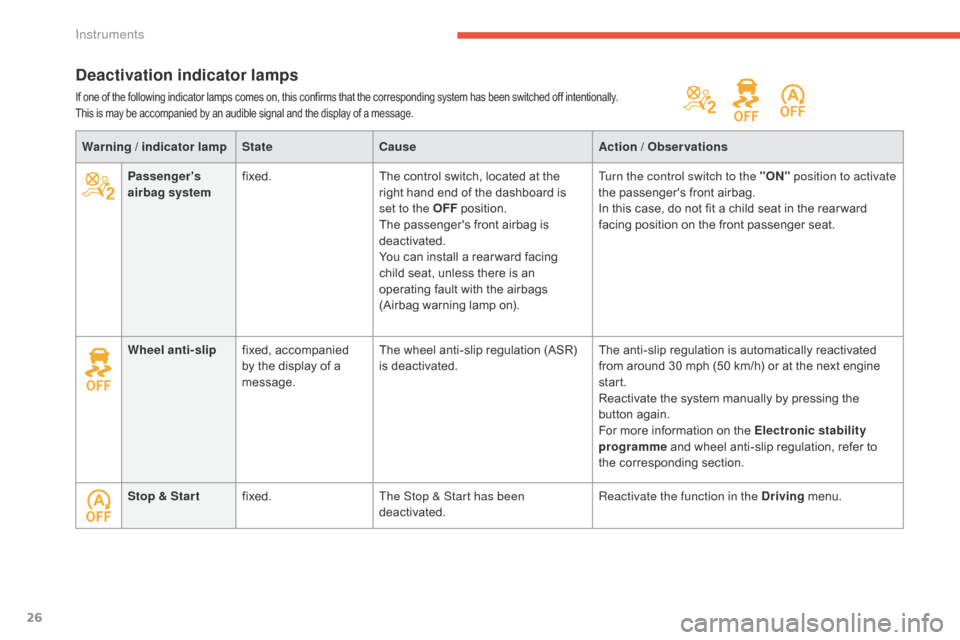
Warning / indicator lampStateCause Action / Observations
Passenger's
airbag system fixed.
The
control switch, located at the
r
ight hand end of the dashboard is
s
et to the OFF
p
osition.
The
passenger's front airbag is
d
eactivated.
You
can install a rear ward facing
c
hild seat, unless there is an
o
perating fault with the airbags
(
Airbag warning lamp on).Turn the control switch to the "ON"
position to activate
the
passenger's front airbag.
In
this case, do not fit a child seat in the rear ward
f
acing position on the front passenger seat.
Wheel anti-slip fixed,
a
ccompanied
b
y the display of a
m
essage.The
wheel anti-slip regulation (ASR)
i
s
d
eactivated.The
anti-slip regulation is automatically reactivated
f
rom around 30 mph (50 km/h) or at the next engine
st
art.
Reactivate
the system manually by pressing the
bu
tton
ag
ain.
For
more information on the Electronic stability
programme
and wheel anti-slip regulation, refer to
t
he corresponding section.
Stop & Star t fixed. The Stop & Start
has been
deactivated. Reactivate the function in the Driving
menu.
Deactivation indicator lamps
If one of the following indicator lamps comes on, this confirms that the corresponding system has been switched off intentionally.
T his is may be accompanied by an audible signal and the display of a message.
Instruments