key Citroen GRAND C4 PICASSO RHD 2017 2.G Owner's Guide
[x] Cancel search | Manufacturer: CITROEN, Model Year: 2017, Model line: GRAND C4 PICASSO RHD, Model: Citroen GRAND C4 PICASSO RHD 2017 2.GPages: 523, PDF Size: 11.96 MB
Page 218 of 523

216
To make your approach to the vehicle easier,
these illuminate:
-
t
he zones facing the driver’s and
passenger’s doors,
-
t
he zones for ward of the door mirrors and
rear ward of the front doors.
Door mirror spotlamps
Switching on
Switching off
They go off automatically after 30 seconds.
Exterior welcome
lighting
Switching on
F Press the open padlock on the remote control or one of the front
door handles with Keyless Entry
and Starting.
Front daytime running
lamps
(light-emitting diodes)
They come on automatically when the engine
is started, when the lighting control stalk is in
position " 0" or " AUTO ".
In some weather conditions (e.g. low
temperature or humidity), the presence
of misting on the internal sur face of the
glass of the headlamps and rear lamps
is normal; it disappears after the lamps
have been on for a few minutes. The remote switching on of the lighting makes
your approach to the vehicle easier in poor
light. It is activated when the lighting control
is in the "
AUTO" position and the level of light
detected by the sunshine sensor is low.
Switching off
The exterior welcome lighting switches off
automatically after a set time, when the ignition
is switched on or on locking the vehicle.
When the courtesy lamp is in this
position, the spotlamps come on
automatically:
-
w
hen you unlock the vehicle,
-
w
hen you remove the electronic key from
the reader,
-
w
hen you open a door,
-
when you use the remote control to locate the vehicle.
The dipped beam headlamps and sidelamps
come on; your vehicle is also unlocked.
Lighting and visibility
Page 241 of 523
239
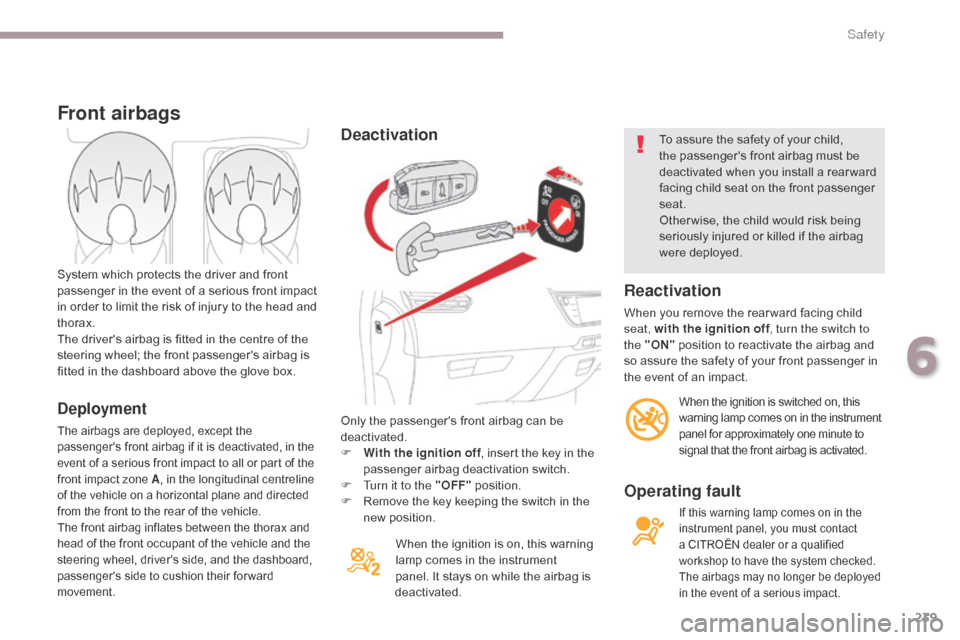
Deactivation
When the ignition is on, this warning
lamp comes in the instrument
panel. It stays on while the airbag is
deactivated.
Front airbags
Deployment
The airbags are deployed, except the
passenger's front airbag if it is deactivated, in the
event of a serious front impact to all or part of the
front impact zone A , in the longitudinal centreline
of the vehicle on a horizontal plane and directed
from the front to the rear of the vehicle.
The front airbag inflates between the thorax and
head of the front occupant of the vehicle and the
steering wheel, driver's side, and the dashboard,
passenger's side to cushion their for ward
movement.
System which protects the driver and front
passenger in the event of a serious front impact
in order to limit the risk of injury to the head and
thorax.
The driver's airbag is fitted in the centre of the
steering wheel; the front passenger's airbag is
fitted in the dashboard above the glove box.
Only the passenger's front airbag can be
deactivated.
F
W
ith the ignition off, insert the key in the
passenger airbag deactivation switch.
F
T
urn it to the "OFF" position.
F
R
emove the key keeping the switch in the
new position. To assure the safety of your child,
the passenger's front airbag must be
deactivated when you install a rear ward
facing child seat on the front passenger
seat.
Other wise, the child would risk being
seriously injured or killed if the airbag
were deployed.
Reactivation
When you remove the rear ward facing child
seat, with the ignition off
, turn the switch to
the "ON" position to reactivate the airbag and
so assure the safety of your front passenger in
the event of an impact.
When the ignition is switched on, this
warning lamp comes on in the instrument
panel for approximately one minute to
signal that the front airbag is activated.
Operating fault
If this warning lamp comes on in the
instrument panel, you must contact
a CITROËN dealer or a qualified
workshop to have the system checked.
The airbags may no longer be deployed
in the event of a serious impact.
6
Safety
Page 259 of 523

257
Child seats
The incorrect installation of a child seat in a
vehicle compromises the child's protection in
the event of an accident.
Check that there is no seat belt or seat belt
buckle under the child seat as this could
destabilise it.
Remember to fasten the seat belts or the
child seat harnesses keeping the slack in
relation to the child's body to a minimum,
even for short journeys.
For the installation of a child seat using a
seat belt, ensure that this is well tensioned
on the child seat and that it is holding the
child seat firmly against the seat of your
vehicle. If your front passenger seat is
adjustable, move it for ward if necessary.
At the rear seats, always leave sufficient
space between the front seat and:
-
a r
ear ward facing child seat,
-
t
he feet of a child seated in a for ward
facing child seat.
Recommendations
For this, move the front seat for ward and if
necessary straighten its backrest.
For optimum installation of the forward facing
child seat, ensure that the back of the child
seat is as close as possible to the backrest
of the vehicle's seat, or in contact if possible.
The head restraint must be removed before
installing a child seat with a backrest on the
passenger seat.
Ensure that the head restraint is stowed or
attached securely so that it is not thrown
around the vehicle in the event of sharp
braking.
Refit the head restraint as soon as the child
seat is removed.Installing a booster
cushion
As a safety precaution, do not leave:
- o ne or more children alone and
unsupervised in a vehicle,
-
a c
hild or an animal in a vehicle which
is exposed to the sun, with the windows
closed,
-
t
he keys within reach of children inside
the vehicle.
To prevent accidental opening of the doors,
use the child lock.
Take care not to open the rear windows by
more than one third.
To protect young children from the rays of
the sun, fit side blinds on the rear windows. The chest part of the seat belt must be
positioned on the child's shoulder without
touching the neck.
Ensure that the lap part of the seat belt
passes correctly over the child's thighs.
CITROËN recommends the use of a booster
seat which has a back, fitted with a seat belt
guide at shoulder level.
The legislation on carrying a child on the
front passenger seat is specific to each
country. Refer to the legislation in force in
the country in which you are driving.
Deactivate the passenger front airbag when
a rear ward facing child seat is installed on
the front passenger seat. Otherwise, the
child would risk being seriously injured or
killed if the airbag were deployed.
Children at the front
6
Safety
Page 260 of 523

258
Child lock
This mechanical system prevents opening of a rear door using its interior control.
The control is located on the edge of each rear door and locking is independent for each door.
F
U
sing the integral ignition key, turn the control as far as it will go:
-
t
o the left on the left-hand rear door,
-
t
o the right on the right-hand rear door.
Unlocking
F Using the integral ignition key, turn the control as far as it will go:- t o the right on the left-hand rear door,
-
t
o the left on the right-hand rear door.
Locking
Safety
Page 284 of 523
282
Important: if your vehicle's AdBlue®
tank is completely empty - which is
confirmed by the alert messages and
the impossibility of starting the engine,
you must add at least 3.8 litres of fluid. Important:
when topping-up after
running out of AdBlue®, signalled
by the message "Top-up AdBlue:
Starting prevented", you must wait
for approximately 5 minutes before
switching on the ignition, without
opening the driver's door, unlocking
the vehicle, placing the key of the
"Keyless Entr y and Star ting" system
inside the vehicle or inser ting the
electronic key in the reader.
Switch on the ignition, wait for
10
seconds, then start the engine.
If any fluid is spilt or splashed, wash
immediately with cold water or wipe with
a damp cloth.
If the fluid has crystallised, clean it off
using a sponge and hot water.
F
A
fter emptying the bottle, wipe away any
spillage around the tank filler using a damp
cloth. F
R
efit the blue cap to the tank and turn it a
6th of a turn clockwise, to its stop.
F
R
efit the black cap and turn it a quarter of
a turn clockwise without pressing. Ensure
that the indicator on the cap lines up with
the indicator on the support.
F
D
epending on equipment, return the spare
wheel and/or the storage box to the bottom
of the boot.
F
R
efit the boot carpet and close the tailgate.
Do not dispose of AdBlue
® bottles or
containers in the household waste.
Place them in a container provided
for this purpose or take them to your
dealer.
Practical information
Page 320 of 523
318
The Stop & Start system may not be
operational during the trip following the
first engine start.
In this case, the system will only be
available again after a continuous
period of immobilisation of the vehicle,
a period which depends on the ambient
temperature and the state of charge of
the battery (up to about 8 hours).
Do not force the lever as locking will
not be possible if the clamp is not
positioned correctly; start the procedure
again.
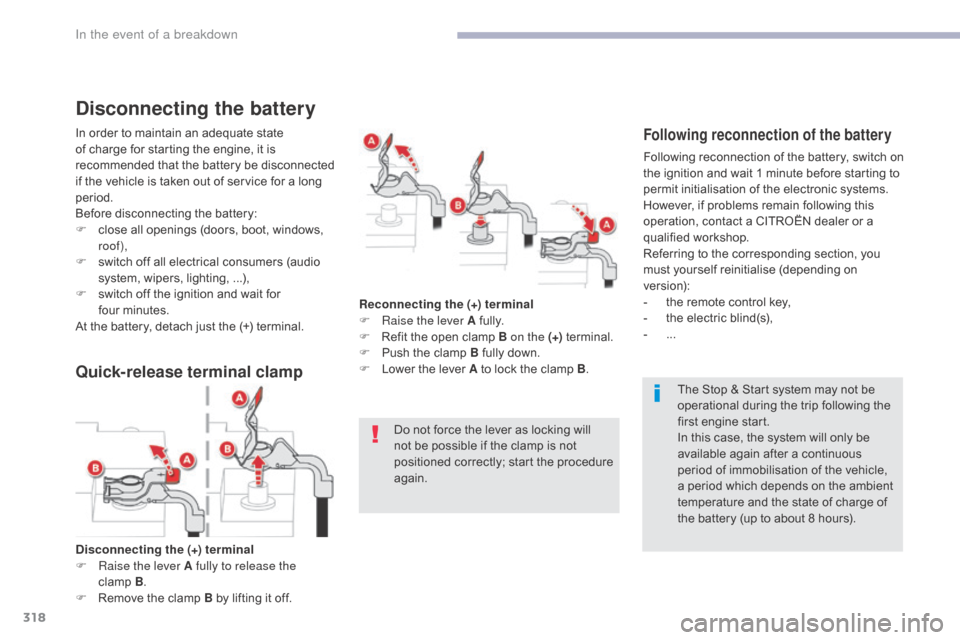
Disconnecting the (+) terminal
F
Ra
ise the lever A fully to release the
clamp
B .
F
R
emove the clamp B by lifting it off. Reconnecting the (+) terminal
F
Ra
ise the lever A fully.
F
R
efit the open clamp B on the (+)
terminal.
F
P
ush the clamp B fully down.
F
L
ower the lever A to lock the clamp B
.
Disconnecting the battery
In order to maintain an adequate state
of charge for starting the engine, it is
recommended that the battery be disconnected
if the vehicle is taken out of service for a long
period.
Before disconnecting the battery:
F
c
lose all openings (doors, boot, windows,
roof),
F
s
witch off all electrical consumers (audio
system, wipers, lighting,
...),
F
s
witch off the ignition and wait for
four
m
inutes.
At the battery, detach just the (+) terminal.Following reconnection of the battery
Following reconnection of the battery, switch on
the ignition and wait 1 minute before starting to
permit initialisation of the electronic systems.
However, if problems remain following this
operation, contact a CITROËN dealer or a
qualified workshop.
Referring to the corresponding section, you
must yourself reinitialise (depending on
version):
-
t
he remote control key,
-
t
he electric blind(s),
-
...
Quick-release terminal clamp
In the event of a breakdown
Page 322 of 523
320
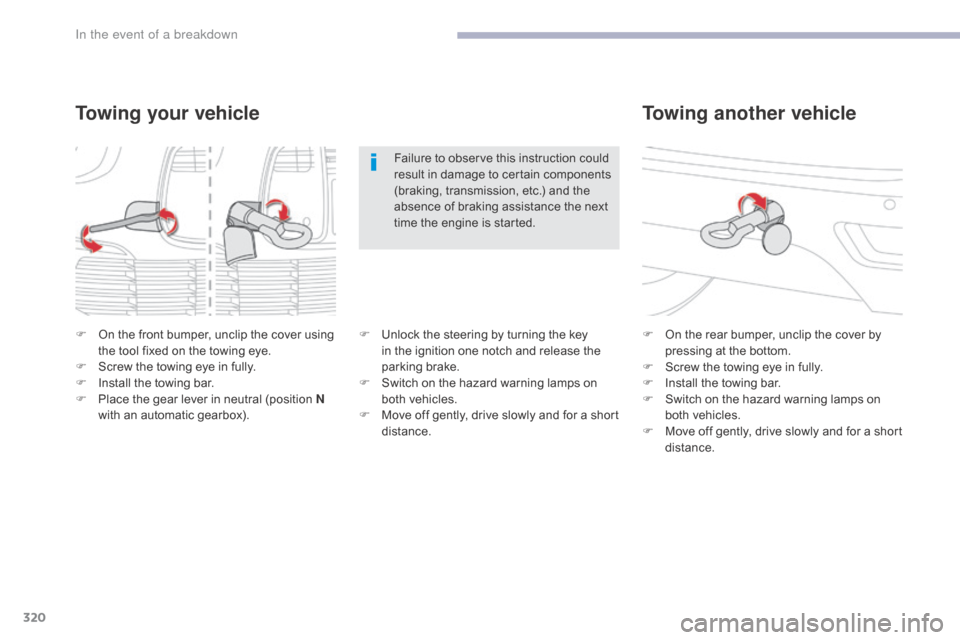
Towing another vehicle
F On the rear bumper, unclip the cover by pressing at the bottom.
F
S
crew the towing eye in fully.
F
I
nstall the towing bar.
F
S
witch on the hazard warning lamps on
both vehicles.
F
M
ove off gently, drive slowly and for a short
distance.
F
O
n the front bumper, unclip the cover using
the tool fixed on the towing eye.
F
S
crew the towing eye in fully.
F
I
nstall the towing bar.
F
P
lace the gear lever in neutral (position N
with an automatic gearbox).
Towing your vehicle
Failure to observe this instruction could
result in damage to certain components
(braking, transmission, etc.) and the
absence of braking assistance the next
time the engine is started.
F
U
nlock the steering by turning the key
in the ignition one notch and release the
parking brake.
F
S
witch on the hazard warning lamps on
both vehicles.
F
M
ove off gently, drive slowly and for a short
distance.
In the event of a breakdown
Page 336 of 523
334
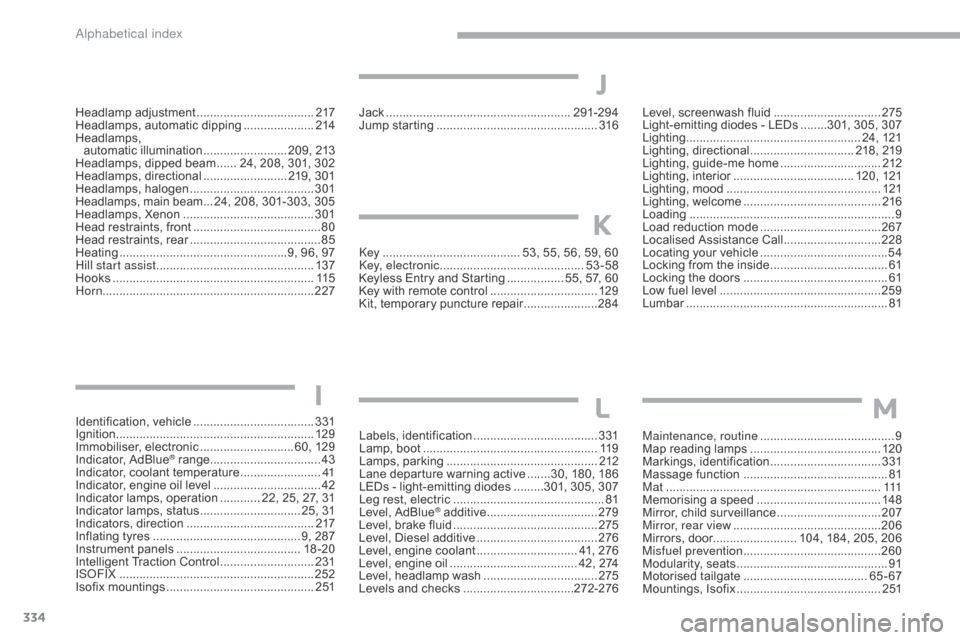
Identification, vehicle ....................................3 31
Ignition ................ ........................................... 129
Immobiliser, electronic
............................6
0, 129
Indicator, AdBlue
® range ................................. 43
I
ndicator, coolant temperature ........................ 41
I
ndicator, engine oil level
................................ 42
I
ndicator lamps, operation
............ 2
2, 25, 27, 31
Indicator lamps, status
.............................. 2
5, 31
Indicators, direction
...................................... 2
17
Inflating tyres
..............................
.............. 9, 287
Instrument panels
...............................
......18 -20
Intelligent Traction Control
............................ 2
31
ISOFIX
...............
........................................... 252
Isofix mountings
...............................
.............2 51Key
.......
.................................. 53, 55, 56, 59, 60
Key, electronic
........................................... 53
-58
Keyless Entry and Starting
................. 5
5, 57, 60
Key with remote control
................................
12
9
Kit, temporary puncture repair
......................
28
4
Labels, identification
..................................... 3
31
Lamp, boot ............................... .....................
11 9
Lamps, parking ............................................. 2
12
Lane departure warning active
.......3 0, 180, 186
LEDs - light-emitting diodes
.........3
01, 305, 307
Leg rest, electric
..............................
...............81
Level, AdBlue
® additive ................................. 2 79
Level, brake fluid ........................................... 2
75
Level, Diesel additive
.................................... 2
76
Level, engine coolant
.............................. 4
1, 276
Level, engine oil
...............................
....... 42, 274
Level, headlamp wash
.................................. 2
75
Levels and checks
..............................
...272-276 Maintenance, routine
........................................ 9
M
ap reading lamps
.......................................
12
0
Markings, identification
................................. 3
31
Massage function
...............................
............
81
Mat
.......
.........................................................
111
Memorising a speed .....................................
14 8
Mirror, child surveillance ...............................2
07
Mirror, rear view
............................................20
6
Mirrors, door......................... 104, 184, 205, 206
Misfuel prevention
...............................
..........260
Modularity, seats
...............................
..............91
Motorised tailgate
..................................... 6
5 - 67
Mountings, Isofix
...............................
............2 51
Level, screenwash fluid
................................
2
75
Light-emitting diodes - LEDs
........3
01, 305, 307
Lighting
................
.................................... 24, 121
Lighting, directional
............................... 21
8, 219
Lighting, guide-me home
..............................
2
12
Lighting, interior
.................................... 12
0, 121
Lighting, mood
..............................
................
121
Lighting, welcome
.........................................
2
16
Loading
..............................
............................... 9
Load reduction mode
....................................
2
67
Localised Assistance Call
.............................
2
28
Locating your vehicle
......................................
54
L
ocking from the inside
...................................
61
L
ocking the doors
..............................
.............
61
Low fuel level
..............................
..................
259
Lumbar
...............................
.............................
81
I
K
LM
Jack ....................................................... 291-294
Jump starting .............................. ..................316
J
Headlamp adjustment ................................... 2 17
Headlamps, automatic dipping .....................2
14
Headlamps,
automatic illumination
......................... 2
09, 213
Headlamps, dipped beam
...... 2
4, 208, 301, 302
Headlamps, directional
......................... 2
19, 301
Headlamps, halogen
..................................... 3
01
Headlamps, main beam ... 24, 208, 301-303, 305
Headlamps, Xenon
....................................... 3
01
Head restraints, front
...................................... 80
H
ead restraints, rear
....................................... 85
H
eating
................
..................................9, 96, 97
Hill start assist
............................................... 13
7
Hooks
...............................
............................. 115
Horn ............................................................... 227
Alphabetical index
Page 375 of 523
26
1
1
8
Audio and Telematics
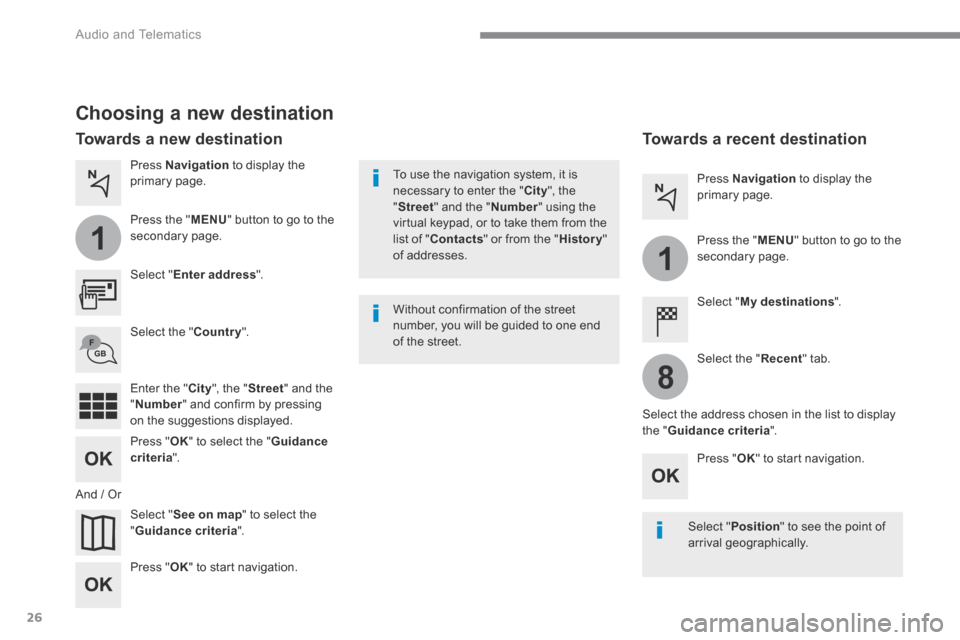
Choosing a new destination
Select " Enter address ".
Select " See on map " to select the " Guidance criteria ".
Select the " Country ".
Press " OK " to select the " Guidance criteria ".
Press " OK " to start navigation.
Press " OK " to start navigation.
And / Or
Press Navigation to display the primary page.
Press the " MENU " button to go to the
secondary page.
Towards a new destination Towards a recent destination
Select " My destinations ".
Press Navigation to display the primary page.
Press the " MENU " button to go to the secondary page.
Enter the " City ", the " Street " and the " Number " and confirm by pressing on the suggestions displayed.
Select the " Recent " tab.
Select the address chosen in the list to display the " Guidance criteria ".
To use the navigation system, it is necessary to enter the " City ", the " Street " and the " Number " using the virtual keypad, or to take them from the list of " Contacts " or from the " History " of addresses.
Without confirmation of the street number, you will be guided to one end of the street.
Select " Position " to see the point of arrival geographically.
Page 388 of 523

39
.
1
Audio and Telematics
To distribute information on the declaration of danger zones, you should check the option: " Allow declaration of danger areas ".
Declaration of "Danger
areas"
Press Navigation to display the primary page.
Press the " Declare a new danger area " button located in the upper bar of the touch screen.
Select the option " Ty p e " to choose the type of "Danger area".
Select the " Speed " option and enter it using the virtual keypad.
Press " OK " to save and distribute the information. You can download the system and map updates from the Brand's website. The update procedure can also be found on the website.
"Danger areas" pack
updates
Press Settings to display the primary page.
Press the " OPTIONS " button to go to the secondary page.
Select " System settings ".
Select " View " to view the version of the various modules installed in the system.
Select " Update(s) due ".
Select the " System info " tab.