key Citroen JUMPY 2016 2.G Workshop Manual
[x] Cancel search | Manufacturer: CITROEN, Model Year: 2016, Model line: JUMPY, Model: Citroen JUMPY 2016 2.GPages: 595, PDF Size: 12.47 MB
Page 226 of 595

224
MEM
Jumpy _en_Chap06_conduite_ed01-2016
Memorising speeds
Programming
This function allows speeds to be saved,
which can then be offered to set the two
systems: the speed limiter (to limit the
speed of the vehicle) or the cruise control
(for a vehicle cruising speed).
You can memorise up to six speed settings for
each of the two systems.As a safety measure, the driver should
carry out these operations when
stationary. F
S elect the system for which you want to
memorise new speed settings:
●
s
peed limiter
or
F
P
ress the button corresponding to the
speed setting you want to modify. ●
c
ruise control.Memorised speeds are
recalled by pressing this
button.
The speed settings can be adjusted in the
touch screen.
F
I
n the Driving menu, select " Adjust speed
settings ".
F
E
nter the new value using the numerical
keypad and confirm.
F
C
onfirm to save the modification and quit
the menu.
Driving
Page 267 of 595
265
Jumpy _en_Chap07_info-pratiques_ed01-2016
Fuel tank
Opening
If your vehicle is fitted with Stop & Start,
never refuel with the engine in STOP
mode; you must switch off the ignition
using the key, or the START/STOP
button if your vehicle has Keyless Entry
and Starting.
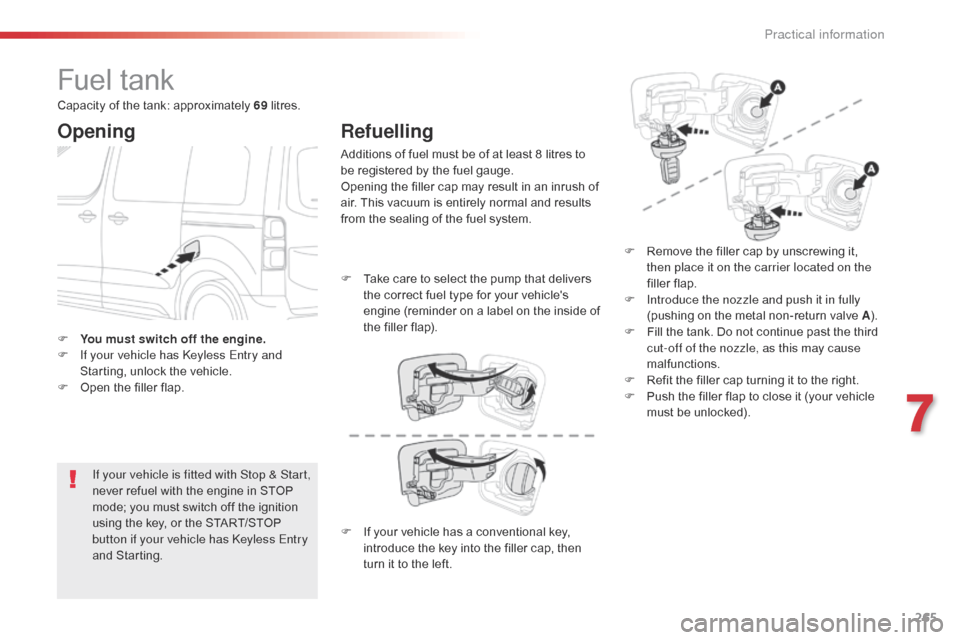
F
Y
ou must switch off the engine.
F
I
f your vehicle has Keyless Entry and
Starting, unlock the vehicle.
F
O
pen the filler flap.
Refuelling
Additions of fuel must be of at least 8 litres to
be registered by the fuel gauge.
Opening the filler cap may result in an inrush of
air. This vacuum is entirely normal and results
from the sealing of the fuel system.
F
R
emove the filler cap by unscrewing it,
then place it on the carrier located on the
filler flap.
F
I
ntroduce the nozzle and push it in fully
(pushing on the metal non-return valve A ).
F
F
ill the tank. Do not continue past the third
cut-off of the nozzle, as this may cause
malfunctions.
F
R
efit the filler cap turning it to the right.
F
P
ush the filler flap to close it (your vehicle
must be unlocked).
F
T
ake care to select the pump that delivers
the correct fuel type for your vehicle's
engine (reminder on a label on the inside of
the filler flap).
Capacity of the tank: approximately 69
litres.
F
I
f your vehicle has a conventional key,
introduce the key into the filler cap, then
turn it to the left.
7
Practical information
Page 287 of 595
285
Jumpy _en_Chap07_info-pratiques_ed01-2016
Recommendations on storage
Never store bottles of AdBlue® in your
vehicle.
AdBlue
® freezes at about -11°C and
deteriorates above 25°C. It is recommended
that bottles be stored in a cool area and
protected from direct sunlight.
Under these conditions, the fluid can be kept
for at least a year.
If the additive has frozen, it can be used once it
has completely thawed out.
Procedure
Before starting the top-up procedure, ensure
that the vehicle is parked on a flat and level
sur face.
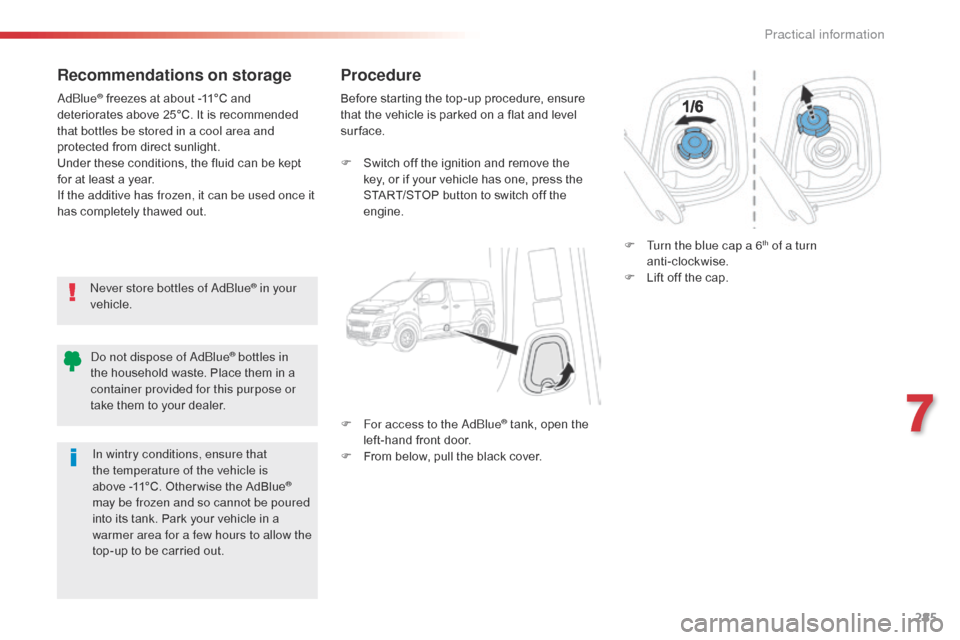
F
S
witch off the ignition and remove the
key, or if your vehicle has one, press the
START/STOP button to switch off the
engine.
F
F
or access to the AdBlue
® tank, open the
left-hand front door.
F
F
rom below, pull the black cover. F
T
urn the blue cap a 6
th of a turn
anti-clockwise.
F
L
ift off the cap.
Do not dispose of AdBlue
® bottles in
the household waste. Place them in a
container provided for this purpose or
take them to your dealer.
In wintry conditions, ensure that
the temperature of the vehicle is
above
-11°C. Other wise the AdBlue
®
may be frozen and so cannot be poured
into its tank. Park your vehicle in a
warmer area for a few hours to allow the
top-up to be carried out.
7
Practical information
Page 288 of 595
286
Jumpy _en_Chap07_info-pratiques_ed01-2016
F After emptying the bottle, wipe away any spillage around the tank filler using a damp
cloth. If any additive is split or splashed, wash
immediately with cold water or wipe with
a damp cloth.
If the additive has crystallised, clean it
off using a sponge and hot water.
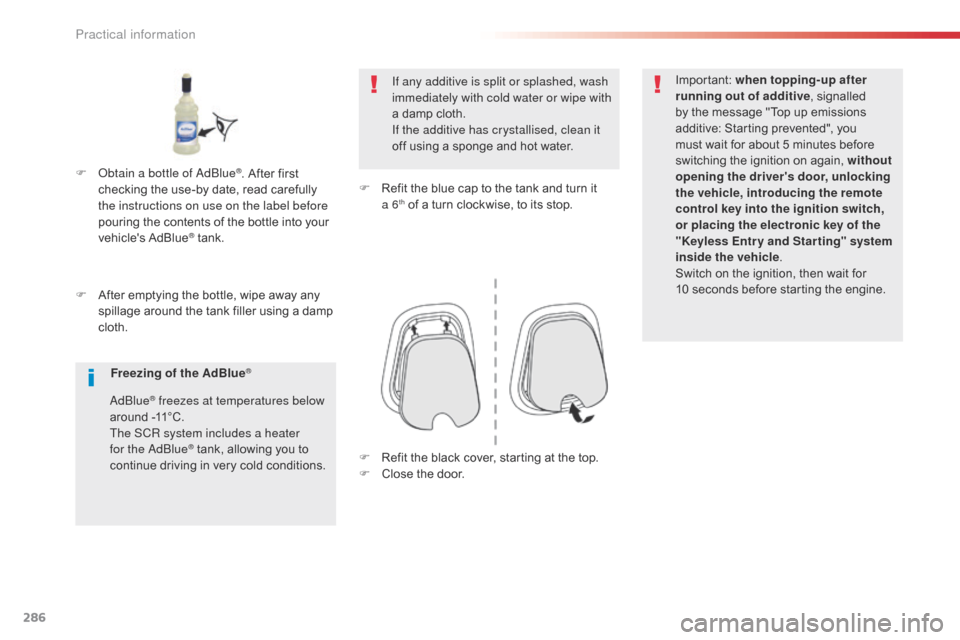
F
R
efit the blue cap to the tank and turn it
a 6
th of a turn clockwise, to its stop.Important:
when topping-up after
running out of additive , signalled
by the message "Top up emissions
additive: Starting prevented", you
must wait for about 5 minutes before
switching the ignition on again, without
opening the driver's door, unlocking
the vehicle, introducing the remote
control key into the ignition switch,
or placing the electronic key of the
"Keyless Entr y and Star ting" system
inside the vehicle .
Switch on the ignition, then wait for
10
seconds before starting the engine.
F
O
btain a bottle of AdBlue
®. After first
checking the use-by date, read carefully
the instructions on use on the label before
pouring the contents of the bottle into your
vehicle's AdBlue
® tank.
Freezing of the AdBlue
®
AdBlue® freezes at temperatures below
around -11°C.
The SCR system includes a heater
for the AdBlue
® tank, allowing you to
continue driving in very cold conditions. F
R efit the black cover, starting at the top.
F
C
lose the door.
Practical information
Page 320 of 595
318
Jumpy _en_Chap08_En-cas-de-panne_ed01-2016
FuseN° Rating
(A) Functions
F1 10Electric power steering, clutch switch
F4 15Horn.
F5 20Front/rear screenwash pump.
F6 20Front/rear screenwash pump.
F7 10Rear 12 V accessory socket.
F8 20Single or double rear wipers.
F10/ F11 30Front and rear, exterior, interior locks.
F13 10Front air conditioning controls, radio controls, gear lever,
head-up display.
F14 5Alarm, emergency and assistance calls.
F17 5Instrument panel.
F19 3Steering mounted controls.
F21 3"Keyless Entry and Starting" system or ignition switch.
F22 3Rain and sunshine sensor, multifunction detection
camera.
F23 5Seat belt unfastened or not fastened display screen.
F24 5Touch screen, reversing camera and parking sensors.
F25 5Airbags.
F29 20Audio system, touch screen, CD player, navigation.
F31 15Audio system (battery +).
F32 15Front 12 V accessory socket.
F34 5Blind spot monitoring system, door mirror electric
controls.
F35 5Heated washer jets, headlamp beam height
control.
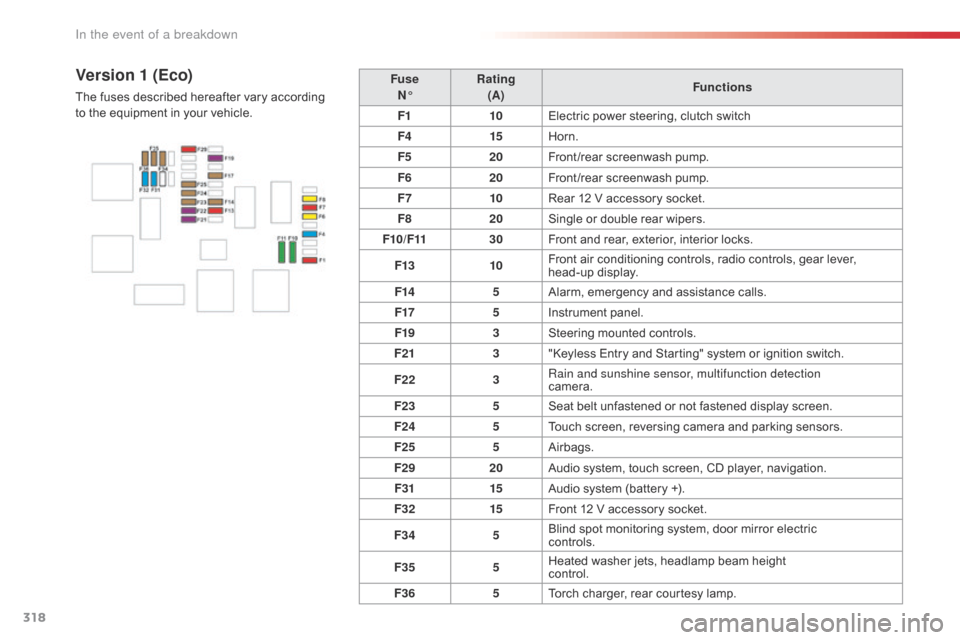
F36 5Torch charger, rear courtesy lamp.Version 1 (Eco)
The fuses described hereafter vary according
to the equipment in your vehicle.
In the event of a breakdown
Page 321 of 595
319
Jumpy _en_Chap08_En-cas-de-panne_ed01-2016
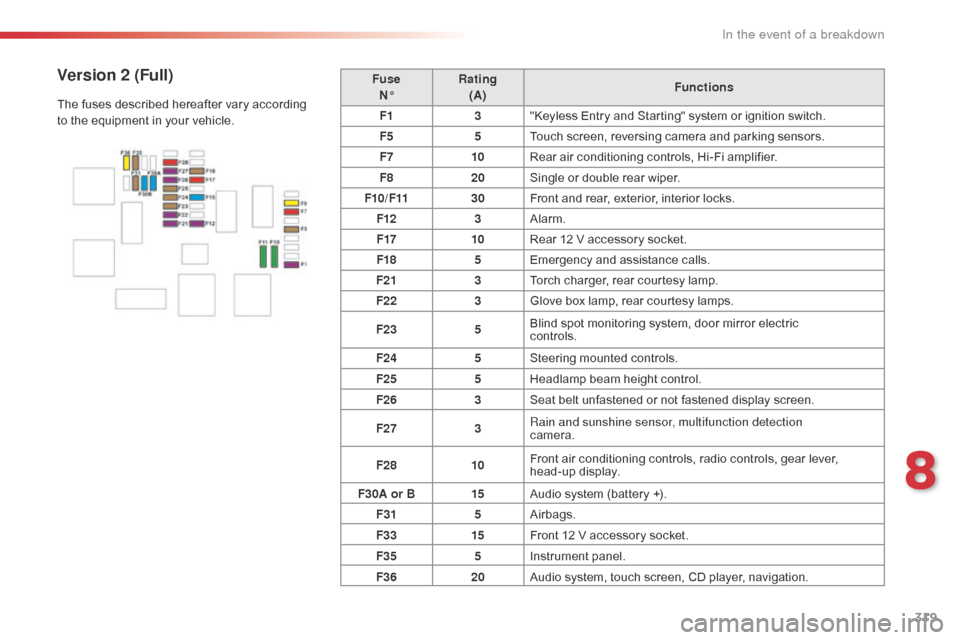
FuseN° Rating
(A) Functions
F1 3"Keyless Entry and Starting" system or ignition switch.
F5 5Touch screen, reversing camera and parking sensors.
F7 10Rear air conditioning controls, Hi-Fi amplifier.
F8 20Single or double rear wiper.
F10/F11 30Front and rear, exterior, interior locks.
F12 3Alarm.
F17 10Rear 12 V accessory socket.
F18 5Emergency and assistance calls.
F21 3Torch charger, rear courtesy lamp.
F22 3Glove box lamp, rear courtesy lamps.
F23 5Blind spot monitoring system, door mirror electric
controls.
F24 5Steering mounted controls.
F25 5Headlamp beam height control.
F26 3Seat belt unfastened or not fastened display screen.
F27 3Rain and sunshine sensor, multifunction detection
camera.
F28 10Front air conditioning controls, radio controls, gear lever,
head-up display.
F30A or B 15Audio system (battery +).
F31 5Airbags.
F33 15Front 12 V accessory socket.
F35 5Instrument panel.
F36 20Audio system, touch screen, CD player, navigation.Version 2 (Full)
The fuses described hereafter vary according
to the equipment in your vehicle.
8
In the event of a breakdown
Page 326 of 595
324
Jumpy _en_Chap08_En-cas-de-panne_ed01-2016
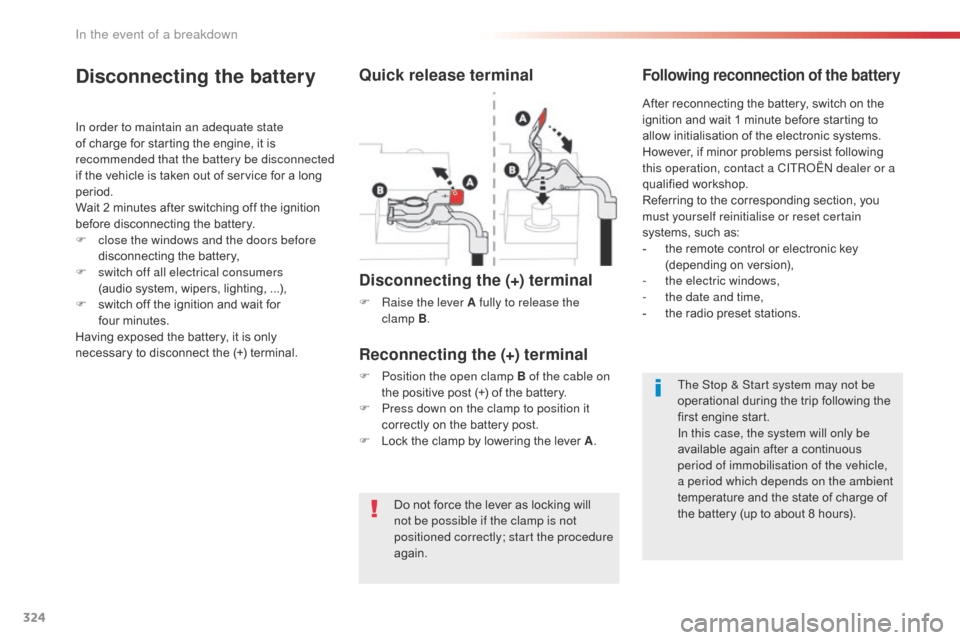
Do not force the lever as locking will
not be possible if the clamp is not
positioned correctly; start the procedure
again.
Disconnecting the battery
In order to maintain an adequate state
of charge for starting the engine, it is
recommended that the battery be disconnected
if the vehicle is taken out of service for a long
period.
Wait 2 minutes after switching off the ignition
before disconnecting the battery.
F
c
lose the windows and the doors before
disconnecting the battery,
F
s
witch off all electrical consumers
(audio system, wipers, lighting, ...),
F
s
witch off the ignition and wait for
four
m
inutes.
Having exposed the battery, it is only
necessary to disconnect the (+) terminal.
Quick release terminal
Disconnecting the (+) terminal
F Raise the lever A fully to release the clamp B.
Following reconnection of the battery
Reconnecting the (+) terminal
F Position the open clamp B of the cable on
the positive post (+) of the battery.
F
P
ress down on the clamp to position it
correctly on the battery post.
F
L
ock the clamp by lowering the lever A .After reconnecting the battery, switch on the
ignition and wait 1 minute before starting to
allow initialisation of the electronic systems.
However, if minor problems persist following
this operation, contact a CITROËN dealer or a
qualified workshop.
Referring to the corresponding section, you
must yourself reinitialise or reset certain
systems, such as:
-
t
he remote control or electronic key
(depending on version),
-
t
he electric windows,
-
t
he date and time,
-
t
he radio preset stations.
The Stop & Start system may not be
operational during the trip following the
first engine start.
In this case, the system will only be
available again after a continuous
period of immobilisation of the vehicle,
a period which depends on the ambient
temperature and the state of charge of
the battery (up to about 8 hours).
In the event of a breakdown
Page 366 of 595
364
1
1
8
Jumpy_en_Chap10b_NAC-1_ed01-2016
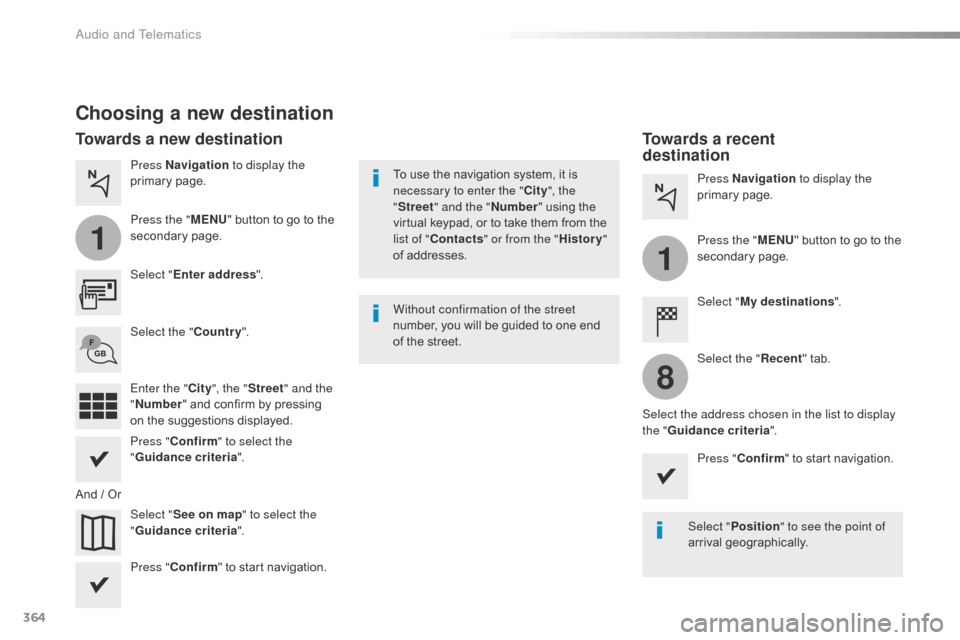
Choosing a new destination
Select "Enter address ".
Select " See on map " to select the
" Guidance criteria ".
Select the "
Country".
Press " Confirm " to select the
" Guidance criteria ".
Press " Confirm " to start navigation. Press "
Confirm " to start navigation.
And / Or Press Navigation
to display the
primary page.
Press the " MENU" button to go to the
secondary page.
Towards a new destination Towards a recent
destination
Select "My destinations ".
Press Navigation
to display the
primary page.
Press the " MENU" button to go to the
secondary page.
Enter the " City", the " Street " and the
" Number " and confirm by pressing
on the suggestions displayed. Select the "
Recent" tab.
Select the address chosen in the list to display
the " Guidance criteria ".
To use the navigation system, it is
necessary to enter the "
City", the
" Street " and the " Number" using the
virtual keypad, or to take them from the
list of " Contacts " or from the " History"
of addresses.
Without confirmation of the street
number, you will be guided to one end
of the street.
Select "Position " to see the point of
arrival geographically.
Audio and Telematics
Page 368 of 595

366
Jumpy_en_Chap10b_NAC-1_ed01-2016
Towards GPS coordinates
Towards a point on the map
Press Navigation to display the
primary page. Press Navigation
to display the
primary page.
Explore the map by sliding a finger on the
screen. Explore the map by sliding a finger on the
screen.
Tap the screen to place a marker and
display the sub-menu.
Or Or
Or
And
Select the destination by pressing on the map.
Press this button to start navigation. Press this button to start navigation.
Press this button to display the world
map.
Using the grid, select by zoom the
desired country or region.
Press this button to save the address
displayed Press this button to save the address
displayed.
Press this button to enter the GPS
coordinates. Press this button to enter the value
for "Latitude " using the virtual
keypad.
Press this button to enter the value
for " Longitude " using the virtual
keypad. A marker is displayed in the middle of
the screen, with the " Latitude" and
" Longitude " coordinates.
A long press on a point opens a list of
POIs nearby.
Audio and Telematics
Page 379 of 595
377
Jumpy_en_Chap10b_NAC-1_ed01-2016
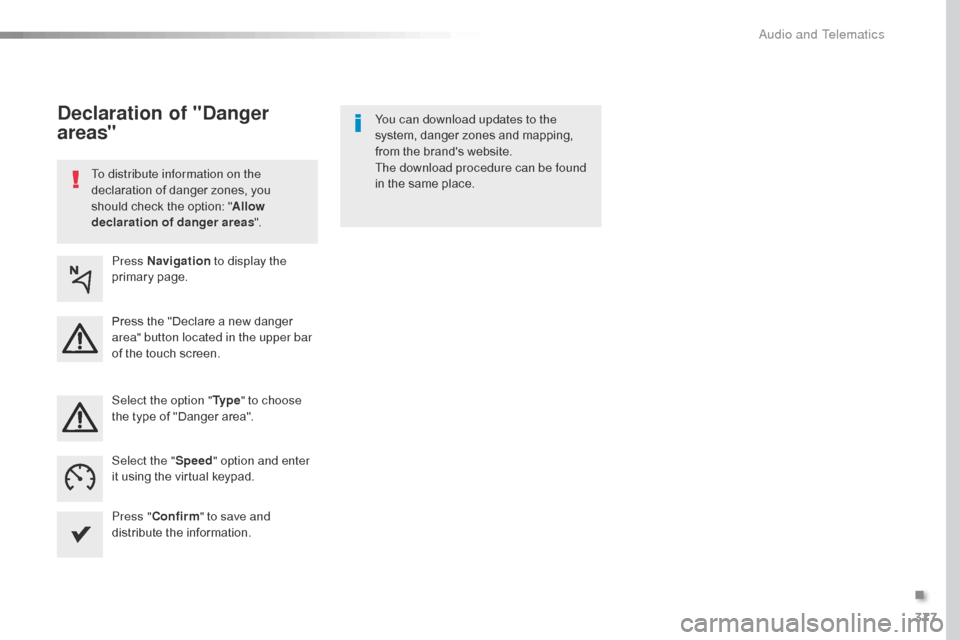
To distribute information on the
declaration of danger zones, you
should check the option: "Allow
declaration of danger areas ".You can download updates to the
system, danger zones and mapping,
from the brand's website.
The download procedure can be found
in the same place.
Declaration of "Danger
areas"
Press Navigation
to display the
primary page.
Press the "Declare a new danger
area" button located in the upper bar
of the touch screen.
Select the option " Ty p e" to choose
the type of "Danger area".
Select the " Speed" option and enter
it using the virtual keypad.
Press " Confirm " to save and
distribute the information.
.
Audio and Telematics