steering CITROEN JUMPY 2022 Owners Manual
[x] Cancel search | Manufacturer: CITROEN, Model Year: 2022, Model line: JUMPY, Model: CITROEN JUMPY 2022Pages: 324, PDF Size: 10.05 MB
Page 4 of 324
2
Contents
■
OverviewOverview 4
Labels 5
■
Eco-driving
1Dashboard instrumentsInstrument Panel 9
Warning and indicator lamps 11
Indicators 16
Distance recorders 21
Lighting dimmer 22
Trip computer 22
Touch screen 24
Additional remotely operable functions (Electric) 26
Setting the date and time 26
2AccessElectronic key with remote control function and
built-in key 28
Unlocking/Complete or selective unlocking 30
Back-up procedures 34
Central locking 37
Electric sliding side door(s) 38
General recommendations for the sliding
side doors
39
Hands-free sliding side door(s) 42
Side-hinged rear doors 43
Tailgate 44
Tailgate rear screen 44
Alarm 45
Electric windows 47
3Ease of use and comfortCorrect driving position 48
Front seats 48
2-seat front bench seat 50
Steering wheel adjustment 52
Mirrors 52
Moduwork 53
Precautions for the seats and bench seats 57
Fixed one-piece bench seat 57
Fixed rear seat and bench seat 59
Rear seat and bench seat on rails 61
Individual rear seat(s) on rails 63
Crew cab, fixed 65
Crew cab, folding 67
Interior fittings 68
Loading area fittings 71
Seating area fittings 72
Panoramic sunroof 74
Retractable sliding table 74
Heating and Ventilation 77
Heating 78
Manual air conditioning 78
Dual-zone automatic air conditioning 79
Front demisting - defrosting 81
Demisting/de-icing the rear screen and/or
the door mirrors
82
Rear heating - air conditioning 82
Additional heating/ventilation system 83
Temperature pre-conditioning (Electric) 85
Courtesy lamp(s) 86
4Lighting and visibilityLighting control stalk 88
Direction indicators 89
Daytime running lamps/Sidelamps 89
Automatic illumination of headlamps 89
Guide-me-home and welcome lighting 90
Automatic headlamp dipping 90
Headlamp beam height adjustment 92
Interior ambient lighting 92
Wiper control stalk 92
Automatic wipers 93
Changing a wiper blade 95
5SafetyGeneral safety recommendations 96
Hazard warning lamps 96
Emergency or assistance 97
Horn 99
Pedestrian horn (Electric) 99
Electronic stability control (ESC) 99
Advanced Grip Control 101
Seat belts 102
Airbags 106
Child seats 108
Deactivating the front passenger airbag 11 0
ISOFIX and i-Size child seats 11 8
i-Size child seats 130
Manual child lock 132
Electric child lock 133
Child lock on rear windows 133
6DrivingDriving recommendations 134
Starting/switching off the engine 136
Manual parking brake 140
Electric parking brake 140
Hill start assist 142
6-speed manual gearbox 143
Page 5 of 324
3
Contents
Gear shift indicator 144
Automatic gearbox 144
Drive selector (Electric) 147
Driving modes (Electric) 148
Stop & Start 149
Tyre under-inflation detection 150
Driving and manoeuvring aids - General
recommendations
152
Head-up display 153
Memorising speeds 154
Road signs recognition 155
Speed limiter 157
Cruise control - Specific recommendations 159
Cruise control 159
Adaptive cruise control 162
Active Safety Brake with Collision Risk Alert and
Intelligent emergency braking assistance
165
Lane departure warning system 168
Distraction detection 169
Blind spot monitoring 170
Parking sensors 171
Top Rear Vision 173
7Practical informationCompatibility of fuels 177
Refuelling 177
Diesel misfuel prevention 178
Charging system (Electric) 179
Charging the traction battery (Electric) 186
Energy economy mode 190
Snow chains 190
Towing device 191
Roof bars/Roof rack 191
Bonnet 192
Engine compartment 193
Checking levels 194
Checks 196
AdBlue® (BlueHDi) 198
Free-wheeling 200
Advice on care and maintenance 202
8In the event of a breakdownWarning triangle 204
Running out of fuel (Diesel) 204
Tool box 205
Temporary puncture repair kit 206
Spare wheel 209
Changing a bulb 213
Fuses 218
12
V battery
/ Accessory battery 218
Towing the vehicle 222
9Technical dataEngine technical data and towed loads 225
Diesel engines 226
Electric motor 231
Dimensions 233
Identification markings 235
10Bluetooth® audio systemFirst steps 237
Steering mounted controls 238
Menus 238
Radio 239
DAB (Digital Audio Broadcasting) radio 240
Media 241
Telephone 243
Frequently asked questions 246
11MyCitroën PlayFirst steps 249
Steering mounted controls 250
Menus 251
Applications 252
Radio 252
DAB (Digital Audio Broadcasting) radio 254
Media 254
Telephone 256
Settings 259
Frequently asked questions 260
12MyCitroën DriveFirst steps 262
Steering mounted controls 263
Menus 263
Voice commands 265
Navigation 268
Connected navigation 271
Applications 273
Radio 276
DAB (Digital Audio Broadcasting) radio 277
Media 277
Telephone 279
Settings 281
Frequently asked questions 283
13Event data recorders
■
Alphabetical index
■
Appendix
Page 6 of 324
4
Overview
Presentation
Instruments and controls
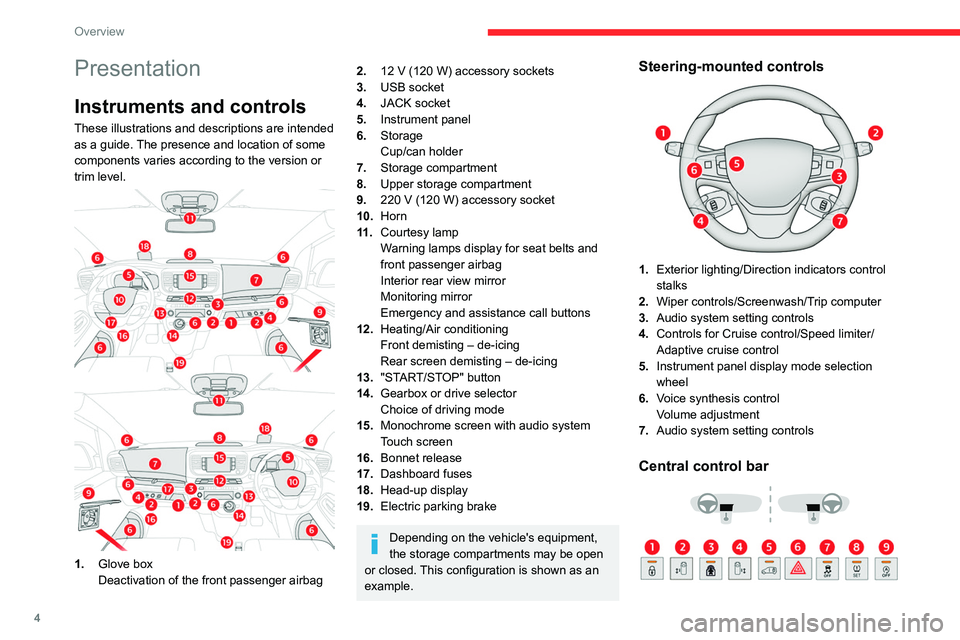
These illustrations and descriptions are intended
as a guide. The presence and location of some
components varies according to the version or
trim level.
1.Glove box
Deactivation of the front passenger airbag
2.12 V (120 W) accessory sockets
3. USB socket
4. JACK socket
5. Instrument panel
6. Storage
Cup/can holder
7. Storage compartment
8. Upper storage compartment
9. 220
V (120 W) accessory socket
10.Horn
11
.Courtesy lamp
Warning lamps display for seat belts and
front passenger airbag
Interior rear view mirror
Monitoring mirror
Emergency and assistance call buttons
12. Heating/Air conditioning
Front demisting – de-icing
Rear screen demisting – de-icing
13. "START/STOP" button
14. Gearbox or drive selector
Choice of driving mode
15. Monochrome screen with audio system
Touch screen
16. Bonnet release
17. Dashboard fuses
18. Head-up display
19. Electric parking brake
Depending on the vehicle's equipment,
the storage compartments may be open
or closed. This configuration is shown as an
example.
Steering-mounted controls
1. Exterior lighting/Direction indicators control
stalks
2. Wiper controls/Screenwash/Trip computer
3. Audio system setting controls
4. Controls for Cruise control/Speed limiter/
Adaptive cruise control
5. Instrument panel display mode selection
wheel
6. Voice synthesis control
Volume adjustment
7. Audio system setting controls
Central control bar
Page 13 of 324
11
Dashboard instruments
1Warning and indicator
lamps
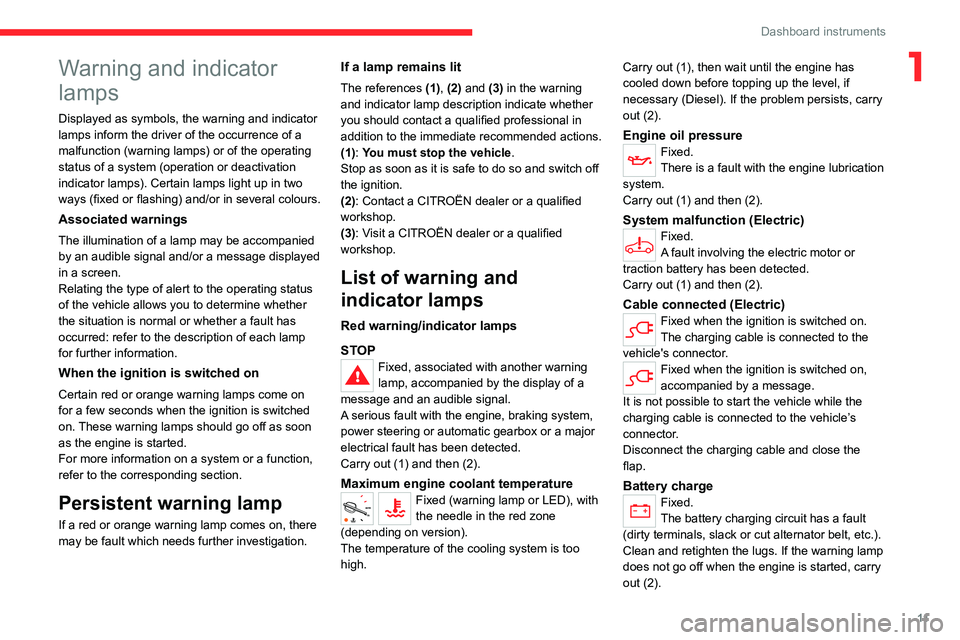
Displayed as symbols, the warning and indicator
lamps inform the driver of the occurrence of a
malfunction (warning lamps) or of the operating
status of a system (operation or deactivation
indicator lamps). Certain lamps light up in two
ways (fixed or flashing) and/or in several colours.
Associated warnings
The illumination of a lamp may be accompanied
by an audible signal and/or a message displayed
in a screen.
Relating the type of alert to the operating status
of the vehicle allows you to determine whether
the situation is normal or whether a fault has
occurred: refer to the description of each lamp
for further information.
When the ignition is switched on
Certain red or orange warning lamps come on
for a few seconds when the ignition is switched
on. These warning lamps should go off as soon
as the engine is started.
For more information on a system or a function,
refer to the corresponding section.
Persistent warning lamp
If a red or orange warning lamp comes on, there
may be fault which needs further investigation.
If a lamp remains lit
The references (1), (2) and (3) in the warning
and indicator lamp description indicate whether
you should contact a qualified professional in
addition to the immediate recommended actions.
(1): You must stop the vehicle.
Stop as soon as it is safe to do so and switch off
the ignition.
(2): Contact a CITROËN dealer or a qualified
workshop.
(3): Visit a CITROËN dealer or a qualified
workshop.
List of warning and
indicator lamps
Red warning/indicator lamps
STOP
Fixed, associated with another warning
lamp, accompanied by the display of a
message and an audible signal.
A serious fault with the engine, braking system,
power steering or automatic gearbox or a major
electrical fault has been detected.
Carry out (1) and then (2).
Maximum engine coolant temperatureFixed (warning lamp or LED), with
the needle in the red zone
(depending on version).
The temperature of the cooling system is too
high. Carry out (1), then wait until the engine has
cooled down before topping up the level, if
necessary (Diesel). If the problem persists, carry
out (2).
Engine oil pressureFixed.
There is a fault with the engine lubrication
system.
Carry out (1) and then (2).
System malfunction (Electric)Fixed.
A fault involving the electric motor or
traction battery has been detected.
Carry out (1) and then (2).
Cable connected (Electric)Fixed when the ignition is switched on.
The charging cable is connected to the
vehicle's connector.
Fixed when the ignition is switched on,
accompanied by a message.
It is not possible to start the vehicle while the
charging cable is connected to the vehicle’s
connector.
Disconnect the charging cable and close the
flap.
Battery chargeFixed.
The battery charging circuit has a fault
(dirty terminals, slack or cut alternator belt, etc.).
Clean and retighten the lugs. If the warning lamp
does not go off when the engine is started, carry
out (2).
Page 17 of 324

15
Dashboard instruments
1Wait until the warning lamp goes off before
starting.
When the warning lamp goes off, starting will
occur immediately if you press and hold:
–
the clutch pedal with a manual gearbox.
–
the brake pedal with an automatic gearbox.
If the engine does not start, make the engine
starting request again, while keeping your foot
on the pedal.
Front passenger airbag (ON)Fixed.
The front passenger airbag is activated.
The control is in the "ON" position.
In this case, do NOT install a "rearward
facing" child seat on the front passenger seat
- Risk of serious injury!
Front passenger airbag (OFF)Fixed.
The front passenger airbag is deactivated.
The control is set to the “OFF ” position.
A "rearward facing" child seat can be installed,
unless there is a fault with the airbags (Airbags
warning lamp on).
AirbagsFixed.
One of the airbags or seat belt
pyrotechnic pretensioners is faulty.
Carry out (3).
Low fuel level (Diesel)Fixed (warning lamp or LED) and
needle in the red zone (depending on version), accompanied by an audible signal
and a message.
When it first comes on, there remains less than
8 litres of fuel in the tank.
Until the fuel level is topped up, this alert will
be repeated every time the ignition is switched
on, with increasing frequency as the fuel level
decreases and approaches zero.
Refuel without delay to avoid running out of fuel.
Never drive until completely empty, as
this could damage the emissions control and
injection systems.
Low traction battery level (Electric)
0 %
100
Fixed LED and needle in the red zone,
accompanied by an audible signal and a
message.
The state of charge of the traction battery is low.
View the remaining range.
Put the vehicle on charge as soon as possible.
Tortoise mode with limited driving range
(Electric)
Fixed.
The state of charge of the traction battery
is critical.
The engine power gradually decreases.
You must put the vehicle on charge.
If the warning lamp remains lit, carry out
(2).
Pedestrian horn (Electric)Fixed.
Horn fault detected.
Carry out (3).
Water in Diesel fuel filter (Diesel)Fixed (with LCD instrument panel).
The Diesel fuel filter contains water.
Carry out (2) without delay. Risk of damaging the
fuel injection system!
Particle filter (Diesel)Fixed, accompanied by an audible signal
and a message about the risk of particle
filter blockage.
The particle filter is nearing saturation.
As soon as traffic conditions allow, regenerate
the filter by driving at a speed of at least 37
mph
(60
km/h), with an engine speed of above 2,500
rpm, until the warning lamp goes off.
Fixed, accompanied by an audible signal
and a message indicating that the
additive level in the particle filter is too low.
The low level in the additive tank has been
reached.
Top up without delay: carry out (3).
Power steeringFixed.
The power steering has a fault.
Drive carefully at moderate speed, then carry
out (3).
Rear foglampFixed.
The lamp is on.
Foot on the brakeFixed.
Insufficient or no pressure on the brake
pedal.
Page 18 of 324
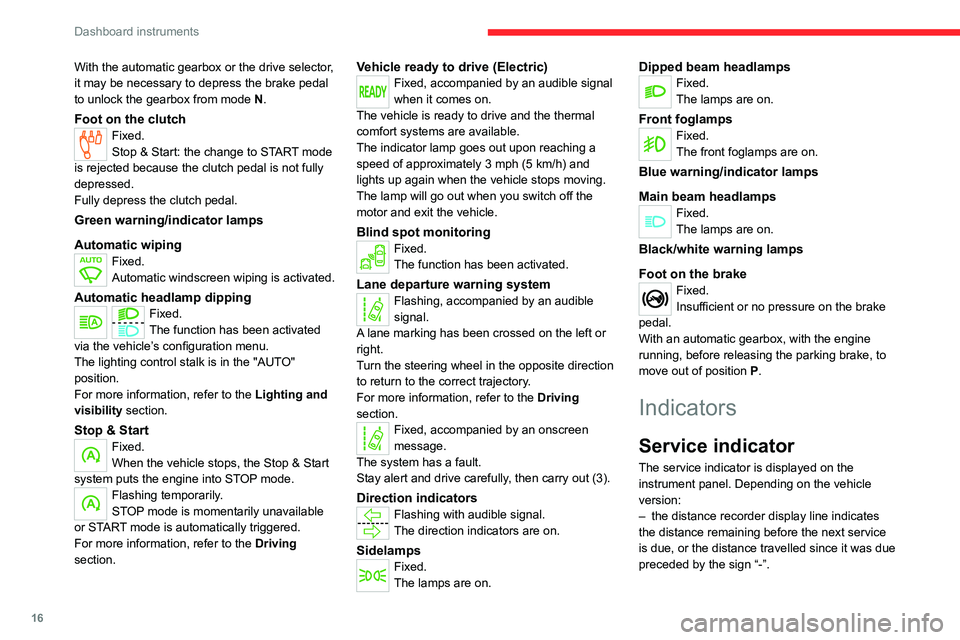
16
Dashboard instruments
With the automatic gearbox or the drive selector,
it may be necessary to depress the brake pedal
to unlock the gearbox from mode N.
Foot on the clutchFixed.
Stop & Start: the change to START mode
is rejected because the clutch pedal is not fully
depressed.
Fully depress the clutch pedal.
Green warning/indicator lamps
Automatic wiping
Fixed.
Automatic windscreen wiping is activated.
Automatic headlamp dippingFixed.
The function has been activated
via the vehicle’s configuration menu.
The lighting control stalk is in the "AUTO"
position.
For more information, refer to the Lighting and
visibility section.
Stop & StartFixed.
When the vehicle stops, the Stop & Start
system puts the engine into STOP mode.
Flashing temporarily.
STOP mode is momentarily unavailable
or START mode is automatically triggered.
For more information, refer to the Driving
section.
Vehicle ready to drive (Electric)Fixed, accompanied by an audible signal
when it comes on.
The vehicle is ready to drive and the thermal
comfort systems are available.
The indicator lamp goes out upon reaching a
speed of approximately 3 mph (5
km/h) and
lights up again when the vehicle stops moving.
The lamp will go out when you switch off the
motor and exit the vehicle.
Blind spot monitoringFixed.
The function has been activated.
Lane departure warning systemFlashing, accompanied by an audible
signal.
A lane marking has been crossed on the left or
right.
Turn the steering wheel in the opposite direction
to return to the correct trajectory.
For more information, refer to the Driving
section.
Fixed, accompanied by an onscreen
message.
The system has a fault.
Stay alert and drive carefully, then carry out (3).
Direction indicatorsFlashing with audible signal.
The direction indicators are on.
SidelampsFixed.
The lamps are on.
Dipped beam headlampsFixed.
The lamps are on.
Front foglampsFixed.
The front foglamps are on.
Blue warning/indicator lamps
Main beam headlamps
Fixed.
The lamps are on.
Black/white warning lamps
Foot on the brake
Fixed.
Insufficient or no pressure on the brake
pedal.
With an automatic gearbox, with the engine
running, before releasing the parking brake, to
move out of position P.
Indicators
Service indicator
The service indicator is displayed on the
instrument panel. Depending on the vehicle
version:
–
the distance recorder display line indicates
the distance remaining before the next service
is due, or the distance travelled since it was due
preceded by the sign “-”.
Page 25 of 324

23
Dashboard instruments
1
► Press the button located on the end of the
wiper control stalk .
With steering-mounted controls
► Press the knob on the steering wheel.
On the instrument panel
► Press this button.
The following current information is shown in
turn:
–
Driving range (Diesel). –
Current consumption.
–
Stop & Start time counter (Diesel).
–
T
rip "1" followed by (depending on version)
trip "2" including average speed, average
consumption and distance travelled for each trip.
Trips "1" and "2" are independent but their use
is identical.
For example, trip "1" can be used for daily
figures and trip " 2" for monthly figures.
Trip reset
The reset is performed when the trip counter is
displayed.
► Press the button on the end of the wiper
control stalk for more than two seconds.
► Press the knob on the steering wheel for
more than two seconds.
► Press this button for more than 2 seconds.
Definitions
Range
(miles or km)
(Traction battery charge level percentage)
(Electric)
Distance that can still be travelled with the
fuel remaining in the tank (based on the
average fuel consumption over the last few miles
(kilometres) travelled).
This value may vary following a change in driving
style or terrain, leading to a significant change in
current fuel consumption.
When the range falls below 19 miles (30
km),
dashes are displayed.
After filling with at least 5 litres of fuel, the range
is recalculated and is displayed if it exceeds 62
miles (100
km).
Dashes appearing permanently in place of
numbers while driving indicates a malfunction.
Page 31 of 324

29
Access
2
► Keep this button 1 pulled while removing
key 2 from the housing.
If the alarm is activated, the audible
signal triggered on opening a door with
the key (integral with the remote control) will
stop when the ignition is switched on.
Once the built-in key is ejected, always
keep it with you to be able to carry out
the corresponding back-up procedures.
"Keyless Entry and Start" on your
person
It allows the unlocking, locking and starting of the
vehicle while carrying the remote control on your
person in recognition zone " A".
In the ignition on (accessories) position,
with the "START/STOP" button, the
hands-free function is deactivated and it is
impossible to open the doors.
For more information on Starting/switching
off the engine,
Keyless Entry and Start and
in particular the "ignition on" position, refer to
the corresponding section.
Locating the vehicle
This function helps you to spot your vehicle from
a distance, with the vehicle locked:
–
The direction indicators flash for approximately
10 seconds.
–
The courtesy lamps come on.
► Press this button.
Remote operation of lighting
If fitted to the vehicle.A short press on this button switches on
the lighting remotely (lighting of
sidelamps, dipped beam headlamps and number
plate lamps).
A second press on the button before the end of
the timed period cancels the remote lighting.
Advice
Remote control
The remote control is a sensitive, high-
frequency device; avoid handling it in your
pocket, due to the risk of unintentionally
unlocking the vehicle.
Avoid pressing the remote control buttons
while out of range of the vehicle, due to
the risk of rendering the remote control
inoperative. It would then be necessary to
reset it.
The remote control does not work
when the
key is in the ignition switch, even when the
ignition is switched off.
Anti-theft protection
Do not modify the electronic vehicle
immobiliser, as this might result in
malfunctions.
For vehicles with a key ignition switch,
remember to remove the key and turn the
steering wheel to engage the steering lock.
Locking the vehicle
Driving with the doors locked could make
it more difficult for the emergency services
to enter the passenger compartment in an
emergency.
As a safety precaution, remove the key from
the ignition or take the electronic key with you
when leaving the vehicle, even for a short
time.
Page 38 of 324

36
Access
Changing the battery
If the battery is flat, this warning lamp
comes on, accompanied by an audible
signal and the display of a message.
Battery type: CR2032/3 volts.
► Unclip the cover by inserting a small
screwdriver in the slot and lift the cover .
►
Remove the flat battery from its housing.
►
Put the new battery in place, respecting the
polarity
. Start by inserting it into the contacts
located in the corner, then clip the cover onto
the unit.
►
Reinitialise the remote control.
For more information on Reinitialising the
remote control
, refer to the corresponding
section.
Do not throw remote control batteries
away, as they contain metals that are
harmful to the environment. Take them to an
approved disposal point.
Reinitialising the remote
control
Following replacement of the battery or in
the event of a fault, it may be necessary to
reinitialise the remote control.
Without Keyless Entry and Start
► Switch the ignition off.
► T urn the key to position 2 (Ignition on) .
►
Immediately press the closed padlock button
for a few seconds.
►
Switch off the ignition and remove the key
from the ignition switch.
The remote control is now fully operational
again.
► Insert the mechanical key (incorporated into
the remote control) into the lock to open the
vehicle.
►
Place the electronic key against the back-up
reader on the steering column and hold it there
until the ignition is switched on.
►
W
ith a manual gearbox, place the gear lever
in neutral then fully depress the clutch pedal.
►
W
ith an automatic gearbox or drive
selector, while in mode
P
, depress the brake
pedal.
►
Switch on the ignition by pressing the
"
START/STOP" button.
If the fault persists after reinitialisation, contact a
CITROËN dealer or a qualified workshop without
delay.
Page 50 of 324

48
Ease of use and comfort
Correct driving position
Before taking to the road and to make the most
of the ergonomic layout of the instruments and
controls, carry out these adjustments in the
following order:
–
the height of the head restraint,
–
the seat backrest angle,
–
the seat cushion height,
–
the longitudinal position of the seat,
–
the height and reach of the steering wheel,
–
the rear view mirror and door mirrors.
Once these adjustments have been
made, check the instrument panel can be
viewed correctly from your driving position.
Manually-adjusted front
seats
For more information on the Seat belts,
refer to the corresponding section.
Longitudinal
► Raise the control bar and slide the seat
forwards or backwards.
►
Release the control bar to lock the seat in
position on one of the notches.
Before moving the seat backwards,
ensure that there is nothing that might
prevent the full travel of the seat.
There is a risk of trapping or pinching
passengers if present in the rear seats or
jamming the seat if large objects are placed
on the floor behind the seat.
Height
► Pull the control upwards to raise or push it
downwards to lower , until you obtain the position
required.
Backrest angle
► Depending on equipment, turn the knob
or pull the control all the way up and tilt the
backrest forwards or backwards to obtain the
desired angle.
Lumbar