wheel Citroen JUMPY MULTISPACE 2013 2.G Owner's Manual
[x] Cancel search | Manufacturer: CITROEN, Model Year: 2013, Model line: JUMPY MULTISPACE, Model: Citroen JUMPY MULTISPACE 2013 2.GPages: 260, PDF Size: 8.79 MB
Page 3 of 260
Your vehicle is fitted with only some of the
equipment described in this document,
depending on the trim level, version and the
specifications for the country in which it is sold.
The fitting of electrical equipment or accessories
which are not recommended by CITROËN may
result in a failure of your vehicle's electronic
system. Please note this specific warning and
contact a CITROËN dealer to be shown the
recommended equipment and accessories.
CITROËN has a presence on every continent,
a complete product range,
bringing together technology and a permanent spirit of innovation,
for a modern and creative approach to mobility.
We thank you and congratulate you on your choice.
Happy motoring!
We draw your attention to the following...
At the wheel of your new vehicle,
getting to know each system,
each control, each setting,
makes your trips, your journeys
more comfortable and more enjoyable.
For any work on your vehicle, use a qualified
workshop that has the technical information,
competence and equipment required, which a
CITROËN dealer is able to provide.
Page 4 of 260
2
Contents
Remote control 21Key 22Alarm 23Doors 24Instrument panel 28Adjusting the time 29Warning lamps 30Fuel gauge 36Coolant 36Tyre under-inflation detection 37Service indicator 38Lighting dimmer 39Gearboxes 40Gear shift indicator 40Automatic gearbox 42Steering wheel adjustment 45Starting and stopping 45
Controls for 46lighting 46wipers 49Cruise control 51Fixed speed limiter 53Speed limiter 54Heating / air conditioning,manual 57digital 59Demisting and defrosting 63Rear ventilation 65Additional heating 66Seats 692-seat front bench 71Rear seats 73Seat and bench configuration 80Cab fittings 81Courtesy lamps 84Toll cards/car park tickets 85
Seating area fittings 85Rear suspension 88Mirrors 91Electric windows 93
Presentation 4Exterior 6Sitting comfortably 11Seeing clearly 13Driving safely 14Cab fittings 15Rear fittings 15Child safety 16Ventilation 17Eco-driving 18
Parking brake 94Hazard warning lamps 94Parking sensors 95Horn 96Anti-lock braking system(ABS) 96Emergency braking assistance96ASR and DSC 97"Grip control" 98Seat belts 100Airbags 103Lateral airbags 105Front airbags 106Deactivating the passenger'sairbag 106Child seats 107ISOFIX seats 111Recommended seats 114
2. READY TO GO
21-45
4. SAFETY
94-116
1. FAMILIARISATION
4-203. EASE OF USE and COMFORT 46-93
Page 5 of 260
CONTENT
S
Contents
3
The "Technology on board"
section presents the new radio/
navigation systems.
Towing a trailer 117Other accessories 119
Opening the bonnet 120Diesel engines 121Petrol engine 122Levels 123Checks 125Fuel 128Fuel cut-off 129Diesel priming pump 129
Battery 131Puncture repair kit 133Changing a wheel 135Removable snow screen 139Snow chains 140Changinga bulb 141
a fuse 146a wiper blade 150Towing the vehicle 151
Dimensions 154Weights 158Identification markings 160
Exterior 161Instruments and controls 162Interior 164Te c hnical data -Maintenance 165
9. TECHNOLOGY on BOARD5. ACCESSORIES
117-119
6. CHECKS 120-130
7. QUICK HELP 131-152
8. TECHNICAL DATA 153-160
10. VISUAL SEARCH 163-172
The "Visual search" section
assists you in finding the
controls and functions and their
associated page numbers on
the schematic outlines of the
vehicle (visual index).
Emergency or assistance 9.1eMyWay 9.3Audio system 9.63
Page 6 of 260
4PRESENTATION
Within the chapters, symbols draw your attention to specific
information: This handbook has been designed to familiarise you with your
new vehicle from the moment you get behind the wheel and to
describe the operating features.
Reading the handbook is made easy with the content consisting
of 10 identified chapters, which can be located by means of a
colour code specific to each one. Its sections cover, by subject, all
of the functions of the vehicle in its most complete specification.
Chapter 8 gives all of the technical data relating to your vehicle.
At the end of the document, diagrams of the outside and inside of
the vehicle will assist you in locating equipment or functions and
page numbers refer you to the relevant section of the handbook. directs you to the chapter and section which contains detailed
information concerning a function,
indicates important information relating to use of the equipment,
alerts you to the safety of individuals and equipment on board.
Page 9 of 260
7
4
7
8
3a
2b
2
2a
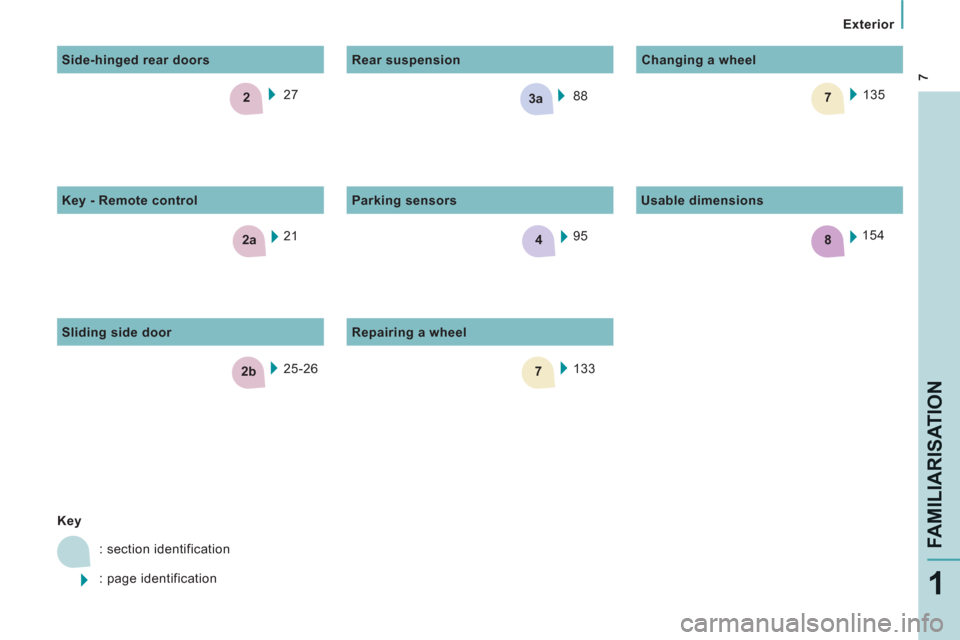
Exterior
FAMILIARISATIO
N
1
Key
: section identification
: page identification 133 95
Rear suspension
Repairing a wheel
Parking sensors 135
Changing a wheel
88 27
25-26 21
Side-hinged rear doors
Key - Remote control
Sliding side door 154
Usable dimensions
Page 11 of 260
9
Interior
FAMILIARISATIO
N
1
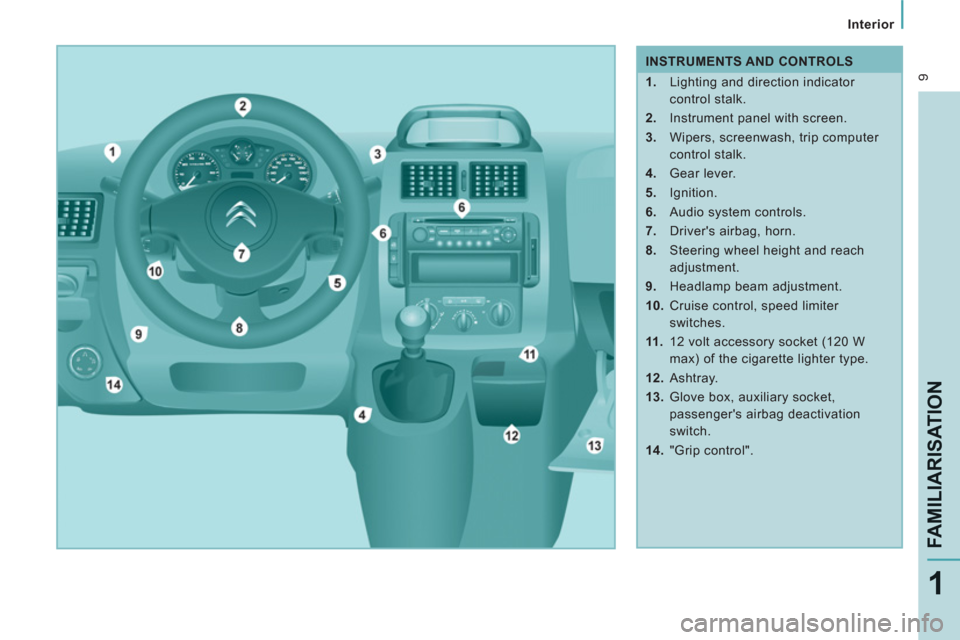
INSTRUMENTS AND CONTROLS
1.
Lighting and direction indicator
control stalk.
2.
Instrument panel with screen.
3.
Wipers, screenwash, trip computer
control stalk.
4.
Gear lever.
5.
Ignition.
6.
Audio system controls.
7.
Driver's airbag, horn.
8.
Steering wheel height and reach
adjustment.
9.
Headlamp beam adjustment.
10.
Cruise control, speed limiter
switches.
11 .
12 volt accessory socket (120 W
max) of the cigarette lighter type.
12.
Ashtray.
13.
Glove box, auxiliary socket,
passenger's airbag deactivation
switch.
14.
"Grip control".
Page 14 of 260
2
4
3
3
12
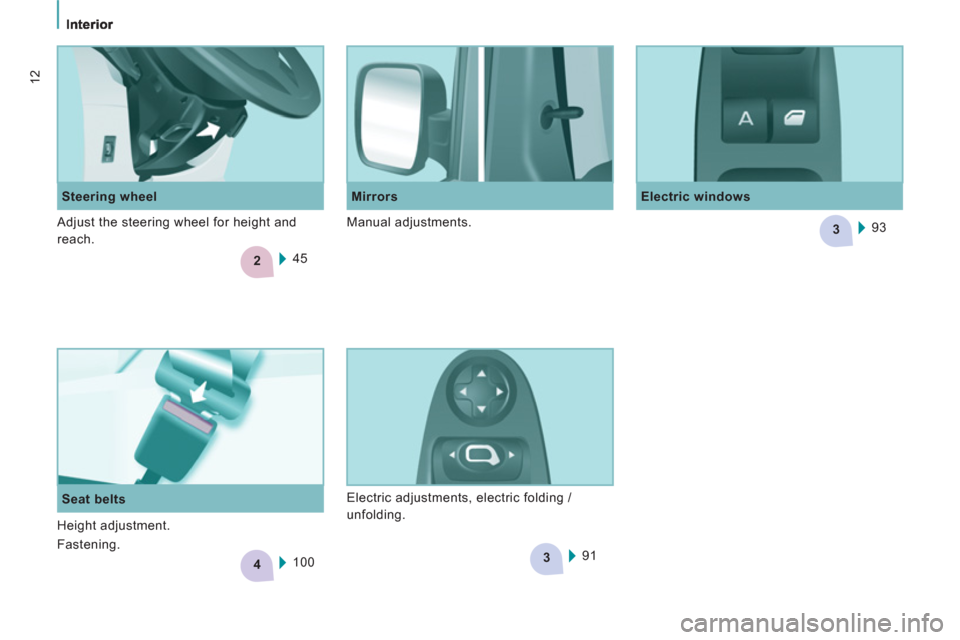
Steering wheel
Electric windows
Mirrors
45
Seat belts
100 93
91 Adjust the steering wheel for height and
reach. Manual adjustments.
Electric adjustments, electric folding /
unfolding.
Height adjustment.
Fastening.
Page 21 of 260
19
Interior
FAMILIARISATIO
N
1
Limit the causes of
excess consumption
Spread loads throughout the vehicle;
place the heaviest items in the bottom of
the boot, as close as possible to the rear
seats.
Limit the loads carried in the vehicle and
reduce wind resistance (roof bars, roof
rack, bicycle carrier, trailer...). Use a roof
box in preference.
Remove roof bars and roof racks after
use.
At the end of winter, remove snow tyres
and refit your summer tyres.
Observe the recommendations
on maintenance
Check the tyre pressures regularly, when
cold, referring to the label in the door
aperture, driver's side.
Carry out this check in particular:
- before a long journey,
- at each change of season,
- after a long period out of use.
Don't forget the spare wheel and the tyres
on any trailer or caravan.
Have your vehicle serviced regularly
(engine oil, oil filter, air filter...) and observe
the schedule of operations recommended
by the manufacturer.
When refuelling, do not continue after the
third cut-off of the nozzle to avoid any
overflow.
At the wheel of your new vehicle,
it is only after the first 1 800 miles
(3 000 kilometres) that you will see
the fuel consumption settle down to a
consistent average.
Page 36 of 260
34
Instruments and controls
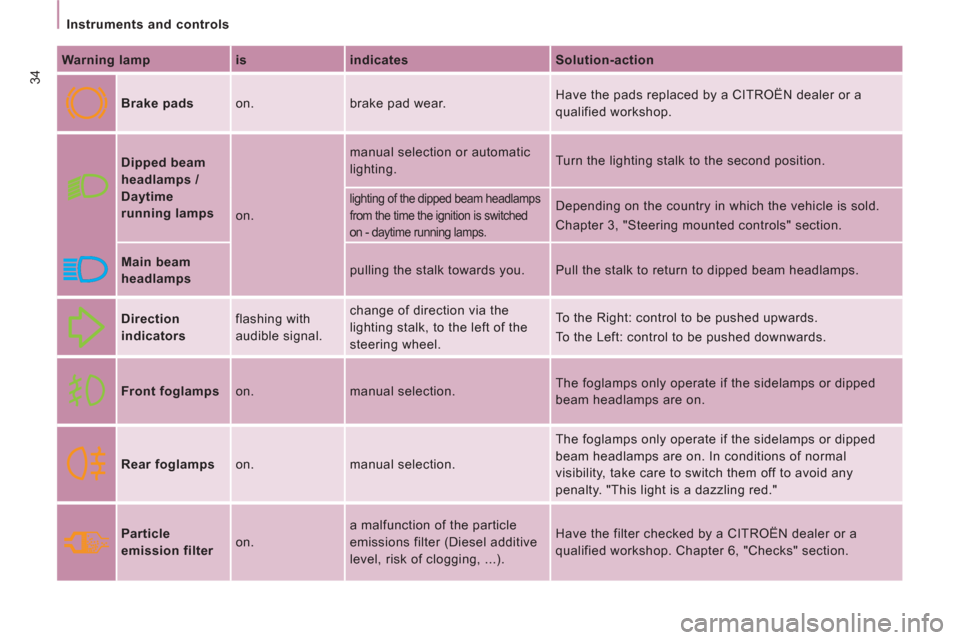
Warning lamp
is
indicates
Solution-action
Brake pads on. brake pad wear. Have the pads replaced by a CITROËN dealer or a
qualified workshop.
Dipped beam
headlamps /
Daytime
running lamps
on. manual selection or automatic
lighting. Turn the lighting stalk to the second position.
lighting of the dipped beam headlamps
from the time the ignition is switched
on - daytime running lamps. Depending on the country in which the vehicle is sold.
Chapter 3, "Steering mounted controls" section.
Main beam
headlamps pulling the stalk towards you. Pull the stalk to return to dipped beam headlamps.
Direction
indicators flashing with
audible signal. change of direction via the
lighting stalk, to the left of the
steering wheel. To the Right: control to be pushed upwards.
To the Left: control to be pushed downwards.
Front foglamps on. manual selection. The foglamps only operate if the sidelamps or dipped
beam headlamps are on.
Rear foglamps on. manual selection. The foglamps only operate if the sidelamps or dipped
beam headlamps are on. In conditions of normal
visibility, take care to switch them off to avoid any
penalty. "This light is a dazzling red."
Particle
emission filter on. a malfunction of the particle
emissions filter (Diesel additive
level, risk of clogging, ...). Have the filter checked by a CITROËN dealer or a
qualified workshop. Chapter 6, "Checks" section.
Page 39 of 260
37
Instruments and controls
REA
DY
TO GO
2
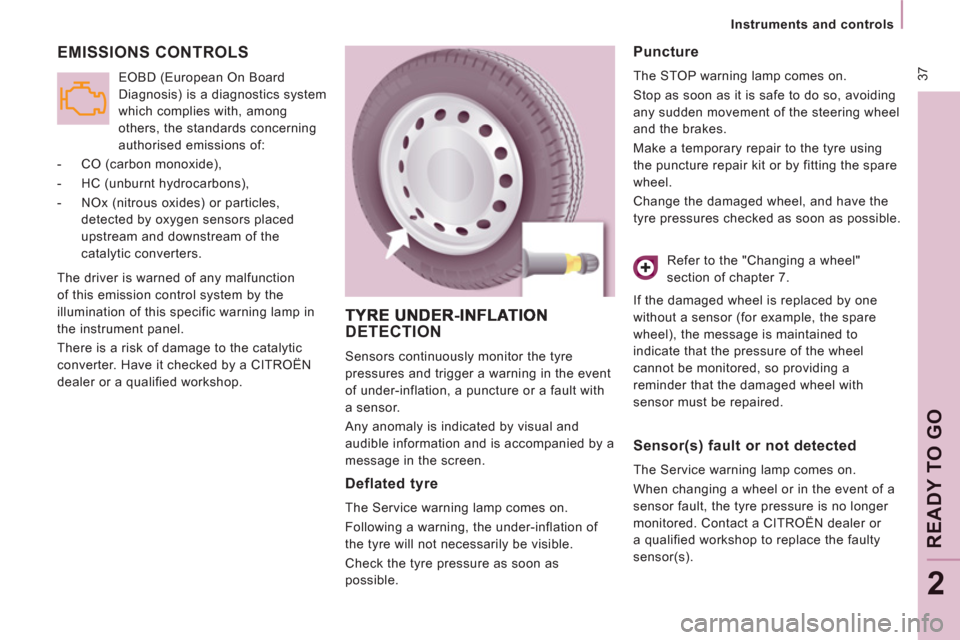
EMISSIONS CONTROLS
The driver is warned of any malfunction
of this emission control system by the
illumination of this specific warning lamp in
the instrument panel.
There is a risk of damage to the catalytic
converter. Have it checked by a CITROËN
dealer or a qualified workshop.
EOBD (European On Board
Diagnosis) is a diagnostics system
which complies with, among
others, the standards concerning
authorised emissions of:
- CO (carbon monoxide),
- HC (unburnt hydrocarbons),
- NOx (nitrous oxides) or particles,
detected by oxygen sensors placed
upstream and downstream of the
catalytic converters.
DETECTION
Sensors continuously monitor the tyre
pressures and trigger a warning in the event
of under-inflation, a puncture or a fault with
a sensor.
Any anomaly is indicated by visual and
audible information and is accompanied by a
message in the screen.
Deflated tyre
The Service warning lamp comes on.
Following a warning, the under-inflation of
the tyre will not necessarily be visible.
Check the tyre pressure as soon as
possible.
Puncture
The STOP warning lamp comes on.
Stop as soon as it is safe to do so, avoiding
any sudden movement of the steering wheel
and the brakes.
Make a temporary repair to the tyre using
the puncture repair kit or by fitting the spare
wheel.
Change the damaged wheel, and have the
tyre pressures checked as soon as possible.
Sensor(s) fault or not detected
The Service warning lamp comes on.
When changing a wheel or in the event of a
sensor fault, the tyre pressure is no longer
monitored. Contact a CITROËN dealer or
a qualified workshop to replace the faulty
sensor(s). Refer to the "Changing a wheel"
section of chapter 7.
If the damaged wheel is replaced by one
without a sensor (for example, the spare
wheel), the message is maintained to
indicate that the pressure of the wheel
cannot be monitored, so providing a
reminder that the damaged wheel with
sensor must be repaired.