brake Citroen JUMPY MULTISPACE 2013 2.G Owner's Guide
[x] Cancel search | Manufacturer: CITROEN, Model Year: 2013, Model line: JUMPY MULTISPACE, Model: Citroen JUMPY MULTISPACE 2013 2.GPages: 260, PDF Size: 8.79 MB
Page 137 of 260

135
Changing a wheel
QUICK HEL
P
7
CHANGING A WHEEL
If your vehicle is equipped with a spare
wheel located underneath the vehicle, follow
these instructions.
1. PARKING THE VEHICLE
- You must ensure that the occupants
get out of the vehicle and wait in a safe
location.
- If possible, park the vehicle on level,
stable and non-slippery ground.
- Apply the parking brake, switch off the
ignition and engage first or reverse gear.
- If available, place a chock under the
wheel diagonally opposite the one to be
changed.
On certain types of ground and/or if heavy
loads are being transported, the vehicle
must be raised in order to disengage
the spare wheel from the carrier. Call a
CITROËN dealer or a qualified workshop.
If your vehicle is fitted with suspension
with pneumatic height correction,
please deactivate the system. Refer to the
"Rear suspension" section of chapter 3.
- If fitted on your vehicle, open the
plastic flap located at the rear left of the
vehicle.
- Unscrew the nut then take out the jack
and the wheelbrace.
1.
Wheelbrace.
2.
Jack.
3.
Towing eye.
The jack and the tool kit are specific to
your vehicle. Do not use them for other
purposes.
Page 142 of 260

140
Snow chains
SNOW CHAINS
In wintry conditions, snow chains improve
traction as well as the behaviour of the
vehicle when braking.
The snow chains must be fitted only to
the driving wheels. They must never be
fitted to "space-saver" type spare wheels.
Take account of the legislation in force
in your country on the use of snow
chains and the maximum running speed
authorised.
Advice on installation
�)
If you have to fit the chains during
a journey, stop the vehicle on a flat
surface on the side of the road.
�)
Apply the parking brake and position any
wheel chocks to prevent movement of
your vehicle.
�)
Fit the chains following the instructions
provided by the manufacturer.
�)
Move off gently and drive for a few
moments, without exceeding 30 mph
(50 km/h).
�)
Stop your vehicle and check that the
snow chains are correctly tightened.
Avoid driving on roads that have been
cleared of snow, to avoid damaging
your vehicle's tyres and the road surface. It
is recommended that before you leave, you
practise fitting the snow chains on a level
and dry surface. If your vehicle is fitted with
alloy wheels, check that no part of the chain
or its fixings is in contact with the wheel rim.
Use only the chains designed to be fitted to
the type of wheel fitted to your vehicle:
For more information on snow chains,
contact a CITROËN dealer or a qualified
workshop.
Original
tyre size
Maximum link
size.
215/65 R15
12 mm
215/60 R16
MICHELIN
215/60 R16
BRIDGESTONE
Page 146 of 260
144
Changing a bulb
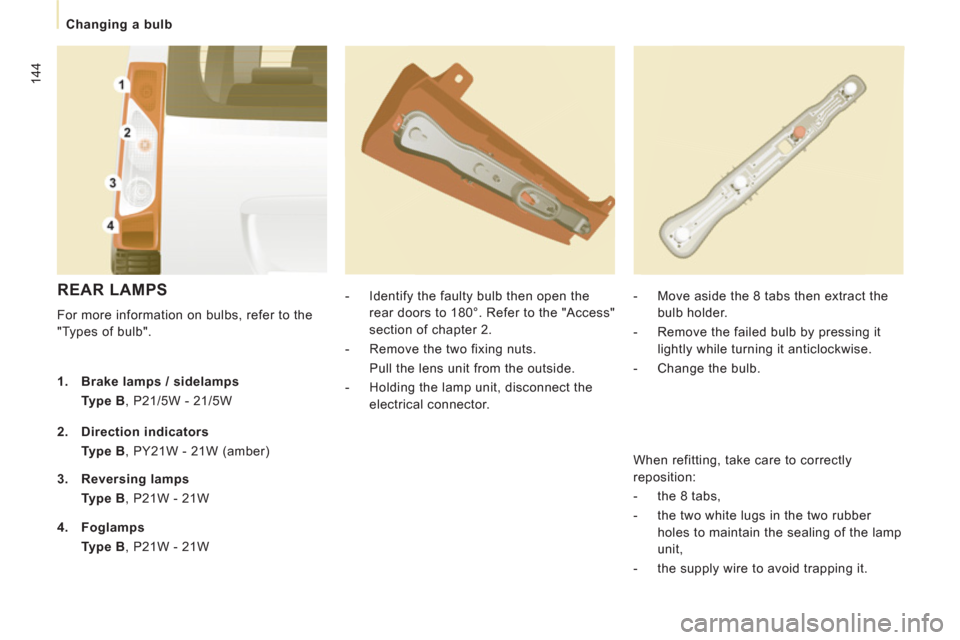
REAR LAMPS
For more information on bulbs, refer to the
"Types of bulb".
- Identify the faulty bulb then open the
rear doors to 180°. Refer to the "Access"
section of chapter 2.
- Remove the two fixing nuts.
Pull the lens unit from the outside.
- Holding the lamp unit, disconnect the
electrical connector.
- Move aside the 8 tabs then extract the
bulb holder.
- Remove the failed bulb by pressing it
lightly while turning it anticlockwise.
- Change the bulb.
1.
Brake lamps / sidelamps
Type B
, P21/5W - 21/5W
2.
Direction indicators
Type B
, PY21W - 21W (amber)
3.
Reversing lamps
Type B
, P21W - 21W
4.
Foglamps
Type B
, P21W - 21W When refitting, take care to correctly
reposition:
- the 8 tabs,
- the two white lugs in the two rubber
holes to maintain the sealing of the lamp
unit,
- the supply wire to avoid trapping it.
Page 147 of 260
Changing a bulb
QUICK HEL
P
7
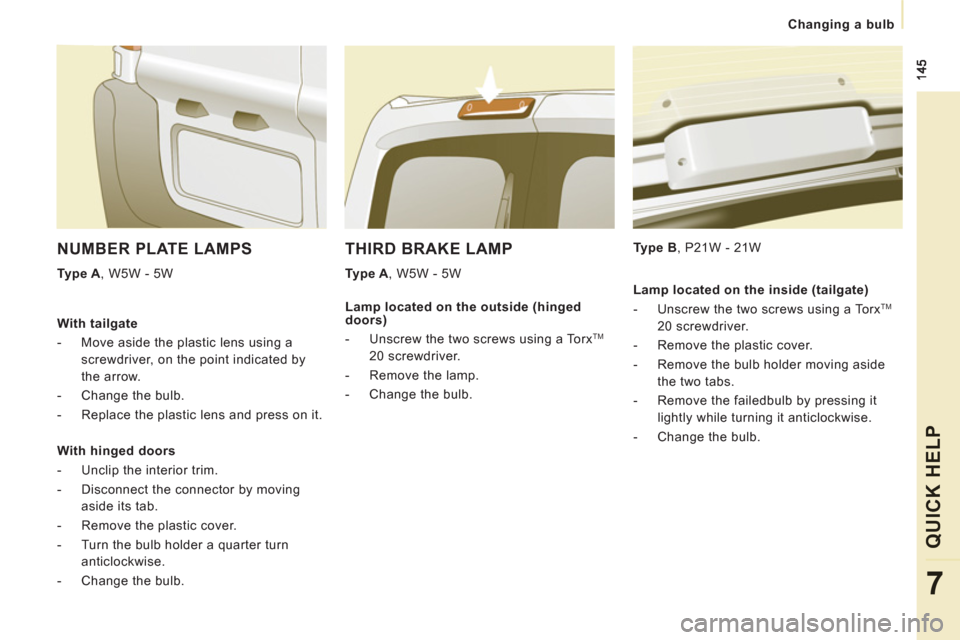
THIRD BRAKE LAMP
Type A
, W5W - 5W
Type B
, P21W - 21W
NUMBER PLATE LAMPS
Type A
, W5W - 5W
With tailgate
- Move aside the plastic lens using a
screwdriver, on the point indicated by
the arrow.
- Change the bulb.
- Replace the plastic lens and press on it.
With hinged doors
- Unclip the interior trim.
- Disconnect the connector by moving
aside its tab.
- Remove the plastic cover.
- Turn the bulb holder a quarter turn
anticlockwise.
- Change the bulb.
Lamp located on the outside (hinged
doors)
- Unscrew the two screws using a Torx
TM
20 screwdriver.
- Remove the lamp.
- Change the bulb.
Lamp located on the inside (tailgate)
- Unscrew the two screws using a Torx
TM
20 screwdriver.
- Remove the plastic cover.
- Remove the bulb holder moving aside
the two tabs.
- Remove the failedbulb by pressing it
lightly while turning it anticlockwise.
- Change the bulb.
Page 151 of 260

149
Changing a fuse
QUICK HEL
P
7
FUSES UNDER THE BONNET
- After opening the bonnet, slide aside the
screenwash reservoir support to make
access easier.
- Unclip and tilt the box to access the
fuses.
Fuses
A (amps)
Allocation
1
20
Engine control unit, Fuel supply and air supply systems,
Fan assembly
2
15
Horn
3
10
Front and rear screenwash pump
4
20
Headlamp wash pump
5
15
Fuel supply system
6
10
Power steering, Secondary brake pedal switch
7
10
Braking system (ABS/DSC)
8
20
Starter motor control
9
10
Main brake pedal switch
10
30
Fuel supply and air supply systems, Emissions control
systems
11
40
Front ventilation
12
30
Windscreen wipers
13
40
Built-in systems interface
14
30
Free
Page 154 of 260
152
Having your vehicle towed
General recommendations
Observe the legislation in force in your
country.
Ensure that the weight of the towing vehicle
is higher than that of the towed vehicle.
The person at the wheel of the towed vehicle
must have a valid driving licence.
When towing a vehicle with all four wheels
on the ground, always use an approved
towing bar; rope and straps are prohibited.
When towing a vehicle with the engine off,
there is no longer any power assistance for
braking or steering.
In the following cases, you must always call
on a professional recovery service:
- vehicle broken down on a motorway or
fast road,
- 4 wheel drive vehicle,
- when it is not possible to put the
gearbox into neutral, unlock the
steering, or release the parking brake,
- towing with only two wheels on the
ground,
- where there is no approved towing bar
available...
Page 160 of 260

158
Weights
WEIGHTS AND TOWED LOADS (KG)
For more information, refer to your registration certificate.
In each country, it is imperative that the towed loads permitted by local legislation are complied with. To find out your vehicle's towing
capabilities and its gross train weight, contact a CITROËN dealer.
Load transfer
If the towing vehicle has not reached the GVW, it is possible to transfer this weight to the trailer.
In all cases, do not exceed the weight of the trailer and the GTW, indicated on your registration certificate.
Observe the towing capacities of your vehicle.
The weight of a braked trailer with load transfer can be increased on condition that the equivalent weight is removed from the vehicle and
the GTW is not exceeded.
High ambient temperatures may result in a reduction in the performance of the vehicle to protect the engine. If the ambient temperature is
above 37 °C, limit the towed load to 700 kg, without any transfer of load.
The speed of a towing vehicle must not exceed 60 mph (100 km/h) (comply with the legislation in force in your country).
Page 247 of 260
16
1
Exterior
VISUAL SEARCH
10
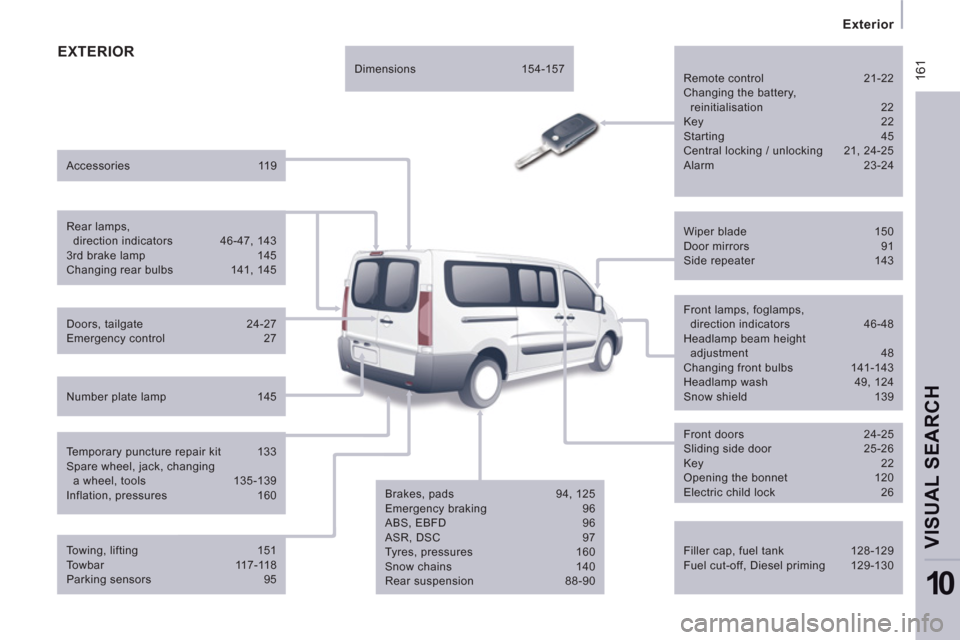
EXTERIOR
Filler cap, fuel tank 128-129
Fuel cut-off, Diesel priming 129-130
Wiper blade 150
Door mirrors 91
Side repeater 143
Front lamps, foglamps,
direction indicators 46-48
Headlamp beam height
adjustment 48
Changing front bulbs 141-143
Headlamp wash 49, 124
Snow shield 139
Front doors 24-25
Sliding side door 25-26
Key 22
Opening the bonnet 120
Electric child lock 26
Brakes, pads 94, 125
Emergency braking 96
ABS, EBFD 96
ASR, DSC 97
Tyres, pressures 160
Snow chains 140
Rear suspension 88-90
Doors, tailgate 24-27
Emergency control 27
Accessories 119
Number plate lamp 145
Dimensions 154-157
Temporary puncture repair kit 133
Spare wheel, jack, changing
a wheel, tools 135-139
Inflation, pressures 160
Remote control 21-22
Changing the battery,
reinitialisation 22
Key 22
Starting 45
Central locking / unlocking 21, 24-25
Alarm 23-24
Towing, lifting 151
Towbar 117-118
Parking sensors 95
Rear lamps,
direction indicators 46-47, 143
3rd brake lamp 145
Changing rear bulbs 141, 145
Page 248 of 260

162
Instruments and controls
Headlamp beam height adjustment 48
Starter, ignition switch 45
Wiper controls 49-50
Automatic wiping 49
Windscreen / headlamp wash 49
Trip computer Section 9
Cruise control 51-53
Fixed speed limiter 53
Speed limiter 54-56
Steering mounted controls:
- eMyWay Section 9
- Audio system Section 9
Lighting controls 46-47
Automatic illumination of headlamps 48
Foglamps 47
Daytime running lamps 47
Opening the bonnet 120
Parking brake 94
Electric windows,
electric mirrors 91-93
Instrument panels, screens,
speedometers 28-29
Warning lamps, indicator lamps 30-35
Indicators, gauge 36-39
Setting the time
in the instrument panel 29
Dashboard lighting dimmer 39
Gear shift indicator 41
Mat 85
Steering wheel adjustment 45
Horn 96
Page 250 of 260
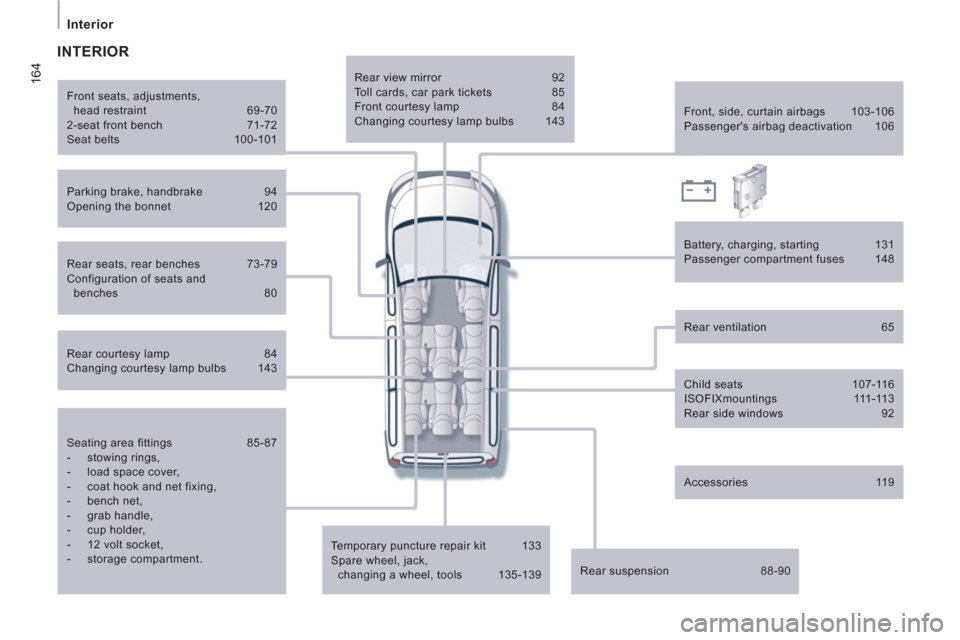
164
Interior
Seating area fittings 85-87
- stowing rings,
- load space cover,
- coat hook and net fixing,
- bench net,
- grab handle,
- cup holder,
- 12 volt socket,
- storage compartment.
Temporary puncture repair kit 133
Spare wheel, jack,
changing a wheel, tools 135-139
Rear suspension 88-90
Front, side, curtain airbags 103-106
Passenger's airbag deactivation 106
Parking brake, handbrake 94
Opening the bonnet 120
Battery, charging, starting 131
Passenger compartment fuses 148
Front seats, adjustments,
head restraint 69-70
2-seat front bench 71-72
Seat belts 100-101
Rear ventilation 65
Child seats 107-116
ISOFIXmountings 111-113
Rear side windows 92
INTERIOR
Rear seats, rear benches 73-79
Configuration of seats and
benches 80
Rear courtesy lamp 84
Changing courtesy lamp bulbs 143
Accessories 119
Rear view mirror 92
Toll cards, car park tickets 85
Front courtesy lamp 84
Changing courtesy lamp bulbs 143