height adjustment Citroen JUMPY MULTISPACE 2014 2.G Owner's Manual
[x] Cancel search | Manufacturer: CITROEN, Model Year: 2014, Model line: JUMPY MULTISPACE, Model: Citroen JUMPY MULTISPACE 2014 2.GPages: 260, PDF Size: 13.41 MB
Page 11 of 260

9
Interior
FAMILIARISATION
1
JUMPY-ATLANTE-VP_EN_CHAP01_PRISE EN MAIN_ED01-2014
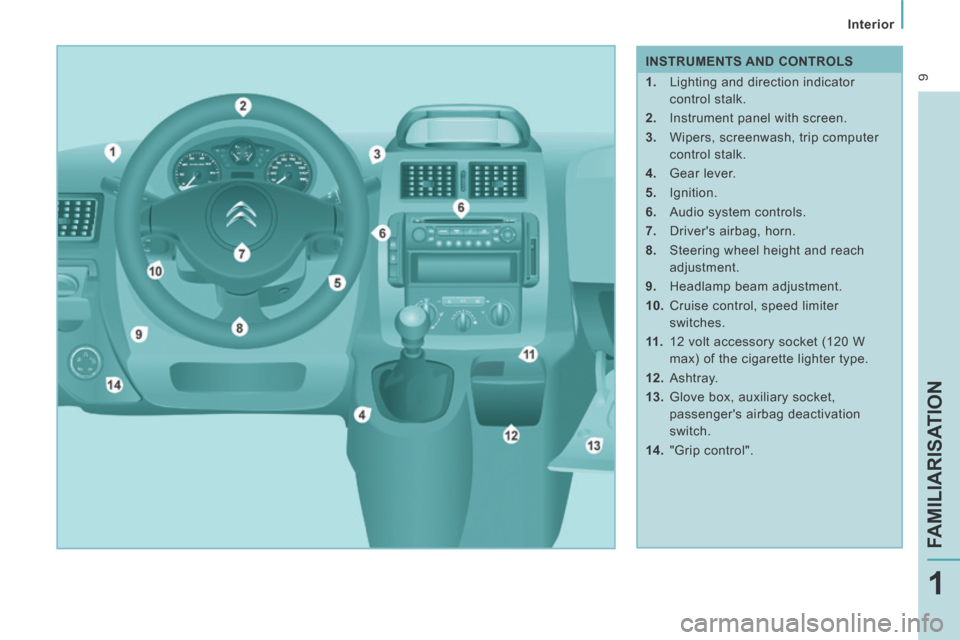
INSTRUMENTS AND CONTROLS
1. Lighting and direction indicator control stalk.
2. Instrument panel with screen.
3. Wipers, screenwash, trip computer control stalk.
4. Gear lever.
5. Ignition.
6. Audio system controls.
7. Driver's airbag, horn.
8. Steering wheel height and reach adjustment.
9. Headlamp beam adjustment.
10. Cruise control, speed limiter switches.
11 . 12 volt accessory socket (120 W
max) of the cigarette lighter type.
12. Ashtray.
13. Glove box, auxiliary socket, passenger's airbag deactivation
switch.
14. "Grip control".
Page 13 of 260

3
11
Interior
FAMILIARISATION
1
JUMPY-ATLANTE-VP_EN_CHAP01_PRISE EN MAIN_ED01-2014
Driver's seat
SITTING COMFORTABLY
1. Forwards-backwards adjustment.
2. Backrest angle.
3. Cushion height.
4. Lumbar.
5. Head restraint height. 69
Page 14 of 260

2
4
3
3
Interior
12
JUMPY-ATLANTE-VP_EN_CHAP01_PRISE EN MAIN_ED01-2014
Steering wheel Electric windows
Mirrors
44
Seat belts 100 93
91
Adjust the steering wheel for height and
reach.
Manual adjustments.
Electric adjustments, electric folding /
unfolding.
Height adjustment.
Fastening.
Page 46 of 260

44
Gearboxes and steering wheel
JUMPY-ATLANTE-VP_EN_CHAP02_PRET A PARTIR_ED01-2014
STEERING WHEEL HEIGHT AND REACH ADJUSTMENT
When the vehicle is stationary, release the
steering wheel adjustment mechanism by
lowering the lever.
Adjust the steering wheel for height and
reach, then lock the adjustment mechanism
by pushing the lever fully upwards.
GEAR SHIFT INDICATOR
This system allows fuel consumption to be
reduced by suggesting when to change up. The information appears in the
instrument panel in the form of an
arrow.
The system adapts its gear change
recommendations according to the driving
conditions (slope, load, ...) and demands
from the driver (for power, acceleration,
braking, ...). The system never recommends
engaging first gear or reverse, or
changing down.
Operation
Depending on the driving conditions and the
equipment of your vehicle, the system may
recommend skipping one or more gears.
You can follow this indication without going
through the intermediate gears.
The gear engagement recommendations
should not be considered to be compulsory.
This because the configuration of the
road, the traffic density and safety remain
determining factors when choosing the
best gear. Therefore, the driver remains
responsible for deciding whether or not to
follow the advice given by the system.
This system cannot be deactivated.
With an automatic gearbox, the system is
only active in manual mode.
Page 71 of 260

69
Seats
EASE OF USE and COMFORT
3
JUMPY-ATLANTE-VP_EN_CHAP03_ERGONOMIE ET CONFORT_ED01-2014
FRONT SEATS
Depending on the version and configuration
of your vehicle, different front seats are
fitted, either:
- a driver's seat and a passenger seat,
- an individual driver's seat and a two-seat passenger bench. 3 - Driver's seat height adjustment
Depending on the version and configuration
of your vehicle, you have either:
- a passive adjustment: pull the handle
upwards then take your weight off the
seat to raise, or push on the seat to
lower,
2 - Seat back angle adjustment
Pull the lever upwards and set the required
angle.
1 - Forwards/backwards adjustment
Lift the bar and slide the seat forwards or
backwards.
Depending on the models, the following
adjustments are available:
Page 72 of 260

70
Seats
JUMPY-ATLANTE-VP_EN_CHAP03_ERGONOMIE ET CONFORT_ED01-2014
- an active adjustment: operate the handle upwards or downwards until the desired
position is reached.
Head restraint height adjustment
To raise or lower the restraint, pull it
forwards, then slide it. The adjustment is correct when the upper
edge of the head restraint is level with the
top of the head.
Never drive with the head restraints
removed; they must be in place and
correctly adjusted.
Front heated seat controls
Adjustable armrest
To place the armrest in its rest position:
- raise it until it is in the centreline of the seat back.
4 - Driver's seat lumbar adjustment
Move the lever up or down to obtain the
required position. To remove it, set it in the high position, press
the tabs and pull upwards and forwards at
the same time.
To re-install, engage the head restraint rods
in the holes, making sure they are aligned
with the seat back.
To place the armrest in a position for use:
- fold it down fully,
- raise it slowly to the required position,
- if you pass the required position, raise it fully then repeat the operations above.
Press the corresponding control,
located on the overhead storage
unit.
The temperature is controlled
automatically.
Pressing a second time stops operation.
Page 73 of 260

71
Seats
EASE OF USE and COMFORT
3
JUMPY-ATLANTE-VP_EN_CHAP03_ERGONOMIE ET CONFORT_ED01-2014
2-SEAT FRONT BENCH
If your vehicle is fitted with this bench seat,
it is fixed and has a 3rd seat belt.
Head restraint
Press the tab to adjust the height of the
head restraint.
To remove the head restraint, press the tabs
and raise the head restraint.
The adjustment is correct when the upper
edge of the head restraint is level with the
top of the head.
Never drive with the head restraints
removed; they must be in place and
adjusted correctly.
Seat back pockets
If your vehicle is fitted with these, they are
located on the backs of the front seats.
Page 91 of 260

89
Rear suspension
EASE OF USE and COMFORT
3
JUMPY-ATLANTE-VP_EN_CHAP03_ERGONOMIE ET CONFORT_ED01-2014
2 - Manual correction of the height of the rear sill
If your vehicle is fitted with this adjustment,
the control is located on the right-hand side
at the rear of the vehicle.
This manual adjustment permits "lowering"
or "raising" of the height of the sill of the
rear platform to facilitate operations in a
parking area.
This adjustment of the height of the sill is
restricted by a lower limit and an upper limit. First use
To initialise the function, press the control
for approximately 2 seconds.
Malfunctions
If the load sill is not adjusted when the
control is pressed, "3 beeps" indicate a
malfunction for the following reasons:
- foot on the brake pedal with the key in
the ignition,
- excessive use of the manual correction,
- low battery charge,
- other.
If the audible signal persists, contact a
CITROËN dealer or a qualified workshop.
Carry out these operations with the vehicle
still stationary and:
- with the front and side doors closed,
- with the parking brake applied,
- do not leave your foot on the brake
pedal.
Lower: downwards adjustment
of the platform sill
Press the control downwards
continuously.
Release the button to stop the movement,
"3 beeps" indicate that you have reached
the maximum limit, the movement stops
automatically.
Raise: upwards adjustment of
the platform sill
Press the control upwards
continuously.
Release the button to stop the movement,
"3 beeps" indicate that you have reached
the maximum limit, the movement stops
automatically.
Return to the optimum sill height
Press the control up or down twice in
succession, the opposite of the position of
the load sill.
Page 102 of 260

100
Seat belts
JUMPY-ATLANTE-VP_EN_CHAP04_SECURITE_ED01-2014
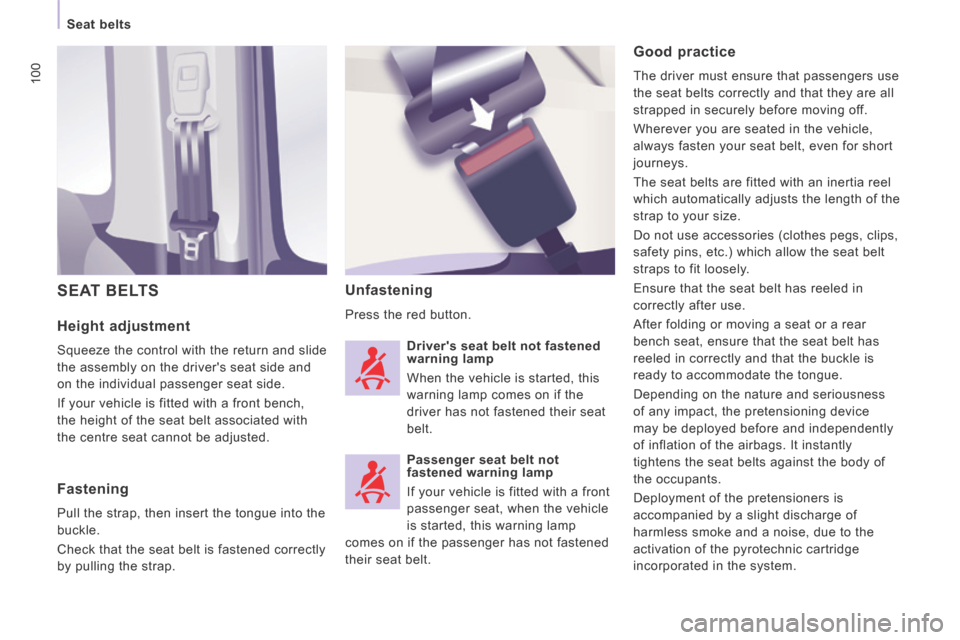
Height adjustment
Squeeze the control with the return and slide
the assembly on the driver's seat side and
on the individual passenger seat side.
If your vehicle is fitted with a front bench,
the height of the seat belt associated with
the centre seat cannot be adjusted.
Unfastening
Press the red button.
SEAT BELTS
Good practice
The driver must ensure that passengers use
the seat belts correctly and that they are all
strapped in securely before moving off.
Wherever you are seated in the vehicle,
always fasten your seat belt, even for short
journeys.
The seat belts are fitted with an inertia reel
which automatically adjusts the length of the
strap to your size.
Do not use accessories (clothes pegs, clips,
safety pins, etc.) which allow the seat belt
straps to fit loosely.
Ensure that the seat belt has reeled in
correctly after use.
After folding or moving a seat or a rear
bench seat, ensure that the seat belt has
reeled in correctly and that the buckle is
ready to accommodate the tongue.
Depending on the nature and seriousness
of any impact, the pretensioning device
may be deployed before and independently
of inflation of the airbags. It instantly
tightens the seat belts against the body of
the occupants.
Deployment of the pretensioners is
accompanied by a slight discharge of
harmless smoke and a noise, due to the
activation of the pyrotechnic cartridge
incorporated in the system.
Fastening
Pull the strap, then insert the tongue into the
buckle.
Check that the seat belt is fastened correctly
by pulling the strap. Driver's seat belt not fastened
warning lamp
When the vehicle is started, this
warning lamp comes on if the
driver has not fastened their seat
belt.
Passenger seat belt not
fastened warning lamp
If your vehicle is fitted with a front
passenger seat, when the vehicle
is started, this warning lamp
comes on if the passenger has not fastened
their seat belt.
Page 249 of 260

163
Exterior
VISUAL SEARCH
10
JUMPY-ATLANTE-VP_EN_CHAP10_LOCALISATION_ED01-2014
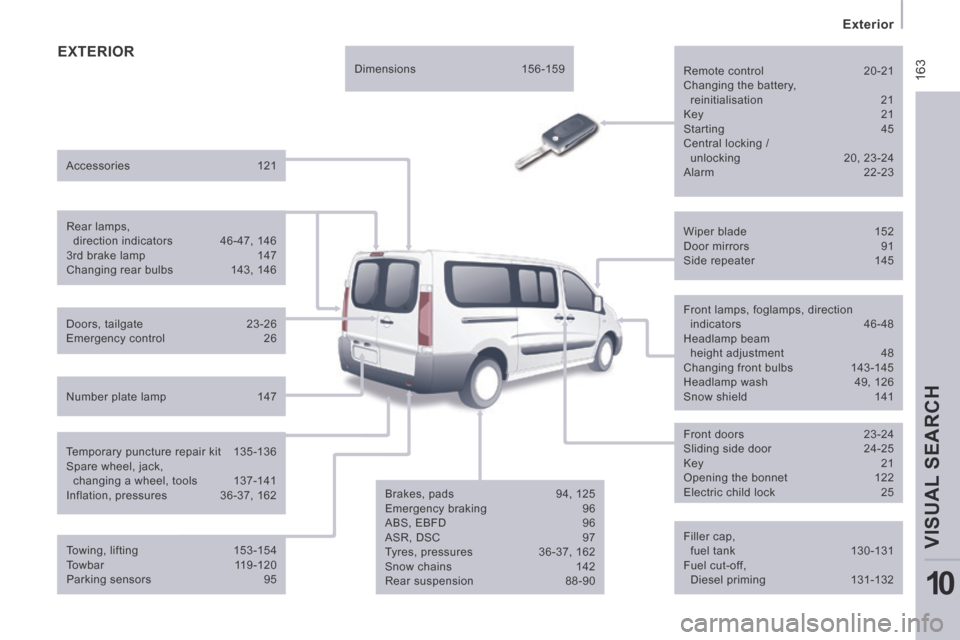
EXTERIOR
Filler cap, fuel tank 130-131
Fuel cut-off, Diesel priming 131-132
Wiper blade
152
Door mirrors 91
Side repeater 145
Front lamps, foglamps, direction
indicators 46-48 Headlamp beam height adjustment 48
Changing front bulbs 143-145
Headlamp wash 49, 126
Snow shield 141
Front doors 23-24
Sliding side door 24-25
Key 21
Opening the bonnet 122
Electric child lock 25
Brakes, pads 94, 125
Emergency braking 96
ABS, EBFD 96
ASR, DSC 97
Tyres, pressures 36-37, 162
Snow chains 142
Rear suspension 88-90
Doors, tailgate
23-26
Emergency control 26
Accessories
121
Number plate lamp 147 Dimensions
156-159
Temporary puncture repair kit 135-136
Spare wheel, jack, changing a wheel, tools 137-141
Inflation, pressures 36-37, 162 Remote control
20-21
Changing the battery,
reinitialisation 21 Key 21
Starting 45
Central locking / unlocking 20, 23-24
Alarm 22-23
Towing, lifting 153-154
Towbar 119-120
Parking sensors 95
Rear lamps,
direction indicators 46-47, 146
3rd brake lamp 147
Changing rear bulbs 143, 146