wheel Citroen JUMPY MULTISPACE RHD 2012 2.G Owner's Guide
[x] Cancel search | Manufacturer: CITROEN, Model Year: 2012, Model line: JUMPY MULTISPACE RHD, Model: Citroen JUMPY MULTISPACE RHD 2012 2.GPages: 278, PDF Size: 10.34 MB
Page 98 of 278
ESP
96
Driving safely
ANTI-SLIP REGULATION (ASR)AND ELECTRONIC STABILITY PROGRAMME (ESP)
These systems are linked and complement
the ABS.
The ASR system is very useful for
maintaining optimum drive and avoiding
losses of control of the vehicle on
acceleration.
The system optimises drive to prevent the
wheels skidding, by acting on the brakes of
the drive wheels and on the engine. It also
allows the directional stability of the vehicle
to be improved on acceleration. acts on the engine and the brake of one
or more wheels, in order to put the vehicle
back on course.
Deactivating the ASR/ESP systems
In certain exceptional conditions (starting
the vehicle when stuck in mud or snow, or
on loose ground...), it could prove useful
to deactivate the ASR and ESP systems to
make the wheels spin and regain grip.
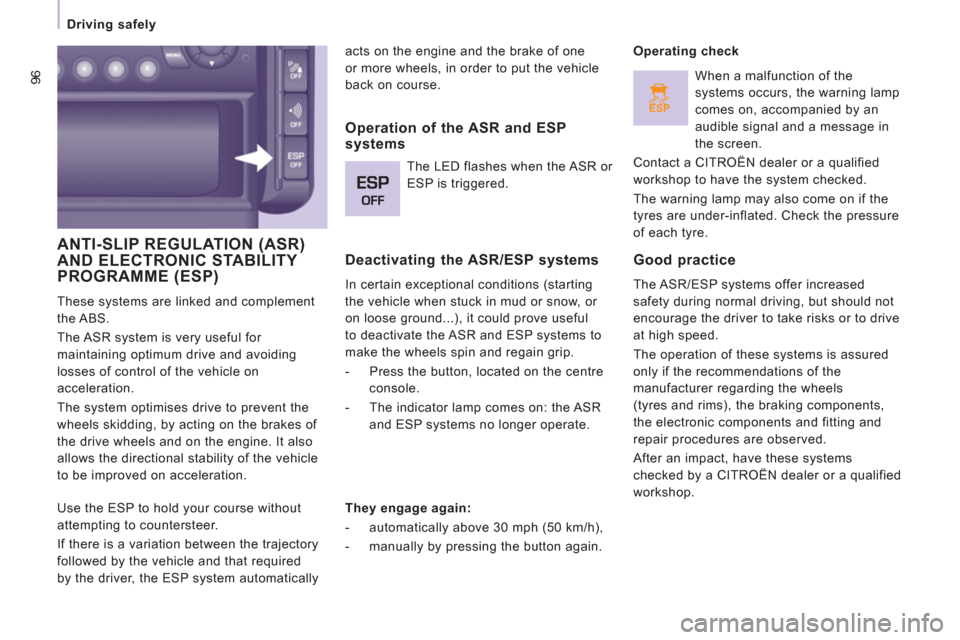
- Press the button, located on the centre
console.
- The indicator lamp comes on: the ASR
and ESP systems no longer operate.
Operating check
Good practice
The ASR/ESP systems offer increased
safety during normal driving, but should not
encourage the driver to take risks or to drive
at high speed.
The operation of these systems is assured
only if the recommendations of the
manufacturer regarding the wheels
(tyres and rims), the braking components,
the electronic components and fitting and
repair procedures are observed.
After an impact, have these systems
checked by a CITROËN dealer or a qualified
workshop.
Operation of the ASR and ESPsystems
The LED flashes when the ASR or
ESP is triggered.
They engage again:
- automatically above 30 mph (50 km/h),
- manually by pressing the button again.
When a malfunction of the
systems occurs, the warning lamp
comes on, accompanied by an
audible signal and a message in
the screen.
Contact a CITROËN dealer or a qualified
workshop to have the system checked.
The warning lamp may also come on if the
tyres are under-inflated. Check the pressure
of each tyre.
Use the ESP to hold your course without
attempting to countersteer.
If there is a variation between the trajectory
followed by the vehicle and that required
by the driver, the ESP system automatically
Page 100 of 278

ESP OFF
98
Driving safely
This ESP mode is calibrated for
a low level of skidding, based
on different conditions of grip
encountered on the road.
When the ignition is switched off, the system
returns automatically to ESP mode.
This ESP OFF
mode is only
suitable for specific conditions
encountered when moving off or
at low speed.
This mode is active up to 30 mph (50 km/h).
This snow
mode allows the
vehicle to adapts its strategy
to the conditions of grip
encountered for each of the two
front wheels, on moving off.
When moving, the system optimises
wheelspin to provide the best acceleration
possible for the grip available.
This off-road
mode (mud, wet
grass...) allows, when moving off,
considerable wheelspin on the
wheel with the least grip to favour
clearing of the mud and regain "grip". At the
same time, the wheel with the most grip is
controlled in such a way as to transmit as
much torque as possible.
When moving, the system optimises
wheelspin to meet the driver's requirements
as fully as possible.
This sand
mode allows a little
wheelspin on the two driving
wheels at the same time to allow
the vehicle to move forward and
reduces the risk of getting stuck in the sand.
Do not use the other modes on sand as the
vehicle may become stuck.
Page 105 of 278
103
Airbags
SAFETY
4
Good practice
Sit in a normal upright position.
Wear a correctly adjusted seat belt.
Do not leave anything between the
occupants and the airbags (a child, pet,
object...). This could hinder the operation of
the airbags or injure the occupants.
After an accident or if the vehicle has been
stolen or broken into, have the airbag
systems checked.
All work on the airbag system is strictly
forbidden unless it is carried out by qualified
personnel at a CITROËN dealer or a
qualified workshop.
Lateral airbags
Only put recommended covers on the seats.
These will not hinder inflation of the lateral
airbags. Contact a CITROËN dealer or a
qualified workshop.
Do not fix or attach anything to the seat
backs. This could cause injury to the chest
or arms when the lateral airbag inflates.
Do not sit with the upper part of the body
any nearer to the door than necessary.
Front airbags
Do not drive holding the steering wheel
by its spokes or resting your hands on the
centre part of the wheel.
Do not allow passengers to place their feet
on the dashboard, they risk serious injury if
the airbag is deployed.
Smoke as little as possible as deployment
of the airbags can cause burns or the risk of
injury from a cigarette or pipe.
Never remove or pierce the steering wheel
or hit it violently.
Even if all of the precautions mentioned are
observed, a risk of injury or of minor burns
to the head, chest or arms when an airbag
is deployed cannot be ruled out. In fact, the
bag inflates almost instantly (within a few
milliseconds) then deflates within the same
time discharging the hot gas via openings
provided for this purpose.
Curtain airbags
Do not fix or attach anything to the roof. This
could cause injury to the head when the
curtain airbag inflates.
Do not remove the grab handles installed
on the roof, they play a part in securing the
curtain airbags.
Page 107 of 278
105
Airbags
SAFETY
4
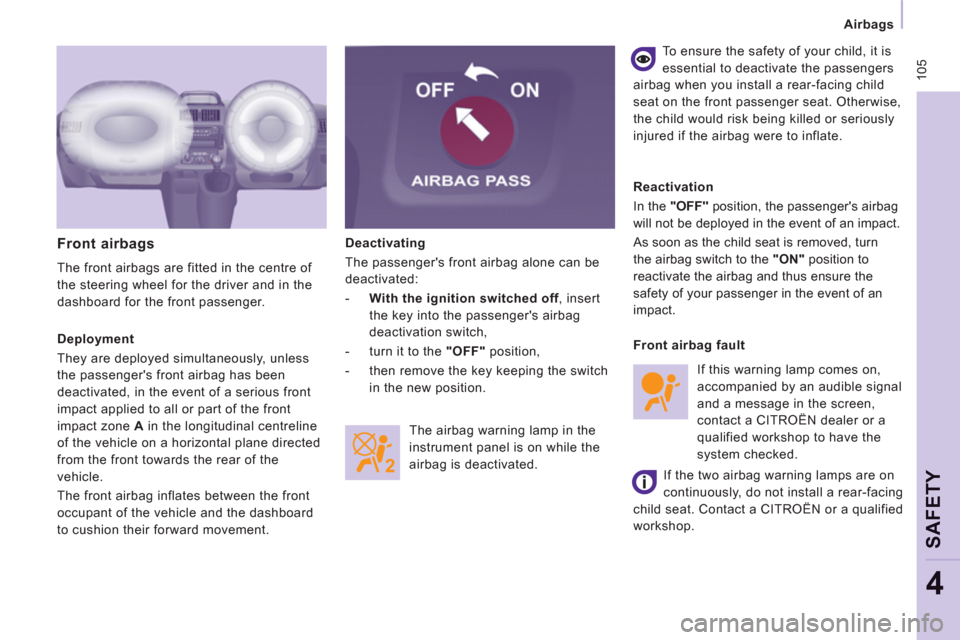
Deactivating
The passenger's front airbag alone can be
deactivated:
- With the ignition switched off
, insert
the key into the passenger's airbag
deactivation switch,
- turn it to the "OFF"
position,
- then remove the key keeping the switch
in the new position.
Front airbags
The front airbags are fitted in the centre of
the steering wheel for the driver and in the
dashboard for the front passenger.
Reactivation
In the "OFF"
position, the passenger's airbag
will not be deployed in the event of an impact.
As soon as the child seat is removed, turn
the airbag switch to the "ON"
position to
reactivate the airbag and thus ensure the
safety of your passenger in the event of an
impact. To ensure the safety of your child, it is
essential to deactivate the passengers
airbag when you install a rear-facing child
seat on the front passenger seat. Otherwise,
the child would risk being killed or seriously
injured if the airbag were to inflate.
The airbag warning lamp in the
instrument panel is on while the
airbag is deactivated.
Deployment
They are deployed simultaneously, unless
the passenger's front airbag has been
deactivated, in the event of a serious front
impact applied to all or part of the front
impact zone A
in the longitudinal centreline
of the vehicle on a horizontal plane directed
from the front towards the rear of the
vehicle.
The front airbag inflates between the front
occupant of the vehicle and the dashboard
to cushion their forward movement.
Front airbag fault
If this warning lamp comes on,
accompanied by an audible signal
and a message in the screen,
contact a CITROËN dealer or a
qualified workshop to have the
system checked.
If the two airbag warning lamps are on
continuously, do not install a rear-facing
child seat. Contact a CITROËN or a qualified
workshop.
Page 116 of 278
114
Towing a trailer
For more information about weights,
refer to the administrative documents
(registration document, ...) or to the
"Weights" section of chapter 8.
TOWING A TRAILER, CARAVAN, BOAT, ETC...
Distribution of loads
Distribute the load in the trailer so that the
heaviest objects are as close as possible
to the axle and the nose weight is close to
the maximum authorised without, however,
exceeding it.
Cooling
Towing a trailer on a slope increases the
coolant temperature.
As the fan is electrically controlled, its
cooling capacity is not dependent on the
engine speed.
Driving advice
A towed vehicle must free wheel: gearbox in
neutral.
Page 132 of 278
130
Repairing a wheel
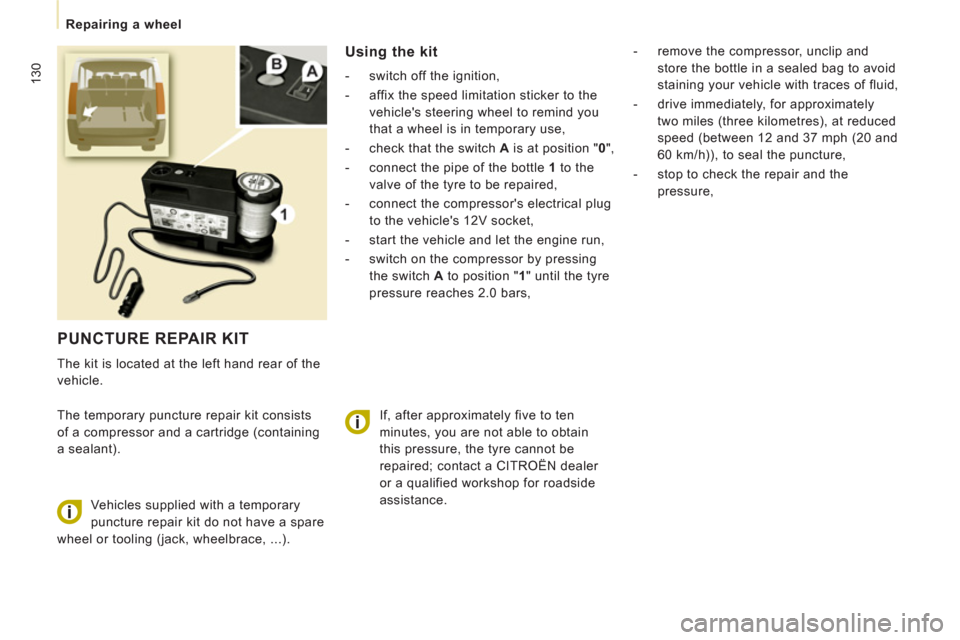
PUNCTURE REPAIR KIT
The kit is located at the left hand rear of the
vehicle.
The temporary puncture repair kit consists
of a compressor and a cartridge (containing
a sealant).
Using the kit
- switch off the ignition,
- affix the speed limitation sticker to the
vehicle's steering wheel to remind you
that a wheel is in temporary use,
- check that the switch A
is at position " 0
",
- connect the pipe of the bottle 1
to the
valve of the tyre to be repaired,
- connect the compressor's electrical plug
to the vehicle's 12V socket,
- start the vehicle and let the engine run,
- switch on the compressor by pressing
the switch A
to position " 1
" until the tyre
pressure reaches 2.0 bars,
Vehicles supplied with a temporary
puncture repair kit do not have a spare
wheel or tooling (jack, wheelbrace, ...).
- remove the compressor, unclip and
store the bottle in a sealed bag to avoid
staining your vehicle with traces of fluid,
- drive immediately, for approximately
two miles (three kilometres), at reduced
speed (between 12 and 37 mph (20 and
60 km/h)), to seal the puncture,
- stop to check the repair and the
pressure,
If, after approximately five to ten
minutes, you are not able to obtain
this pressure, the tyre cannot be
repaired; contact a CITROËN dealer
or a qualified workshop for roadside
assistance.
Page 133 of 278

Repairing a wheel
QUICK HEL
P
7
- connect the compressor pipe directly to
the valve of the repaired wheel.
- connect the compressor's electrical plug
to the vehicle's 12V socket again,
- start the vehicle again and let the engine
run, Warning, the sealant cartridge contains
ethylene-glycol, this product is harmful
if swallowed and causes irritation to
the eyes. Keep this product out of reach of
children.
The expiry date of the sealant is indicated
under the cartridge.
The cartridge is intended for a single use;
once opened, it must be replaced.
After use, do not discard the cartridge into
the environment, take it to a CITROËN
dealer or to a specialised waste disposal
site.
Do not forget to obtain a new sealant
cartridge, available from a CITROËN dealer
or a qualified workshop.
- adjust the pressure using the
compressor (to inflate: switch A
in
position " 1
"; to deflate: switch A
in
position " 0
" and press button B
), in
accordance with the vehicle's tyre
pressure label (located on the door
aperture, on the driver's side), then
remember to check that the leak has
been sealed correctly (no further
loss of pressure after several miles
(kilometres)),
- remove the compressor, then stow the
complete kit,
- drive at reduced speed (50 mph (80 km/h)
max) limiting the distance travelled to
approximately 125 miles (200 km),
- visit a CITROËN dealer or a qualified
workshop as soon as possible to have
the tyre repaired or replaced by a
technician.
Page 134 of 278
132
Changing a wheel
CHANGING A WHEEL
If your vehicle is equipped with a spare
wheel located underneath the vehicle, follow
these instructions.
1. PARKING THE VEHICLE
- You must ensure that the occupants
get out of the vehicle and wait in a safe
location.
- If possible, park the vehicle on level,
stable and non-slippery ground.
- Apply the parking brake, switch off the
ignition and engage first or reverse gear.
- If available, place a chock under the
wheel diagonally opposite the one to be
changed.
On certain types of ground and/or if heavy
loads are being transported, the vehicle
must be raised in order to disengage
the spare wheel from the carrier. Call a
CITROËN dealer or a qualified workshop.
If your vehicle is fitted with suspension
with pneumatic height correction,
please deactivate the system. Refer to the
"Rear suspension" section of chapter 3.
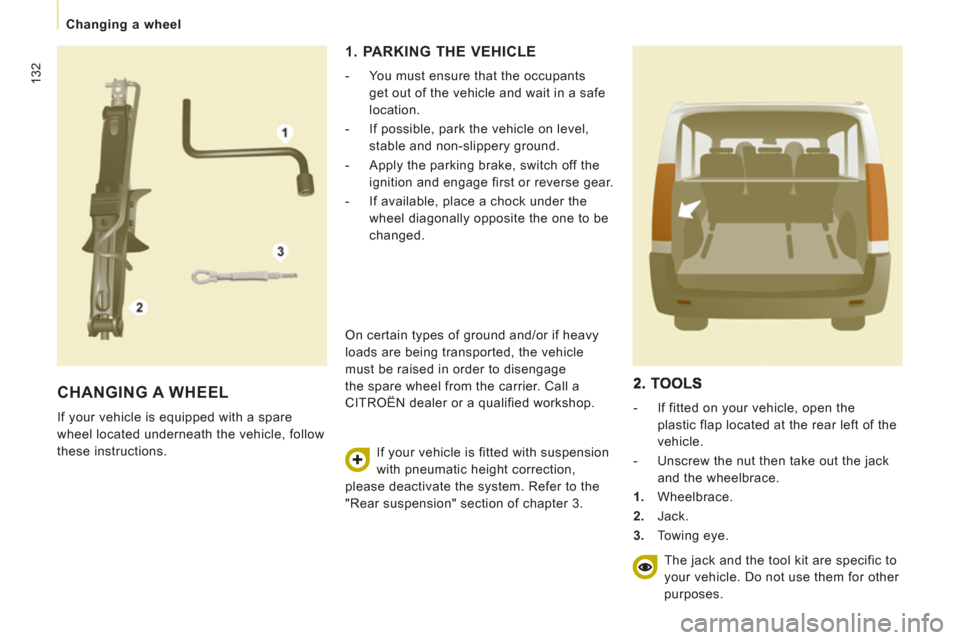
- If fitted on your vehicle, open the
plastic flap located at the rear left of the
vehicle.
- Unscrew the nut then take out the jack
and the wheelbrace.
1.
Wheelbrace.
2.
Jack.
3.
Towing eye.
The jack and the tool kit are specific to
your vehicle. Do not use them for other
purposes.
Page 135 of 278
133
Changing a wheel
QUICK HEL
P
7
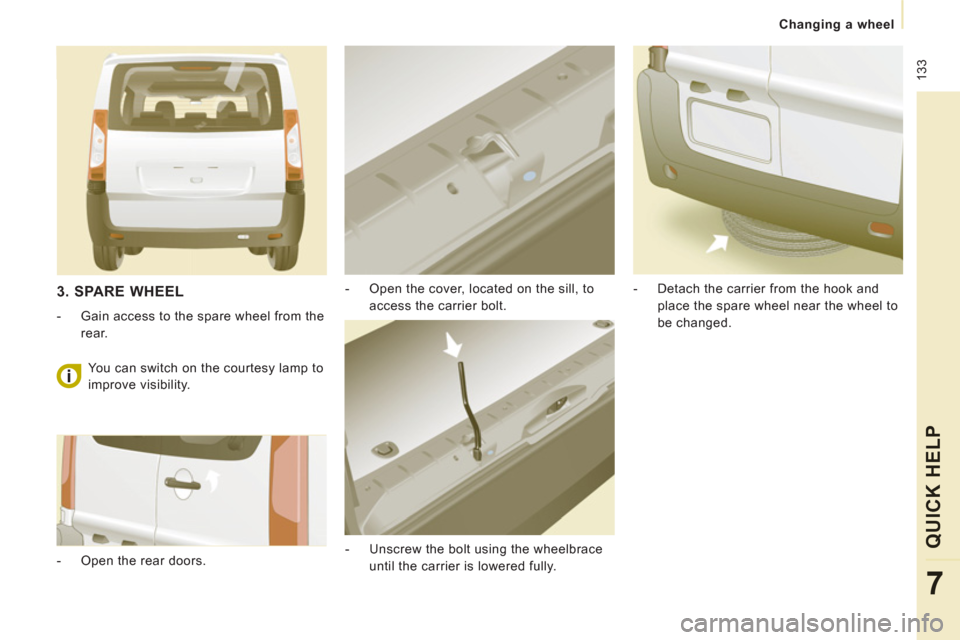
- Open the cover, located on the sill, to
access the carrier bolt.
- Unscrew the bolt using the wheelbrace
until the carrier is lowered fully.
- Detach the carrier from the hook and
place the spare wheel near the wheel to
be changed.
3. SPARE WHEEL
- Gain access to the spare wheel from the
rear.
- Open the rear doors. You can switch on the courtesy lamp to
improve visibility.
Page 136 of 278

134
Changing a wheel
4. OPERATING PROCEDURE
- Place the jack in contact with the
locating point provided, the one which is
closest to the wheel to be changed.
Ensure that the jack is straight and that
the base of the jack is fully in contact
with the ground.
- Extend the jack to lift the wheel clear of
the ground.
- Resume and complete the unscrewing of
the wheel bolts.
- Remove the bolts and remove the
wheel.
- Remove the trim pulling it using the
towing eye.
- Loosen the wheel bolts and start
unscrewing them. Do not extend the jack until you have
started unscrewing the bolts on the
wheel to be changed and have placed
the chock under the wheel diagonally
opposite.