wheel Citroen JUMPY MULTISPACE RHD 2012 2.G Owner's Guide
[x] Cancel search | Manufacturer: CITROEN, Model Year: 2012, Model line: JUMPY MULTISPACE RHD, Model: Citroen JUMPY MULTISPACE RHD 2012 2.GPages: 278, PDF Size: 10.34 MB
Page 137 of 278

135
Changing a wheel
QUICK HEL
P
7
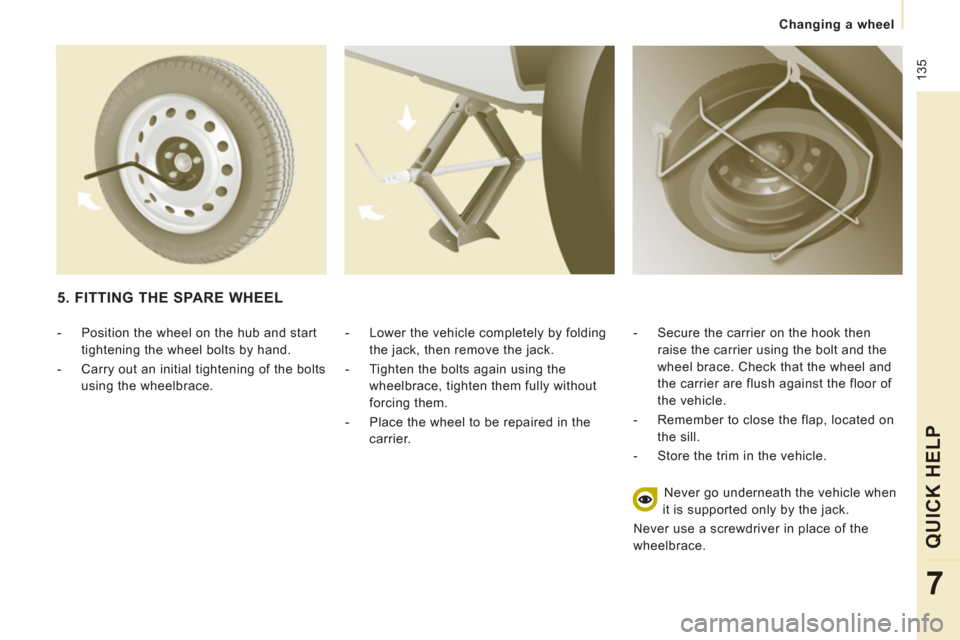
- Lower the vehicle completely by folding
the jack, then remove the jack.
- Tighten the bolts again using the
wheelbrace, tighten them fully without
forcing them.
- Place the wheel to be repaired in the
carrier.
- Secure the carrier on the hook then
raise the carrier using the bolt and the
wheel brace. Check that the wheel and
the carrier are flush against the floor of
the vehicle.
- Remember to close the flap, located on
the sill.
- Store the trim in the vehicle.
Never go underneath the vehicle when
it is supported only by the jack.
Never use a screwdriver in place of the
wheelbrace.
5. FITTING THE SPARE WHEEL
- Position the wheel on the hub and start
tightening the wheel bolts by hand.
- Carry out an initial tightening of the bolts
using the wheelbrace.
Page 138 of 278

136
Snow screen
REMOVABLE SNOW SCREEN
According to country, the removable snow
screen is installed on the lower part of the
front bumper to prevent the accumulation of
snow at the radiator cooling fan.
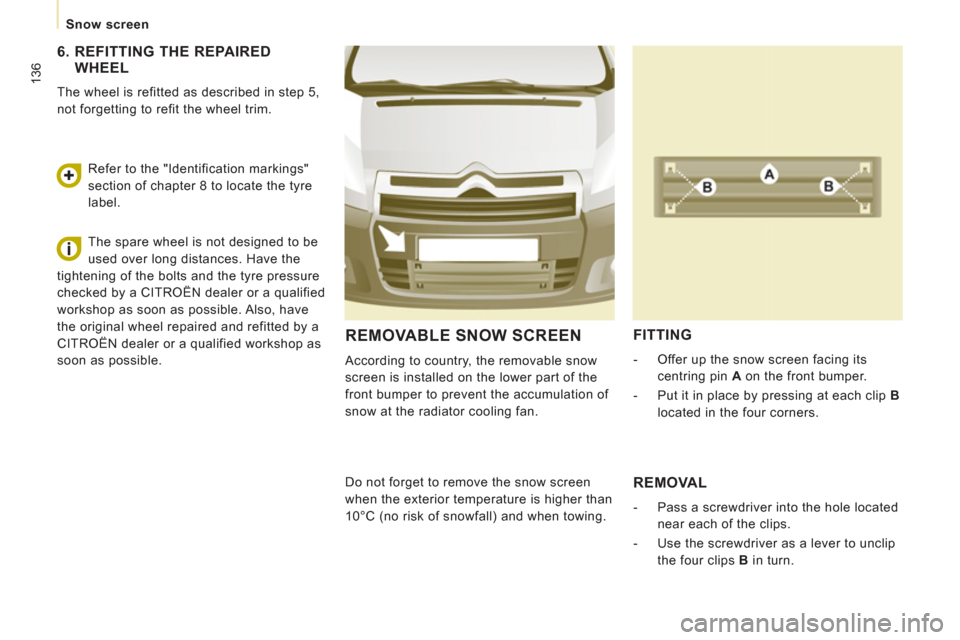
FITTING
- Offer up the snow screen facing its
centring pin A
on the front bumper.
- Put it in place by pressing at each clip B
located in the four corners.
Do not forget to remove the snow screen
when the exterior temperature is higher than
10°C (no risk of snowfall) and when towing.
REMOVAL
- Pass a screwdriver into the hole located
near each of the clips.
- Use the screwdriver as a lever to unclip
the four clips B
in turn.
6. REFITTING THE REPAIREDWHEEL
The wheel is refitted as described in step 5,
not forgetting to refit the wheel trim.
Refer to the "Identification markings"
section of chapter 8 to locate the tyre
label.
The spare wheel is not designed to be
used over long distances. Have the
tightening of the bolts and the tyre pressure
checked by a CITROËN dealer or a qualified
workshop as soon as possible. Also, have
the original wheel repaired and refitted by a
CITROËN dealer or a qualified workshop as
soon as possible.
Page 145 of 278

143
Changing a fuse
QUICK HEL
P
7
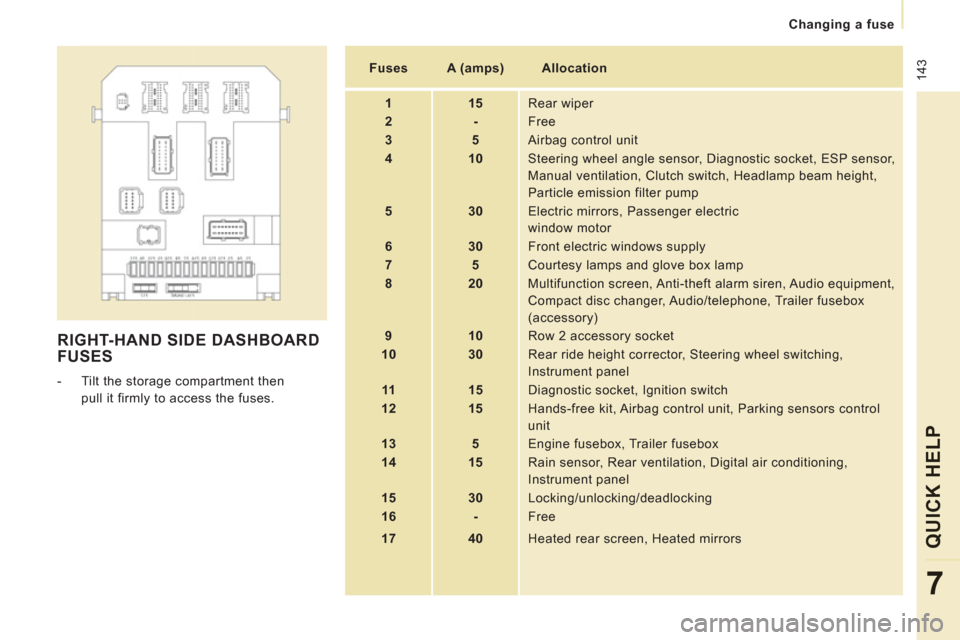
RIGHT-HAND SIDE DASHBOARD
FUSES
- Tilt the storage compartment then
pull it firmly to access the fuses.
Fuses
A (amps)
Allocation
1
15
Rear wiper
2
-
Free
3
5
Airbag control unit
4
10
Steering wheel angle sensor, Diagnostic socket, ESP sensor,
Manual ventilation, Clutch switch, Headlamp beam height,
Particle emission filter pump
5
30
Electric mirrors, Passenger electric
window motor
6
30
Front electric windows supply
7
5
Courtesy lamps and glove box lamp
8
20
Multifunction screen, Anti-theft alarm siren, Audio equipment,
Compact disc changer, Audio/telephone, Trailer fusebox
(accessory)
9
10
Row 2 accessory socket
10
30
Rear ride height corrector, Steering wheel switching,
Instrument panel
11
15
Diagnostic socket, Ignition switch
12
15
Hands-free kit, Airbag control unit, Parking sensors control
unit
13
5
Engine fusebox, Trailer fusebox
14
15
Rain sensor, Rear ventilation, Digital air conditioning,
Instrument panel
15
30
Locking/unlocking/deadlocking
16
-
Free
17
40
Heated rear screen, Heated mirrors
Page 149 of 278

147
Having your vehicle towed
QUICK HEL
P
7
Without lifting (4 wheels on the ground)
You should always use a towing bar.
From the front
- Unclip the cover by pressing at the
bottom,
- Fully screw in the removable towing eye.
TOWING THE VEHICLE
Lifting (2 wheels on the ground only)
It is preferable to lift the vehicle using
professional lifting equipment.
From the rear
- Unclip the cover using a coin or the flat
part of the towing eye,
- Fully screw in the removable towing eye.
Vehicles fitted with a manual gearbox (Diesel version)
In the case of vehicles fitted with a manual
gearbox, the gear lever must be in the
neutral position. Failure to observe this
special condition may result in damage
to certain braking components and the
absence of braking assistance the next time
the engine is started.
Page 150 of 278

148
Having your vehicle towed
General recommendations
Observe the legislation in force in your
country.
Ensure that the weight of the towing vehicle
is higher than that of the towed vehicle.
The driver must stay at the wheel of the
towed vehicle.
Driving on motorways and fast roads is
prohibited when towing.
When towing a vehicle with all four wheels
on the ground, always use an approved
towing bar; rope and straps are prohibited.
When towing a vehicle with the engine off,
there is no longer any power assistance
for braking or steering.
In the following cases, you must always call
on a professional recovery service:
- vehicle broken down on a motorway or
fast road,
- when it is not possible to put the
gearbox into neutral, unlock the
steering, or release the parking brake,
- towing with only two wheels on the
ground,
- where there is no approved towing bar
available...
Page 153 of 278

151
Dimensions
TECHNICAL DAT
A
8
H1
L Overall length
4 805
5 135
H Overall height pneumatic/metal suspension
1 895/1 942
A Wheelbase
3 000
3 122
B Front overhang
975
C Rear overhang
830
1 038
Overall width:
on panel
1 870
D with mouldings
1 895
with mirrors folded
1 986
with mirrors unfolded
2 194
E Width of front tracks
1 574
F Width of rear tracks
1 574
Turning circle between kerbs (m)
12.18
12.59
Maximum loads (kg)
Payload
1 000
On roof
170
DIMENSIONS (MM)
The vehicle is available in 2 lengths (L1, L2) and 1 height (H1),
refer to the tables:
Page 158 of 278

156
Identification markings
IDENTIFICATION MARKINGS
A. Manufacturer's label.
1 - VF Type serial number.
2 - Gross vehicle weight (GVW).
3 - Gross train weight (GTW).
4.1 - Maximum weight on front axle.
4.2 - Maximum weight on rear axle.
B. Model serial number.
Use the flat end piece of the towing eye to
open the flap.
C. Tyres and paint colour code.
The label C
, on the front door gives:
- the wheel and tyre sizes,
- the brands of tyres approved by the
manufacturer,
- the tyre pressures (the tyre pressures
must be checked when the tyres are
cold, at least once a month),
- the paint colour code.
Page 195 of 278

9.37
07
1
2
4
3
6
5
USING THE TELEPHONE
CALLING A CONTACT
Select "Call list" or "Phone book" and press "OK". Select thenumber required and confi rm to make the call. Press the PICK UP button to displa
ythe telephone short-cut menu.
Dial the telephone number of
your contact using the alphanumeric keypad. Pr
ess the dial to confi rm the selection.
Press the HAN
G UP button to end the call.
Press the PI
CK UP button to call thenumber dialled.
Press the HANG UP button to re
ject a call.
Press the PI
CK UP button to accept a call.
ACCEPTING OR REJECTING A CALL Turn the dial and select the "Dial" function.
Dial
To select the telephone used, press MENU, then select "Telematics",
then "Bluetooth
functions", then "Bluetooth activation mode". Then select:
- "Deactivated": to use the internal tele
phone,
- "Activated and visible": to use the Bluetooth tele
phone, visible to all
telephones,
-
"Activated and not visible": to use the Bluetooth telephone, not visible to other telephones, it is not possible to match a new
telephone.
Press the end of the steerin
g wheel stalk for more
than 2 seconds to access the telephone menu: calls
log, directory, voice mailbox.
Page 254 of 278

9.96
06
1
2
1
2
1
RECEIVING A CALL
An incomin
g call is announced by a ring and a superimposed
display in the vehicle's screen.
Select the YES tab on the display
using the buttons and confi rm bypressing OK.
Press the steering mounted control to accept
the call.
MAKING A CALL
From the Bluetooth telephone
function Audio menu, select Manage
the telephone call then Call, Call list or Directory.
Press the steerin
g mounted control for more than
two seconds for access to your directory, then navigate with the thumb wheel.
Or
To dial a number, use your telephone's keypad,with the vehicle stationary.
Durin
g a call, press the steering mounted control
for more than 2 seconds.
Confi rm with OK to end the call.
BLUETOOTH FUNCTIONS
ENDING A CALL
Page 267 of 278

15
7
Exterior
VISUAL SEARCH
10
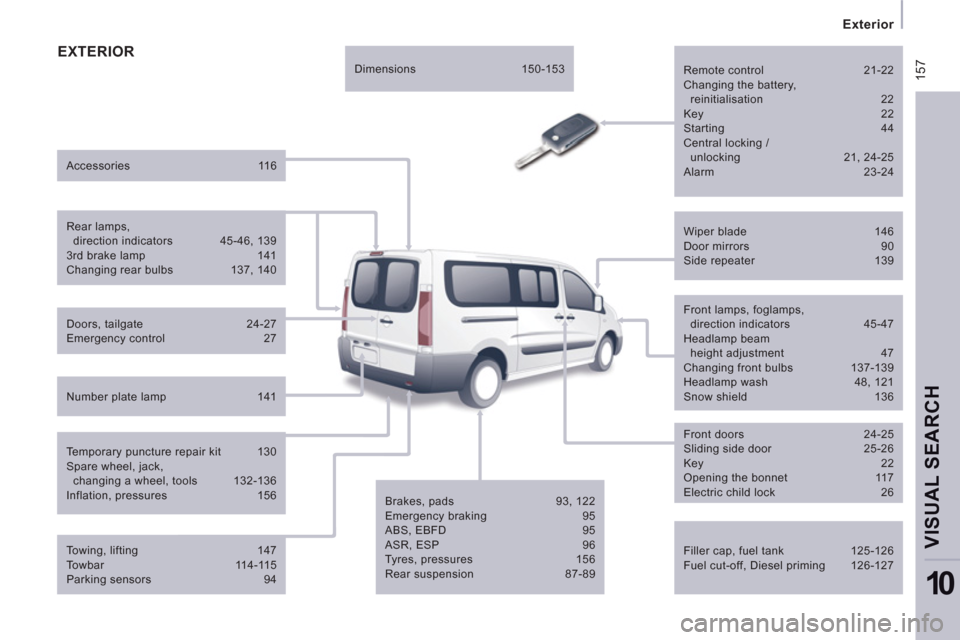
EXTERIOR
Filler cap, fuel tank 125-126
Fuel cut-off, Diesel priming 126-127
Wiper blade 146
Door mirrors 90
Side repeater 139
Front lamps, foglamps,
direction indicators 45-47
Headlamp beam
height adjustment 47
Changing front bulbs 137-139
Headlamp wash 48, 121
Snow shield 136
Front doors 24-25
Sliding side door 25-26
Key 22
Opening the bonnet 117
Electric child lock 26
Brakes, pads 93, 122
Emergency braking 95
ABS, EBFD 95
ASR, ESP 96
Tyres, pressures 156
Rear suspension 87-89
Doors, tailgate 24-27
Emergency control 27
Accessories 116
Number plate lamp 141
Dimensions 150-153
Temporary puncture repair kit 130
Spare wheel, jack,
changing a wheel, tools 132-136
Inflation, pressures 156
Remote control 21-22
Changing the battery,
reinitialisation 22
Key 22
Starting 44
Central locking /
unlocking 21, 24-25
Alarm 23-24
Towing, lifting 147
Towbar 114-115
Parking sensors 94
Rear lamps,
direction indicators 45-46, 139
3rd brake lamp 141
Changing rear bulbs 137, 140