display Citroen JUMPY RHD 2012 2.G Owner's Guide
[x] Cancel search | Manufacturer: CITROEN, Model Year: 2012, Model line: JUMPY RHD, Model: Citroen JUMPY RHD 2012 2.GPages: 270, PDF Size: 9.6 MB
Page 168 of 270
9.18
04
1
2
3
5
4
NAVIGATION - GUIDANCE
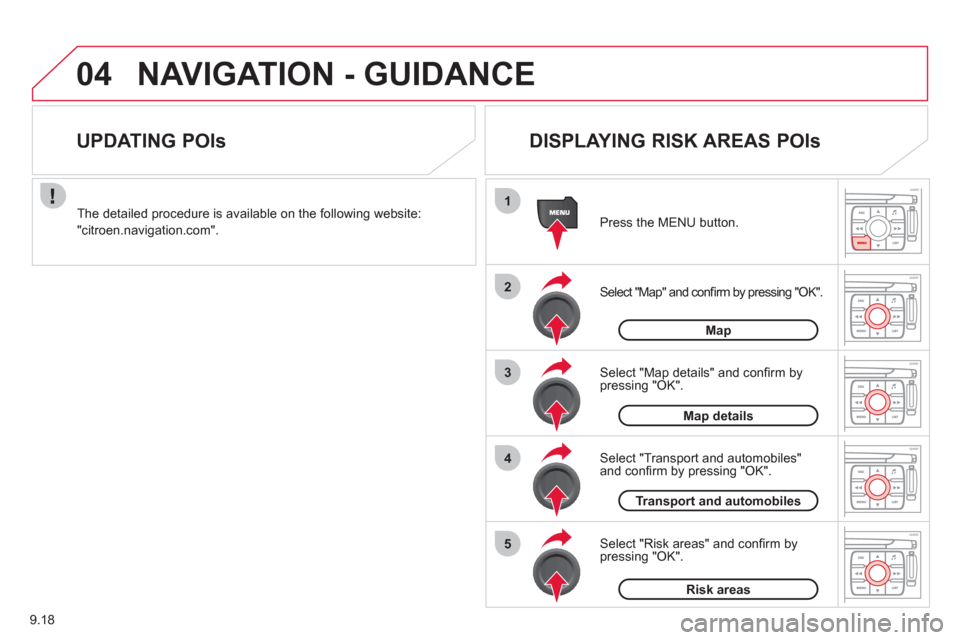
Select "Map" and confi rm by pressing "OK". Press the MEN
U button.
Select "Transport and automobiles"and confi rm by pressing "OK". Select "Map details" and confi rm b
y
pressing "OK". The detailed procedure is available on the followin
g website:
"citroen.navigation.com".
UPDATING POIs
DISPLAYING RISK AREAS POIs
Select "Risk areas" and confi rm by
pressing "OK".
Map
Map details
Transport and automobiles
Risk areas
Page 172 of 270
9.22
04
1
2
3
4
5
6
7
NAVIGATION - GUIDANCE
DISPLAYING THE MAP IN A WINDOW
OR IN FULL SCREEN MODE
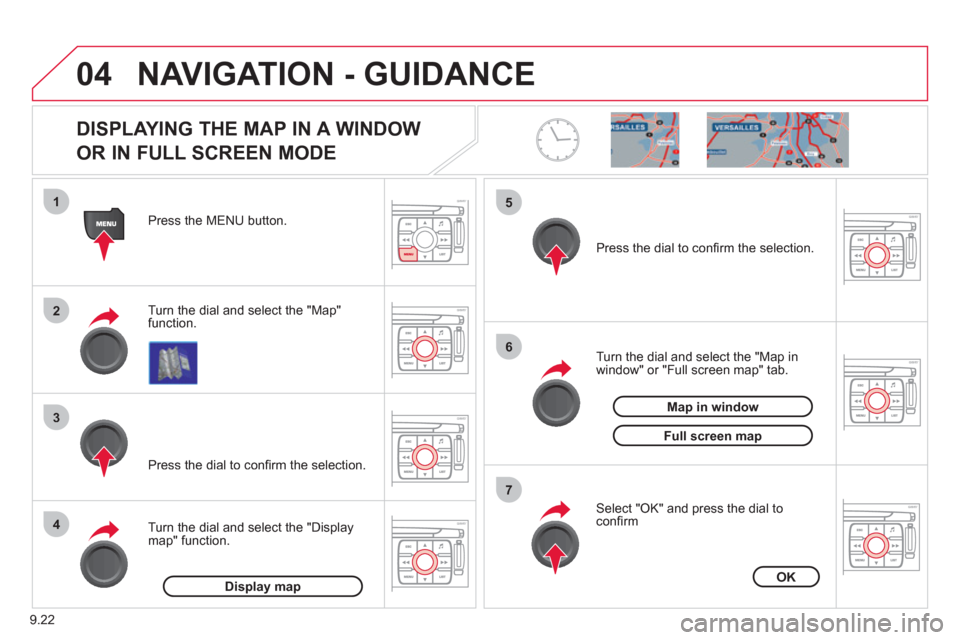
Turn the dial and select the "Map"
function. Press the MENU button.
Turn the dial and select the "Displa
ymap" function. Pr
ess the dial to confi rm the selection.
Turn the dial and select the "Map in
window" or "Full screen map" tab.
Pr
ess the dial to confi rm the selection.
Select "OK" and press the dial to confi rm
Display mapOK
Map in window
Full screen map
Page 174 of 270
9.24
05
1
2
3
4
5
6
8
7
TRAFFIC INFORMATION
CONFIGURING THE DISPLAY
OF TMC MESSAGES
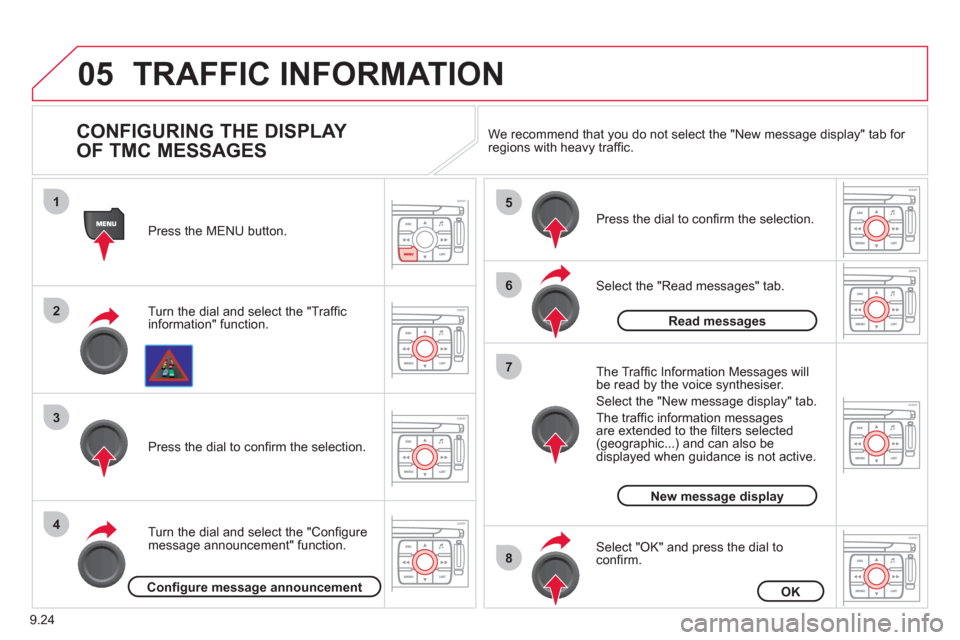
Turn the dial and select the "Traffi cinformation" function. Press the MEN
U button.
Turn the dial and select the "Confi
gure
message announcement" function. Pr
ess the dial to confi rm the selection.
Select the "Read messages" tab.
Pr
ess the dial to confi rm the selection.
Select "OK" and press the dial to confi rm.
The Tra
ffi c Information Messages will
be read by the voice synthesiser.
Select the "New messa
ge display" tab.
The traffi c information messa
gesare extended to the fi lters selected (geographic...) and can also be displayed when guidance is not active. We recommend that
you do not select the "New message display" tab for regions with heavy traffi c.
Confi gure message announcementOK
Read messages
New message display
Page 175 of 270
9.25
06
1
2
4
3
1
2
4
3
AUDIO/VIDEO
RADIO
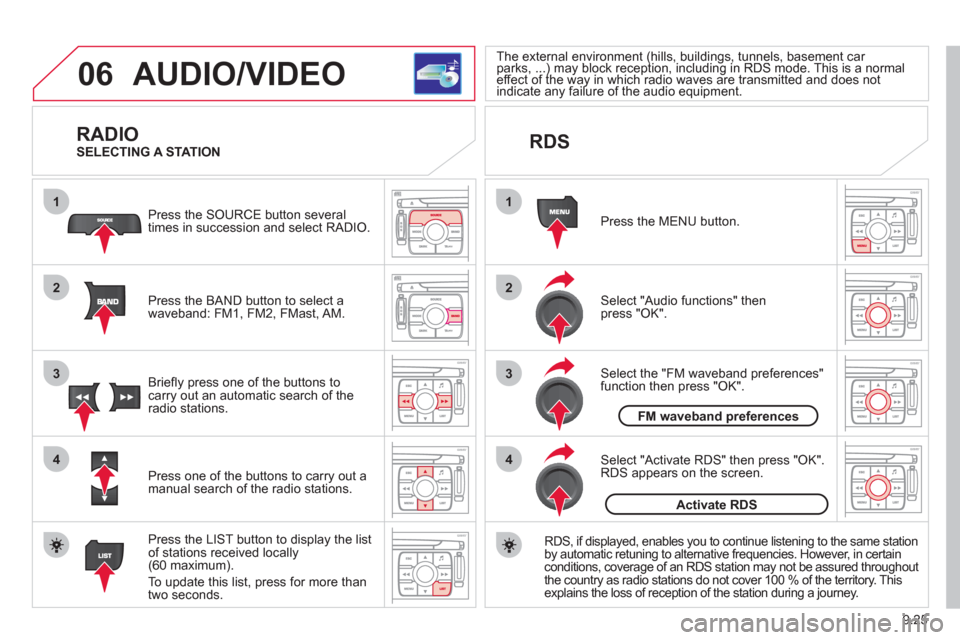
Press the BAND button to select awaveband: FM1, FM2, FMast, AM. Pr
ess the SOURCE button several
times in succession and select RADIO.
Press the LIST button to displa
y the list
of stations received locally(60 maximum).
To update this list, press for more than
tw
o seconds.
Press one of the buttons to carr
y out a
manual search of the radio stations. Brie
fl y press one of the buttons tocarry out an automatic search of the radio stations.
RDS
Select "Audio functions" then press "OK".
Press the MENU button.
RD
S, if displayed, enables you to continue listening to the same station
by automatic retuning to alternative frequencies. However, in certain conditions, coverage of an RDS station may not be assured throughout
the country as radio stations do not cover 100 % of the territory. Thisexplains the loss of reception of the station during a journey.
Select "Activate RDS" then press "OK". RDS appears on the screen.
Select the "FM waveband preferences" function then press "OK".
The external environment (hills, buildings, tunnels, basement car parks, ...) may block reception, including in RDS mode. This is a normal(g(g
effect of the way in which radio waves are transmitted and does notp)y p g)y p g
indicate any failure of the audio equipment. yy
SELECTING A STATION
FM waveband preferences
Activate RDS
Page 176 of 270
9.26
06
1
2
MP3 CD
The MP3 format, an abbreviation of MPEG 1.2 & 2.5 Audio
Layer 3, is an audio compression standard which permits the recording of several tens of music fi les on a single disc. Empt
y CDs are not recognised and may damage the system.
It is advisable to restrict
fi le names to 20 characters without usingspecial characters (e.g. " ? ; ˘) to avoid any playing or displaying problems. The audio s
ystem will only play fi les with the extension ".mp3" with
a sampling rate of 22.05 KHz or 44.1 KHz. No other type of fi le(.wma, .mp4, .m3u...) can be played.
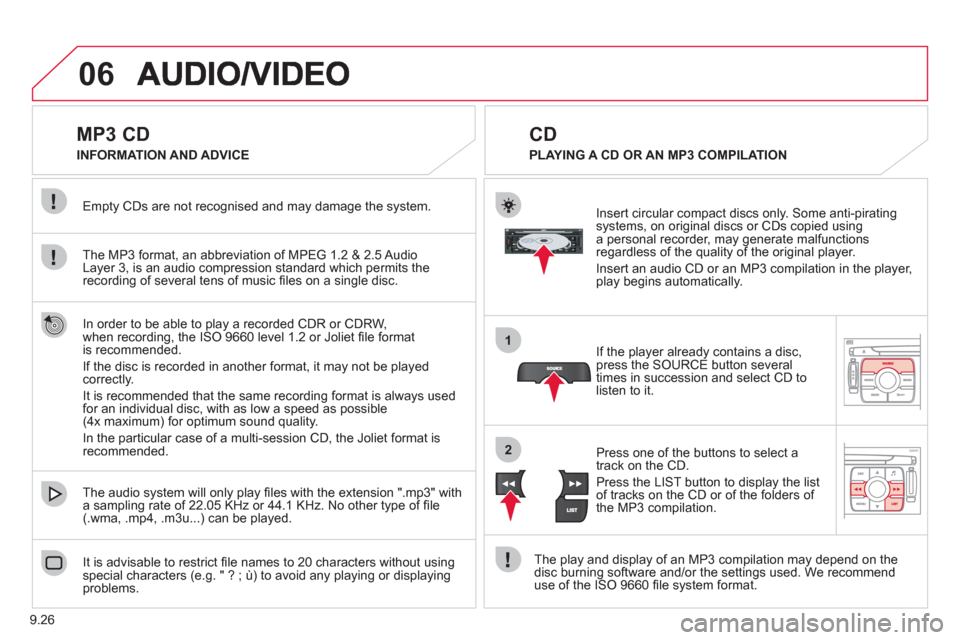
If the pla
yer already contains a disc, press the SOURCE button several
times in succession and select CD to listen to it.
Insert circular compact discs onl
y. Some anti-piratingsystems, on original discs or CDs copied usinga personal recorder, may generate malfunctionsregardless of the quality of the original player.
Insert an audio
CD or an MP3 compilation in the player,play begins automatically.
The pla
y and display of an MP3 compilation may depend on the
disc burning software and/or the settings used. We recommend use of the ISO 9660 fi le system format.
Pr
ess one of the buttons to select atrack on the CD.
Press the LI
ST button to display the list
of tracks on the CD or of the folders of
the MP3 compilation.
CD
PLAYING A CD OR AN MP3 COMPILATION INFORMATION AND ADVICE
In order to be able to pla
y a recorded CDR or CDRW,
when recording, the ISO 9660 level 1.2 or Joliet fi le formatis recommended.
I
f the disc is recorded in another format, it may not be playedcorrectly.
It is recommended that the same recordin
g format is always used
for an individual disc, with as low a speed as possible
(4x maximum) for optimum sound quality.
In the particular case o
f a multi-session CD, the Joliet format is recommended.
Page 178 of 270
9.28
06
1
2
4
3
5
1
2
3
AUDIO/VIDEO
PLAYING AN MP3 USB MEMORY STICK
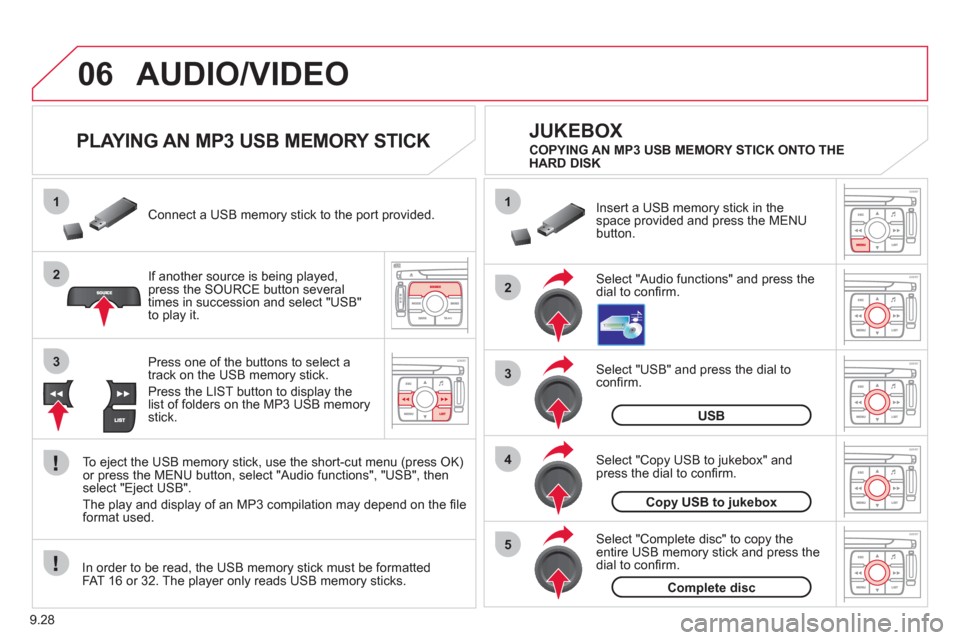
If another source is being played,press the SOURCE button several
times in succession and select "USB"
to play it. Connect a USB memor
y stick to the port provided.
To e
ject the USB memory stick, use the short-cut menu (press OK)or press the MENU button, select "Audio functions", "USB", then
select "Eject USB".
The pla
y and display of an MP3 compilation may depend on the fi le
format used.
Select "USB" and press the dial toconfi rm.
Insert a U
SB memory stick in thespace provided and press the MENUbutton.
JUKEBOX
USB
Select "Complete disc" to copy theentire USB memory stick and press thedial to confi rm.
Complete disc
Select "Copy USB to jukebox" andpress the dial to confi rm.
Copy USB to jukebox
Select "Audio functions" and press the dial to confi rm.
Pr
ess one of the buttons to select atrack on the USB memory stick.
Press the LIST button to displa
y the list of folders on the MP3 USB memorystick. COPYING AN MP3 USB MEMORY STICK ONTO THE
HARD DISK
In order to be read, the USB memor
y stick must be formatted
FAT 16 or 32. The player only reads USB memory sticks.
Page 183 of 270
9.33
06
2
4
3
7
5
6
AUDIO/VIDEO
VIDEO MENU
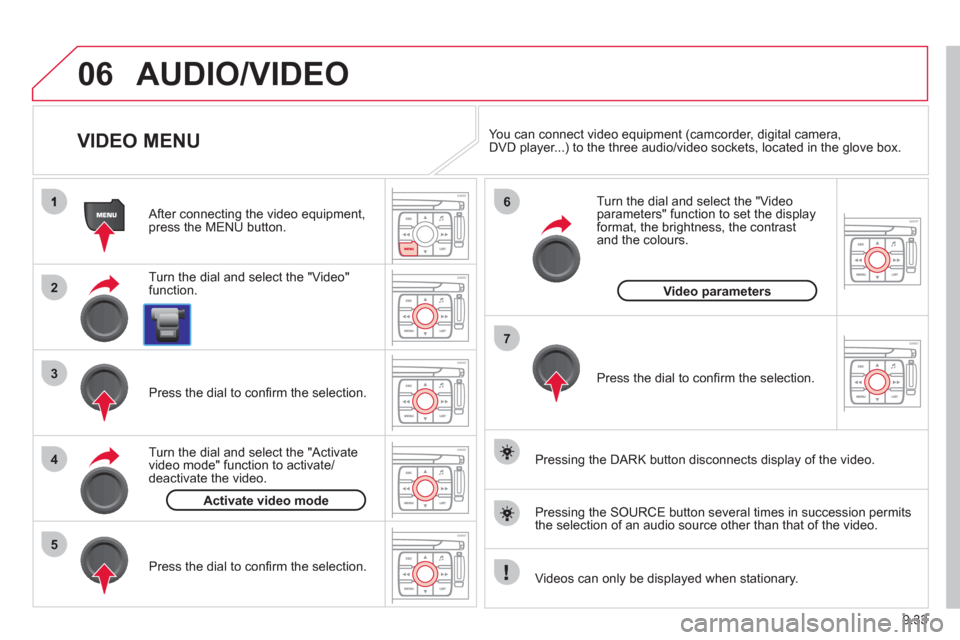
Turn the dial and select the "Video"
function.
After connecting the video equipment,press the MENU button.
Pr
ess the dial to confi rm the selection.
T
urn the dial and select the "Activatevideo mode" function to activate/deactivate the video.
Pr
ess the dial to confi rm the selection.
T
urn the dial and select the "Video parameters" function to set the displayformat, the brightness, the contrast and the colours.
Videos can only be displayed when stationary.
Pressin
g the DARK button disconnects display of the video.
You can connect video equipment
(camcorder, digital camera,DVD player...) to the three audio/video sockets, located in the glove box.
Pressin
g the SOURCE button several times in succession permits
the selection of an audio source other than that of the video.
Pr
ess the dial to confi rm the selection.
Activate video mode
Video parameters
Page 188 of 270
9.38
08
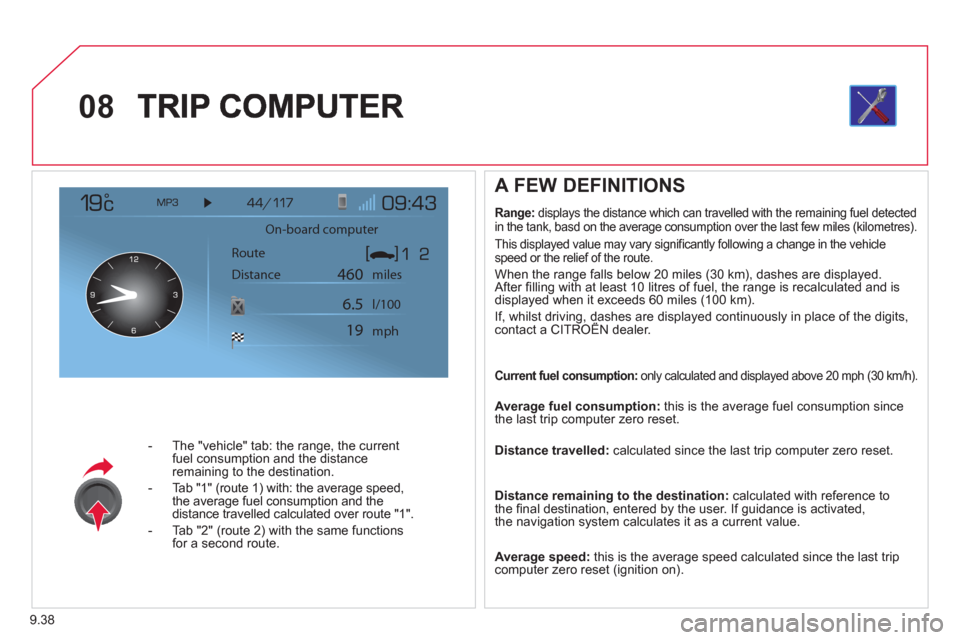
- The "vehicle" tab: the range, the current
fuel consumption and the distance
remaining to the destination.
- Tab "1"
(route 1) with: the average speed,
the average fuel consumption and the distance travelled calculated over route "1".
- Tab "2"
(route 2) with the same functions for a second route.
A FEW DEFINITIONS
Range:displays the distance which can travelled with the remaining fuel detected
in the tank, basd on the average consumption over the last few miles (kilometres).
This displa
yed value may vary signifi cantly following a change in the vehicle
speed or the relief of the route.
When the range falls below 20 miles (30 km), dashes are displayed.
After fi lling with at least 10 litres of fuel, the range is recalculated and is
displayed when it exceeds 60 miles (100 km).
If, whilst driving, dashes are displayed continuously in place of the digits,contact a CITROËN dealer. ,g,
Current fuel consumption: only calculated and displayed above 20 mph (30 km/h).
Average fuel consumption:
this is the average fuel consumption since
the last trip computer zero reset.
Distance travelled: calculated since the last trip computer zero reset.
Distance remaining to the destination:calculated with reference to
the fi nal destination, entered by the user. If guidance is activated,
the navigation system calculates it as a current value.
Average speed: this is the average speed calculated since the last trip computer zero reset (ignition on).
On-board computer
Route
Distance miles
mph l/100
460
6.5
19
Page 189 of 270
9.39
08TRIP COMPUTER
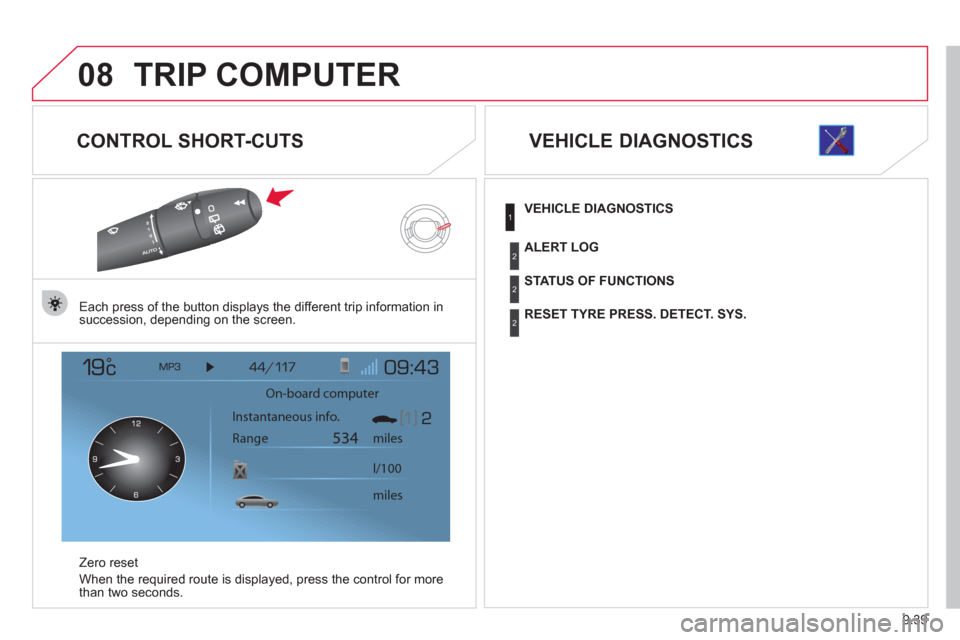
CONTROL SHORT-CUTS
Each press of the button displays the different trip information in
succession, depending on the screen.
Z
ero reset
When the required route is displa
yed, press the control for more
than two seconds.
VEHICLE DIAGNOSTICS
On-board computer
Instantaneous info.
Range miles
534
miles l/100
VEHICLE DIAGNOSTICS
STATUS OF FUNCTIONS
RESET TYRE PRESS. DETECT. SYS.
ALERT LOG
1
2
2
2
Page 190 of 270
9.40
09
1
2
3
4
5
6
7
8
CONFIGURATION
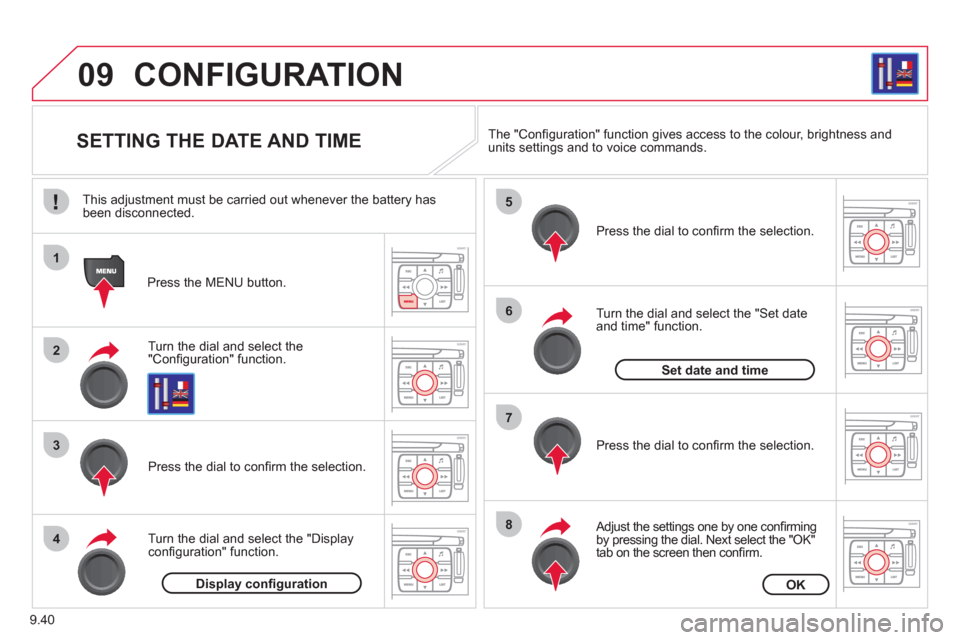
SETTING THE DATE AND TIME
Turn the dial and select the"Confi guration" function.
Press the MENU button.
Pr
ess the dial to confi rm the selection.
Turn the dial and select the "Displa
yconfi guration" function.
Pr
ess the dial to confi rm the selection.
Turn the dial and select the "
Set dateand time" function.
Adjust the settings one by one confi rmingby pressing the dial. Next select the "OK"
tab on the screen then confi rm.
Pr
ess the dial to confi rm the selection. The "
Confi guration" function gives access to the colour, brightness and units settings and to voice commands.
Display confi gurationOK
Set date and time
This adjustment must be carried out whenever the battery has been disconnected.