tow CITROEN NEMO 2013 Handbook (in English)
[x] Cancel search | Manufacturer: CITROEN, Model Year: 2013, Model line: NEMO, Model: CITROEN NEMO 2013Pages: 180, PDF Size: 9.06 MB
Page 105 of 180

103
4
EASE OF USE and COMFORT
Ventilation
CORRECT USE OF THE AIR
CONDITIONING
For even air distribution, ensure that the
exterior air intake grille located at the base
of the windscreen is not obstructed and that
the side and central vents, the air outlets on
the floor and the air extractor at the rear are
open.
The air conditioning is useful in all seasons
as it eliminates condensation and air
humidity. Operate the air conditioning system for
5 to 10 minutes, once or twice a month,
to keep it in perfect working order.
Have the filter elements (air filter and
passenger compartment filter) replaced
regularly. If you drive in a dusty environment,
have them replaced twice as often.
It is normal that the condensation created by
the air conditioning system results in a flow
of water which may form a puddle under the
vehicle when parked.
If the system does not produce cold air, do
not use it and contact a CITROËN dealer or
a qualified workshop.
VENTS
For optimum distribution and diffusion of hot
or cool air in the passenger compartment,
there are:
- 2 adjustable central vents,
- 2 adjustable and closing side vents,
- 2 vents directed towards the floor of the
vehicle.
In order to be effective, the air conditioning
should only be used with the windows
closed. However, if the interior temperature
remains high after a prolonged period parked
in the sun, do not hesitate to ventilate the
passenger compartment for a few minutes.
Page 106 of 180

104
Ventilation
These controls are located on the centre console.
Air conditioning
The air conditioning mode is operational
when the engine is running. The diode is lit.
Temperature adjustment
Control positioned:
- in the blue zone triggers cool
air,
Air flow
The force of the blown air, from
the vents, varies from 1
to the
strongest 4
. Remember to adjust
this control in order to reach the
ambient air comfort level. To switch off the
blower, place the control in position 0
.
The air supply distribution is
directed by the control turned
towards:
the side vents and the central
vents,
the side vents, the central vents
and the footwells,
the footwells,
the windscreen, the front side
windows and the footwells,
the windscreen. Press the air blower control. The
diode lights.
The air blower control must not
be in position 0
(zero flow) for air
conditioning to be obtained.
Turn the control to the position required.
- in the red zone triggers
heating of the interior ambient
air.
Air distribution
Page 110 of 180

108
Practical information
LOAD SPACE LAYOUT
Stowing rings
There are 6 stowing rings on the rear floor to
secure your loads.
As a safety precaution in case of sharp
braking, you are advised to place heavy
objects as far forwards towards the driver’s
seat as possible.
Storage tray
A storage tray is provided at the rear left of
the load space.
Torch
A magnetic torch is provided at the rear right
of the load space.
Remove the torch from its base by
pressing the button then pivoting the torch
downwards by 90 degrees.
To switch on the torch, slide the switch
forwards.
To change the 4 storage batteries (NiMH
type), remove the protective cover from the
torch.
To put the torch back in place, engage
it in the notches on the base and pivot it
upwards.
Ladder type vertical partition
Behind the driver’s seat, a ladder type
vertical partition protects the driver against
the risk of load movement.
Partitions
Panel, glazed and mid-height panel
with grille type partitions are offered to
complement your light van.
The transportation of passengers in the
load space is not permitted.
You are advised to immobilise the load
by securing it firmly using the stowing
rings on the floor. The torch’s storage batteries recharge
automatically while driving.
An additional light is installed in the centre of
the torch base (refer to the "Interior lighting"
section).
Page 112 of 180

11 0
Practical information
REAR LAYOUT
Stowing rings
There are 4 stowing rings on the rear floor to
secure your luggage.
Luggage retaining net
Hooked onto the stowing rings, this enables
you to secure your luggage.
Rear shelf
Unfold the shelf to conceal the contents of
the boot from sight from the outside.
Fold the shelf back on itself for easier
access to the contents of the boot.
Store the shelf behind the rear bench seat
when loading bulky items vertically.
Removing the shelf
Fold the shelf back on itself.
Lift the shelf to approximately 60°.
Unclip the shelf's side fixings from its
supports.
Remove the shelf.
Store the folded shelf in the location behind
the rear bench seat.
To put the shelf back in place, carry out
these operations in reverse order.
Page 115 of 180

11 3
5
SAFETY
Driving safely
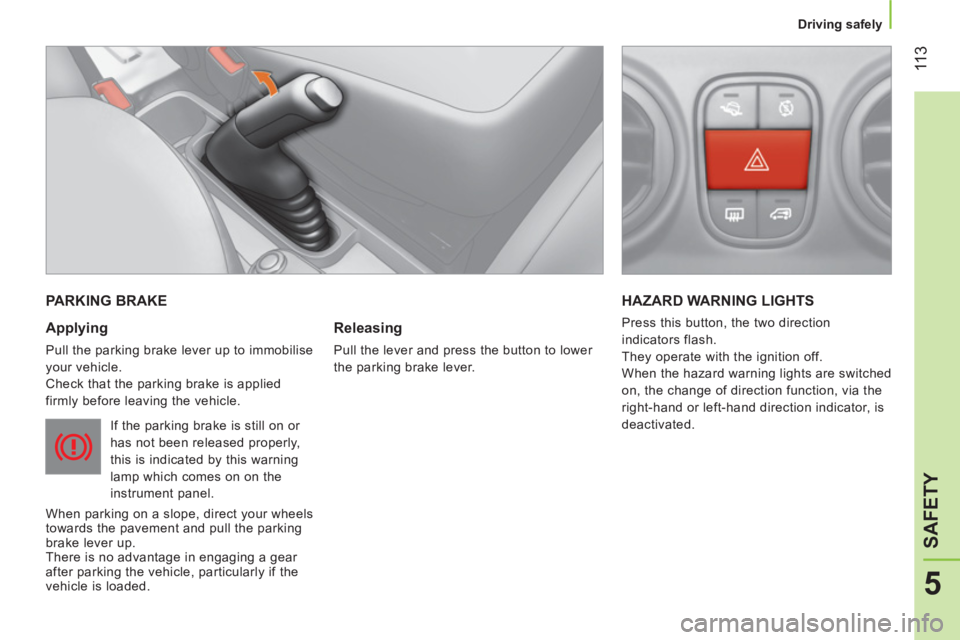
PARKING BRAKE
Applying
Pull the parking brake lever up to immobilise
your vehicle.
Check that the parking brake is applied
firmly before leaving the vehicle.
If the parking brake is still on or
has not been released properly,
this is indicated by this warning
lamp which comes on on the
instrument panel.
When parking on a slope, direct your wheels
towards the pavement and pull the parking
brake lever up.
There is no advantage in engaging a gear
after parking the vehicle, particularly if the
vehicle is loaded.
Releasing
Pull the lever and press the button to lower
the parking brake lever.
HAZARD WARNING LIGHTS
Press this button, the two direction
indicators flash.
They operate with the ignition off.
When the hazard warning lights are switched
on, the change of direction function, via the
right-hand or left-hand direction indicator, is
deactivated.
Page 123 of 180

121
5
SAFETY
Airbags
LATERAL AIRBAGS
Deployment
It is deployed unilaterally in the event of a
serious side impact, perpendicular to the
longitudinal centreline of the vehicle on
a horizontal plane and directed from the
outside towards the inside of the vehicle.
The lateral airbag inflates between the
front occupant of the vehicle and the
corresponding door trim panel.
In the event of a minor impact or bump
on the side of the vehicle or if the
vehicle rolls over, the airbag may not be
deployed.
Operating fault
If this warning lamp comes on in
the instrument panel, contact a
CITROËN dealer or a qualified
workshop without delay to have
the system checked. The airbags
may no longer be deployed in the
event of a serious impact.
Page 133 of 180

131
6
ACCESSORIES
Towing a trailer
TOWING A TRAILER, CARAVAN, ETC...
Driving advice
As the fan is electrically controlled, its
cooling capacity is not dependent on
the engine speed.
On the contrary, use a high gear to lower
the engine speed and reduce your speed. In all cases, pay attention to the coolant
temperature. A towed vehicle must free wheel: gearbox in
neutral.
Cooling:
towing a trailer on a slope
increases the coolant temperature.
Page 134 of 180

132
Towing a trailer
In certain cases of particularly arduous
use (towing the maximum load up a steep
slope in high temperatures), the engine
automatically limits its power. In this case,
automatic cutting off of the air conditioning
allows the engine power to be saved.
If the coolant temperature
warning lamp comes on, stop the
vehicle and switch off the engine
as soon as possible.
See the "Levels" section of chapter 7.
Tyres:
check the tyre pressures of the
towing vehicle (see the "Identification
markings" section of chapter 7) and of
the trailer, observing the recommended
pressures.
Brakes:
towing increases the braking
distance. Drive at a moderate speed,
change down early and brake gradually.
Side wind:
sensitivity to side wind is
increased. Drive smoothly and at a
moderate speed.
ABS:
the system only controls the vehicle,
not the trailer.
Rear parking sensors:
the sensors
will be deactivated automatically
when an genuine CITROËN towbar is used
(see the "Rear parking sensors" section of
chapter 3).
Towbar
We recommend the use of original
CITROËN towbars and their harnesses,
which have been tested and approved from
the design stage of your vehicle, and that
the fitting of this equipment is entrusted to
a CITROËN dealer or a qualified workshop.
If this equipment is not fitted by a CITROËN
dealer, it is essential that it is fitted using
the electrical pre-equipment located at
the rear of the vehicle and following the
manufacturer's instructions.
The operation of the rear parking sensors is
deactivated automatically when the trailer
cable connector is inserted in the towbar
socket.
When the trailer cable is removed, the rear
parking sensors are re-activated.
Distribution of loads
Distribute the load in the trailer so that the
heaviest objects are as close as possible
to the axle and the nose weight is close to
the maximum authorised without, however,
exceeding it. The air density decreases with
altitude, so reducing the performance of
the engine. The maximum towed load must
be reduced by 10 % for each 1 000 metres
of altitude. Refer to the "Technical data"
chapter for details of the weights and
towed loads applicable to your vehicle
and also to the administrative documents
(V5 registration document, ...).
Page 135 of 180

133
6
ACCESSORIES
Equipment
ROOF RACK AND ROOF BARS
To install the transverse roof bars or a
roof rack, use the fixings provided for this
purpose.
Maximum load: 75 kg.
OTHER ACCESSORIES
A wide range of accessories and original
parts is offered by the CITROËN network.
These accessories and parts have been
tested and approved both for reliability and
for safety.
They all benefit from CITROËN's
recommendation and warranty.
Never exceed the gross vehicle weight
(GVW).
Range of professional equipment
The replacement parts department publishes
an accessories catalogue offering various
equipment and fittings, such as:
- wooden protective floor, non-slip wooden
floors, wooden side protectors, glass
protection grilles,
- roof rack, set of transverse roof bars,
loading roller,
- towbars, towbar harnesses with
7/13 sockets, 7/7 sockets, 13 socket...
The fitting of electrical equipment or
accessories not listed by CITROËN
may result in the failure of your vehicle's
electronic system or high consumption.
Please note this specific warning. You
are advised to contact a representative
of CITROËN to be shown the range of
recommended equipment and accessories.
Depending on the country in which the
vehicle is sold or operated, it may be
compulsory to have a high visibility vest,
warning triangle, replacement bulbs and
fuses available in the vehicle.
Before installing accessory radio
communication transmitters with
external aerial on your vehicle, you can
contact a CITROËN dealer, who will provide
the specification (frequency band, maximum
output power, aerial position, specific
installation conditions) of the transmitters
which can be fitted, in accordance with the
Motor Vehicle Electromagnetic Compatibility
Directive (2004/104/EC). When fitting a towbar and harness
outside the CITROËN dealer
network, the installation must be done
using the electrical pre-equipment on the
vehicle and following the manufacture's
recommendations.
Page 140 of 180

138
Changing a wheel
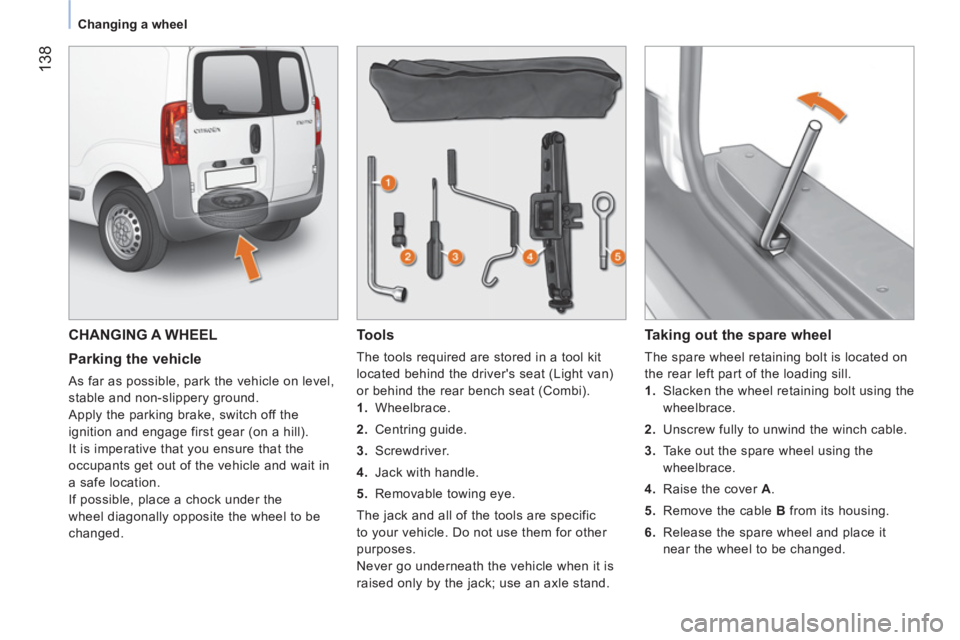
CHANGING A WHEEL
Parking the vehicle
As far as possible, park the vehicle on level,
stable and non-slippery ground.
Apply the parking brake, switch off the
ignition and engage first gear (on a hill).
It is imperative that you ensure that the
occupants get out of the vehicle and wait in
a safe location.
If possible, place a chock under the
wheel diagonally opposite the wheel to be
changed.
Tools
The tools required are stored in a tool kit
located behind the driver's seat (Light van)
or behind the rear bench seat (Combi).
1.
Wheelbrace.
2.
Centring guide.
3.
Screwdriver.
4.
Jack with handle.
5.
Removable towing eye.
The jack and all of the tools are specific
to your vehicle. Do not use them for other
purposes.
Never go underneath the vehicle when it is
raised only by the jack; use an axle stand.
Taking out the spare wheel
The spare wheel retaining bolt is located on
the rear left part of the loading sill.
1.
Slacken the wheel retaining bolt using the
wheelbrace.
2.
Unscrew fully to unwind the winch cable.
3.
Take out the spare wheel using the
wheelbrace.
4.
Raise the cover A
.
5.
Remove the cable B
from its housing.
6.
Release the spare wheel and place it
near the wheel to be changed.