CITROEN NEMO 2014 Handbook (in English)
Manufacturer: CITROEN, Model Year: 2014, Model line: NEMO, Model: CITROEN NEMO 2014Pages: 192, PDF Size: 10.74 MB
Page 11 of 192

9
FAMILIARISATION
Familiarisation
Load space (Light van)
1.
Stowing eyes.
2.
Storage box.
3.
Torch.
4.
Partition.
5.
Spare wheel.
It is advisable to immobilise the load
by fi xing it securely using the stowing
rings 1
on the fl oor.
109
Page 12 of 192

10
Familiarisation
With tailgate
REAR FITTINGS (COMBI)
With side-hinged rear doors
1.
Stowing rings.
2.
Luggage retaining net.
3.
Tool kit.
4.
Rear parcel shelf.
1.
Stowing rings.
2.
Luggage retaining net.
3.
Rear parcel shelf.
4.
Retaining straps / Tool kit.
5.
Torch / Boot lamp.
111
Page 13 of 192

11
FAMILIARISATION
Familiarisation
SITTING COMFORTABLY
Driver's seat adjustment
Forwards-backwards
Height
Seat back angle (A)
Lumbar support (B)
96
Page 14 of 192

12
Familiarisation
Front seat belts
A.
Fastening.
SITTING COMFORTABLY
1.
Release the adjustment mechanism.
2.
Adjust for height and reach.
3.
Lock the adjustment mechanism.
Steering wheel adjustment
As a safety precaution, these operations
must only be carried out while
stationary.
Electric door mirror adjustment
A.
Selection of the left hand mirror.
B.
Selection of the right hand mirror.
C.
Adjustment of the position of the mirror.
Rear view mirror adjustment
1.
Selection of the "day / night" position of the
mirror.
2.
Adjustment of the mirror.
49 47 11 9
Page 15 of 192

13
FAMILIARISATION
Familiarisation
SEEING CLEARLY
Ring
Lighting off.
Sidelamps.
Dipped / main beam headlamps.
Foglamps
Rear foglamp.
or
Front and rear foglamps.
Ring B: rear wiper
Intermittent wipe.
Screenwash.
Park.
Lighting
Raise or lower the lighting stalk passing the
point of resistance; the corresponding direction
indicators will fl ash until the lighting stalk is
moved out of this position.
Direction indicators
"Motorway" function
Press the lighting stalk up or down once,
without passing the point of resistance; the
corresponding direction indicators will fl ash
three times.
Wipers
Ring A: windscreen wipers
Park.
Intermittent.
Slow continuous.
Rapid continuous.
Single wipe.
Screenwash.
42 - 43 42 44 44
Page 16 of 192

14
Familiarisation
VENTILATION
Recommended interior settings
I require...
Heating or Manual Air Conditioning
Air distribution
Air fl ow
Air recirculation /
Intake of outside air
Temperature
Manual A/C
HOT
COLD
DEMISTING
DEFROSTING
104
Page 17 of 192

15
FAMILIARISATION
Familiarisation
MONITORING
Instrument panel
Switch panel
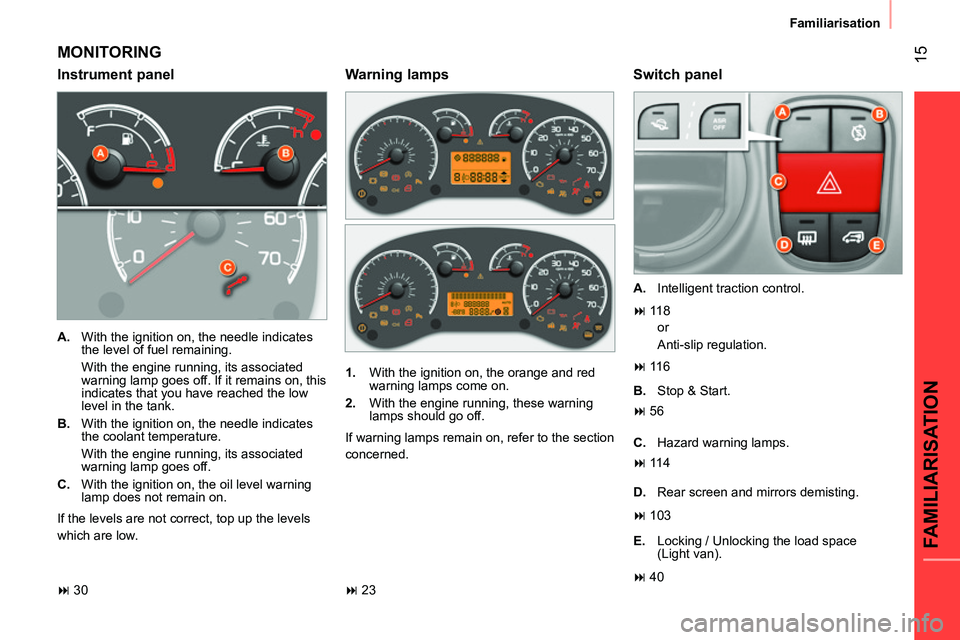
A.
With the ignition on, the needle indicates
the level of fuel remaining.
With the engine running, its associated
warning lamp goes off. If it remains on, this
indicates that you have reached the low
level in the tank.
B.
With the ignition on, the needle indicates
the coolant temperature.
With the engine running, its associated
warning lamp goes off.
C.
With the ignition on, the oil level warning
lamp does not remain on.
If the levels are not correct, top up the levels
which are low.
A.
Intelligent traction control.
1.
With the ignition on, the orange and red
warning lamps come on.
2.
With the engine running, these warning
lamps should go off.
If warning lamps remain on, refer to the section
concerned.
Warning lamps
or
Anti-slip regulation.
B.
Stop & Start.
C.
Hazard warning lamps.
D.
Rear screen and mirrors demisting.
E.
Locking / Unlocking the load space
(Light van).
30 23 11 8
11 6
56
11 4
103
40
Page 18 of 192

16
Familiarisation
PASSENGER SAFETY
Seat belt not fastened
A.
Driver's seat belt not fastened warning
lamp.
Ladder type vertical partition
(Light van)
A ladder type vertical partition protects the
driver against the risk of load movement. The passenger's front airbag is deactivated by
means of the MENU button, located to the side
of the steering wheel.
1.
Press the MENU button.
2.
Select "Bag" and confi rm by pressing the
MENU button.
3.
Select "OFF" and confi rm by pressing the
MENU button.
4.
Select "YES" and confi rm by pressing the
MENU button.
Passenger's front airbag
11 9 123 109
Page 19 of 192

17
FAMILIARISATION
Familiarisation
DRIVING SAFELY
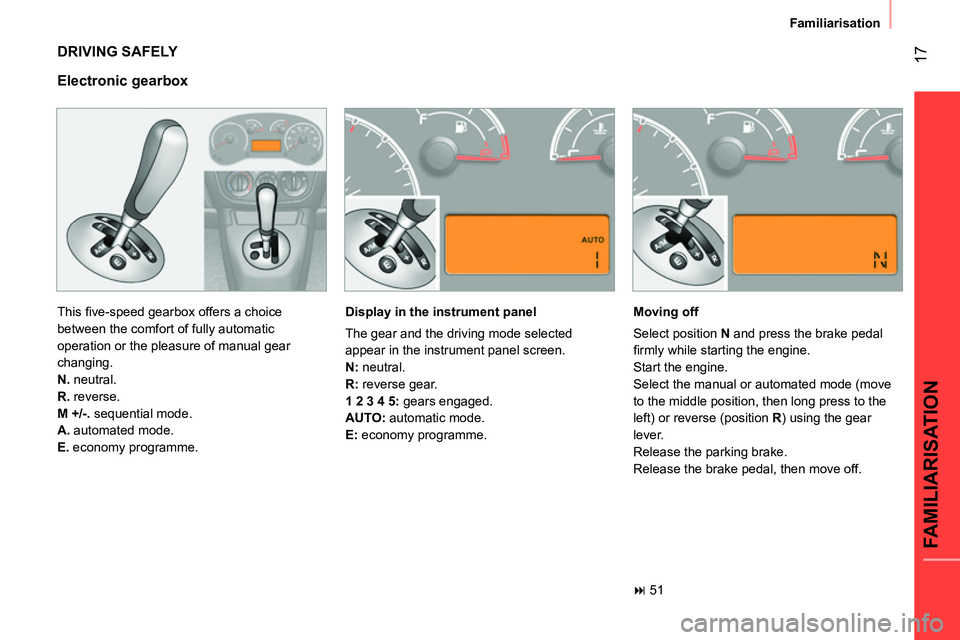
This fi ve-speed gearbox offers a choice
between the comfort of fully automatic
operation or the pleasure of manual gear
changing.
N.
neutral.
R.
reverse.
M +/-.
sequential mode.
A.
automated mode.
E.
economy programme.
Electronic gearbox
Display in the instrument panel
The gear and the driving mode selected
appear in the instrument panel screen.
N:
neutral.
R:
reverse gear.
1 2 3 4 5:
gears engaged.
AUTO:
automatic mode.
E:
economy programme.
Moving off
Select position N
and press the brake pedal
fi rmly while starting the engine.
Start the engine.
Select the manual or automated mode (move
to the middle position, then long press to the
left) or reverse (position R
) using the gear
lever.
Release the parking brake.
Release the brake pedal, then move off.
51
Page 20 of 192

18
Familiarisation
DRIVING SAFELY
Stop & Start
- with a manual gearbox;
with the vehicle
stationary, put the gear lever into neutral,
then release the clutch pedal,
- with an electronic gearbox;
with the
vehicle stationary, maintain pressure on
the brake pedal or put the gear lever in
position N
.
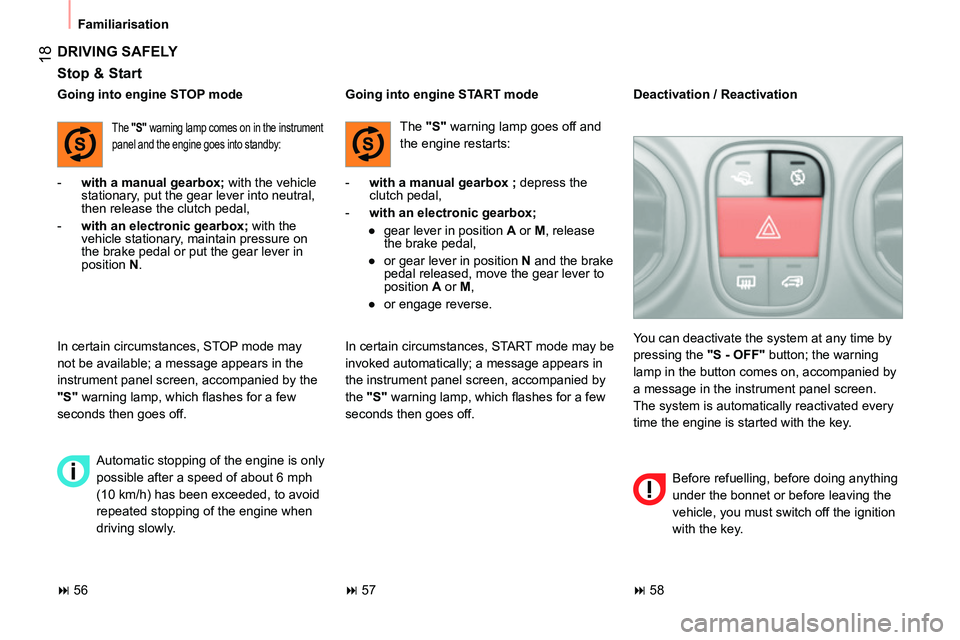
Going into engine STOP mode
The "S"
warning lamp comes on in the instrument
panel and the engine goes into standby:
In certain circumstances, STOP mode may
not be available; a message appears in the
instrument panel screen, accompanied by the
"S"
warning lamp, which fl ashes for a few
seconds then goes off.
Automatic stopping of the engine is only
possible after a speed of about 6 mph
(10 km/h) has been exceeded, to avoid
repeated stopping of the engine when
driving slowly.
Going into engine START mode
The "S"
warning lamp goes off and
the engine restarts:
- with a manual gearbox ;
depress the
clutch pedal,
- with an electronic gearbox;
●
gear lever in position A
or M
, release
the brake pedal,
●
or gear lever in position N
and the brake
pedal released, move the gear lever to
position A
or M
,
●
or engage reverse.
In certain circumstances, START mode may be
invoked automatically; a message appears in
the instrument panel screen, accompanied by
the "S"
warning lamp, which fl ashes for a few
seconds then goes off. You can deactivate the system at any time by
pressing the "S - OFF"
button; the warning
lamp in the button comes on, accompanied by
a message in the instrument panel screen.
The system is automatically reactivated every
time the engine is started with the key.
Deactivation / Reactivation
Before refuelling, before doing anything
under the bonnet or before leaving the
vehicle, you must switch off the ignition
with the key.
56 57 58