change wheel Citroen NEMO DAG 2008.5 1.G Owner's Manual
[x] Cancel search | Manufacturer: CITROEN, Model Year: 2008.5, Model line: NEMO DAG, Model: Citroen NEMO DAG 2008.5 1.GPages: 140, PDF Size: 2.17 MB
Page 22 of 140
25
1
READY TO SET OFF
Instruments and controls
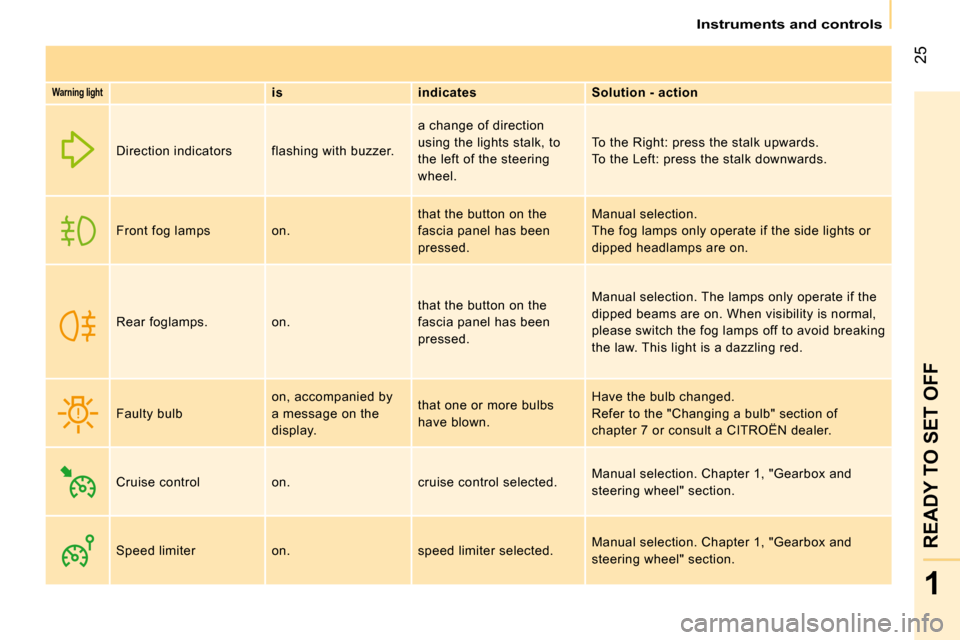
Warning light
is indicates Solution - action
Direction indicators flashing with buzzer. a change of direction
using the lights stalk, to
the left of the steering
wheel. To the Right: press the stalk upwards.
To the Left: press the stalk downwards.
Front fog lamps on. that the button on the
fascia panel has been
pressed. Manual selection.
The fog lamps only operate if the side lights or
dipped headlamps are on.
Rear foglamps. on. that the button on the
fascia panel has been
pressed. Manual selection.
The lamps only operate if the
dipped beams are on. When visibility is normal,
please switch the fog lamps off to avoid breaking
the law. This light is a dazzling red.
Faulty bulb on, accompanied by
a message on the
display. that one or more bulbs
have blown. Have the bulb changed.
Refer to the "Changing a bulb" section of
chapter 7 or consult a CITROËN dealer .
Cruise control on. cruise control selected. Manual selection. Chapter 1, "Gearbox and
steering wheel" section.
Speed limiter on. speed limiter selected. Manual selection. Chapter 1, "Gearbox and
steering wheel" section.
Page 43 of 140
37
1
READY TO SET OFF
Steering wheel controls
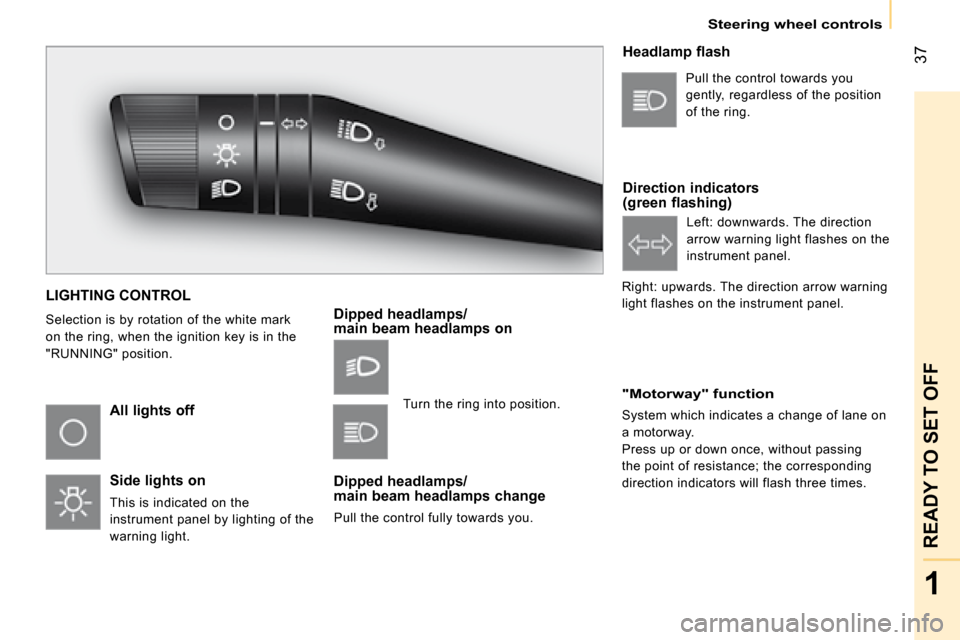
LIGHTING CONTROL
Selection is by rotation of the white mark
on the ring, when the ignition key is in the
"RUNNING" position.
All lights off
Side lights on
This is indicated on the
instrument panel by lighting of the
warning light.
Dipped headlamps/main beam headlamps on
Dipped headlamps/main beam headlamps change
Pull the control fully towards you.
Headlamp flash
Direction indicators (green flashing)
"Motorway" function
System which indicates a change of lane on
a motorway.
Press up or down once, without passing
the point of resistance; the corresponding
direction indicators will flash three times. Pull the control towards you
gently, regardless of the position
of the ring.
Left: downwards. The direction
arrow warning light flashes on the
instrument panel.
Right: upwards. The direction arrow warning
light flashes on the instrument panel.
Turn the ring into position.
Page 46 of 140
39
1
READY TO SET OFF
Steering wheel controls
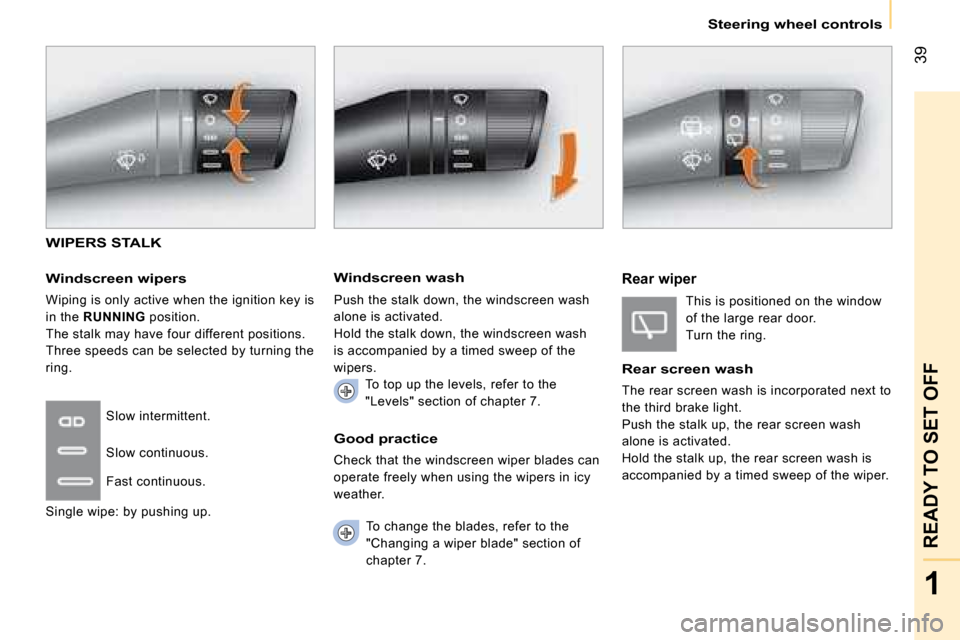
WIPERS STALK
Windscreen wipers
Wiping is only active when the ignition key is
in the RUNNING position.
The stalk may have four different positions.
Three speeds can be selected by turning the
ring.
To change the blades, refer to the
"Changing a wiper blade" section of
chapter 7.
Good practice
Check that the windscreen wiper blades can
operate freely when using the wipers in icy
weather.
Slow intermittent.
Slow continuous.
Fast continuous.
Single wipe: by pushing up.
Windscreen wash
Push the stalk down, the windscreen wash
alone is activated.
Hold the stalk down, the windscreen wash
is accompanied by a timed sweep of the
wipers. To top up the levels, refer to the
"Levels" section of chapter 7.
Rear wiper
This is positioned on the window
of the large rear door.
Turn the ring.
Rear screen wash
The rear screen wash is incorporated next to
the third brake light.
Push the stalk up, the rear screen wash
alone is activated.
Hold the stalk up, the rear screen wash is
accompanied by a timed sweep of the wiper.
Page 49 of 140
Gearbox and steering wheel
Good practice
To change gear easily, always press the
clutch pedal down fully.
To prevent the mat from becoming caught
under the pedal:
- ensure that the mat is positioned correctly,
- never fit one mat on top of another.
Avoid leaving your hand on the gear knob as
the force exerted, even if slight, may wear
the internal components of the gearbox over
time.
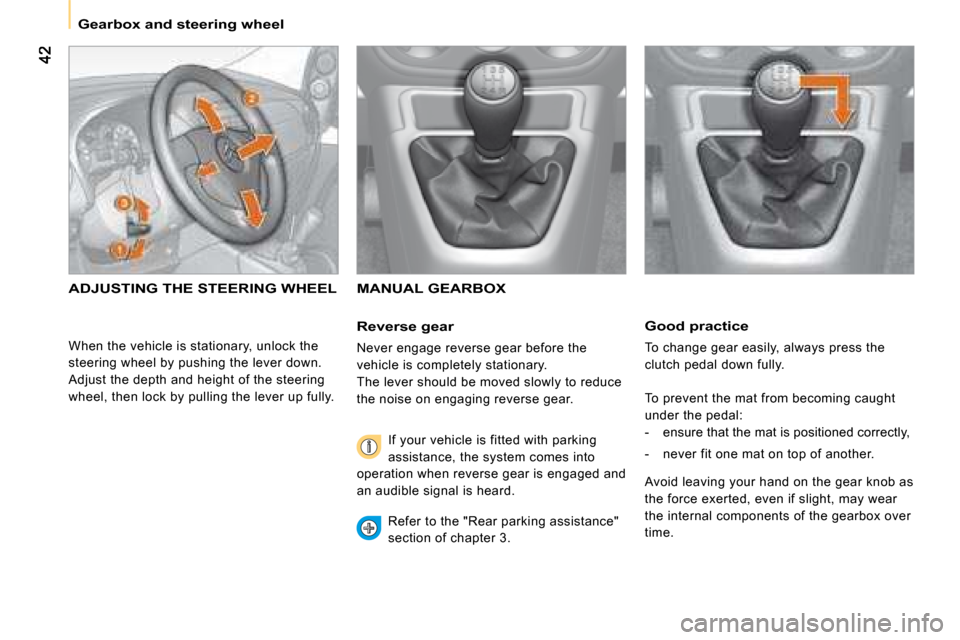
ADJUSTING THE STEERING WHEEL MANUAL GEARBOX
Reverse gear
Never engage reverse gear before the
vehicle is completely stationary.
The lever should be moved slowly to reduce
the noise on engaging reverse gear.
If your vehicle is fitted with parking
assistance, the system comes into
operation when reverse gear is engaged and
an audible signal is heard.
Refer to the "Rear parking assistance"
section of chapter 3.
When the vehicle is stationary, unlock the
steering wheel by pushing the lever down.
Adjust the depth and height of the steering
wheel, then lock by pulling the lever up fully.
Page 50 of 140
43
1
READY TO SET OFF
Gearbox and steering wheel
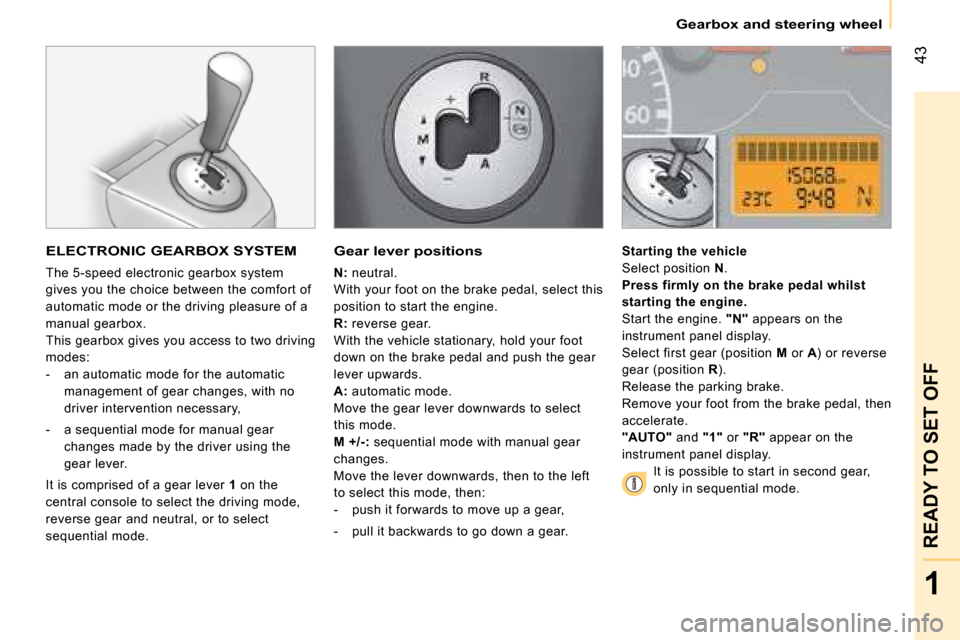
ELECTRONIC GEARBOX SYSTEM
The 5-speed electronic gearbox system
gives you the choice between the comfort of
automatic mode or the driving pleasure of a
manual gearbox.
This gearbox gives you access to two driving
modes:
- an automatic mode for the automatic
management of gear changes, with no
driver intervention necessary,
- a sequential mode for manual gear
changes made by the driver using the
gear lever.
It is comprised of a gear lever 1 on the
central console to select the driving mode,
reverse gear and neutral, or to select
sequential mode.
Gear lever positions
N : neutral.
With your foot on the brake pedal, select this
position to start the engine.
R : reverse gear.
With the vehicle stationary, hold your foot
down on the brake pedal and push the gear
lever upwards.
A : automatic mode.
Move the gear lever downwards to select
this mode.
M +/-: sequential mode with manual gear
changes.
Move the lever downwards, then to the left
to select this mode, then:
- push it forwards to move up a gear,
- pull it backwards to go down a gear.
Starting the vehicle
Select position N .
Press firmly on the brake pedal whilst
starting the engine.
Start the engine. "N" appears on the
instrument panel display.
Select first gear (position M or A) or reverse
gear (position R).
Release the parking brake.
Remove your foot from the brake pedal, then
accelerate.
"AUTO" and "1" or "R" appear on the
instrument panel display.
It is possible to start in second gear,
only in sequential mode.
Page 51 of 140

44
Gearbox and steering wheel
Stopping - Starting on a gradient
This is an electronic gearbox system without
a clutch pedal.
To immobilise the vehicle on a gradient,
you must use the parking brake and not
the accelerator.
When starting on a gradient, accelerate
gradually while releasing the parking brake.
Changing to sequential mode
Once you have started the engine, you
can go into sequential mode by selecting
position M.
Changing to automatic mode
When in sequential mode, you can return to
automatic mode by selecting position A.
Stopping the vehicle
Before switching off the engine, you can:
- select position N to engage neutral.
- leave a gear engaged, such as first or
reverse gear.
In either case, you must engage the parking
brake to immobilise the vehicle.
Reinitialising
Following a battery disconnection, you must
reinitialise the gearbox:
- switch on the ignition, "AUTO" appears
on the instrument panel display,
- press on the brake pedal,
- wait for about 30 seconds until "N" or
a gear appears on the instrument panel
display,
- release the brake pedal.
The gearbox is now operational again.
Operating anomaly
"AUTO" is displayed and the
gear selected appears on the
instrument panel display.
The gearbox operates in automatic mode,
without the need for driver intervention.
It always selects the gear best suited to the
following parameters:
- driving style,
- road profile,
- vehicle load.
To maximise driving comfort and obtain the
most suitable gear, avoid making rough
movements on the accelerator pedal.
If you press the accelerator beyond the point
of resistance, the gearbox selects the next
gear down to allow for faster acceleration.
"AUTO" disappears and
the gears selected appear
successively on the instrument
panel display.
Gear change requests are only possible if
the engine speed allows them.
Gently lift your foot from the accelerator
pedal to select the gear.
When driving at low speed (e.g. approaching
a stop sign or at traffic lights), the gearbox
automatically changes down to first gear.
With the ignition switched on, the �fl� �a�s�h�i�n�g� �o�f� "AUTO" and the lighting of this warning lamp, accompanied by a sound signal and a message on the instrument panel display, indicate a gearbox malfunction.Have the system checked by your CITROËN dealer.You must always press the brake pedal
down when starting the engine.
When the vehicle is moving, never select
neutral N.
Only select reverse gear R with the vehicle
stationary and your foot on the brake pedal.
In all cases, you must engage the parking
brake to immobilise the vehicle.
When on a steep gradient, you are advised
to use sequential mode.
Page 92 of 140
86
Driving safety
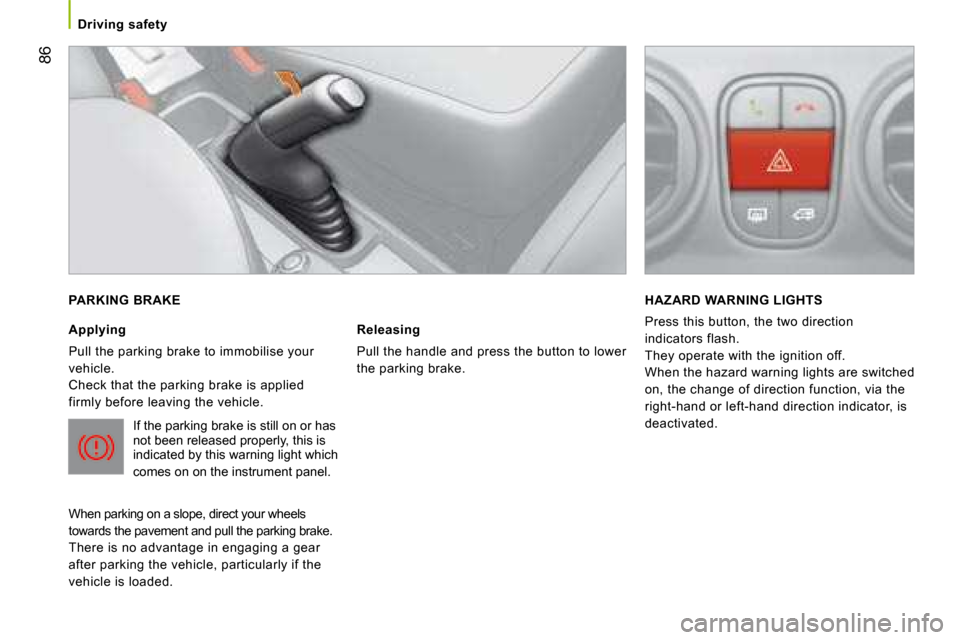
PARKING BRAKE
Applying
Pull the parking brake to immobilise your
vehicle.
Check that the parking brake is applied
firmly before leaving the vehicle. If the parking brake is still on or has
not been released properly, this is
indicated by this warning light which
comes on on the instrument panel.
When parking on a slope, direct your wheels
towards the pavement and pull the parking brake.
There is no advantage in engaging a gear
after parking the vehicle, particularly if the
vehicle is loaded.
Releasing
Pull the handle and press the button to lower
the parking brake.
HAZARD WARNING LIGHTS
Press this button, the two direction
indicators flash.
They operate with the ignition off.
When the hazard warning lights are switched
on, the change of direction function, via the
right-hand or left-hand direction indicator, is
deactivated.
Page 117 of 140
107
7
TROUBLESHOOTING
Changing a wheel
CHANGING A WHEEL
PARKING THE VEHICLE
As far as possible, park the vehicle on level,
stable and non-slippery ground.
Apply the handbrake, switch off the ignition
and engage first gear (on a hill).
If possible, place a chock under the
wheel diagonally opposite the wheel to be
changed.
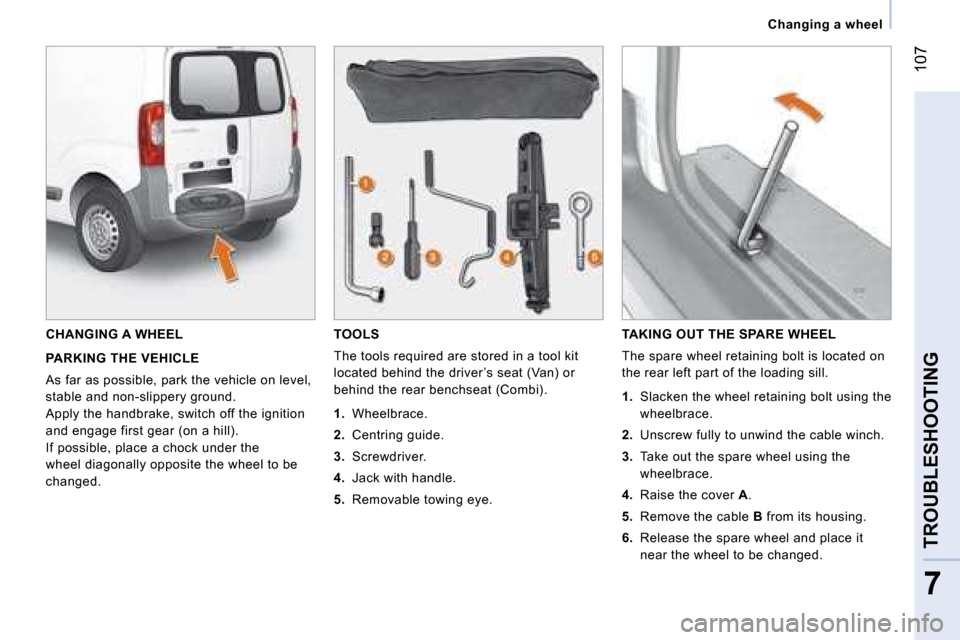
TOOLS
The tools required are stored in a tool kit
located behind the driver ’s seat (Van) or
behind the rear benchseat (Combi).
1. Wheelbrace.
2. Centring guide.
3. Screwdriver.
4. Jack with handle.
5. Removable towing eye.
TAKING OUT THE SPARE WHEEL
The spare wheel retaining bolt is located on
the rear left part of the loading sill.
1. Slacken the wheel retaining bolt using the
wheelbrace.
2.
Unscrew fully to unwind the cable winch.
3. Take out the spare wheel using the
wheelbrace.
4. Raise the cover A .
5. Remove the cable B from its housing.
6. Release the spare wheel and place it
near the wheel to be changed.
Page 118 of 140
108
Changing a wheel
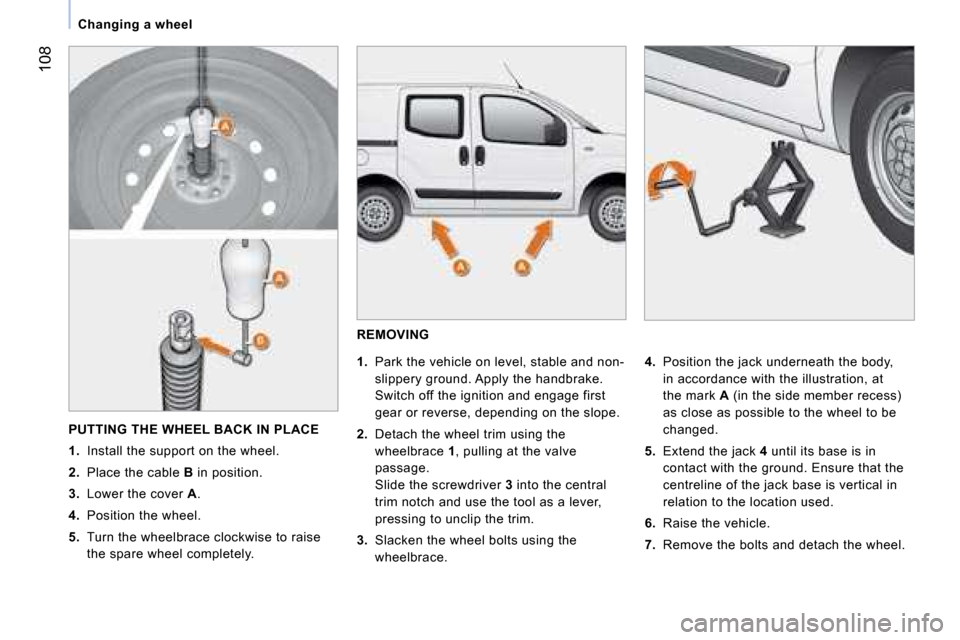
REMOVING
1. Park the vehicle on level, stable and non-
slippery ground. Apply the handbrake.
Switch off the ignition and engage first
gear or reverse, depending on the slope.
2.
Detach the wheel trim using the
wheelbrace 1, pulling at the valve
passage.
Slide the screwdriver 3 into the central
trim notch and use the tool as a lever,
pressing to unclip the trim.
3. Slacken the wheel bolts using the
wheelbrace.
4. Position the jack underneath the body,
in accordance with the illustration, at
the mark A (in the side member recess)
as close as possible to the wheel to be
changed.
5. Extend the jack 4 until its base is in
contact with the ground. Ensure that the
centreline of the jack base is vertical in
relation to the location used.
6. Raise the vehicle.
7. Remove the bolts and detach the wheel.
PUTTING THE WHEEL BACK IN PLACE
1. Install the support on the wheel.
2. Place the cable B in position.
3. Lower the cover A .
4. Position the wheel.
5. Turn the wheelbrace clockwise to raise
the spare wheel completely.