headlamp Citroen NEMO DAG 2008.5 1.G Owner's Manual
[x] Cancel search | Manufacturer: CITROEN, Model Year: 2008.5, Model line: NEMO DAG, Model: Citroen NEMO DAG 2008.5 1.GPages: 140, PDF Size: 2.17 MB
Page 16 of 140
19
1
READY TO SET OFF
Instruments and controls
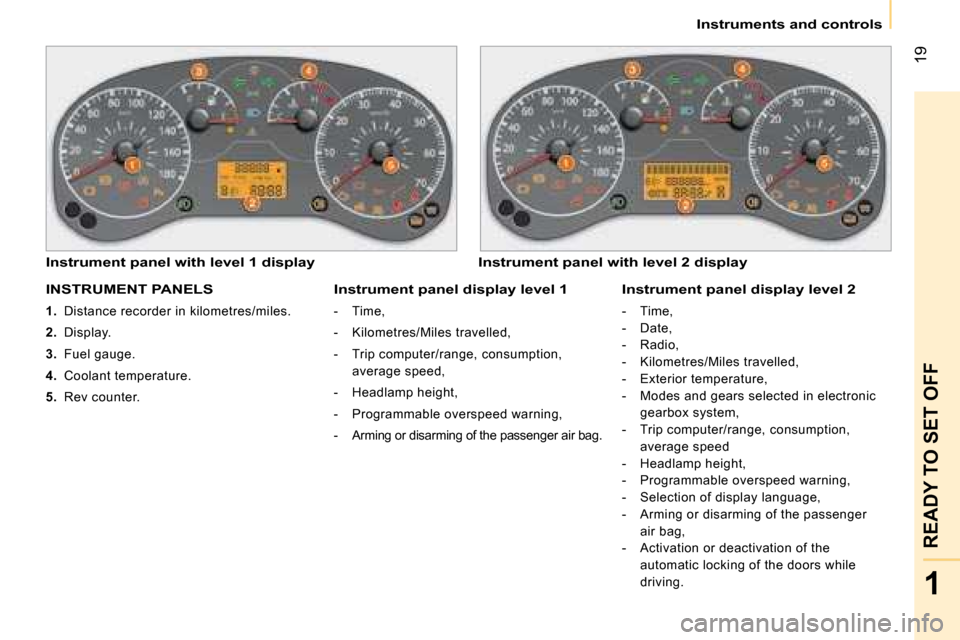
INSTRUMENT PANELS
1. Distance recorder in kilometres/miles.
2. Display.
3. Fuel gauge.
4. Coolant temperature.
5. Rev counter.
Instrument panel with level 1 display Instrument panel with level 2 display
Instrument panel display level 1
- Time,
- Kilometres/Miles travelled,
- Trip computer/range, consumption,
average speed,
- Headlamp height,
- Programmable overspeed warning,
- Arming or disarming of the passenger air bag.
Instrument panel display level 2
- Time,
- Date,
- Radio,
- Kilometres/Miles travelled,
- Exterior temperature,
-
Modes and gears selected in electronic
gearbox system,
- Trip computer/range, consumption,
average speed
- Headlamp height,
- Programmable overspeed warning,
-
Selection of display language,
- Arming or disarming of the passenger air bag,
- Activation or deactivation of the automatic locking of the doors while
driving.
Page 17 of 140
20
Instruments and controls
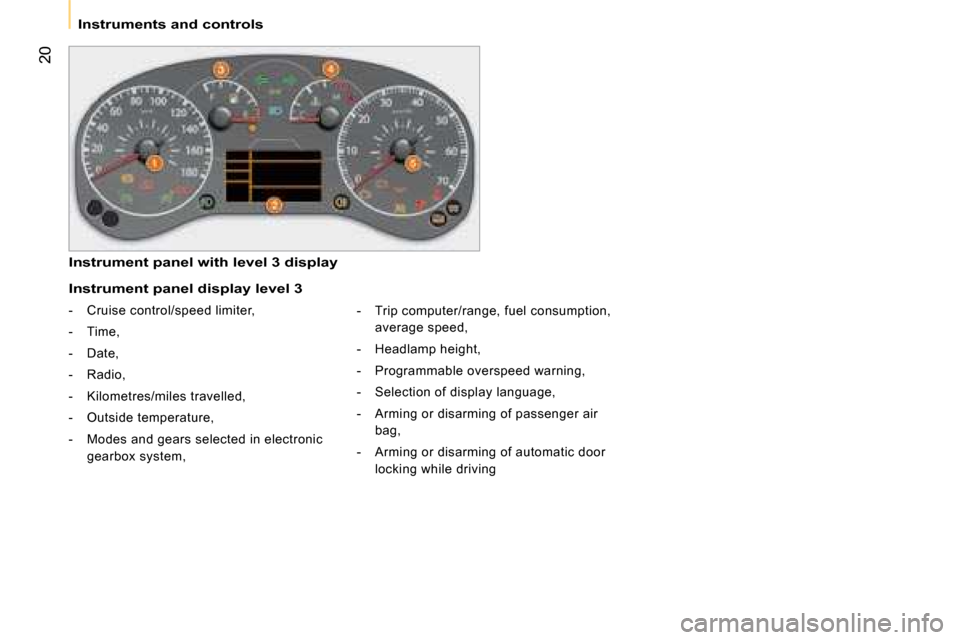
Instrument panel with level 3 display
Instrument panel display level 3
- Cruise control/speed limiter,
- Time,
- Date,
- Radio,
- Kilometres/miles travelled,
- Outside temperature,
- Modes and gears selected in electronic gearbox system, - Trip computer/range, fuel consumption,
average speed,
- Headlamp height,
- Programmable overspeed warning,
- Selection of display language,
- Arming or disarming of passenger air bag,
- Arming or disarming of automatic door locking while driving
Page 21 of 140
24
Instruments and controls
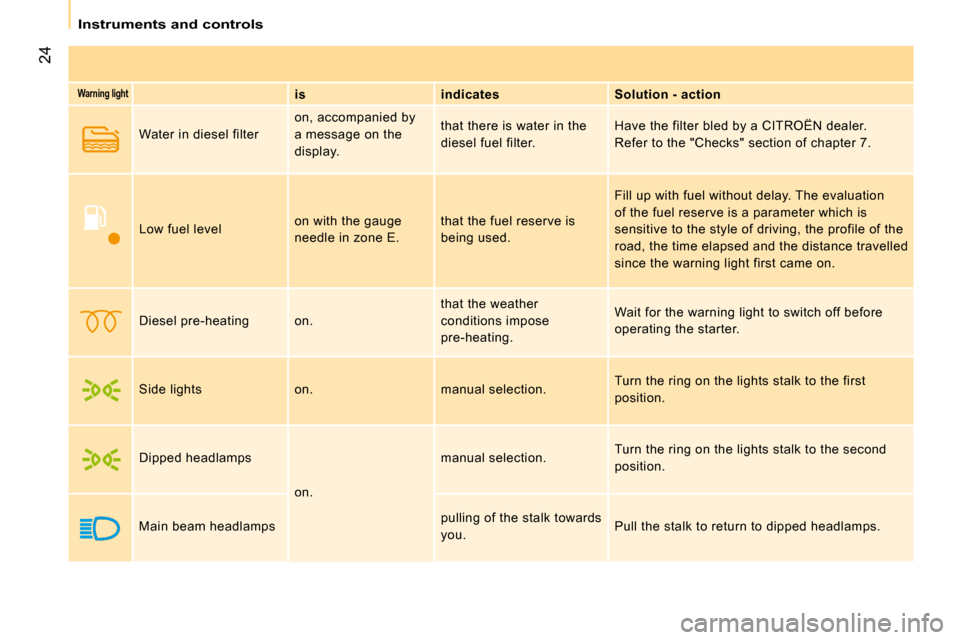
Warning light is
indicates Solution - action
Water in diesel filter on, accompanied by
a message on the
display. that there is water in the
diesel fuel filter.
Have the filter bled by a CITROËN dealer .
Refer to the "Checks" section of chapter 7.
Low fuel level on with the gauge
needle in zone E. that the fuel reserve is
being used. Fill up with fuel without delay. The evaluation
of the fuel reserve is a parameter which is
sensitive to the style of driving, the profile of t
he
road, the time elapsed and the distance travelled
since the warning light first came on.
Diesel pre-heating on. that the weather
conditions impose
pre-heating. Wait for the warning light to switch off before
operating the starter.
Side lights on. manual selection.
Turn the ring on the lights stalk to the first
position.
Dipped headlamps
on.
manual selection. Turn the ring on the lights stalk to the second
position.
Main beam headlamps pulling of the stalk towards
you. Pull the stalk to return to dipped headlamps.
Page 22 of 140
25
1
READY TO SET OFF
Instruments and controls
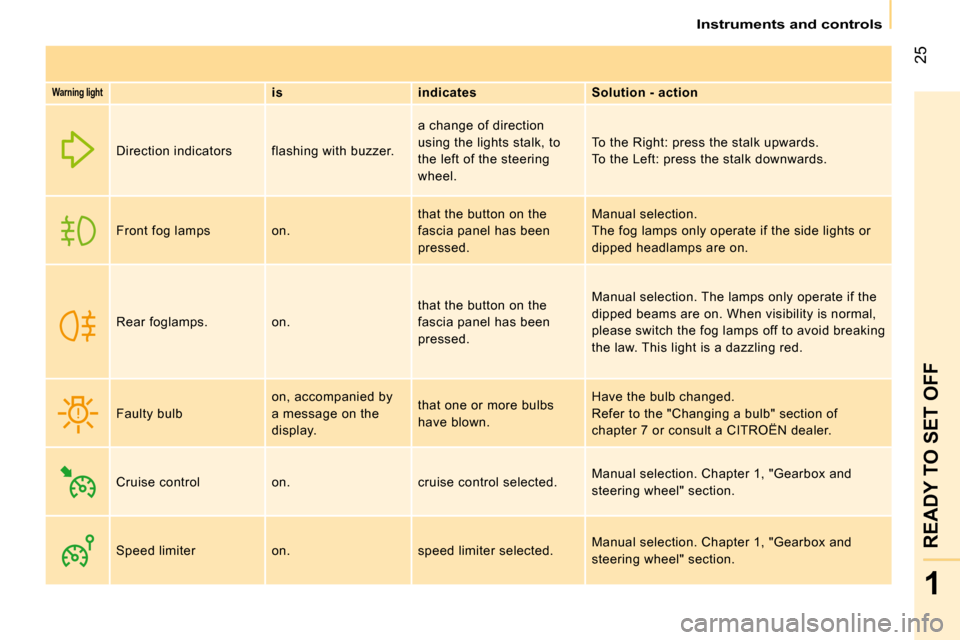
Warning light
is indicates Solution - action
Direction indicators flashing with buzzer. a change of direction
using the lights stalk, to
the left of the steering
wheel. To the Right: press the stalk upwards.
To the Left: press the stalk downwards.
Front fog lamps on. that the button on the
fascia panel has been
pressed. Manual selection.
The fog lamps only operate if the side lights or
dipped headlamps are on.
Rear foglamps. on. that the button on the
fascia panel has been
pressed. Manual selection.
The lamps only operate if the
dipped beams are on. When visibility is normal,
please switch the fog lamps off to avoid breaking
the law. This light is a dazzling red.
Faulty bulb on, accompanied by
a message on the
display. that one or more bulbs
have blown. Have the bulb changed.
Refer to the "Changing a bulb" section of
chapter 7 or consult a CITROËN dealer .
Cruise control on. cruise control selected. Manual selection. Chapter 1, "Gearbox and
steering wheel" section.
Speed limiter on. speed limiter selected. Manual selection. Chapter 1, "Gearbox and
steering wheel" section.
Page 23 of 140
26
Instruments and controls
Warning light
is indicates Solution - action
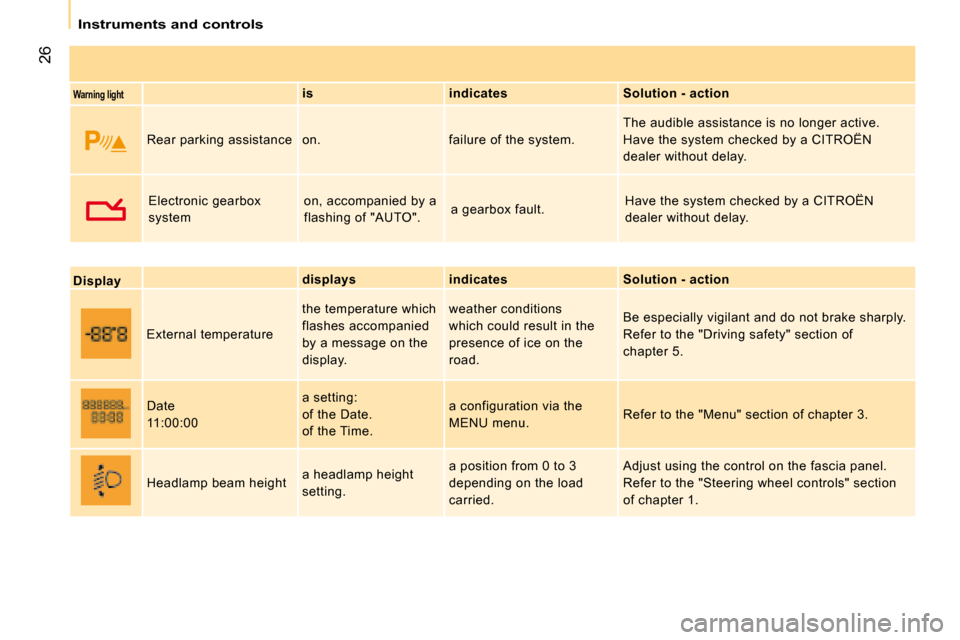
Rear parking assistance on. failure of the syste m. The audible assistance is no longer active.
Have the system checked by a CITROËN
dealer without delay.
Electronic gearbox
system
on, accompanied by a
flashing of "AUTO". a gearbox fault. Have the system checked by a CITROËN
dealer without delay.
Display
displays indicates Solution - action
External temperature the temperature which
flashes accompanied
by a message on the
display. weather conditions
which could result in the
presence of ice on the
road.
Be especially vigilant and do not brake sharply.
Refer to the "Driving safety" section of
chapter 5.
Date
11:00:00 a setting:
of the Date.
of the Time. a configuration via the
MENU menu.
Refer to the "Menu" section of chapter 3.
Headlamp beam height a headlamp height
setting. a position from 0 to 3
depending on the load
carried. Adjust using the control on the fascia panel.
Refer to the "Steering wheel controls" section
of chapter 1.
Page 24 of 140
26
Instruments and controls
Warning light
is indicates Solution - action
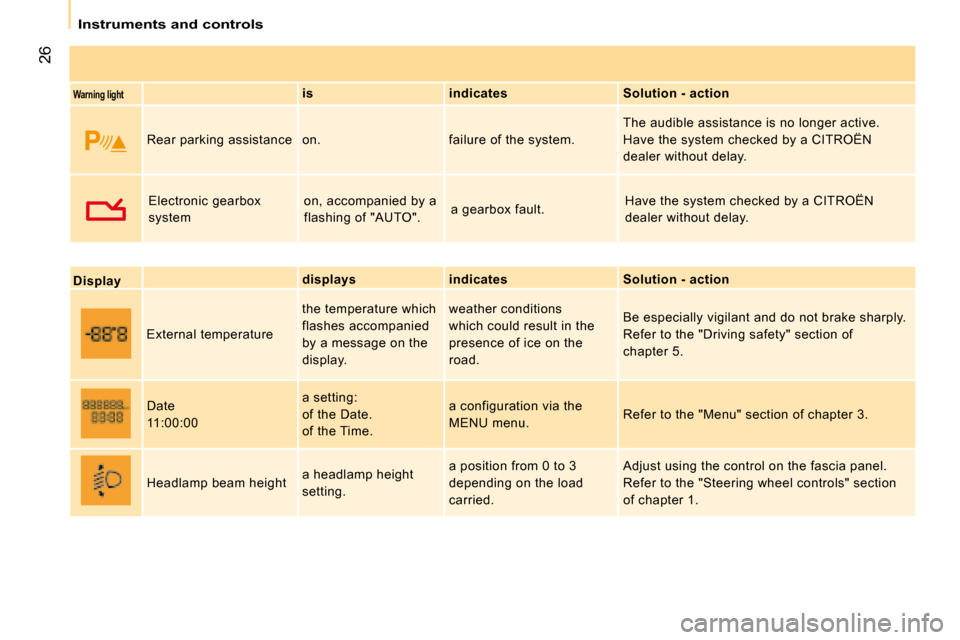
Rear parking assistance on. failure of the syste m. The audible assistance is no longer active.
Have the system checked by a CITROËN
dealer without delay.
Electronic gearbox
system
on, accompanied by a
flashing of "AUTO". a gearbox fault. Have the system checked by a CITROËN
dealer without delay.
Display
displays indicates Solution - action
External temperature the temperature which
flashes accompanied
by a message on the
display. weather conditions
which could result in the
presence of ice on the
road.
Be especially vigilant and do not brake sharply.
Refer to the "Driving safety" section of
chapter 5.
Date
11:00:00 a setting:
of the Date.
of the Time. a configuration via the
MENU menu.
Refer to the "Menu" section of chapter 3.
Headlamp beam height a headlamp height
setting. a position from 0 to 3
depending on the load
carried. Adjust using the control on the fascia panel.
Refer to the "Steering wheel controls" section
of chapter 1.
Page 43 of 140
37
1
READY TO SET OFF
Steering wheel controls
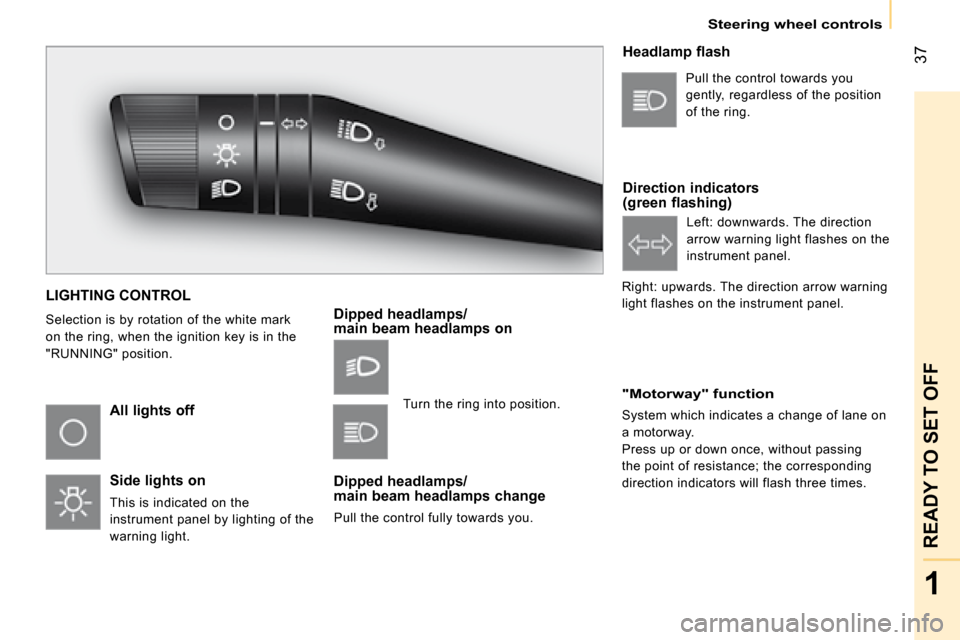
LIGHTING CONTROL
Selection is by rotation of the white mark
on the ring, when the ignition key is in the
"RUNNING" position.
All lights off
Side lights on
This is indicated on the
instrument panel by lighting of the
warning light.
Dipped headlamps/main beam headlamps on
Dipped headlamps/main beam headlamps change
Pull the control fully towards you.
Headlamp flash
Direction indicators (green flashing)
"Motorway" function
System which indicates a change of lane on
a motorway.
Press up or down once, without passing
the point of resistance; the corresponding
direction indicators will flash three times. Pull the control towards you
gently, regardless of the position
of the ring.
Left: downwards. The direction
arrow warning light flashes on the
instrument panel.
Right: upwards. The direction arrow warning
light flashes on the instrument panel.
Turn the ring into position.
Page 44 of 140
38
Steering wheel controls
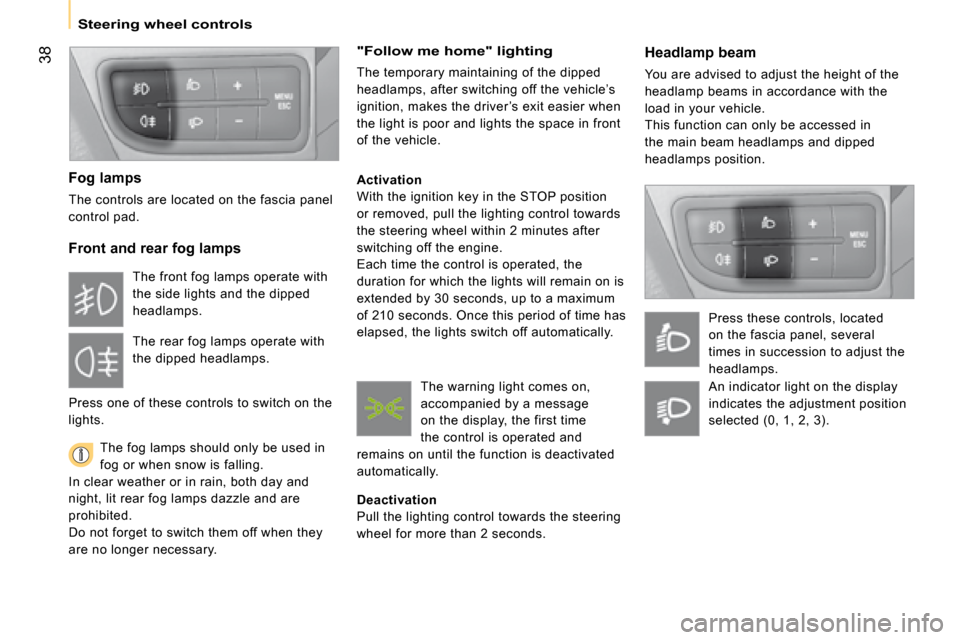
Headlamp beam
You are advised to adjust the height of the
headlamp beams in accordance with the
load in your vehicle.
This function can only be accessed in
the main beam headlamps and dipped
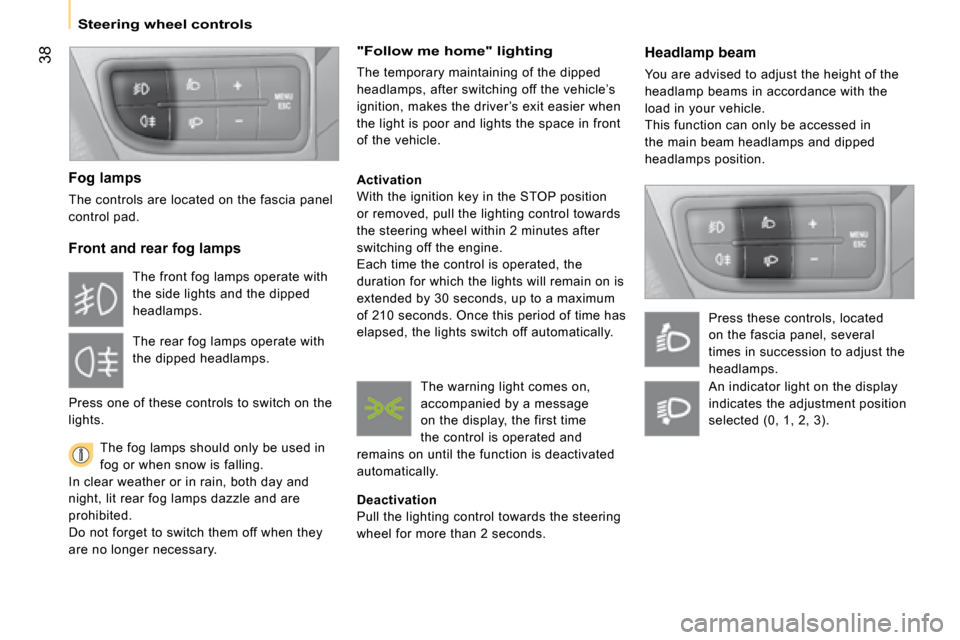
headlamps position. Press these controls, located
on the fascia panel, several
times in succession to adjust the
headlamps.
Fog lamps
The controls are located on the fascia panel
control pad.
Front and rear fog lamps
The fog lamps should only be used in
fog or when snow is falling.
In clear weather or in rain, both day and
night, lit rear fog lamps dazzle and are
prohibited.
Do not forget to switch them off when they
are no longer necessary.
"Follow me home" lighting
The temporary maintaining of the dipped
headlamps, after switching off the vehicle’s
ignition, makes the driver ’s exit easier when
the light is poor and lights the space in front
of the vehicle.
Activation
With the ignition key in the STOP position
or removed, pull the lighting control towards
the steering wheel within 2 minutes after
switching off the engine.
Each time the control is operated, the
duration for which the lights will remain on is
extended by 30 seconds, up to a maximum
of 210 seconds. Once this period of time has
elapsed, the lights switch off automatically.
Deactivation
Pull the lighting control towards the steering
wheel for more than 2 seconds.
The front fog lamps operate with
the side lights and the dipped
headlamps.
The rear fog lamps operate with
the dipped headlamps.
Press one of these controls to switch on the
lights. The warning light comes on,
accompanied by a message
on the display, the first time
the control is operated and
remains on until the function is deactivated
automatically. An indicator light on the display
indicates the adjustment position
selected (0, 1, 2, 3).
Page 45 of 140
38
Steering wheel controls
Headlamp beam
You are advised to adjust the height of the
headlamp beams in accordance with the
load in your vehicle.
This function can only be accessed in
the main beam headlamps and dipped
headlamps position. Press these controls, located
on the fascia panel, several
times in succession to adjust the
headlamps.
Fog lamps
The controls are located on the fascia panel
control pad.
Front and rear fog lamps
The fog lamps should only be used in
fog or when snow is falling.
In clear weather or in rain, both day and
night, lit rear fog lamps dazzle and are
prohibited.
Do not forget to switch them off when they
are no longer necessary.
"Follow me home" lighting
The temporary maintaining of the dipped
headlamps, after switching off the vehicle’s
ignition, makes the driver ’s exit easier when
the light is poor and lights the space in front
of the vehicle.
Activation
With the ignition key in the STOP position
or removed, pull the lighting control towards
the steering wheel within 2 minutes after
switching off the engine.
Each time the control is operated, the
duration for which the lights will remain on is
extended by 30 seconds, up to a maximum
of 210 seconds. Once this period of time has
elapsed, the lights switch off automatically.
Deactivation
Pull the lighting control towards the steering
wheel for more than 2 seconds.
The front fog lamps operate with
the side lights and the dipped
headlamps.
The rear fog lamps operate with
the dipped headlamps.
Press one of these controls to switch on the
lights. The warning light comes on,
accompanied by a message
on the display, the first time
the control is operated and
remains on until the function is deactivated
automatically. An indicator light on the display
indicates the adjustment position
selected (0, 1, 2, 3).
Page 122 of 140
112
Changing a bulb
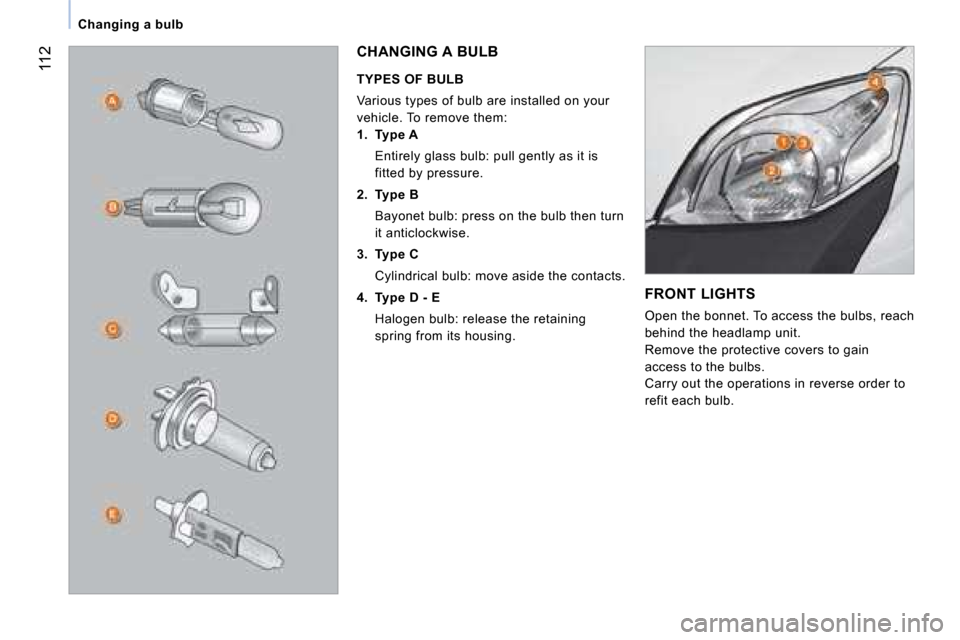
FRONT LIGHTS
Open the bonnet. To access the bulbs, reach
behind the headlamp unit.
Remove the protective covers to gain
access to the bulbs.
Carry out the operations in reverse order to
refit each bulb.
CHANGING A BULB
TYPES OF BULB
Various types of bulb are installed on your
vehicle. To remove them:
1. Type A
Entirely glass bulb: pull gently as it is fitted by pressure.
2. Type B
Bayonet bulb: press on the bulb then turn it anticlockwise.
3. Type C
Cylindrical bulb: move aside the contacts.
4. Type D - E
Halogen bulb: release the retaining spring from its housing.