display CITROEN RELAY 2015 Handbook (in English)
[x] Cancel search | Manufacturer: CITROEN, Model Year: 2015, Model line: RELAY, Model: CITROEN RELAY 2015Pages: 248, PDF Size: 8.86 MB
Page 225 of 248
05
10.59
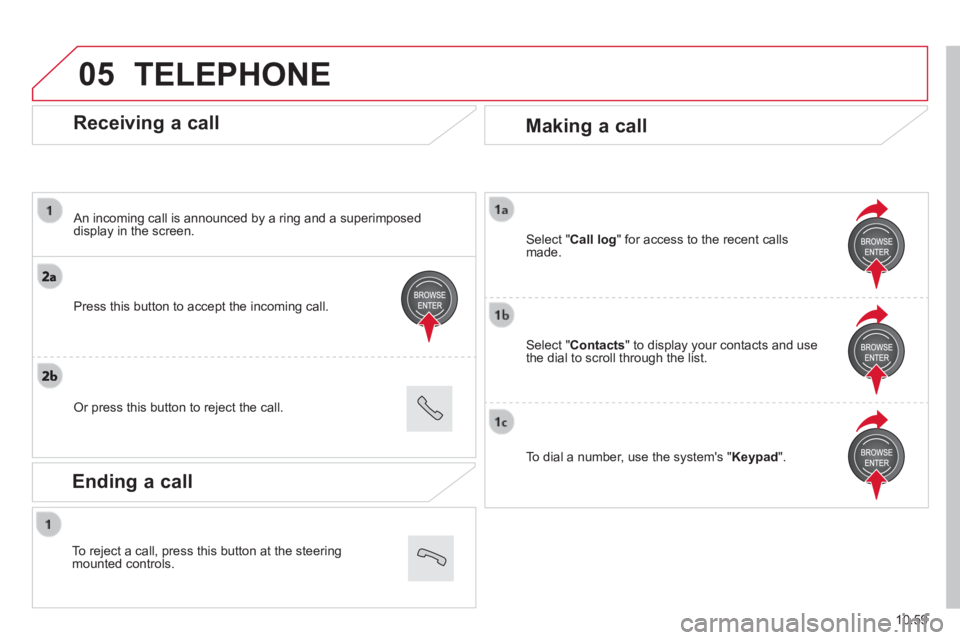
Receiving a call
An incoming call is announced by a ring and a superimposed display in the screen.
Press this button to accept the incoming call.
Or press this button to reject the call.
Making a call
Select " Contacts " to display your contacts and use the dial to scroll through the list.
Select " Call log " for access to the recent calls made.
To dial a number, use the system's " Keypad ".
TELEPHONE
Ending a call
To reject a call, press this button at the steering mounted controls.
Page 226 of 248
06
10.60
SETTINGS
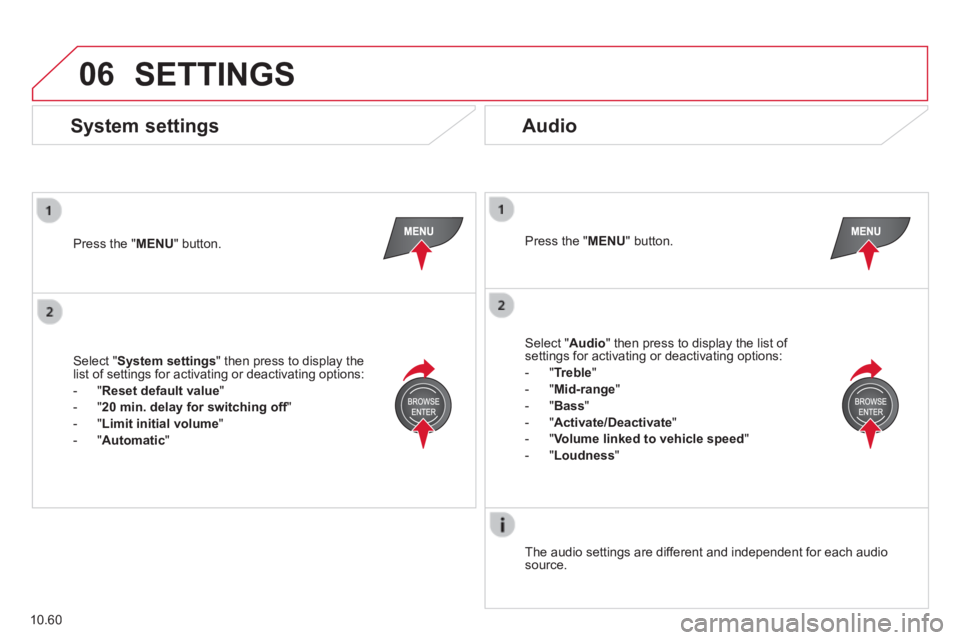
Press the " MENU " button. Press the " MENU " button.
The audio settings are different and independent for each audio source.
System settings Audio
Select " System settings " then press to display the list of settings for activating or deactivating options:
- " Reset default value "
- " 20 min. delay for switching off " 20 min. delay for switching off " 20 min. delay for switching off
- " Limit initial volume "
- " Automatic "
Select " Audio " then press to display the list of settings for activating or deactivating options:
- " Treble "
- " Mid-range "
- " Bass "
- "Activate/Deactivate"
- " Volume linked to vehicle speed "
- " Loudness "
Page 227 of 248
07
10.61
VOICE COMMANDS
Information - Using the system
To ensure that your voice commands are always recognised by the system, we recommend that you follow the advice below:
- speak with a normal tone of voice,
- before speaking, always wait for the "beep" (audible signal),
- the system is able to recognise the voice commands delivered, independent off gender, tone and infl exion of the voice of the person speaking,
- keep the noise level inside the vehicle as low as possible,
- before speaking a voice command, ask other passengers not to speak. As the system recognizes voice commands whatever is said, when more than one person speaks at the same time, it is possible that the system will recognise commands different or additional to the one intended,
- for best operation, it is recommended that the windows and opening roof (for versions/markets where it is available) be closed to avoid interference from extraneous noises.
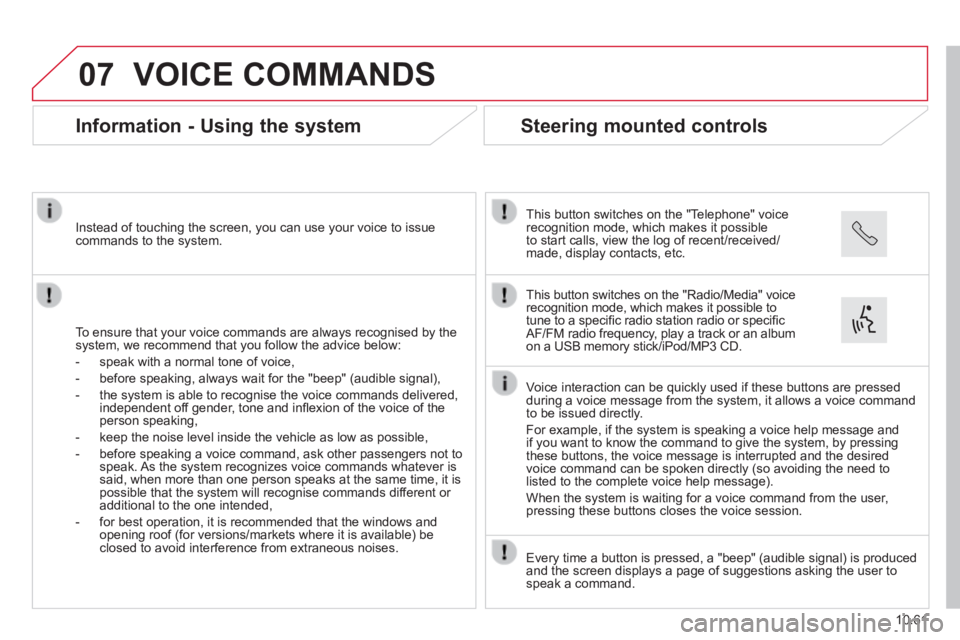
Instead of touching the screen, you can use your voice to issue commands to the system.
Steering mounted controls
This button switches on the "Telephone" voice recognition mode, which makes it possible to start calls, view the log of recent/received/made, display contacts, etc.
Every time a button is pressed, a "beep" (audible signal) is produced \
and the screen displays a page of suggestions asking the user to speak a command.
This button switches on the "Radio/Media" voice recognition mode, which makes it possible to tune to a specifi c radio station radio or specifi c AF/FM radio frequency, play a track or an album on a USB memory stick/iPod/MP3 CD.
Voice interaction can be quickly used if these buttons are pressed during a voice message from the system, it allows a voice command to be issued directly.
For example, if the system is speaking a voice help message and if you want to know the command to give the system, by pressing these buttons, the voice message is interrupted and the desired voice command can be spoken directly (so avoiding the need to listed to the complete voice help message).
When the system is waiting for a voice command from the user, pressing these buttons closes the voice session.
Page 229 of 248
07
10.63
VOICE COMMANDS
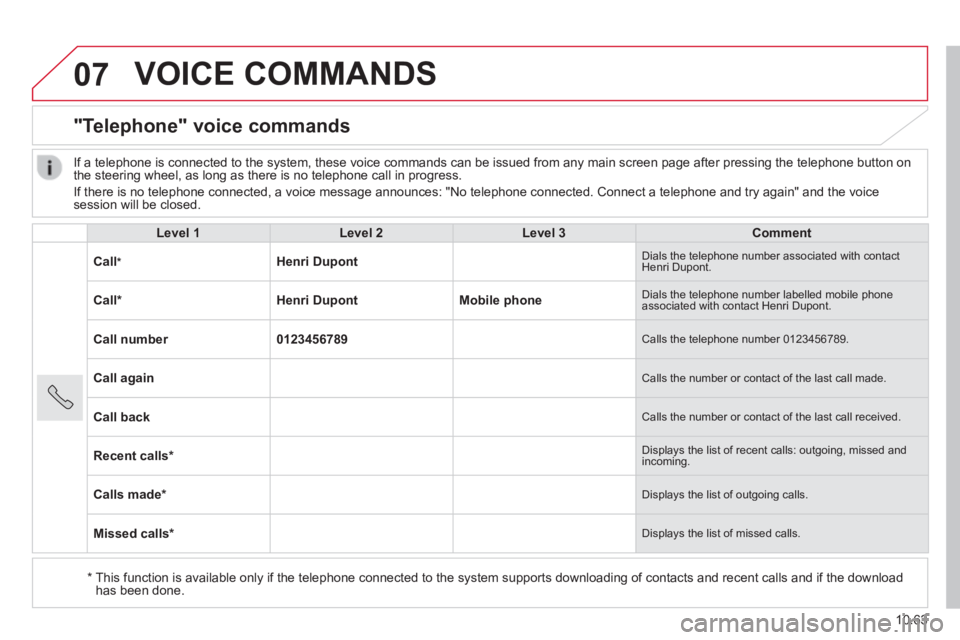
"Telephone" voice commands
Level 1Level 2Level 3Comment
Call * Henri Dupont Dials the telephone number associated with contact Henri Dupont.
Call * Henri DupontMobile phone Dials the telephone number labelled mobile phone associated with contact Henri Dupont.
Call number0123456789 Calls the telephone number 0123456789.
Call again Calls the number or contact of the last call made.
Call back Calls the number or contact of the last call received.
Recent calls * Displays the list of recent calls: outgoing, missed and incoming.
Calls made * Displays the list of outgoing calls.
Missed calls * Displays the list of missed calls.
If a telephone is connected to the system, these voice commands can be i\
ssued from any main screen page after pressing the telephone button on the steering wheel, as long as there is no telephone call in progress.
If there is no telephone connected, a voice message announces: "No telep\
hone connected. Connect a telephone and try again" and the voice session will be closed.
* This function is available only if the telephone connected to the system\
supports downloading of contacts and recent calls and if the download has been done.
Page 230 of 248
07
10.64
VOICE COMMANDS
"Telephone" voice commands
Level 1Level 2Level 3Comment
Incoming calls * Displays the list of incoming calls.
Contacts * Displays the list of contacts in the telephone connected.
Search * Henri Dupont Displays the contact Henri Dupont in the list with all of the numbers saved.
Search * Henri DupontMobile phone Displays the telephone number labeled as mobile phone associated with contact Henri Dupont.
If the telephone allows the "fi rst name" (Henri) and "surname" (Dupont) to be entered in two separate fi elds, issue the following voice commands:
- "Call"; "Henri"; "Dupont" or "Call"; "Dupont"; "Henri".
- "Search"; "Henri"; "Dupont" or "Search"; "Dupont"; "Henri".
* This function is only available if the telephone connected to the system\
supports downloading of contacts and recent calls and if the download h\
as been done.
It is possible to replace the "Mobile phone" label by one of the three o\
ther labels available: "Home"; "Work"; "Other".
Page 232 of 248

07
10.66
VOICE COMMANDS
"Media" voice commands
Level 1Level 2Level 3Comment
Play track " Title 1 " Plays the track "Title 1".
Play album " Album 1 " Plays the songs in album "Album 1".
Play artist " Artist 1 " Plays the songs by "Artist 1".
Play musical genre " Jazz " Plays the songs of the "Jazz" musical genre.
Play playlist " Playlist 1 " Plays the songs in the playlist "Playlist 1".
Play podcast " Radio 1 " Plays the podcast "Podcast 1".
Play audio book " Book 1 " Plays the audio book "Book 1".
Play track number " 5 " Plays track number "5".
Select " USB " Selects the USB media as the active audio source.
Scan " Album " Displays the list of albums available.
These voice commands can be issued from any main screen page after press\
ing the voice recognition button on the steering wheel, as long as there is no telephone call in progress.
Page 233 of 248

07
10.67
VOICE COMMANDS
"Test message" voice commands
Level 1Level 2Level 3Comment
Send a text to0123456789 Starts the voice procedure for sending a pre-defi ned text message using the system. Send a text toHenri DupontMobile phone
Display textHenri DupontMobile phone Display the message box downloaded from the telephone.
These voice commands can be issued from any main screen page after press\
ing the telephone button on the steering wheel, as long as there is no telephone call in progress.
Page 241 of 248

1
3
EASE OF USE and COMFORT
Ventilation
Setting the time of the internal clock
Set the clock on the control panel before
programming the deferred switching on of
the heating. Press and hold the " set " button.
The time setting screen and
indicator come on.
Within ten seconds, press one of the two
setting buttons until the correct time is
displayed: - ">" to increase the time,
or
- "<" reduce the time.
Reading the time
Press the " < " or " > " button.
This time reading indicator comes
on and the time is displayed for
approximately ten seconds.
PROGRAMMABLE ADDITIONAL HEATING
If your vehicle is fitted with separate
programmable heating, it gradually brings
the engine up to a good temperature to
facilitate starting.
An integrated clock permits programming of
its start time. The passenger compartment
will be heated more quickly. Time display
Digital programming control
The programmable heating control panel
is located to the side of the steering wheel
below the
MODE switch panel. Heating cycle indicator
Time setting and reading
indicator
Display of the programme
number selected
Ventilation indicator
Time setting buttons
Programme selection button
Button for immediate switching on
of the heating
Press and hold the button for more rapid
scrolling of the digits.
Release the
"set" button.
When the screen is off, the time is
memorised.
Page 242 of 248

2
Ventilation
Immediate heating
Before switching on the heating, check that:
- the temperature setting control is in the " Hot air " position (red),
- the air flow setting control is in position " 2 ". The " - -:- - " symbol or the
previous stored time and the
number (1, 2 or 3) corresponding
to the recalled pre-selection are
displayed for ten seconds.
Note: if you wish to recall the other pre-
selected times, press the " set " button
repeatedly before the ten seconds have
elapsed.
Press this button.
The screen and the heating cycle
indicator come on and remain
on throughout the duration of
operation.
Deferred heating
Switching on can be programmed between
one minute and twenty-four hours in
advance.
You can store up to three different start
times, but programme one deferred start
only.
Note: if you wish to start the heating at a
fixed time each day, simply reprogramme
the stored time each day.
Press the " set " button, the screen
comes on. Within ten seconds, press the "<
"
or "> " setting button to select the
required start time.
Setting of the stored time is confirmed by
clearing of the start time, displaying of
the pre-selection number (1, 2 or 3) and
illumination of the screen.
By default, pre-selected times are
already memorised in the system
(1 = 6 hours; 2 = 16 hours; 3 = 22 hours).
Any modification cancels and replaces the
previous pre-selected time.
If the battery is disconnected, the default
pre-selected times are restored.
Cancelling the programming
Press the " set " button briefly to
clear the programmed start time.
The screen illumination and the pre-
selection number (1, 2 or 3) go off.
Recalling one of the pre-selected start times
Press the " set " button as many
times as necessary until the
number corresponding to the
required pre-selected start time
(1, 2 or 3) appears.
After ten seconds, the time disappears but
remains stored while the corresponding
number (1, 2 or 3) and the screen remain on.
Page 243 of 248
3
3
EASE OF USE and COMFORT
Ventilation
Have the additional heating checked at
least once a year at the beginning of
winter. Maintenance and repairs should only
be carried out by a CITROËN dealer or a
qualified workshop.
Use only genuine replacement parts.
Switching off the heating
In the case of deferred operation, the
heating stops at the end of the programmed
period.
Good practice
To avoid any risk of poisoning or
asphyxiation, the additional heating must
not be used, even for short periods, in
an enclosed space such as a garage or
workshop which is not fitted with an exhaust
gas extraction system.
The additional heating switches off when the
battery voltage is low, so as to allow engine
starting.
The additional heating is supplied by the
vehicle's fuel tank. Ensure that the low fuel
warning lamp is not on.
Always switch off the additional heating
when filling with fuel to avoid any risk of fire
or explosion. Do not park the vehicle on an inflammable
surface (dry grass, dead leaves, paper…),
there is a risk of fire.
The temperature near the heater must not
exceed 120 °C. A temperature higher than
this (for example in the case of painting in
an oven) could damage the components of
the electronic circuits.
The additional heating is fitted with a
temperature limiter which cuts off the
combustion in the event of overheating due
to a lack of coolant. Check the level and if
necessary top-up following the advice given
in the "Checks - Levels" section. Then press
the programme selection button before
switching the heating on again.
Setting the operating period
The period of operation can be set to
between 10 and 60 minutes.
Press and hold the "set" button.
At the same time press the "<"
or ">" button.
The time and the time setting
indicator come on.
Press and hold the "set" button again.
At the same time press the "<" or ">" button
again.
The programmed operating period is
displayed and the heating or ventilation
cycle indicator flashes.
Adjust the period by pressing the "<" or ">"
button.
The setting is confirmed by the period
disappearing from the screen or by pressing
the "set" button again In the case of immediate
operation, press this button again
to switch off manually.
The heating cycle indicator and the screen
go off.