display CITROEN RELAY 2016 Handbook (in English)
[x] Cancel search | Manufacturer: CITROEN, Model Year: 2016, Model line: RELAY, Model: CITROEN RELAY 2016Pages: 308, PDF Size: 10.98 MB
Page 201 of 308
199
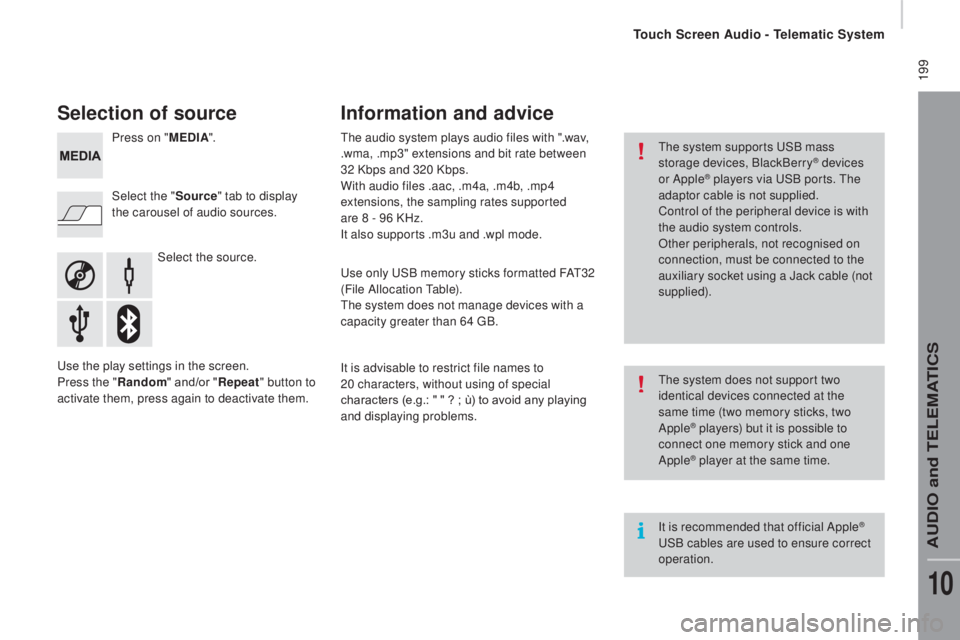
Selection of source
Select the source.
Select the "
Source" tab to display
the carousel of audio sources. Press on " MEd
I
A
".
Use the play settings in the screen.
Press the "
ra
ndom " and/or "
rep
eat" button to
activate them, press again to deactivate them. The audio system plays audio files with ".wav,
.wma, .mp3" extensions and bit rate between
32 Kbps and 320 Kbps.
With audio files .aac, .m4a, .m4b, .mp4
extensions, the sampling rates supported
are 8 - 96 KHz.
It also supports .m3u and .wpl mode.
Use only USB memory sticks formatted FAT32
(File Allocation Table).
The system does not manage devices with a
capacity greater than 64 GB.
It is advisable to restrict file names to
20
characters, without using of special
characters (e.g.: " " ?
; ù) to avoid any playing
and displaying problems.
Information and advice
The system supports USB mass
storage devices, BlackBerry® devices
or Apple® players via USB ports. The
adaptor cable is not supplied.
Control of the peripheral device is with
the audio system controls.
Other peripherals, not recognised on
connection, must be connected to the
auxiliary socket using a Jack cable (not
supplied).
It is recommended that official Apple
®
USB cables are used to ensure correct
operation. The system does not support two
identical devices connected at the
same time (two memory sticks, two
Apple
® players) but it is possible to
c
onnect one memory stick and one
Apple
® player at the same time.
Touch Screen Audio - Telematic System
AUDIO and TELEMATICS
10
Page 202 of 308
200
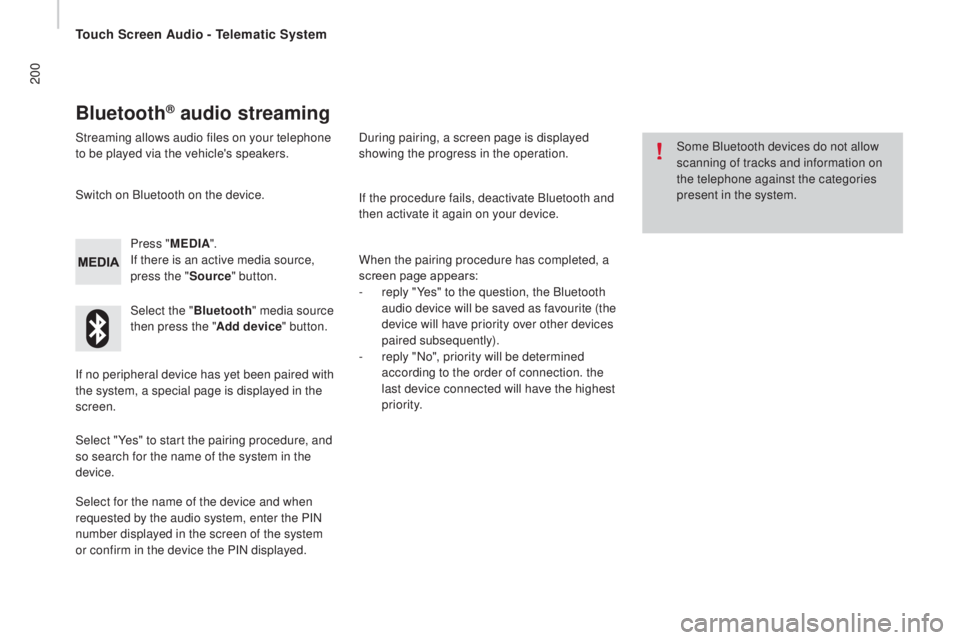
Bluetooth® audio streaming
Streaming allows audio files on your telephone
to be played via the vehicle's speakers.Press "ME
d
I
A".
If there is an active media source,
press the " Source" button.
Select the " Bluetooth" media source
then press the " Add device" button.
Switch on Bluetooth on the device.
Some Bluetooth devices do not allow
scanning of tracks and information on
the telephone against the categories
present in the system.
If the procedure fails, deactivate Bluetooth and
then activate it again on your device.
Select for the name of the device and when
requested by the audio system, enter the PIN
number displayed in the screen of the system
or confirm in the device the PIN displayed. When the pairing procedure has completed, a
screen page appears:
-
r
eply "Yes" to the question, the Bluetooth
audio device will be saved as favourite (the
device will have priority over other devices
paired subsequently).
-
r
eply "No", priority will be determined
according to the order of connection. the
last device connected will have the highest
priority.
During pairing, a screen page is displayed
showing the progress in the operation.
If no peripheral device has yet been paired with
the system, a special page is displayed in the
screen.
Select "Yes" to start the pairing procedure, and
so search for the name of the system in the
device.
Touch Screen Audio - Telematic System
Page 205 of 308
203Level 1Level 2 Level 3co mment
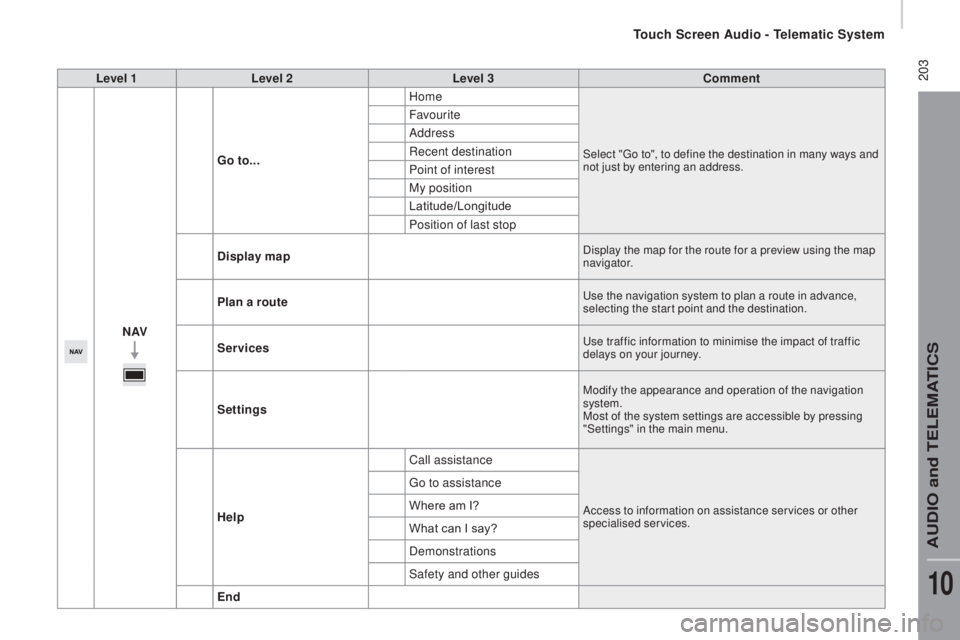
nAVG
o to... Home
Select "Go to", to define the destination in many ways and
not just by entering an address.
Favourite
Address
Recent destination
Point of interest
My position
Latitude/Longitude
Position of last stop
d
isplay map
Display the map for the route for a preview using the map
navigator.
Plan a routeUse the navigation system to plan a route in advance,
selecting the star t point and the destination.
ServicesUse traffic information to minimise the impact of traffic
delays on your journey.
Settings
Modify the appearance and operation of the navigation
system.
Most of the system settings are accessible by pressing
"Settings" in the main menu.
Help Call assistanceAccess to information on assistance ser vices or other
specialised services.
Go to assistance
Where am I?
What can I say?
Demonstrations
Safety and other guides
End
Touch Screen Audio - Telematic System
AUDIO and TELEMATICS
10
Page 207 of 308
205Level 1Level 2 Level 3co mment
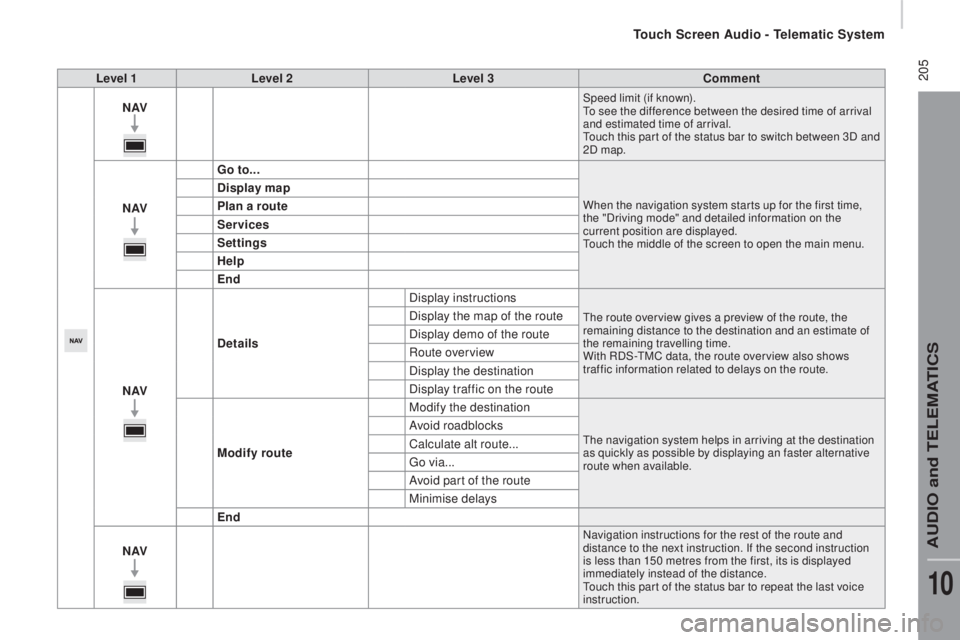
nAVSpeed limit (if known).
To see the difference between the desired time of arrival
and estimated time of arrival.
Touch this par t of the status bar to switch between 3D and
2D map.
nAVG o to...When the navigation system star ts up for the first time,
the "Driving mode" and detailed information on the
current position are displayed.
Touch the middle of the screen to open the main menu.
display map
P lan a route
Services
Settings
Help
End
nAV
de
tails Display instructions
The route over view gives a preview of the route, the
remaining distance to the destination and an estimate of
the remaining travelling time.
With RDS-TMC data, the route over view also shows
traffic information related to delays on the route.Display the map of the route
Display demo of the route
Route overview
Display the destination
Display traffic on the route
Modify route Modify the destination
The navigation system helps in arriving at the destination
as quickly as possible by displaying an faster alternative
route when available.Avoid roadblocks
Calculate alt route...
Go via...
Avoid part of the route
Minimise delays
End
nAV
Navigation instructions for the rest of the route and
distance to the next instruction. If the second instruction
is less than 150 metres from the first, its is displayed
immediately instead of the distance.
Touch this par t of the status bar to repeat the last voice
instruction.
Touch Screen Audio - Telematic System
AUDIO and TELEMATICS
10
Page 209 of 308
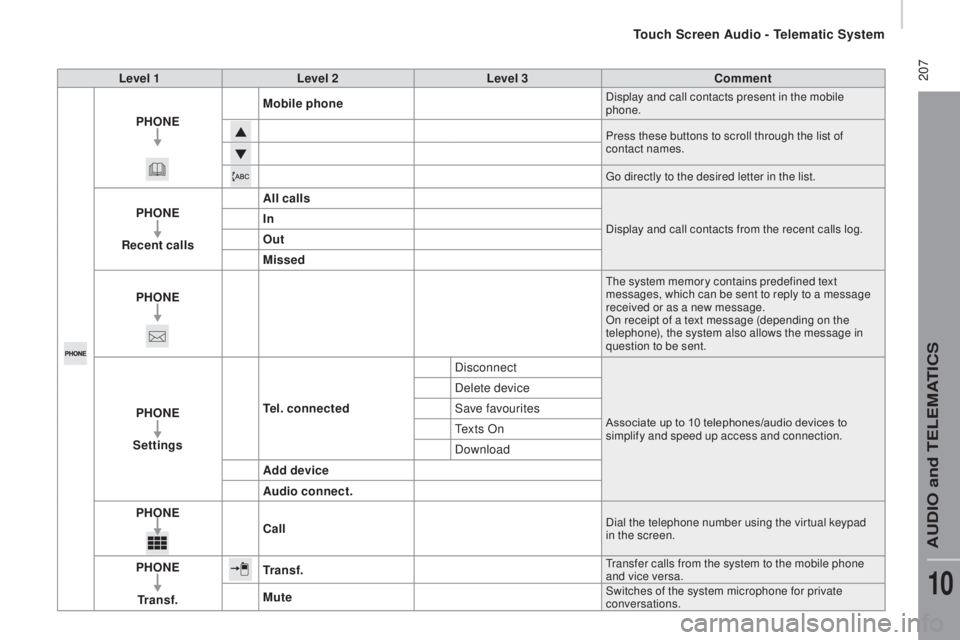
207Level 1Level 2 Level 3co mment
PHO
nE M
obile phone
Display and call contacts present in the mobile
phone.
Press these buttons to scroll through the list of
contact names.
Go directly to the desired letter in the list.
PHOnE
re
cent calls All callsDisplay and call contacts from the recent calls log.In
Out
Missed
PHO
nE
The system memory contains predefined text
messages, which can be sent to reply to a message
received or as a new message.
On receipt of a text message (depending on the
telephone), the system also allows the message in
question to be sent.
PHOnE
S ettingste l. connected DisconnectAssociate up to 10 telephones/audio devices to
simplify and speed up access and connection.
Delete device
Save favourites
Te x t s O n
Download
Add device
Audio connect.
PHO
nEc
all
Dial the telephone number using the vir tual keypad
in the screen.
PHOnE
tr
a n s f .tr a n s f .Transfer calls from the system to the mobile phone
and vice versa.
MuteSwitches of the system microphone for private
conversations.
Touch Screen Audio - Telematic System
AUDIO and TELEMATICS
10
Page 210 of 308
208
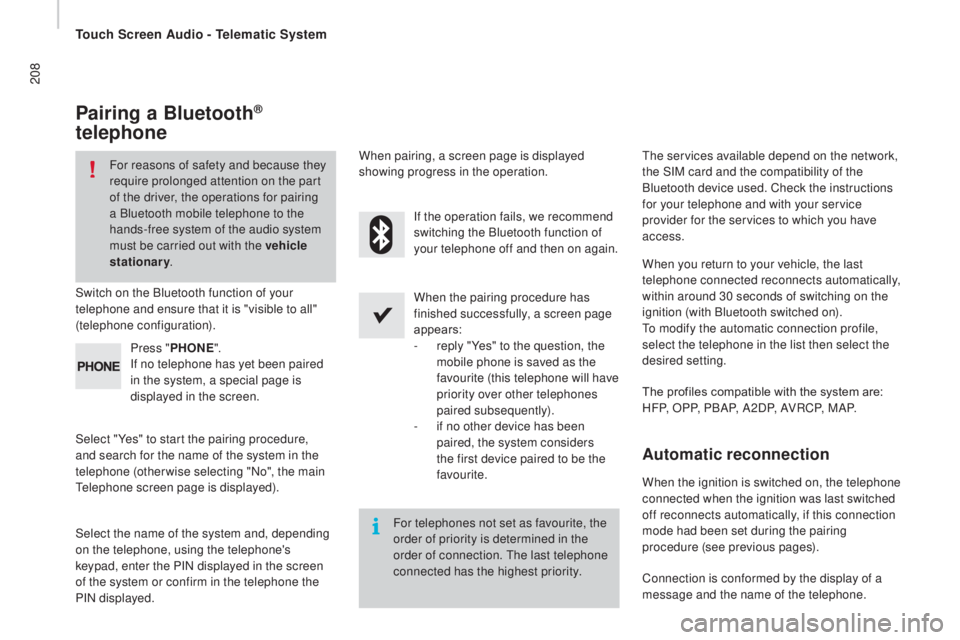
Pairing a Bluetooth®
telephone
For reasons of safety and because they
require prolonged attention on the part
of the driver, the operations for pairing
a Bluetooth mobile telephone to the
hands-free system of the audio system
must be carried out with the vehicle
stationary .
Switch on the Bluetooth function of your
telephone and ensure that it is "visible to all"
(telephone configuration).
Select "Yes" to start the pairing procedure,
and search for the name of the system in the
telephone (otherwise selecting "No", the main
Telephone screen page is displayed). When the pairing procedure has
finished successfully, a screen page
appears:
-
r
eply "Yes" to the question, the
mobile phone is saved as the
favourite (this telephone will have
priority over other telephones
paired subsequently).
-
i
f no other device has been
paired, the system considers
the first device paired to be the
favourite.
When pairing, a screen page is displayed
showing progress in the operation.
The services available depend on the network,
the SIM card and the compatibility of the
Bluetooth device used. Check the instructions
for your telephone and with your service
provider for the services to which you have
access.
Select the name of the system and, depending
on the telephone, using the telephone's
keypad, enter the PIN displayed in the screen
of the system or confirm in the telephone the
PIN displayed. Press "
PHO
nE".
I
f no telephone has yet been paired
in the system, a special page is
displayed in the screen. If the operation fails, we recommend
switching the Bluetooth function of
your telephone off and then on again.
For telephones not set as favourite, the
order of priority is determined in the
order of connection. The last telephone
connected has the highest priority. The profiles compatible with the system are:
H F P, O P P, P B A P, A 2 D P, A V R C P, M A P. When you return to your vehicle, the last
telephone connected reconnects automatically,
within around 30 seconds of switching on the
ignition (with Bluetooth switched on).
To modify the automatic connection profile,
select the telephone in the list then select the
desired setting.
Automatic reconnection
When the ignition is switched on, the telephone
connected when the ignition was last switched
off reconnects automatically, if this connection
mode had been set during the pairing
procedure (see previous pages).
Connection is conformed by the display of a
message and the name of the telephone.
Touch Screen Audio - Telematic System
Page 211 of 308
209
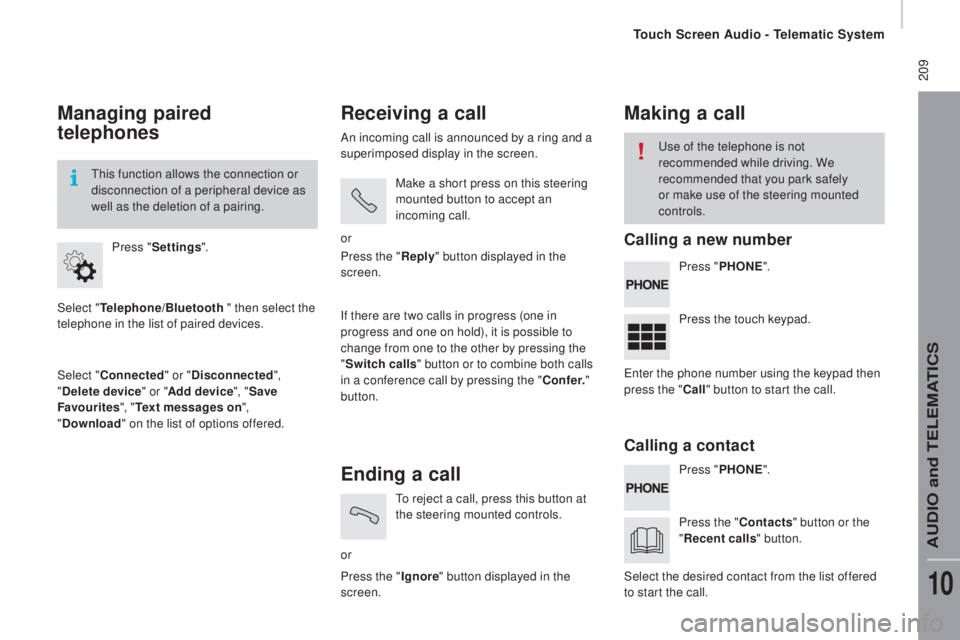
Managing paired
telephones
Select "telephone/Bluetooth " then select the
telephone in the list of paired devices.
Select "
co
nnected" or "
di
sconnected",
"
de
lete device " or "Add device", " Save
Favourites ", "
te
xt messages on ",
"
d
ownload " on the list of options offered.
Press "
Settings ".
This function allows the connection or
disconnection of a peripheral device as
well as the deletion of a pairing.
receiving a call
An incoming call is announced by a ring and a
superimposed display in the screen.
Make a short press on this steering
mounted button to accept an
incoming call.
or
If there are two calls in progress (one in
progress and one on hold), it is possible to
change from one to the other by pressing the
" Switch calls " button or to combine both calls
in a conference call by pressing the "
co
nf e r."
button. Press the "
rep
ly" button displayed in the
screen.
Ending a call
or To reject a call, press this button at
the steering mounted controls.
Press the " Ignore" button displayed in the
screen.
Making a call
Press " PHOnE".
P ress " PHO
nE".
P
ress the touch keypad.
Press the "
c
ontacts" button or the
"
re
cent calls " button.
Use of the telephone is not
recommended while driving. We
recommended that you park safely
or make use of the steering mounted
controls.
Enter the phone number using the keypad then
press the "
c
all " button to start the call.
Select the desired contact from the list offered
to start the call.
calling a new number
ca
lling a contact
Touch Screen Audio - Telematic System
AUDIO and TELEMATICS
10
Page 213 of 308
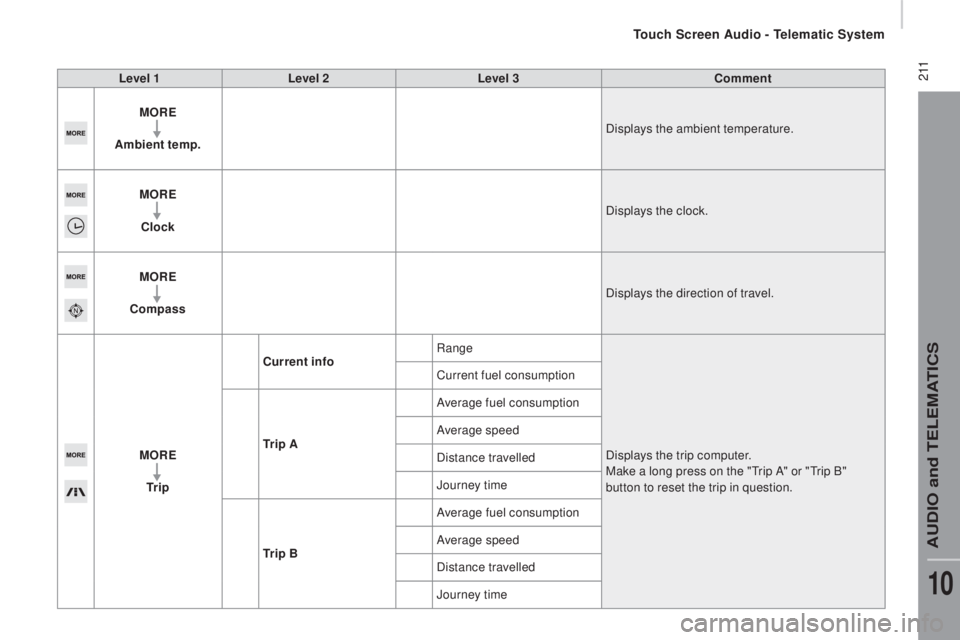
2 11Level 1Level 2 Level 3co mment
MO r
E
A
mbient temp. Displays the ambient temperature.
MO
r
E
c
lock Displays the clock.
MO
r
E
co
mpass Displays the direction of travel.
MO
r
E
tr
i p
cur
rent infoRange
Displays the trip computer.
Make a long press on the "Trip A" or "Trip B"
button to reset the trip in question.
Current fuel consumption
tr
i p A Average fuel consumption
Average speed
Distance travelled
Journey time
tr
i p B Average fuel consumption
Average speed
Distance travelled
Journey time
Touch Screen Audio - Telematic System
AUDIO and TELEMATICS
10
Page 215 of 308
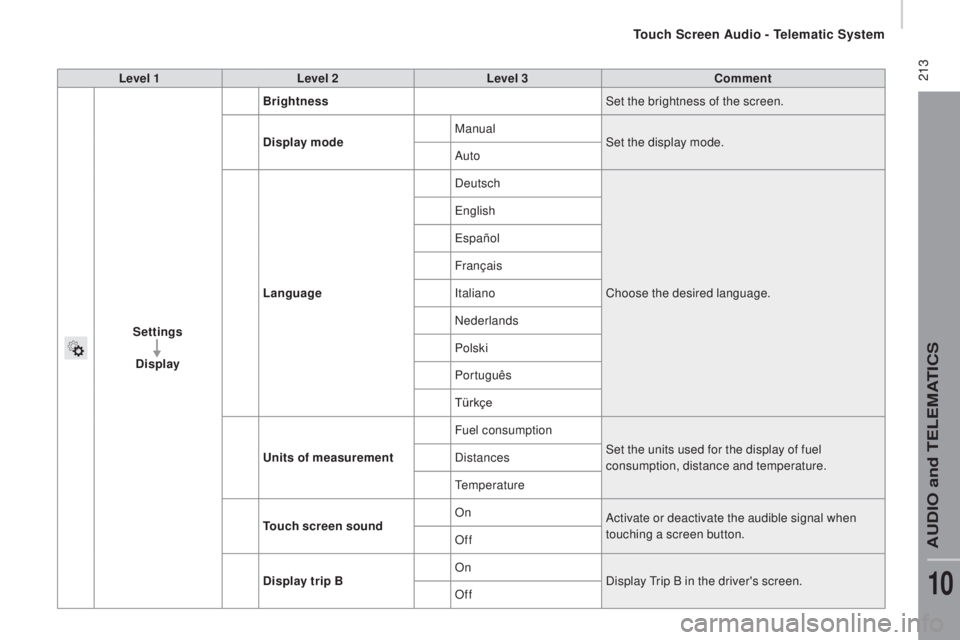
213Level 1Level 2 Level 3co mment
Settings
d
isplay Brightness
Set the brightness of the screen.
d
isplay mode Manual
Set the display mode.
Auto
Language Deutsch
Choose the desired language.
English
Español
Français
Italiano
Nederlands
Polski
Português
Türkçe
un
its of measurement Fuel consumption
Set the units used for the display of fuel
consumption, distance and temperature.
Distances
Temperature
to
uch screen sound On
Activate or deactivate the audible signal when
touching a screen button.
Off
di
splay trip B On
Display Trip B in the driver's screen.
Off
Touch Screen Audio - Telematic System
AUDIO and TELEMATICS
10
Page 217 of 308
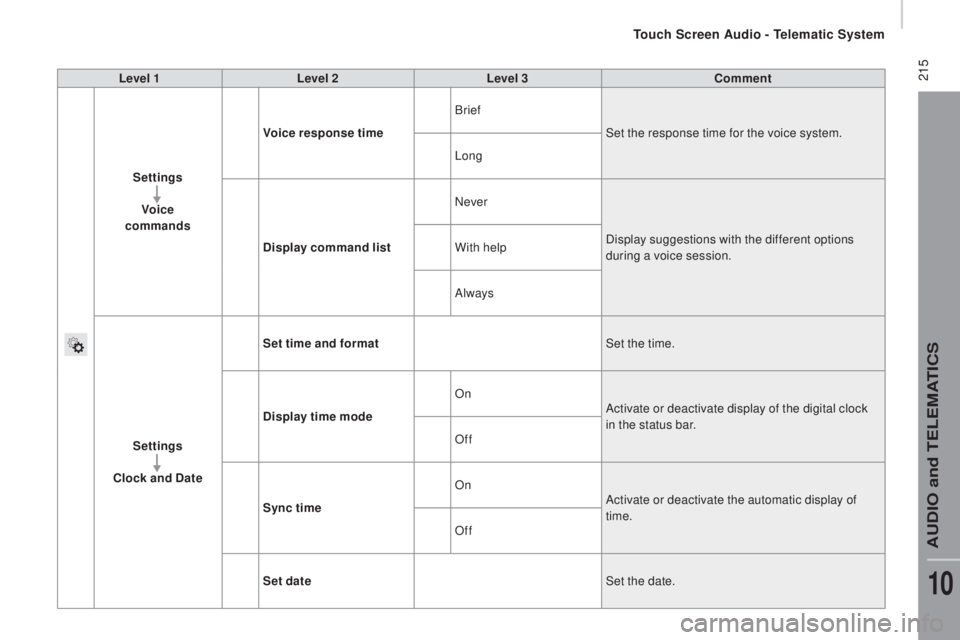
215Level 1Level 2 Level 3co mment
Settings Voice
commands Voice response time
Brief
Set the response time for the voice system.
Long
d
isplay command list Never
Display suggestions with the different options
during a voice session.
With help
Always
Settings
clo
ck and d
at
eSet time and format
Set the time.
d
isplay time mode On
Activate or deactivate display of the digital clock
in the status bar.
Off
Sync time On
Activate or deactivate the automatic display of
time.
Off
Set date Set the date.
Touch Screen Audio - Telematic System
AUDIO and TELEMATICS
10