Service CITROEN RELAY 2017 Handbook (in English)
[x] Cancel search | Manufacturer: CITROEN, Model Year: 2017, Model line: RELAY, Model: CITROEN RELAY 2017Pages: 292, PDF Size: 9.04 MB
Page 146 of 292

144
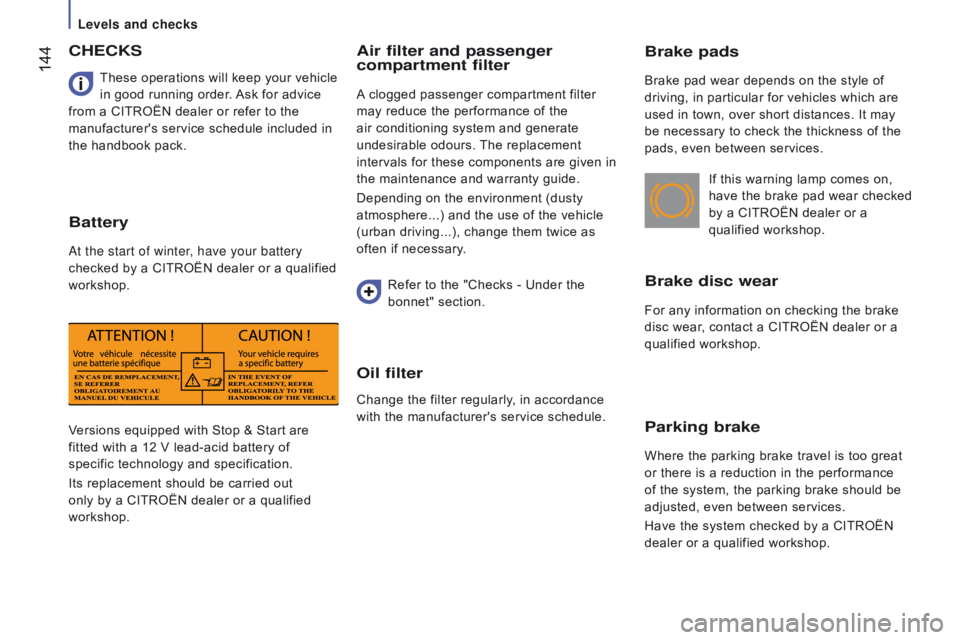
Brake pads
Brake pad wear depends on the style of
driving, in particular for vehicles which are
used in town, over short distances. It may
be necessary to check the thickness of the
pads, even between services.
Brake disc wear
For any information on checking the brake
disc wear, contact a CITROËN dealer or a
qualified workshop.If this warning lamp comes on,
have the brake pad wear checked
by a CITROËN dealer or a
qualified workshop.
Parking brake
Where the parking brake travel is too great
or there is a reduction in the performance
of the system, the parking brake should be
adjusted, even between services.
Have the system checked by a CITROËN
dealer or a qualified workshop.
Versions equipped with Stop & Start are
fitted with a 12 V lead-acid battery of
specific technology and specification.
Its replacement should be carried out
only by a CITROËN dealer or a qualified
workshop. These operations will keep your vehicle
in good running order. Ask for advice
from a CITROËN dealer or refer to the
manufacturer's service schedule included in
the handbook pack.
cHEcKS
Battery
At the start of winter, have your battery
checked by a CITROËN dealer or a qualified
workshop.
Air filter and passenger
compartment filter
A clogged passenger compartment filter
may reduce the performance of the
air conditioning system and generate
undesirable odours. The replacement
intervals for these components are given in
the maintenance and warranty guide.
Depending on the environment (dusty
atmosphere...) and the use of the vehicle
(urban driving...), change them twice as
often if necessary.
Refer to the "Checks - Under the
bonnet" section.
Oil filter
Change the filter regularly, in accordance
with the manufacturer's service schedule.
Levels and checks
Page 179 of 292

177
tOWInG
t
owing the vehicle
The removable towing eye is located in the
tool box under the front passenger seat.
Unclip the cover using a flat tool.
Screw the removable towing eye in fully.
Attach the approved towing arm to to the
removable towing eye.
Place the gear lever in neutral.
towing another vehicle
The fixed towing eye is located on the right
below the bumper.
Attach the approved towing arm to the
fixed
eye.
Failure to observe this requirement
may result in damage to certain braking
components and the lack of some braking
assistance systems when the engine is
re-started.
General recommendations
Observe the legislation in force in your
country.
Ensure that the weight of the towing vehicle
is higher than that of the towed vehicle.
The driver must remain at the wheel of the
towed vehicle and must have a valid driving
licence.
When towing a vehicle with all four wheels
on the ground, always use an approved
towing arm; rope and straps are prohibited.
The towing vehicle must move off gently.
When towing a vehicle with the engine off,
there is no longer any power assistance for
braking or steering.
In the following cases, you must always call
on a professional recovery service:
-
vehicle broken down on a motorway or
fast road,
-
four-wheel drive vehicle,
-
when it is not possible to put the
gearbox into neutral, unlock the
steering, or release the parking brake,
-
towing with only two wheels on the
ground,
-
where there is no approved towing arm
available...
QuIcK HELP
8
Being towed or towing
Page 215 of 292

213
HYdrAuLIc SYStEM
these precautions are mandatory for any work on the hydraulic
system.
●
When carrying out maintenance work under the tipper body
,
place the tipper body in the safety position secured with its stay
(position indicated by a red arrow under the back of the tipper
body),
●
Never work under a tipper body that is not supported,
●
Switch of
f the power supply to the electro-hydraulic unit using
the circuit breaker,
●
V
ehicle stationary, engine off.
As a safety measure we strongly advise against doing anything
under the tipper body while it is being operated or while it is
being serviced.
SPEcIAL FEAturES
10
tipper body
Page 230 of 292

228
If the "DAB" radio station being listened
to is not available, the "AF" alternative
frequency option is crossed out.
DAB (Digital Audio Broadcasting) radio
Select the audio source.Display the name and number of the
multiplex service being used.Alternative frequency.
Adjust audio settings. Select preset radio stations.
Next "Multiplex".
Next radio station.
Display the "DAB" band.
Select a radio station from
"All", "Genres", "Multiplex". Previous "Multiplex".
Previous radio station. Display name and
"Radiotext" for the current
station. Preset station.
Short press: select preset radio station.
Long press: preset a radio station.
Touch Screen Audio - Telematic System
Page 241 of 292

239Level 1Level 2 Level 3co mment
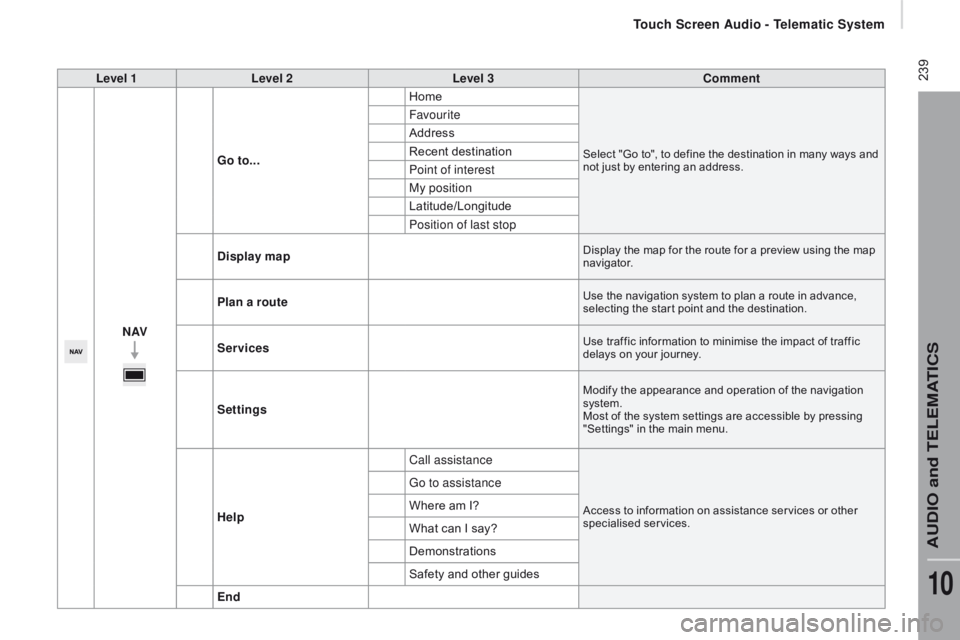
nAVG
o to... Home
Select "Go to", to define the destination in many ways and
not just by entering an address.
Favourite
Address
Recent destination
Point of interest
My position
Latitude/Longitude
Position of last stop
d
isplay map
Display the map for the route for a preview using the map
navigator.
Plan a routeUse the navigation system to plan a route in advance,
selecting the star t point and the destination.
ServicesUse traffic information to minimise the impact of traffic
delays on your journey.
Settings
Modify the appearance and operation of the navigation
system.
Most of the system settings are accessible by pressing
"Settings" in the main menu.
Help Call assistanceAccess to information on assistance ser vices or other
specialised services.
Go to assistance
Where am I?
What can I say?
Demonstrations
Safety and other guides
End
touch Screen Audio - telematic System
AudIO and tELEMAtIcS
10
Page 243 of 292

241Level 1Level 2 Level 3co mment
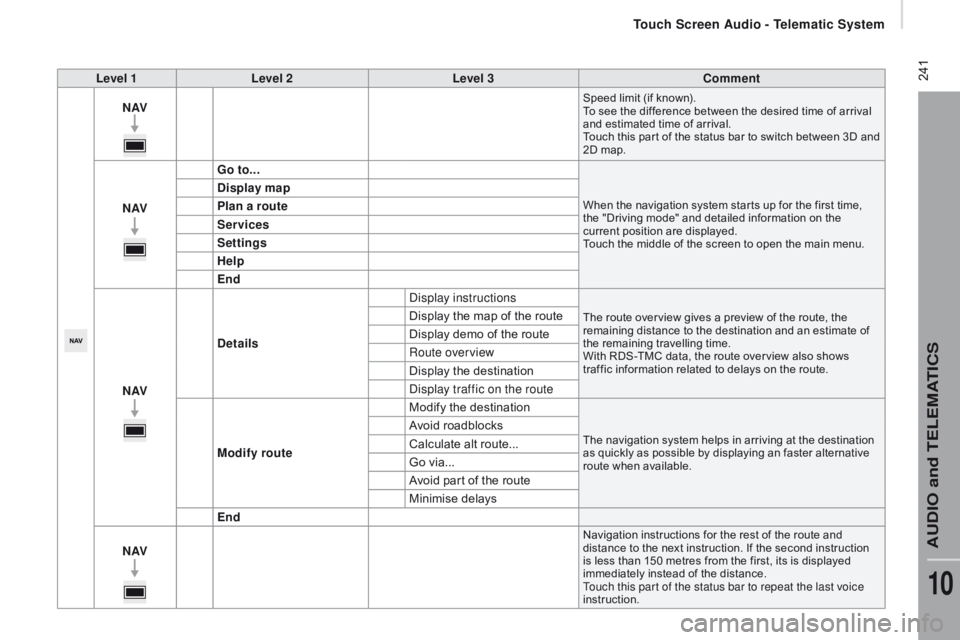
nAVSpeed limit (if known).
To see the difference between the desired time of arrival
and estimated time of arrival.
Touch this par t of the status bar to switch between 3D and
2D map.
nAVG o to...When the navigation system star ts up for the first time,
the "Driving mode" and detailed information on the
current position are displayed.
Touch the middle of the screen to open the main menu.
display map
P lan a route
Services
Settings
Help
End
nAV
de
tails Display instructions
The route over view gives a preview of the route, the
remaining distance to the destination and an estimate of
the remaining travelling time.
With RDS-TMC data, the route over view also shows
traffic information related to delays on the route.Display the map of the route
Display demo of the route
Route overview
Display the destination
Display traffic on the route
Modify route Modify the destination
The navigation system helps in arriving at the destination
as quickly as possible by displaying an faster alternative
route when available.Avoid roadblocks
Calculate alt route...
Go via...
Avoid part of the route
Minimise delays
End
nAV
Navigation instructions for the rest of the route and
distance to the next instruction. If the second instruction
is less than 150 metres from the first, its is displayed
immediately instead of the distance.
Touch this par t of the status bar to repeat the last voice
instruction.
touch Screen Audio - telematic System
AudIO and tELEMAtIcS
10
Page 246 of 292

244
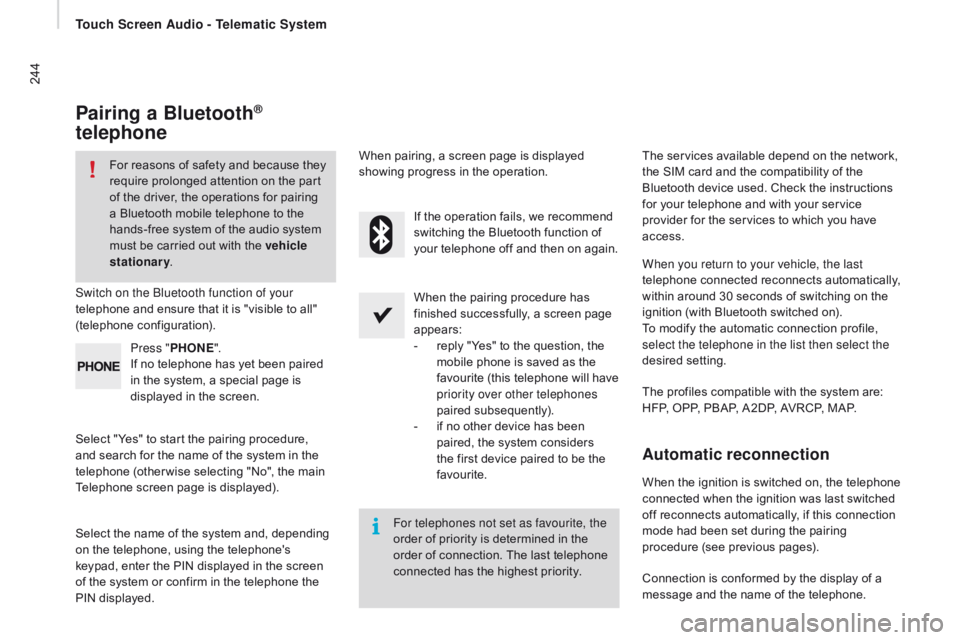
Pairing a Bluetooth®
telephone
For reasons of safety and because they
require prolonged attention on the part
of the driver, the operations for pairing
a Bluetooth mobile telephone to the
hands-free system of the audio system
must be carried out with the vehicle
stationary .
Switch on the Bluetooth function of your
telephone and ensure that it is "visible to all"
(telephone configuration).
Select "Yes" to start the pairing procedure,
and search for the name of the system in the
telephone (other wise selecting "No", the main
Telephone screen page is displayed). When the pairing procedure has
finished successfully, a screen page
appears:
-
r
eply "Yes" to the question, the
mobile phone is saved as the
favourite (this telephone will have
priority over other telephones
paired subsequently).
-
i
f no other device has been
paired, the system considers
the first device paired to be the
favourite.
When pairing, a screen page is displayed
showing progress in the operation.
The services available depend on the network,
the SIM card and the compatibility of the
Bluetooth device used. Check the instructions
for your telephone and with your service
provider for the services to which you have
access.
Select the name of the system and, depending
on the telephone, using the telephone's
keypad, enter the PIN displayed in the screen
of the system or confirm in the telephone the
PIN displayed. Press "
PHO
nE".
I
f no telephone has yet been paired
in the system, a special page is
displayed in the screen. If the operation fails, we recommend
switching the Bluetooth function of
your telephone off and then on again.
For telephones not set as favourite, the
order of priority is determined in the
order of connection. The last telephone
connected has the highest priority. The profiles compatible with the system are:
HFP, OPP, PBAP, A2DP, AVRCP, MAP. When you return to your vehicle, the last
telephone connected reconnects automatically,
within around 30 seconds of switching on the
ignition (with Bluetooth switched on).
To modify the automatic connection profile,
select the telephone in the list then select the
desired setting.
Automatic reconnection
When the ignition is switched on, the telephone
connected when the ignition was last switched
off reconnects automatically, if this connection
mode had been set during the pairing
procedure (see previous pages).
Connection is conformed by the display of a
message and the name of the telephone.
touch Screen Audio - telematic System
Page 264 of 292

262"AM / FM / dAB rad io" voice commands
These voice commands can be issued from any main screen page after pressing the voice recognition button on the steering wheel, as long as
there is no telephone call in progress.
Level 1 Level 2Level 3
co
mment
t
u n e t o 105.5 FMTunes the radio to the frequency 105.5 on the
FM waveband.
t
u n e t o 940 AMTunes the radio to the frequency 940 on the
AM waveband.
t
u n e t o * FIP FMTune the radio to the FIP station.
tu
ne to d
A
B channel**
ra
dio n OVA Tunes the DAB radio to the Radio NOVA channel.
* The name "FIP" can be replaced by any other FM station name received by the radio. Not all radio stations provide this service.
**
T
he name "Radio NOVA" can be replaced by any other DAB channel name received by the radio. Not all DAB channels provide this
service.
touch Screen Audio - telematic System
Page 282 of 292

280"AM /FM radio" voice commands
These voice commands can be issued from any main screen page after pressing the voice recognition button on the steering wheel, as long as
there is no telephone call in progress.Level 1 Level 2Level 3
co
mment
t
u n e t o 105.5 FMTunes the radio the the frequency 105.5 on the
FM
waveband.
t
u n e t o 940 AMTunes the radio the the frequency 940 on the
AM
waveband.
t
u n e t o * FIP FMTunes the radio the the station FIP.
* The name "FIP" can be replaced by any other FM station name received by the radio. Not all radio stations provide this service.
Audio System