clock CITROEN RELAY 2020 Handbook (in English)
[x] Cancel search | Manufacturer: CITROEN, Model Year: 2020, Model line: RELAY, Model: CITROEN RELAY 2020Pages: 196, PDF Size: 34.07 MB
Page 105 of 196

103
Practical information
7If the AdBlue® tank is completely empty
– which is confirmed by the message
"Top up AdBlue: Starting impossible" – it is
essential to add at least 5 litres.
After refilling
► Refit the blue cap to the tank filler and turn it
clockwise as far as it will go (one sixth of a turn).
► Close the fuel filler flap.
Do not dispose of AdBlue® containers in
the household waste.
Place them in a container reserved for this
purpose or take them back to where you
bought them.
Page 106 of 196

104
In the event of a breakdown
Temporary puncture repair kit
This temporary puncture repair kit is stored in a
bag, placed in one of the front doors.
It includes:
– a cartridge A, containing the sealant, equipped
with: • a filling pipe B,
• a sticker C indicating "50 mph (80 km/h)
max.", which the driver must apply within
their field of vision (on the dashboard) after
having repaired the tyre,
– a quick user guide for the repair kit,
– a compressor D equipped with a pressure
gauge and connections,
– adapters, for the inflation of various
components.
Repairing a tyre
► Apply the parking brake.
► Unscrew the cap of the tyre valve, remove
filling hose B and screw ring E onto the valve.
► Make sure compressor switch F is in
position 0 (off).
► Start the engine.
► Insert plug G into the nearest socket on the
vehicle.
► Operate the compressor by setting switch F
to position I (on).
► Inflate the tyre to a pressure of 5 bar.
To obtain a more accurate reading, it is
recommended to check the pressure value on
pressure gauge H, with the compressor off.
► If a pressure of at least 3 bar is not reached
within 5 minutes, disconnect the compressor
from the valve and the power socket, then move
the vehicle forwards by approximately 10 metres,
to disperse the sealant inside the tyre.
► Then repeat the inflation procedure:
• if a pressure of at least 3 bar is not reached
within 10 minutes, stop your vehicle: the tyre
is too damaged and could not be repaired.
Contact a CITROËN dealer or a qualified
workshop.
• if the tyre pressure has reached 5 bar,
restart immediately.
► After driving for approximately 10 minutes,
stop and check the tyre pressure again.
► Restore the correct pressure in accordance
with the label on the driver's side pillar and
contact a CITROËN dealer or a qualified
workshop as soon as possible.
This puncture repair kit and the replacement cartridges are available
from a CITROËN dealer.
Checking and restoring
pressure
The compressor can only be used to check and
restore pressure.
► Disconnect hose I and directly connect it
to the tyre valve; the cartridge will thereby be
connected to the compressor and the sealant will
not be injected.
If the tyre needs to be deflated, connect hose
I to the tyre valve and press the yellow button
located in the centre of the compressor switch.
Replacing the cartridge
To replace the sealant cartridge, proceed as
follows:
► Disconnect the hose I.
► Turn the cartridge to be replaced anti-
clockwise and lift it.
► Insert the new cartridge and turn it clockwise,
► Reconnect the hose I and connect pipe B to
its location.
The cartridge contains ethylene glycol, which is harmful if swallowed and irritates
the eyes.
It must be kept out of the reach of children.
Page 107 of 196

105
In the event of a breakdown
8► Disconnect hose I and directly connect it
to the tyre valve; the cartridge will thereby be
connected to the compressor and the sealant will
not be injected.
If the tyre needs to be deflated, connect hose
I to the tyre valve and press the yellow button
located in the centre of the compressor switch.
Replacing the cartridge
To replace the sealant cartridge, proceed as
follows:
► Disconnect the hose I.
► Turn the cartridge to be replaced anti-
clockwise and lift it.
► Insert the new cartridge and turn it clockwise,
► Reconnect the hose I and connect pipe B to
its location.
The cartridge contains ethylene glycol, which is harmful if swallowed and irritates
the eyes.
It must be kept out of the reach of children.
After use, do not discard the cartridge in standard waste, take it to a
CITROËN dealer or an authorised waste
disposal site.
Spare wheel
Parking
► Park the vehicle where it does not block
traffic: the ground must be level, stable and
non-slippery.
► If the road is sloping or damaged, place an
object under the wheels to act as a chock.
► With a manual gearbox, engage first gear
then switch off the ignition to block the wheels.
► Apply the parking brake and check that the
warning lamp is on in the instrument panel.
► The passengers must get out of the vehicle
and wait where they are safe.
► Put on the high visibility vest and signal that
the vehicle is immobile by using the devices
envisaged by the legislation in force in the
country where you are driving (warning triangle,
hazard warning lamps, etc.).
► Equip yourself with the tools.
Special feature with pneumatic
suspension
If fitted to the vehicle, activate the vehicle lifting
mode before lifting the vehicle with a jack.
For right-hand drive vehicles, the buttons are
located on the right of the steering wheel.
► With the ignition on, press both buttons 1 and
2 simultaneously for at least 5 seconds.
Their indicator lamps light up, and remain fixed.
► To exit this mode, press buttons 1 and 2
simultaneously for an additional 5 seconds.
Their indicator lamps go out and the system
becomes fully operational again.
This mode is automatically deactivated if you
exceed the speed by about 3 mph (5 km/h).
Once the vehicle is well secured, proceed in the
following order:
1- Getting the tools.
2- Removing the spare wheel from its
housing.
3- Positioning the jack.
4- Replacing the wheel to be repaired.
5- Storing the wheel to be repaired.
Page 109 of 196

107
In the event of a breakdown
8
► Install extended socket A, wheelbrace D and
wheel bar B on the retaining bolt.
► Turn the assembly anti-clockwise to lower the
wheel.
► Turn to the locking point of the winch,
indicated by the hardening of the manoeuvre and
notch G not visible.
► After unrolling the cable completely, take the
spare wheel out.
With steel wheels:
► Unscrew handle H. ►
Remove caliper I from the outer part of the
steel wheel.
With alloy wheels:
► Unscrew the three fixing bolts K.
► Unscrew handle H.
► Remove bracket J from caliper I.
► Remove the spare wheel and place it near
the wheel to be replaced.
► If possible, place a chock under the wheel
diagonally opposite the wheel to be changed.
3 - Position the jack
Ensure that the jack is stable.
If the ground is slippery or loose, the jack
may collapse - Risk of injury!
Take care to place the jack strictly at jacking point 1 or 2 under the vehicle,
making sure that the jack head is centred at
the contact point on the vehicle. Otherwise,
there is a risk of damage to the vehicle and/or
the jack collapsing.
Make sure that any passengers are safe
(removed, away from the vehicle).
Never put your hands or your head in the
wheel arch.
Page 112 of 196

11 0
In the event of a breakdown
► Lightly tighten using wheelbrace D and wheel
bar B.
► Lower the vehicle using wheelbrace D and
wheel bar B, and then remove the jack.
► Tighten the bolts again using wheelbrace D
and wheel bar B.
Have the tightening of the bolts and the
pressure of the spare wheel checked by
the Manufacturer's dealer network or a
qualified workshop without delay.
Have the punctured wheel repaired and
refitted on the vehicle as soon as possible.
If your vehicle has tyre under-inflation
detection, check the tyre pressures and
reinitialise the system.
5 - Storing the wheel to be
repaired
You must reposition the wheel to be repaired or
the spare wheel under the vehicle to lock the
winch system.
Check that it is securely fastened in its
compartment under the floor.
Improper wheel positioning can compromise
safety.
► Reposition the wheel at the rear of the
vehicle.
With steel wheels:
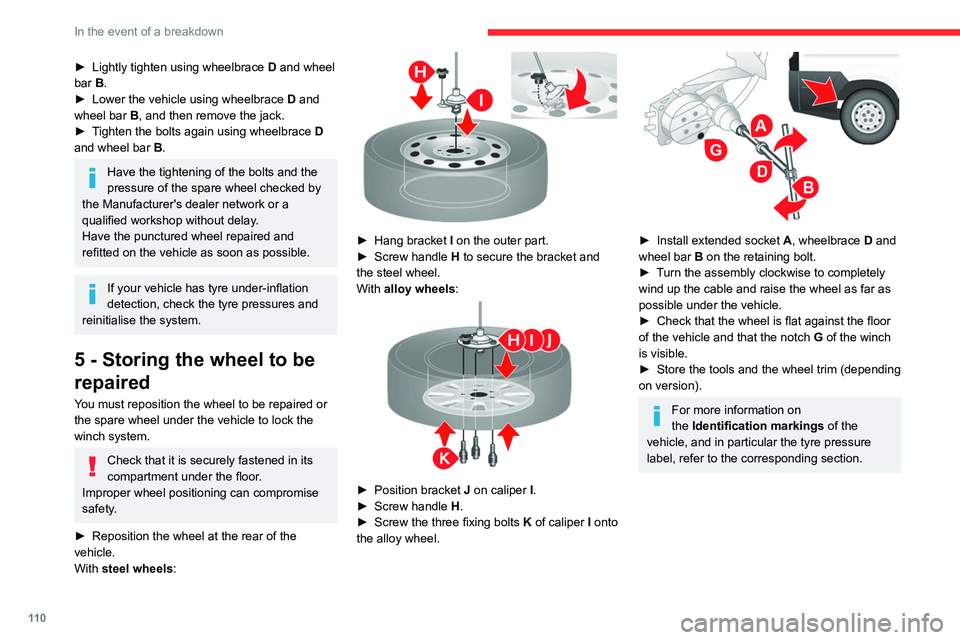
► Hang bracket I on the outer part.
► Screw handle H to secure the bracket and
the steel wheel.
With alloy wheels:
► Position bracket J on caliper I.
► Screw handle H.
► Screw the three fixing bolts K of caliper I onto
the alloy wheel.
► Install extended socket A, wheelbrace D and
wheel bar B on the retaining bolt.
► Turn the assembly clockwise to completely
wind up the cable and raise the wheel as far as
possible under the vehicle.
► Check that the wheel is flat against the floor
of the vehicle and that the notch G of the winch
is visible.
► Store the tools and the wheel trim (depending
on version).
For more information on
the Identification markings of the
vehicle, and in particular the tyre pressure
label, refer to the corresponding section.
Changing a bulb
The headlamps have polycarbonate lenses with a protective coating:
► do not clean them using a dry or
abrasive cloth, nor with a detergent or
solvent product,
► use a sponge and soapy water or a pH
neutral product,
► when using a high pressure washer on
persistent marks, do not keep the lance
directed towards the lamps or their edges for
too long, so as not to damage their protective
coating and seals.
Changing a bulb must only be done with
the ignition off and after the lamp has
been switched off for several minutes - Risk
of serious burns!
► Do not touch the bulb directly with your
fingers, use a lint-free cloth.
It is essential only to use anti-ultraviolet
(UV) type bulbs, so as not to damage the
headlamp.
Always replace a failed bulb with a new bulb
with the same type and specification.
In some weather conditions (e.g. low
temperature or humidity), the presence
of misting on the internal surface of the glass
of the headlamps and rear lamps is normal; it
Page 113 of 196

111
In the event of a breakdown
8Changing a bulb
The headlamps have polycarbonate lenses with a protective coating:
► do not clean them using a dry or
abrasive cloth, nor with a detergent or
solvent product,
► use a sponge and soapy water or a pH
neutral product,
► when using a high pressure washer on
persistent marks, do not keep the lance
directed towards the lamps or their edges for
too long, so as not to damage their protective
coating and seals.
Changing a bulb must only be done with
the ignition off and after the lamp has
been switched off for several minutes - Risk
of serious burns!
► Do not touch the bulb directly with your
fingers, use a lint-free cloth.
It is essential only to use anti-ultraviolet
(UV) type bulbs, so as not to damage the
headlamp.
Always replace a failed bulb with a new bulb
with the same type and specification.
In some weather conditions (e.g. low
temperature or humidity), the presence
of misting on the internal surface of the glass
of the headlamps and rear lamps is normal; it
disappears after the lamps have been on for a
few minutes.
Types of bulb
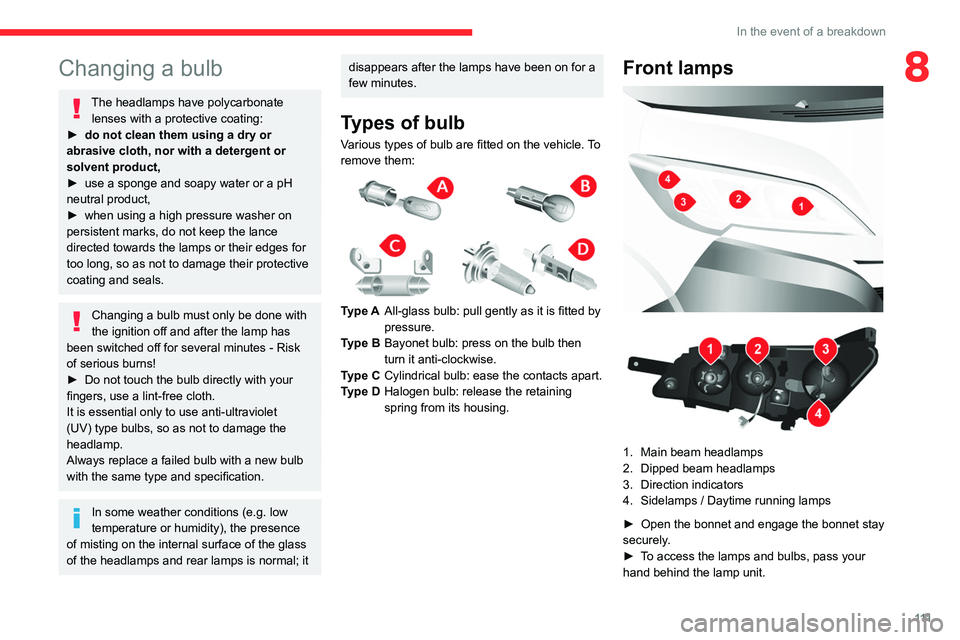
Various types of bulb are fitted on the vehicle. To
remove them:
Type A All-glass bulb: pull gently as it is fitted by
pressure.
Type B Bayonet bulb: press on the bulb then
turn it anti-clockwise.
Type C Cylindrical bulb: ease the contacts apart.
Type D Halogen bulb: release the retaining
spring from its housing.
Front lamps
1. Main beam headlamps
2. Dipped beam headlamps
3. Direction indicators
4. Sidelamps / Daytime running lamps
► Open the bonnet and engage the bonnet stay
securely.
► To access the lamps and bulbs, pass your
hand behind the lamp unit.
Page 114 of 196

11 2
In the event of a breakdown
If necessary, you can remove the lamp unit:
► Depending on the country of sale, remove
the winter protection foam by sliding it sideways
towards the outside.
► Disconnect the electrical connector by
removing its locking ring.
► Remove the two fixing screws of the lamp
unit.
► Move the lamp unit towards the centre of the
vehicle to extract it from its slides. Pay attention
to the bonnet stay on the left-hand side.
Main beam headlamps
Type D, H7 - 55W
► Remove the cover by pulling on the rubber
tab.
► Disconnect the electrical connector. ►
Release the locking spring by pressing the
central clamp.
► Change the bulb taking care to align the
metal part with the groove on the lamp.
Dipped beam headlamps
Type D, H7 - 55W
► Remove the cover by pulling on the rubber
tab.
► Disconnect the electrical connector.
► Release the locking spring by pressing the
central clamp.
► Change the bulb taking care to align the
metal part with the grooves on the lamp.
Direction indicators
Type A, WY21W - 21W
► Remove the cover by pulling on the rubber
tab.
► Turn the bulb holder a quarter turn
anti-clockwise.
► Change the bulb.
Sidelamps/Daytime running lamps
Type B, W21/5W - 21W and 5W
► Remove the cover by pulling on the rubber
tab.
► Turn the bulb holder a quarter turn
anti-clockwise.
► Change the bulb.
LED daytime running lamps
These light-emitting diodes (LEDs) are used both
as daytime running lamps and as sidelamps.
If your vehicle is equipped with LED daytime
running lamps, contact a CITROËN dealer.
Front foglamps
Type D, H11-55W
► Completely turn the wheel inwards.
Page 162 of 196

160
Touch screen audio and telematics system
Vehicle information
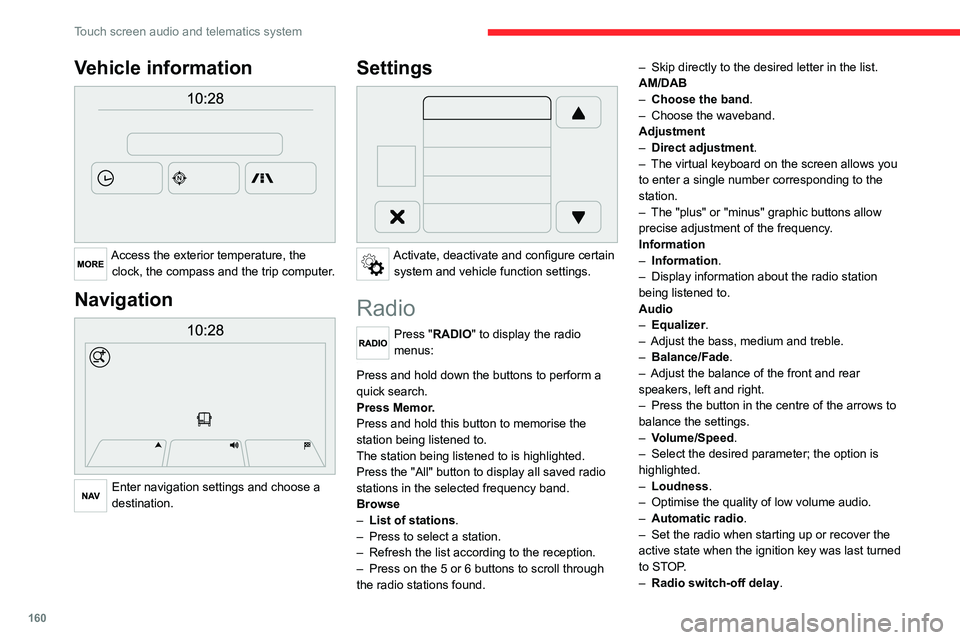
Access the exterior temperature, the clock, the compass and the trip computer.
Navigation
Enter navigation settings and choose a
destination.
Settings
Activate, deactivate and configure certain system and vehicle function settings.
Radio
Press "RADIO" to display the radio
menus:
Briefly press on the 9 or : buttons to perform an automatic search.
Press and hold down the buttons to perform a
quick search.
Press Memor.
Press and hold this button to memorise the
station being listened to.
The station being listened to is highlighted.
Press the "All" button to display all saved radio
stations in the selected frequency band.
Browse
– List of stations .
– Press to select a station.
– Refresh the list according to the reception.
– Press on the 5 or 6 buttons to scroll through
the radio stations found. –
Skip directly to the desired letter in the list.
AM/DAB
– Choose the band .
– Choose the waveband.
Adjustment
– Direct adjustment.
– The virtual keyboard on the screen allows you
to enter a single number corresponding to the
station.
– The "plus" or "minus" graphic buttons allow
precise adjustment of the frequency.
Information
– Information .
– Display information about the radio station
being listened to.
Audio
– Equalizer.
– Adjust the bass, medium and treble.
– Balance/Fade.
– Adjust the balance of the front and rear
speakers, left and right.
– Press the button in the centre of the arrows to
balance the settings.
– Volume/Speed.
– Select the desired parameter; the option is
highlighted.
– Loudness.
– Optimise the quality of low volume audio.
– Automatic radio.
– Set the radio when starting up or recover the
active state when the ignition key was last turned
to STOP.
– Radio switch-off delay .
– Set the parameter.
– AUX vol. setting .
– Set the parameters.
DAB (Digital Audio
Broadcasting) radio
Terrestrial Digital Radio
Digital radio
Digital radio provides higher quality
reception and also the graphical display
of current information on the radio station
being listened to.
The various "multiplexes/ensembles" offer
a choice of radio stations organised in
alphabetical order.
Press “RADIO” successively to display
the "DAB Radio".
Select the "Navigate" tab.
Select a list from the filters
offered: "All", "Types",
"Ensembles", then select a radio station.
Press the "Update" button to update the
list of "DAB Radio" stations received.
Page 170 of 196

168
Touch screen audio and telematics system
Enter the telephone number using the keypad,
then press the “Call” button to make the call.
Calling a contact
Press "PHONE".
Press the "Contacts" button or the
"Recent calls" button.
Select the desired contact from the list offered to
start the call.
Vehicle information
Press "MORE" to display the vehicle
information menus:
Exterior temp.
Display the exterior temperature.
Clock
Display the clock.
Compass
Display the direction that you are travelling in.
Trip
– Current info., Trip A, Trip B.
Display the trip computer.
Press and hold the "Trip A" or "Trip B" button to
reset the trip concerned.
Settings
Press this button to display the settings
menus:
Display
– Brightness. –
Set the brightness of the screen.
– Display mode.
– Set the display mode.
– Language.
– Choose the desired language.
– Unit of measurement.
– Set the display units for consumption, distance
and temperature.
– Touch screen beep.
– Activate or deactivate the audible signal when
touching a button on the screen.
– Display Trip B.
– Display Trip B on the driver's screen.
Voice commands
– Voice response time.
– Set the length of the voice system response.
– Display list of commands.
– Display suggestions with the different options
during a voice session.
Clock and Date
– Time setting and format.
– Setting the time.
– Display time mode.
– Activate or deactivate the display of the digital
clock on the status bar.
– Synchro time.
– Activate or deactivate the automatic time
display.
– Date setting.
– Set the date.
Safety/Assistance
– Reversing camera .
– Display the reversing camera in reverse. –
Camera delay .
– Maintain the on-screen display of the
reversing camera for a maximum of 10 seconds
or up to 11 mph (18 km/h).
Lighting
– Daytime running lamps.
– Activate or deactivate the automatic
illumination of the headlamps when starting.
Doors & locking
– Autoclose.
– Activate or deactivate the automatic locking of
the doors when the vehicle is moving.
Audio
– Equalizer.
– Adjust the bass, medium and treble.
– Balance/Fade.
– Adjust the balance of the front and rear
speakers, left and right.
– Press the button in the centre of the arrows to
balance the settings.
– Volume/Speed.
– Select the desired parameter; the option is
highlighted.
– Loudness.
– Optimise the quality of low volume audio.
– Automatic radio.
– Set the radio when starting up or recover the
active state when the ignition key was last turned
to STOP.
– Radio switch-off delay .
– Set the parameter.
– AUX vol. setting .
– Set the parameters.
Page 171 of 196

169
Touch screen audio and telematics system
12Telephone/Bluetooth®
– Connected tels.
– Start the Bluetooth® connection of the selected
mobile device.
– Delete the selected mobile device.
– Memorise the selected mobile device in the
favourites.
– Set the parameters.
– Add device.
– Add a new mobile device.
– Connected audio.
– Connect the mobile device only for audio.
Radio setting
– DAB announcements.
– Activate or deactivate the announcements.
– Activate or deactivate the options: Alarm,
Event announc., Stock market newsflash,
Newsflash, Programme info, Special event, Sport
info, Public transp. info. Alarm announcement,
Weather newsflash.
Restore settings
Restore the default settings of the screen, clock,
sound and radio.
Delete personal data
Delete personal data, Bluetooth
® devices and
built-in presets.
Voice commands
Information - Using the
system
Instead of touching the screen, you can
use your voice to control the system.
To ensure that voice commands are always recognised by the system, please
observe the following recommendations:
– speak in a normal tone of voice,
– before speaking, always wait for the "beep"
(acoustic signal),
– the system is able to recognise the voice
commands provided, regardless of gender,
tone and inflection of the voice of the speaker,
– if possible, minimise the noise inside the
passenger compartment,
– before issuing a voice command, ask any
other passengers to refrain from speaking.
Since the system recognises commands
regardless of who is speaking, when several
people are speaking simultaneously, it
is possible for the system to recognise
commands that are different or additional to
what has been requested,
– for optimal operation, you are advised to
close the windows and any sunroof present
(on versions/markets where fitted) to avoid
any external source of disturbance.
Steering-mounted controls
This button is used to activate the “Telephone” voice recognition mode that
allows you to make calls, view recent/received/
outgoing calls, display the directory, etc.
This button is used to activate the "Radio/ Media" voice recognition mode that allows
you to tune to a specific radio station or a
specific AM/FM radio frequency, play a track or
an album contained on a USB stick/iPod/MP3/
CD.
Quick voice interaction can be used if
these buttons are depressed during a
voice message from the system; it allows you
to directly say a voice command.
For example, if the system is in the middle
of saying a voice help message and if we
know the command to give the system, by
pressing these buttons, the voice message
is interrupted and it is possible to directly
say the desired voice command (so avoiding
having to listen to the complete voice help
message).
When the system is waiting for a voice
command from the user, pressing these
buttons closes the voice session.
Each time a button is pressed, a "beep"
(acoustic signal) is emitted and the
screen displays a screen page of suggestions
asking the user to say a command.