ignition CITROEN RELAY 2020 Handbook (in English)
[x] Cancel search | Manufacturer: CITROEN, Model Year: 2020, Model line: RELAY, Model: CITROEN RELAY 2020Pages: 196, PDF Size: 34.07 MB
Page 104 of 196

102
Practical information
If the AdBlue® tank is completely empty
– which is confirmed by the message
"Top up AdBlue: Starting impossible" – it is
essential to add at least 5 litres.
After refilling
► Refit the blue cap to the tank filler and turn it
clockwise as far as it will go (one sixth of a turn).
► Close the fuel filler flap.
Do not dispose of AdBlue® containers in
the household waste.
Place them in a container reserved for this
purpose or take them back to where you
bought them.
Never store AdBlue® containers in your
vehicle.
Precautions for use
AdBlue® is a urea-based solution. This fluid is
non-flammable, colourless and odourless (when
kept in a cool place).
In the event of contact with the skin, wash the
affected area with soap and running water. In the
event of contact with the eyes, immediately rinse
the eyes with large amounts of water or with an
eye wash solution for at least 15 minutes. Seek
medical attention if you feel a persistent burning
sensation or irritation.
If swallowed, immediately wash out the mouth
with clean water and then drink plenty of water.
In certain conditions (high temperature, for
example), the risk of release of ammonia cannot
be excluded: do not inhale the fluid. Ammonia
vapours have an irritant effect on mucous
membranes (eyes, nose and throat).
Store AdBlue® out of the reach of
children, in its original container.
Procedure
Before starting the top-up procedure, ensure that
the vehicle is parked on a flat and level surface.
In wintry conditions, ensure that the temperature
of the vehicle is above -11 °C. Otherwise the
AdBlue
® may be frozen and so cannot be poured
into its tank. Park the vehicle in a warmer area
for a few hours to allow the top-up to be carried
out.
Never put the AdBlue® into the Diesel
fuel tank.
If any AdBlue® is splashed, or if there are
any spillages on the bodywork, rinse
immediately with cold water or wipe with a
damp cloth.
If the fluid has crystallised, clean it off using a
sponge and hot water.
Important: in the event of a top-up after
an AdBlue breakdown, you must wait
about 5 minutes before switching on the
ignition, without opening the driver's door,
unlocking the vehicle or bringing the
electronic key into the passenger
compartment.
Switch on the ignition, then wait for 10
seconds before starting the engine.
► Switch off the ignition and remove the key
from the switch to switch off the engine.
► Turn the blue cap of the AdBlue® tank a 6th of
a turn anti-clockwise and remove it.
Filling up
► With a container of AdBlue®: after checking
the expiry date, read the instructions on the
label carefully before pouring the contents of the
container into the vehicle's AdBlue tank.
► With an AdBlue
® pump: introduce the nozzle
and fill the tank until the nozzle automatically
cuts out.
In order not to overfill the AdBlue® tank:
– Add between 10 and 13 litres using
AdBlue
® containers.
– Stop after the nozzle’s first automatic cut-
out, if you are refilling at a service station.
The system only registers AdBlue
® top-ups of
5 litres or more.
Page 107 of 196

105
In the event of a breakdown
8► Disconnect hose I and directly connect it
to the tyre valve; the cartridge will thereby be
connected to the compressor and the sealant will
not be injected.
If the tyre needs to be deflated, connect hose
I to the tyre valve and press the yellow button
located in the centre of the compressor switch.
Replacing the cartridge
To replace the sealant cartridge, proceed as
follows:
► Disconnect the hose I.
► Turn the cartridge to be replaced anti-
clockwise and lift it.
► Insert the new cartridge and turn it clockwise,
► Reconnect the hose I and connect pipe B to
its location.
The cartridge contains ethylene glycol, which is harmful if swallowed and irritates
the eyes.
It must be kept out of the reach of children.
After use, do not discard the cartridge in standard waste, take it to a
CITROËN dealer or an authorised waste
disposal site.
Spare wheel
Parking
► Park the vehicle where it does not block
traffic: the ground must be level, stable and
non-slippery.
► If the road is sloping or damaged, place an
object under the wheels to act as a chock.
► With a manual gearbox, engage first gear
then switch off the ignition to block the wheels.
► Apply the parking brake and check that the
warning lamp is on in the instrument panel.
► The passengers must get out of the vehicle
and wait where they are safe.
► Put on the high visibility vest and signal that
the vehicle is immobile by using the devices
envisaged by the legislation in force in the
country where you are driving (warning triangle,
hazard warning lamps, etc.).
► Equip yourself with the tools.
Special feature with pneumatic
suspension
If fitted to the vehicle, activate the vehicle lifting
mode before lifting the vehicle with a jack.
For right-hand drive vehicles, the buttons are
located on the right of the steering wheel.
► With the ignition on, press both buttons 1 and
2 simultaneously for at least 5 seconds.
Their indicator lamps light up, and remain fixed.
► To exit this mode, press buttons 1 and 2
simultaneously for an additional 5 seconds.
Their indicator lamps go out and the system
becomes fully operational again.
This mode is automatically deactivated if you
exceed the speed by about 3 mph (5 km/h).
Once the vehicle is well secured, proceed in the
following order:
1- Getting the tools.
2- Removing the spare wheel from its
housing.
3- Positioning the jack.
4- Replacing the wheel to be repaired.
5- Storing the wheel to be repaired.
Page 112 of 196
11 0
In the event of a breakdown
► Lightly tighten using wheelbrace D and wheel
bar B.
► Lower the vehicle using wheelbrace D and
wheel bar B, and then remove the jack.
► Tighten the bolts again using wheelbrace D
and wheel bar B.
Have the tightening of the bolts and the
pressure of the spare wheel checked by
the Manufacturer's dealer network or a
qualified workshop without delay.
Have the punctured wheel repaired and
refitted on the vehicle as soon as possible.
If your vehicle has tyre under-inflation
detection, check the tyre pressures and
reinitialise the system.
5 - Storing the wheel to be
repaired
You must reposition the wheel to be repaired or
the spare wheel under the vehicle to lock the
winch system.
Check that it is securely fastened in its
compartment under the floor.
Improper wheel positioning can compromise
safety.
► Reposition the wheel at the rear of the
vehicle.
With steel wheels:
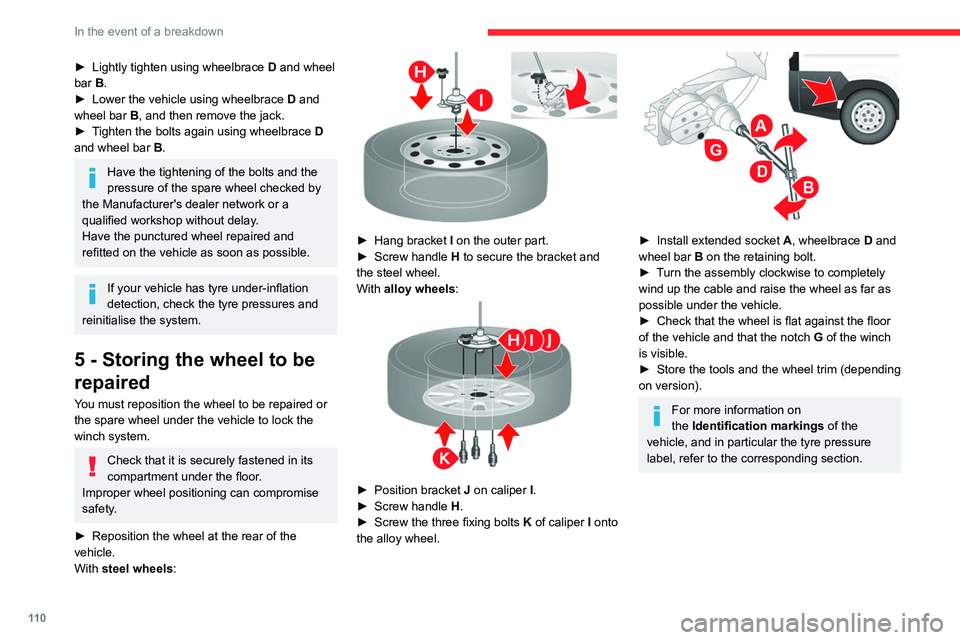
► Hang bracket I on the outer part.
► Screw handle H to secure the bracket and
the steel wheel.
With alloy wheels:
► Position bracket J on caliper I.
► Screw handle H.
► Screw the three fixing bolts K of caliper I onto
the alloy wheel.
► Install extended socket A, wheelbrace D and
wheel bar B on the retaining bolt.
► Turn the assembly clockwise to completely
wind up the cable and raise the wheel as far as
possible under the vehicle.
► Check that the wheel is flat against the floor
of the vehicle and that the notch G of the winch
is visible.
► Store the tools and the wheel trim (depending
on version).
For more information on
the Identification markings of the
vehicle, and in particular the tyre pressure
label, refer to the corresponding section.
Changing a bulb
The headlamps have polycarbonate lenses with a protective coating:
► do not clean them using a dry or
abrasive cloth, nor with a detergent or
solvent product,
► use a sponge and soapy water or a pH
neutral product,
► when using a high pressure washer on
persistent marks, do not keep the lance
directed towards the lamps or their edges for
too long, so as not to damage their protective
coating and seals.
Changing a bulb must only be done with
the ignition off and after the lamp has
been switched off for several minutes - Risk
of serious burns!
► Do not touch the bulb directly with your
fingers, use a lint-free cloth.
It is essential only to use anti-ultraviolet
(UV) type bulbs, so as not to damage the
headlamp.
Always replace a failed bulb with a new bulb
with the same type and specification.
In some weather conditions (e.g. low
temperature or humidity), the presence
of misting on the internal surface of the glass
of the headlamps and rear lamps is normal; it
Page 113 of 196
111
In the event of a breakdown
8Changing a bulb
The headlamps have polycarbonate lenses with a protective coating:
► do not clean them using a dry or
abrasive cloth, nor with a detergent or
solvent product,
► use a sponge and soapy water or a pH
neutral product,
► when using a high pressure washer on
persistent marks, do not keep the lance
directed towards the lamps or their edges for
too long, so as not to damage their protective
coating and seals.
Changing a bulb must only be done with
the ignition off and after the lamp has
been switched off for several minutes - Risk
of serious burns!
► Do not touch the bulb directly with your
fingers, use a lint-free cloth.
It is essential only to use anti-ultraviolet
(UV) type bulbs, so as not to damage the
headlamp.
Always replace a failed bulb with a new bulb
with the same type and specification.
In some weather conditions (e.g. low
temperature or humidity), the presence
of misting on the internal surface of the glass
of the headlamps and rear lamps is normal; it
disappears after the lamps have been on for a
few minutes.
Types of bulb
Various types of bulb are fitted on the vehicle. To
remove them:
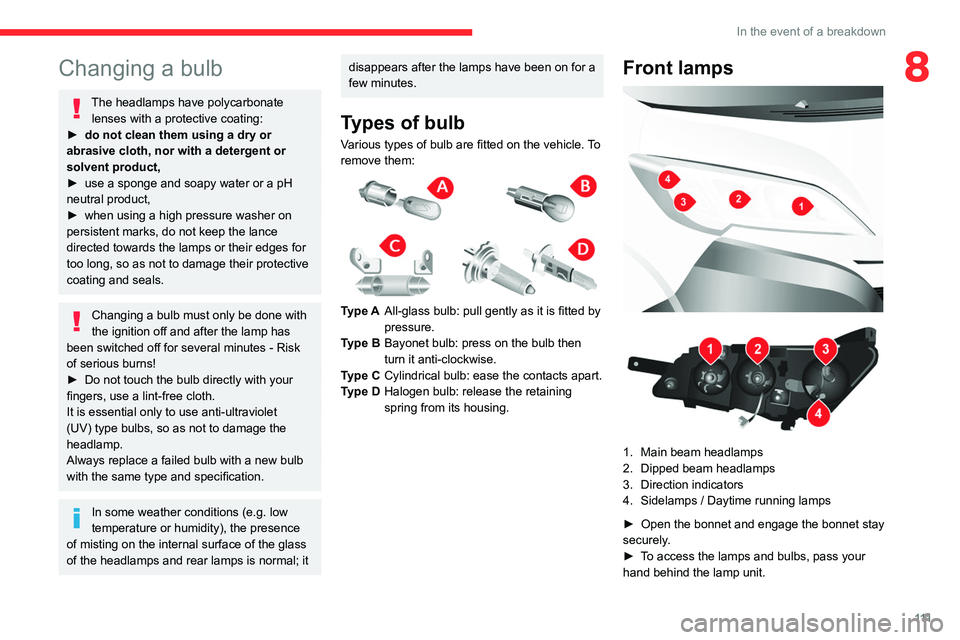
Type A All-glass bulb: pull gently as it is fitted by
pressure.
Type B Bayonet bulb: press on the bulb then
turn it anti-clockwise.
Type C Cylindrical bulb: ease the contacts apart.
Type D Halogen bulb: release the retaining
spring from its housing.
Front lamps
1. Main beam headlamps
2. Dipped beam headlamps
3. Direction indicators
4. Sidelamps / Daytime running lamps
► Open the bonnet and engage the bonnet stay
securely.
► To access the lamps and bulbs, pass your
hand behind the lamp unit.
Page 121 of 196

11 9
In the event of a breakdown
8Engine compartment fuses
► Remove the nuts and tilt the casing to access
the fuses.
When you have finished, close the cover very
carefully.
Fuses A (amperes)Allocation
1 40ABS pump supply
2 50Diesel pre-heating unit
3 30Ignition switch - Starter
4 40Diesel heater
5 20/50Passenger compartment ventilation with programmable additional heating (+ battery)
6 40/60Maximum speed passenger compartment cooling fan unit (+ battery)
7 40/50/60Minimum speed passenger compartment cooling fan unit (+ battery)
8 40Passenger compartment cooling fan unit (+ key)
9 15Rear 12 V socket (+ battery)
10 15Horn
Page 123 of 196

121
In the event of a breakdown
8
► Tilt lever 1 downwards to release the
terminals.
► Remove terminals 2 from the negative (-)
terminal.
Wait approximately 6 minutes after
switching off the ignition before
disconnecting the battery.
Do not disconnect the terminals while the
engine is running.
Do not charge a battery without disconnecting
the terminals first.
Close the windows and the doors before
disconnecting the battery.
After reconnecting the battery, turn on the
ignition and wait 1 minute before starting the
engine, to enable the electronic systems to
initialise. If minor problems nevertheless persist
following this operation, contact a CITROËN
dealer or a qualified workshop.
It is recommended to disconnect the (-)
terminal of the battery if the vehicle is to
be left unused for more than one month.
The description of the battery charging
procedure is only indicative.
After prolonged battery disconnection, it may be
necessary to reinitialise the following functions:
– the display parameters (date, time, language,
distance and temperature units),
– the stations of the audio system,
– the central locking.
Some settings are cancelled and must be
entered once again; contact a CITROËN dealer.
If the vehicle is equipped with a tachograph or
an alarm, it is recommended that the (-) terminal
of the battery (located under the floor on the
left-hand side, in the cab) be disconnected if the
vehicle is not going to be used for more than 5
days.
Starting using another
battery
Never start the engine by connecting a
battery charger.
Never use a 24 V or higher battery booster.
Check beforehand that the backup battery
has a nominal voltage of 12 V and a capacity
at least equal to that of the discharged
battery.
The two vehicles must not be in contact with
each other.
Switch off all the electrical consumers on both
vehicles (audio system, wipers, lighting, etc.).
Make sure that the jump leads are not close
to the moving parts of the engine (fan, belt,
etc.).
Do not disconnect the (+) terminal while the
engine is running.
A. Positive metallic terminal of your vehicle
B. Backup battery
C. Earth of your vehicle
The positive metallic terminal A is accessible
through a flap located on the side of the fuse
box.
Connect only to the terminals indicated
and illustrated above. In case of
non-compliance, risk of short circuit!
Page 136 of 196
134
Technical data
In the engine compartment
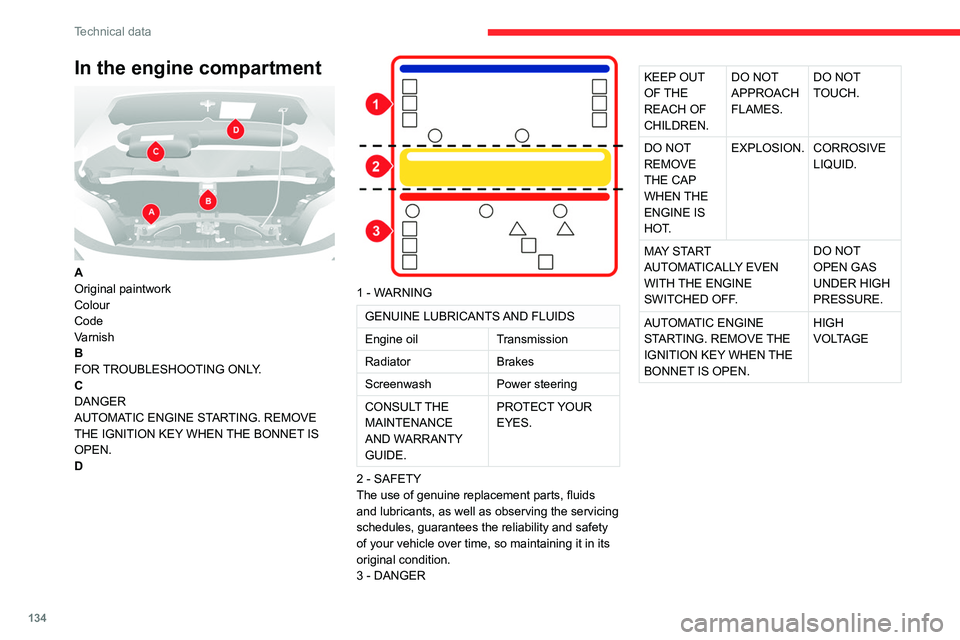
A
Original paintwork
Colour
Code
Varnish
B
FOR TROUBLESHOOTING ONLY.
C
DANGER
AUTOMATIC ENGINE STARTING. REMOVE
THE IGNITION KEY WHEN THE BONNET IS
OPEN.
D
1 - WARNING
GENUINE LUBRICANTS AND FLUIDS
Engine oil Transmission
Radiator Brakes
Screenwash Power steering
CONSULT THE
MAINTENANCE
AND WARRANTY
GUIDE. PROTECT YOUR
EYES.
2 - SAFETY
The use of genuine replacement parts, fluids
and lubricants, as well as observing the servicing
schedules, guarantees the reliability and safety
of your vehicle over time, so maintaining it in its
original condition.
3 - DANGER
KEEP OUT
OF THE
REACH OF
CHILDREN. DO NOT
APPROACH
FLAMES. DO NOT
TOUCH.
DO NOT
REMOVE
THE CAP
WHEN THE
ENGINE IS
HOT. EXPLOSION.
CORROSIVE
LIQUID.
MAY START
AUTOMATICALLY EVEN
WITH THE ENGINE
SWITCHED OFF. DO NOT
OPEN GAS
UNDER HIGH
PRESSURE.
AUTOMATIC ENGINE
STARTING. REMOVE THE
IGNITION KEY WHEN THE
BONNET IS OPEN. HIGH
VOLTAGEIn the fuel filler flap
DANGER REMOVE SLOWLY.
FUEL VAPOURS MAY CAUSE INJURY.
Page 154 of 196
152
Audio system
To protect the system, do not use a USB hub.
The system builds playlists (in temporary
memory); this operation can take from a
few seconds to several minutes at the first
connection.
Reduce the number of non-music files and the
number of folders to reduce the waiting time.
The playlists are updated every time the ignition
is switched off or a USB memory stick is
connected. The lists are memorised: if they are
not modified, the subsequent loading time will
be shorter.
USB socket
Located on the central console, this
socket is used only to power and
recharge the connected portable device.
Auxiliary socket (AUX)
Connect a portable device (MP3 player,
etc.) to the auxiliary jack socket using an
audio cable (not supplied).
First adjust the volume on your portable device
(to a high level). Then adjust the volume on your
audio system.
Controls are managed via the portable device.
The functions of the device connected to the
“AUX” socket are managed directly by this
device: it is therefore not possible to change the
track/folder/playlist or manipulate the playback
Radio, toggle up or down continuously: scan up/
down frequencies until you release the button.
Media, toggle up or down: select next/previous
track.
Media, toggle up or down continuously: fast
forward/rewind until you release the button.
Refuse an incoming call.
End the call in progress.
Radio
Selecting a station
The exterior environment (hills, buildings, tunnels, car parks, underground location,
etc.) may block reception, including in RDS
mode.
This behaviour is normal in the propagation of
radio waves and does not indicate any fault
with the audio system.
Press the "RADIO" button to select the
FM or AM waveband.
Briefly press one of the buttons to
automatically search for a lower/
higher frequency.
Turn the knob to manually search for a lower/higher frequency.
Press the knob to display the list of
stations received locally.
Turn the knob to select a station and press to
select it.
Memorising a station
Press the "RADIO" button to select the
FM or AM waveband.
Press the "A-B-C" button to select one of
the three memorised station levels.
Press and hold a button to memorise the
station being listened to.
The name of the station is displayed and an
audible signal confirms the memorisation.
Press "INFO" to display the information of
the station being listened to.
RDS
RDS, if displayed, allows you to continue
listening to the same station by
automatically retuning to alternative
frequencies. However, in certain conditions,
following this RDS station is not guaranteed
over the whole country, because radio
stations do not cover 100% of the area. When
the reception is weak, the frequency switches
to a regional station.
Press the "MENU" button.
Select "Regional" then press to activate
or deactivate RDS.
Alternative frequency (AF)
Select "Alternative frequency (AF)" then
press to activate or deactivate the
frequency.
When the "Regional” function is
activated, the system is therefore able to
search at any time for the best available
frequency.
Playing TA messages
The TA (Traffic Announcement) function gives priority to TA alert messages. To
operate, this function needs good reception of
a radio station that carries this type of
message. While traffic information is being
broadcast, the current media is automatically
interrupted so that the TA message can be
heard. Normal play of the previously playing
media resumes at the end of the message.
Press the "MENU" button.
Select "Traffic announcement (TA)" then
press to activate or deactivate the
reception of traffic announcements.
Media
USB socket
Insert the USB memory stick or connect
the device to the USB socket in the
central storage space , provided for transferring
data to the system, using a suitable cable (not
supplied).
Page 155 of 196
153
Audio system
11To protect the system, do not use a USB hub.
The system builds playlists (in temporary
memory); this operation can take from a
few seconds to several minutes at the first
connection.
Reduce the number of non-music files and the
number of folders to reduce the waiting time.
The playlists are updated every time the ignition
is switched off or a USB memory stick is
connected. The lists are memorised: if they are
not modified, the subsequent loading time will
be shorter.
USB socket
Located on the central console, this
socket is used only to power and
recharge the connected portable device.
Auxiliary socket (AUX)
Connect a portable device (MP3 player,
etc.) to the auxiliary jack socket using an
audio cable (not supplied).
First adjust the volume on your portable device
(to a high level). Then adjust the volume on your
audio system.
Controls are managed via the portable device.
The functions of the device connected to the
“AUX” socket are managed directly by this
device: it is therefore not possible to change the
track/folder/playlist or manipulate the playback
start/end/pause using the controls on the control
panel or the steering wheel.
Do not leave the cable of your portable device
connected to the “AUX” socket when not in use,
to avoid possible noise from the speakers.
Information and advice
The system supports USB Mass Storage
devices, BlackBerry® devices or Apple® players
via the USB sockets. The adapter cable is not
supplied.
Other devices, not recognised by the system
during connection, must be connected to
the auxiliary socket using a Jack cable (not
supplied).
It is advisable to restrict file names to 20
characters, without using special characters (e.g.
" " ? . ; ù) so as to avoid any reading or display
problems.
Only use USB memory sticks formatted to FAT
32 (File Allocation Table).
To protect the system, do not use a USB hub.
The system does not support the simultaneous connection of two identical
devices (two memory sticks or two
Apple
® players) but it is possible to connect
one memory stick and one Apple® player at
the same time.
It is recommended that you use genuine
Apple® USB cables to guarantee correct
operation.
Connecting Apple® players
Connect the Apple® player to the USB
socket using a suitable cable (not
supplied).
Play starts automatically.
Control is via the audio system.
The classifications available are those of the portable device connected (artists/
albums/types/tracks/playlists/audio books/
podcasts).
The default classification is sorting by artist.
To change the classification used, return to
the first level of the menu and then select the
desired classification (playlists for example)
and confirm to browse the tree to the desired
track.
The audio system software version may not be compatible with the generation of
your Apple
® player.
Page 162 of 196
160
Touch screen audio and telematics system
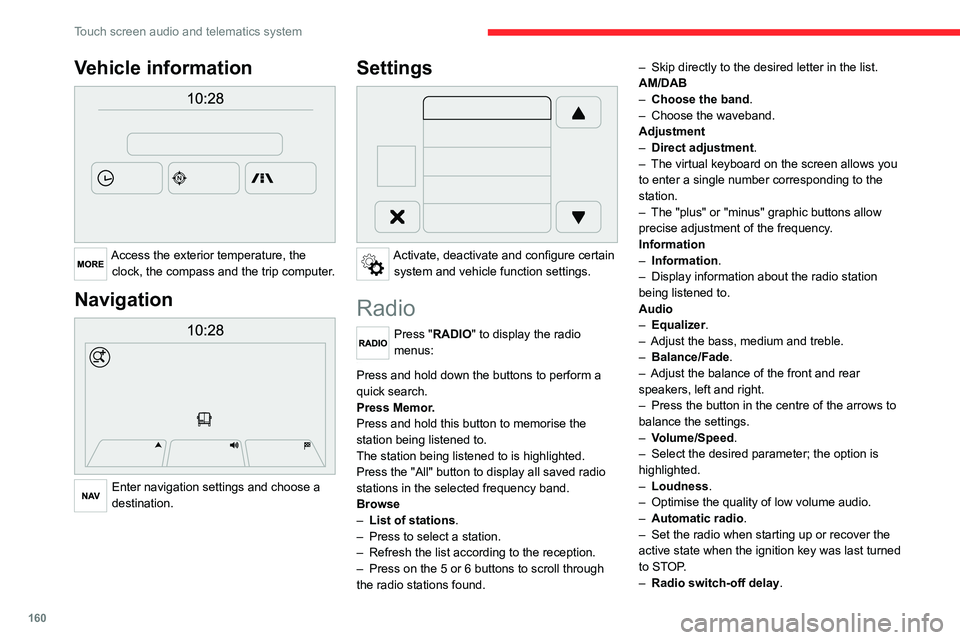
Vehicle information
Access the exterior temperature, the clock, the compass and the trip computer.
Navigation
Enter navigation settings and choose a
destination.
Settings
Activate, deactivate and configure certain system and vehicle function settings.
Radio
Press "RADIO" to display the radio
menus:
Briefly press on the 9 or : buttons to perform an automatic search.
Press and hold down the buttons to perform a
quick search.
Press Memor.
Press and hold this button to memorise the
station being listened to.
The station being listened to is highlighted.
Press the "All" button to display all saved radio
stations in the selected frequency band.
Browse
– List of stations .
– Press to select a station.
– Refresh the list according to the reception.
– Press on the 5 or 6 buttons to scroll through
the radio stations found. –
Skip directly to the desired letter in the list.
AM/DAB
– Choose the band .
– Choose the waveband.
Adjustment
– Direct adjustment.
– The virtual keyboard on the screen allows you
to enter a single number corresponding to the
station.
– The "plus" or "minus" graphic buttons allow
precise adjustment of the frequency.
Information
– Information .
– Display information about the radio station
being listened to.
Audio
– Equalizer.
– Adjust the bass, medium and treble.
– Balance/Fade.
– Adjust the balance of the front and rear
speakers, left and right.
– Press the button in the centre of the arrows to
balance the settings.
– Volume/Speed.
– Select the desired parameter; the option is
highlighted.
– Loudness.
– Optimise the quality of low volume audio.
– Automatic radio.
– Set the radio when starting up or recover the
active state when the ignition key was last turned
to STOP.
– Radio switch-off delay .
– Set the parameter.
– AUX vol. setting .
– Set the parameters.
DAB (Digital Audio
Broadcasting) radio
Terrestrial Digital Radio
Digital radio
Digital radio provides higher quality
reception and also the graphical display
of current information on the radio station
being listened to.
The various "multiplexes/ensembles" offer
a choice of radio stations organised in
alphabetical order.
Press “RADIO” successively to display
the "DAB Radio".
Select the "Navigate" tab.
Select a list from the filters
offered: "All", "Types",
"Ensembles", then select a radio station.
Press the "Update" button to update the
list of "DAB Radio" stations received.