fuse CITROEN RELAY 2020 Handbook (in English)
[x] Cancel search | Manufacturer: CITROEN, Model Year: 2020, Model line: RELAY, Model: CITROEN RELAY 2020Pages: 196, PDF Size: 34.07 MB
Page 5 of 196
3
Contents
Compatibility of fuels 91
Snow chains 91
Towing a trailer 92
Towbar with quickly detachable towball 92
Roof-mounted carrying system 94
Bonnet 94
Diesel engines 95
Checking levels 96
Checks 98
AdBlue® (BlueHDi engines)
101
8In the event of a breakdown
Temporary puncture repair kit 104
Spare wheel 105
Changing a bulb 111
Changing a fuse 11 6
12 V battery 120
Towing 122
9Technical data
Engine technical data and towed loads 124
Diesel engines 124
Weights 125
Dimensions 129
Identification markings 133
Glossary of labels 133
10Special features
Crew cab 136
Chassis cab / Flatbed cab 136
Double cab 141
Drop-side back 145
11Audio system
First steps 151
Steering mounted controls 151
Radio 152
Media 152
Telephone 154
Settings 154
Voice commands
155
12 Touch screen audio and telematicssystem
First steps
158
Steering mounted controls 159
Menus 159
Radio 160
DAB (Digital Audio Broadcasting) radio 161
Media 161
Navigation 163
Telephone 166
Vehicle information 168
Settings 168
Voice commands 169
13ALPINE® X902D system
First steps 173
Menus 174
■
Alphabetical index
Page 6 of 196
4
Overview
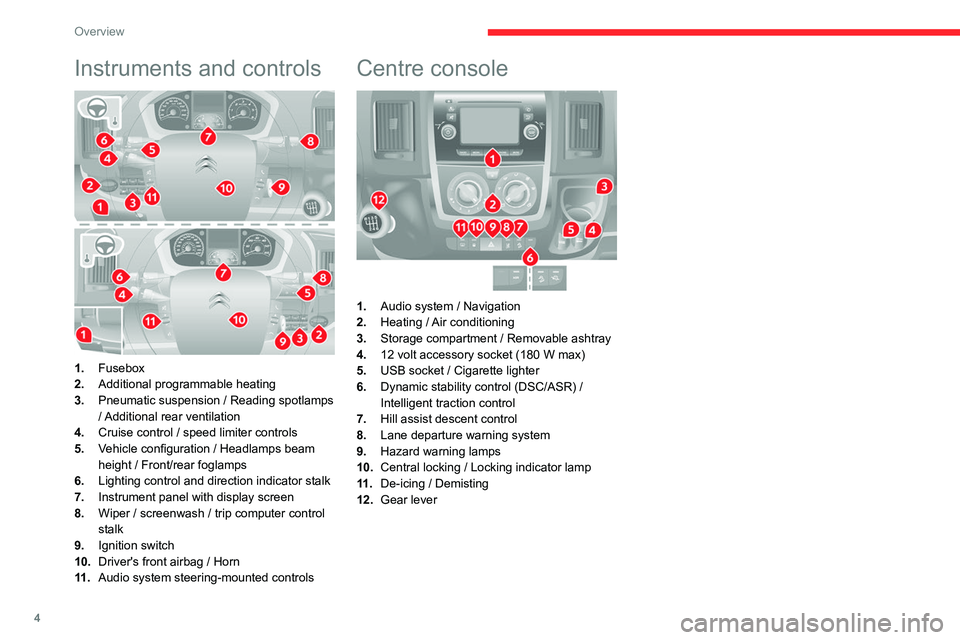
Instruments and controls
1.Fusebox
2. Additional programmable heating
3. Pneumatic suspension / Reading spotlamps
/ Additional rear ventilation
4. Cruise control / speed limiter controls
5. Vehicle configuration / Headlamps beam
height / Front/rear foglamps
6. Lighting control and direction indicator stalk
7. Instrument panel with display screen
8. Wiper / screenwash / trip computer control
stalk
9. Ignition switch
10. Driver's front airbag / Horn
11 . Audio system steering-mounted controls
Centre console
1.Audio system / Navigation
2. Heating / Air conditioning
3. Storage compartment / Removable ashtray
4. 12 volt accessory socket (180 W max)
5. USB socket / Cigarette lighter
6. Dynamic stability control (DSC/ASR) /
Intelligent traction control
7. Hill assist descent control
8. Lane departure warning system
9. Hazard warning lamps
10. Central locking / Locking indicator lamp
11 . De-icing / Demisting
12. Gear lever
Page 36 of 196

34
Ease of use and comfort
Additional pre-heater or programmable additional
heating
This is an additional, programmable and
independent system that heats the hot water
loop of the Diesel engine to facilitate starting.
It improves the performance of the defrosting
and demisting and, if fitted to the vehicle, that of
the heated seats.
The passenger compartment’s temperature rises
more quickly.
This system must be programmed to be started
before entering the vehicle.
Automatic additional heating
This is an additional system that starts
automatically when the ignition is switched on. Its
activation depends on the outside temperature
and the temperature inside the vehicle.
It switches off automatically as soon as the
heating is manually switched on.
Supplementary heating
On 2-3 seat versions, it is located under the
driver's seat with air diffusion directed towards
the front.
Complete switch-off
► Press button 3 to switch off the system. The
LED and the display go out.
Temperature
The scale is between:
– a rise in interior air temperature HI (High),
which heats up to a maximum graduation of 32,
– a cooling of interior air temperature LO (Low),
which decreases to a graduation of 16.
Air distribution
► Press one of the buttons 4 to direct the air
flow towards:
the windscreen and front side window
vents (demisting - defrosting windows),
the central and side vents (chest and
face),
the diffusers of the front and rear zones
(footwells).
Combining buttons makes it possible to refine
the air distribution.
Air flow
► Press one of the buttons 5 to increase or
decrease the air flow.
Air intake/Air recirculation
The intake of exterior air prevents the formation
of mist on the windscreen and side windows.
Recirculating the interior air isolates the
passenger compartment from exterior odours
and fumes.
This function allows hot or cold air to be delivered selectively and more quickly.
Return to exterior air intake as soon as possible
to avoid deterioration of the air quality and the
formation of mist.
► Press button 6 to activate interior air
recirculation. The indicator lamp comes on.
Pressing this button again restores exterior air
intake. The indicator lamp goes off.
Pressing button 1 also restores exterior
air intake. Returning to this position
allows the air in the passenger compartment
to be renewed and demisting. Pressing button
1 again restores the FULL AUTO function.
Additional rear ventilation
This system is complementary
to the standard passenger
compartment ventilation
equipment.
Air output
► Press control 1 to activate/deactivate the
release of air to the exterior (confirmed by the
LED coming on/going out).
Air intake
► Press control 2 to activate/deactivate
the exterior air intake into the passenger
compartment (confirmed by the LED coming on/
going out).
Additional heating systems
Additional heating
This is heating for the passenger compartment
which is additional to the standard equipment.
Its operation may be independent of the engine.
Page 37 of 196
35
Ease of use and comfort
3Additional pre-heater or programmable additional
heating
This is an additional, programmable and
independent system that heats the hot water
loop of the Diesel engine to facilitate starting.
It improves the performance of the defrosting
and demisting and, if fitted to the vehicle, that of
the heated seats.
The passenger compartment’s temperature rises
more quickly.
This system must be programmed to be started
before entering the vehicle.
Automatic additional heating
This is an additional system that starts
automatically when the ignition is switched on. Its
activation depends on the outside temperature
and the temperature inside the vehicle.
It switches off automatically as soon as the
heating is manually switched on.
Supplementary heating
On 2-3 seat versions, it is located under the
driver's seat with air diffusion directed towards
the front.
On 5-9 seat versions, it is
located at the rear. Depending
on the version of the model, the
air diffusion is either direct from
the rear, or comes from the rail
located under each of the two
rows of seats.
► Press this control to activate/
deactivate the heating. The LED lights up
if heating is activated.
When quickly defrosting and demisting, turn off
the control.
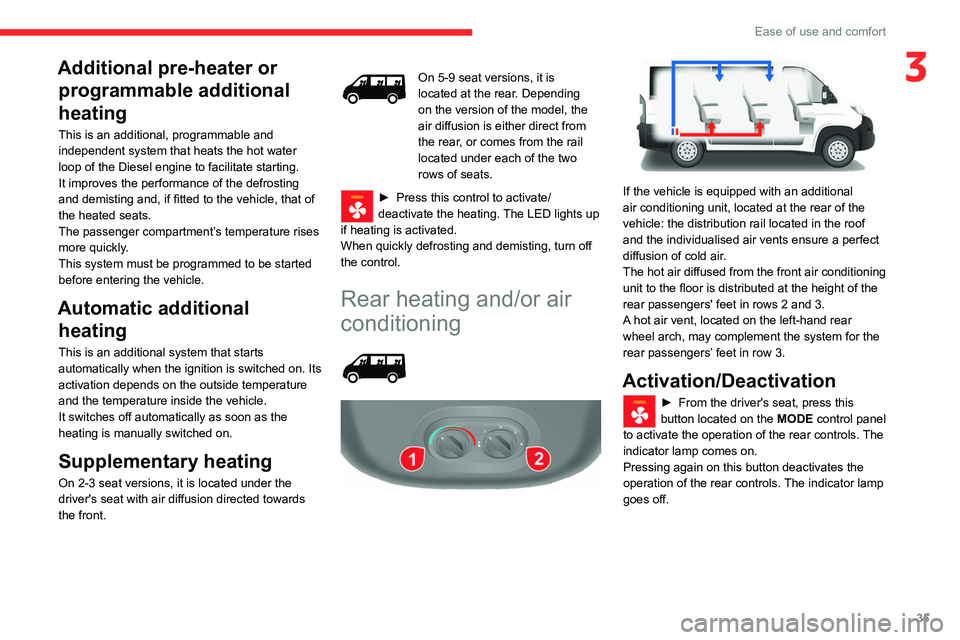
Rear heating and/or air
conditioning
If the vehicle is equipped with an additional
air conditioning unit, located at the rear of the
vehicle: the distribution rail located in the roof
and the individualised air vents ensure a perfect
diffusion of cold air.
The hot air diffused from the front air conditioning
unit to the floor is distributed at the height of the
rear passengers' feet in rows 2 and 3.
A hot air vent, located on the left-hand rear
wheel arch, may complement the system for the
rear passengers’ feet in row 3.
Activation/Deactivation
► From the driver's seat, press this
button located on the MODE control panel
to activate the operation of the rear controls. The
indicator lamp comes on.
Pressing again on this button deactivates the
operation of the rear controls. The indicator lamp
goes off.
Page 53 of 196
51
Safety
5General safety
recommendations
Do not remove the labels attached in
different places on your vehicle. They
include safety warnings as well as
identification information for the vehicle.
For all work on your vehicle, use a
qualified workshop that has the technical
information, skills and equipment required, all
of which a CITROËN dealer is able to
provide.
Depending on country regulations,
certain safety equipment may be
mandatory: high visibility safety vests,
warning triangles, breathalysers, spare bulbs,
spare fuses, fire extinguisher, first aid kit, mud
flaps at the rear of the vehicle, etc.
Installing electrical accessories:
– The fitting of electrical equipment or
accessories not approved by CITROËN may
cause excessive current consumption and
faults and failures with the electrical system
of your vehicle. Contact a CITROËN dealer
for information on the range of approved
accessories.
– As a safety measure, access to the
diagnostic socket, used for the vehicle's
electronic systems, is reserved strictly for
CITROËN dealers or qualified workshops,
equipped with the special tools required (risk
of malfunctions of the vehicle's electronic
systems that could cause breakdowns or
serious accidents). The Manufacturer cannot
be held responsible if this advice is not
followed.
– Any modification or adaptation not intended
or authorised by CITROËN or carried out
without meeting the technical requirements
defined by the Manufacturer will result in the
suspension of the commercial warranty.
Installation of accessory radio
communication transmitters
Before installing a radio communication
transmitter with an external aerial, you must
without fail contact a CITROËN dealer for
the specification of transmitters which can
be fitted (frequency, maximum power, aerial
position, specific installation requirements),
in line with the Vehicle Electromagnetic
Compatibility Directive (2004/104/EC).
Declarations of conformity for radio
equipment
The relevant certificates are available on the
http://service.citroen.com/ACddb/ website.
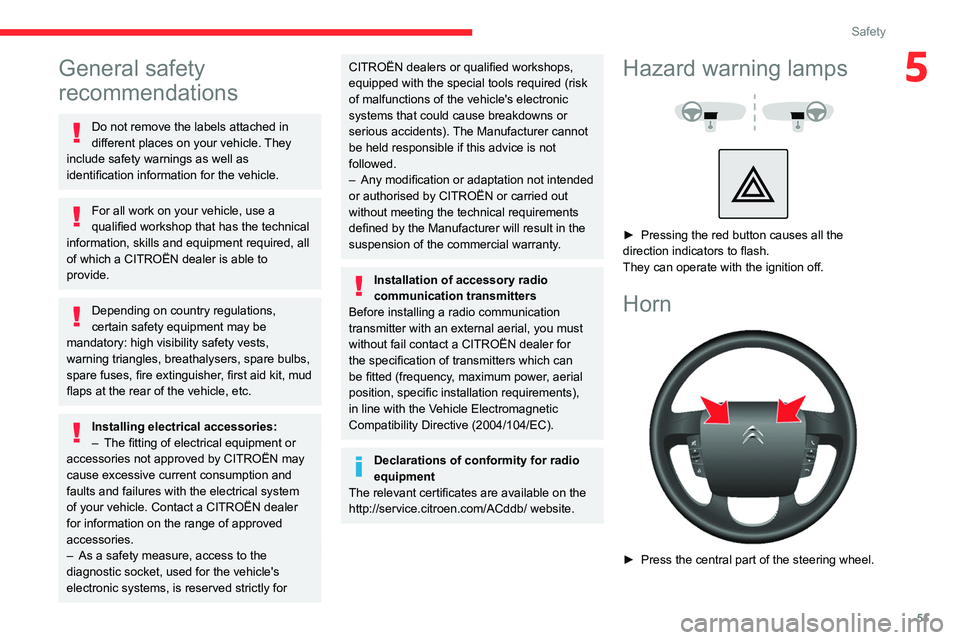
Hazard warning lamps
► Pressing the red button causes all the
direction indicators to flash.
They can operate with the ignition off.
Horn
► Press the central part of the steering wheel.
Page 92 of 196

90
Practical information
For other versions, the second button is
replaced by a fuse; contact a CITROËN
dealer or a qualified workshop.
Compatibility of fuels
Diesel fuels conforming to the EN590, EN16734
and EN16709 standards and containing up to
7%, 10%, 20% and 30% fatty acid methyl ester
respectively. The use of B20 or B30 fuels, even
occasionally, imposes special maintenance
conditions referred to as "Arduous conditions".
Paraffinic Diesel fuel conforming to the EN15940
standard.
The use of any other type of (bio) fuel (vegetable or animal oils, pure or diluted,
domestic fuel, etc.) is strictly prohibited (risk
of damage to the engine and fuel system).
The only Diesel fuel additives authorised for use are those that meet the B715000
standard.
Diesel at low temperature
At temperatures below 0 °C (+32 °F), the
formation of paraffins in summer-type Diesel
Fuel
The capacity of the tank is about 90 litres.
Fuel tanks of different capacities may be fitted,
60 and 120 litres, depending on the engine.
Low fuel level
When the low fuel tank level E (Empty) is
reached, this warning lamp comes on.
At this moment, you have approximately 10 or
12 litres left in the reserve, depending on the
capacity of your tank and the engine.
You must refuel as soon as possible to avoid
running out of fuel.
Refuelling
The fuel tank must be filled with the engine off.
► Open the fuel filler flap.
► Hold the black filler cap with one hand.
► With the other hand, insert the key and turn it
anti-clockwise.
► Remove the black filler cap and hang it on
the hook located on the inside of the filler flap.
A label inside the fuel filler flap indicates the type
of fuel to use.
Do not continue past the 3
rd cut-off of the nozzle.
This may cause malfunctions.
► After filling the fuel tank, lock the black filler
cap and close the filler flap.
With the Stop & Start system, never
refuel with the engine in STOP mode;
you must switch off the ignition using the key.
Fuel system cut off
In the event of an impact, a device automatically
cuts off the fuel supply to the engine and the
vehicle's power supply.
It triggers the hazard warning lamps and the
courtesy lamps, as well as the unlocking of the
doors.
After the impact and before restoring these power supplies, check that there
are no fuel leaks or sparks to avoid any risk of
fire.
► To restore the fuel supply, press the first
button, located on the front right-hand side.
► To then restore the power supply, press
the second button, located in the battery
compartment under the floor (Minibus).
Page 93 of 196

91
Practical information
7For other versions, the second button is
replaced by a fuse; contact a CITROËN
dealer or a qualified workshop.
Compatibility of fuels
Diesel fuels conforming to the EN590, EN16734
and EN16709 standards and containing up to
7%, 10%, 20% and 30% fatty acid methyl ester
respectively. The use of B20 or B30 fuels, even
occasionally, imposes special maintenance
conditions referred to as "Arduous conditions".
Paraffinic Diesel fuel conforming to the EN15940
standard.
The use of any other type of (bio) fuel (vegetable or animal oils, pure or diluted,
domestic fuel, etc.) is strictly prohibited (risk
of damage to the engine and fuel system).
The only Diesel fuel additives authorised for use are those that meet the B715000
standard.
Diesel at low temperature
At temperatures below 0 °C (+32 °F), the
formation of paraffins in summer-type Diesel
fuels could prevent the engine from operating
correctly. In these temperature conditions, use
winter-type Diesel fuel and keep the fuel tank
more than 50 % full.
At temperatures below -15 °C (+5 °F) to avoid
problems starting, it is best to park the vehicle
under shelter (heated garage).
Travelling abroad
Certain fuels could damage your vehicle’s
engine.
In certain countries, the use of a particular
fuel may be required (specific octane rating,
specific trade name, etc.) to ensure correct
operation of the engine.
For all additional information, consult a dealer.
Snow chains
In wintry conditions, snow chains improve
traction as well as the behaviour of the
vehicle when braking.
The snow chains must be fitted only to the front wheels. They must never be
fitted to "space-saver" type spare wheels.
Observe the legislation in force in your
country on the use of snow chains and
the maximum authorised speed.
Use only the chains designed to be fitted to the
type of wheel fitted to your vehicle:
Original tyre size Maximum link size.
205/70 R15 16 mm
215/70 R15 12 mm
225/70 R15 16 mm
215/75 R16 12 mm
225/75 R16 16 mm
For more information on snow chains, contact a
CITROËN dealer or a qualified workshop.
Installation tips
► To fit the chains during a journey, stop the
vehicle on a flat surface on the side of the road.
► Apply the parking brake and position any
wheel chocks under the wheels to prevent
movement of the vehicle.
► Fit the chains following the instructions
provided by the manufacturer.
► Move off gently and drive for a few moments,
without exceeding 31 mph (50 km/h).
► Stop the vehicle and check that the snow
chains are correctly tightened.
It is strongly recommended that before
you leave, you practise fitting the snow
chains on a level and dry surface.
Avoid driving with snow chains on roads that have been cleared of snow to avoid
damaging the vehicle's tyres and the road
surface. If the vehicle is fitted with alloy
Page 97 of 196
95
Practical information
7
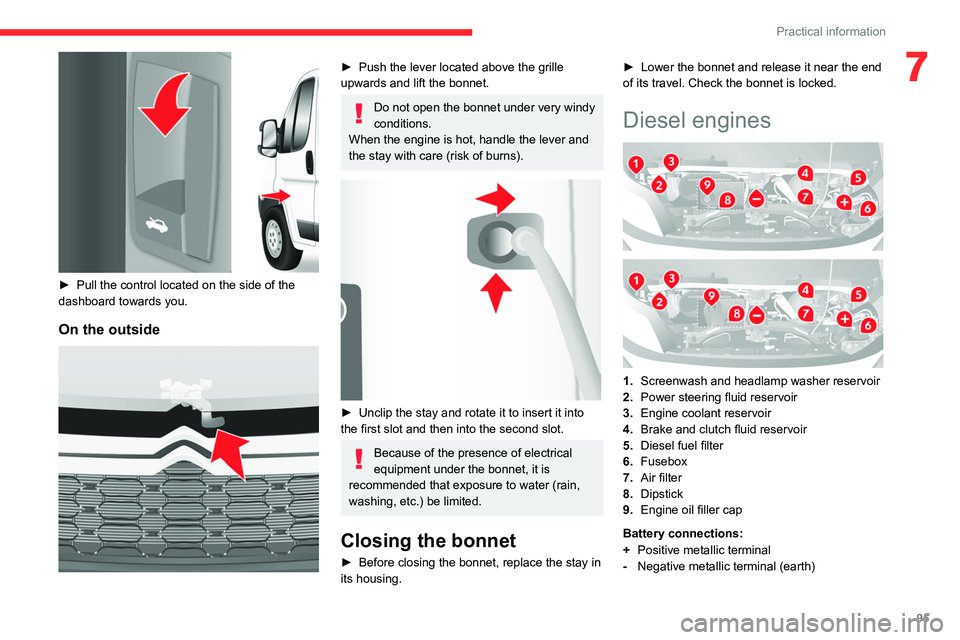
► Pull the control located on the side of the
dashboard towards you.
On the outside
► Push the lever located above the grille
upwards and lift the bonnet.
Do not open the bonnet under very windy
conditions.
When the engine is hot, handle the lever and
the stay with care (risk of burns).
► Unclip the stay and rotate it to insert it into
the first slot and then into the second slot.
Because of the presence of electrical
equipment under the bonnet, it is
recommended that exposure to water (rain,
washing, etc.) be limited.
Closing the bonnet
► Before closing the bonnet, replace the stay in
its housing. ►
Lower the bonnet and release it near the end
of its travel. Check the bonnet is locked.
Diesel engines
1. Screenwash and headlamp washer reservoir
2. Power steering fluid reservoir
3. Engine coolant reservoir
4. Brake and clutch fluid reservoir
5. Diesel fuel filter
6. Fusebox
7. Air filter
8. Dipstick
9. Engine oil filler cap
Battery connections:
+ Positive metallic terminal
- Negative metallic terminal (earth)
Page 118 of 196

11 6
In the event of a breakdown
Changing a fuse
The three fuseboxes are located on the
dashboard on the left-hand side, in the pillar
on the right-hand side and in the engine
compartment.
The designations provided are only for the fuses
that can be replaced by the user. For any other
work, visit a CITROËN dealer or a qualified
workshop.
Professional repairers: for full information
on the fuses and relays, consult the
wiring information and diagrams available
from a CITROËN dealer.
Removing and fitting a fuse
Good
Failed
Before changing a fuse, the cause of the fault
must be found and rectified. The numbers of the
fuses are indicated on the fuse box.
Always replace a faulty fuse with a fuse of
the same rating.
CITROËN accepts no responsibility for
the cost incurred in repairing your vehicle
or for rectifying malfunctions resulting from
the installation of accessories not supplied or
not recommended by CITROËN and not
installed in accordance with its
recommendations, in particular when the
combined power consumption of all of the
additional equipment connected exceeds 10
milliamperes.
Left-hand side dashboard
fuses
► Remove the screws and tilt the casing to
access the fuses.
Fuses A (amperes)Allocation
12 7.5Right-hand dipped beam headlamp
13 7.5Left-hand dipped beam headlamp
Page 119 of 196
11 7
In the event of a breakdown
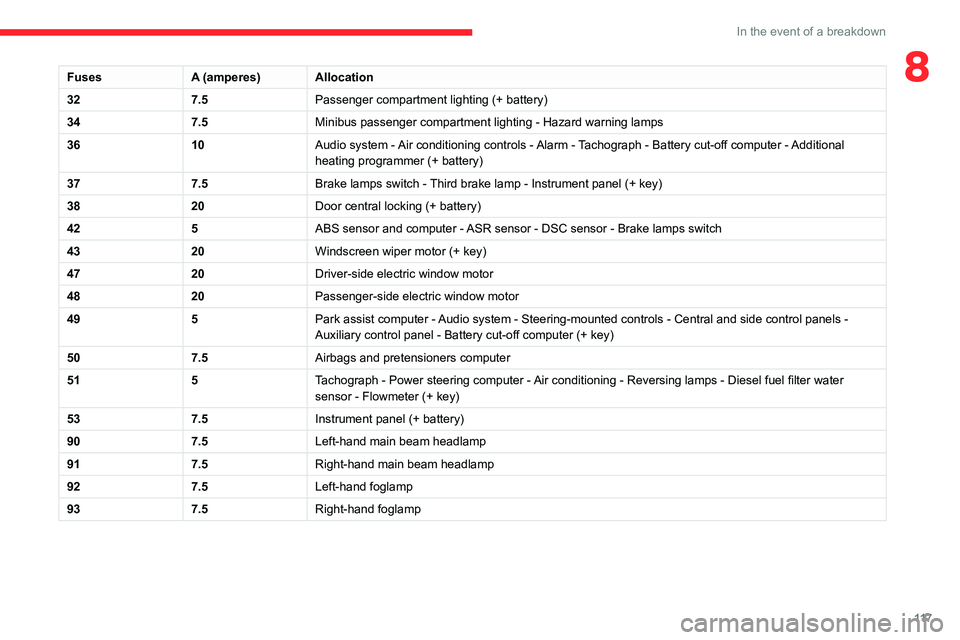
8FusesA (amperes)Allocation
32 7.5Passenger compartment lighting (+ battery)
34 7.5Minibus passenger compartment lighting - Hazard warning lamps
36 10Audio system - Air conditioning controls - Alarm - Tachograph - Battery cut-off computer - Additional
heating programmer (+ battery)
37 7.5Brake lamps switch - Third brake lamp - Instrument panel (+ key)
38 20Door central locking (+ battery)
42 5ABS sensor and computer - ASR sensor - DSC sensor - Brake lamps switch
43 20Windscreen wiper motor (+ key)
47 20Driver-side electric window motor
48 20Passenger-side electric window motor
49 5Park assist computer - Audio system - Steering-mounted controls - Central and side control pane\
ls -
Auxiliary control panel - Battery cut-off computer (+ key)
50 7.5Airbags and pretensioners computer
51 5Tachograph - Power steering computer - Air conditioning - Reversing lamps - Diesel fuel filter water
sensor - Flowmeter (+ key)
53 7.5Instrument panel (+ battery)
90 7.5Left-hand main beam headlamp
91 7.5Right-hand main beam headlamp
92 7.5Left-hand foglamp
93 7.5Right-hand foglamp