bar DACIA DUSTER 2010 1.G Owners Manual
[x] Cancel search | Manufacturer: DACIA, Model Year: 2010, Model line: DUSTER, Model: DACIA DUSTER 2010 1.GPages: 200, PDF Size: 7.12 MB
Page 17 of 200
front seat adjustment ............................(up to the end of the DU)
front seats adjustment ...................................... (up to the end of the DU)
1.11
ENG_UD20680_3
Sièges avant (H79 - Dacia)
ENG_NU_898-5_H79_Dacia_1
Front seats
FRONT SEATS
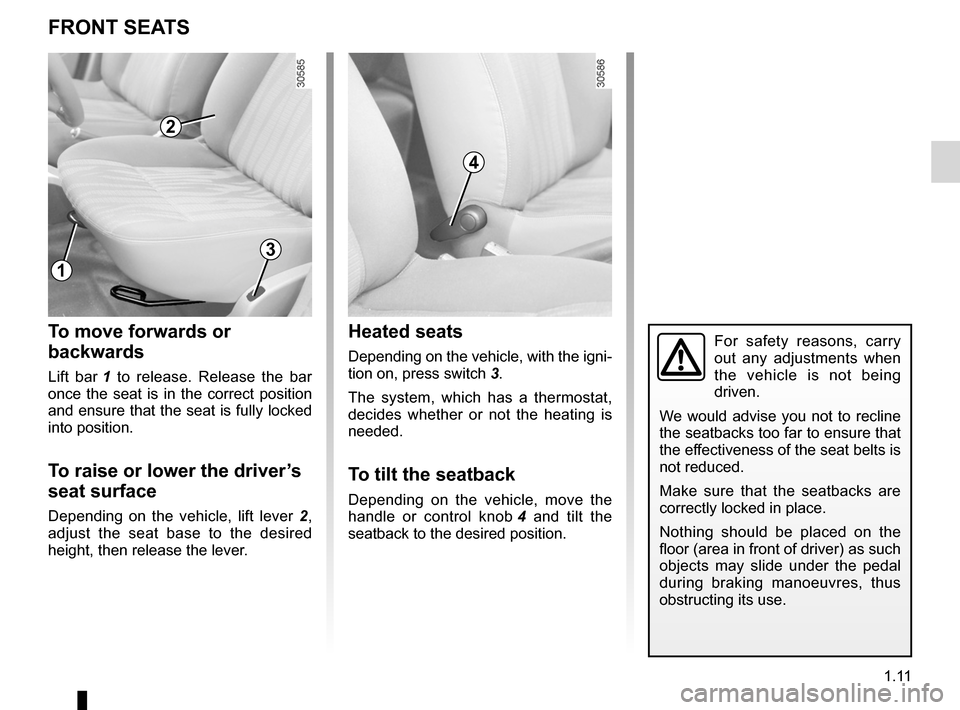
To move forwards or
backwards
Lift bar 1 to release. Release the bar
once the seat is in the correct position
and ensure that the seat is fully locked
into position.
To raise or lower the driver’s
seat surface
Depending on the vehicle, lift lever 2 ,
adjust the seat base to the desired
height, then release the lever.
For safety reasons, carry
out any adjustments when
the vehicle is not being
driven.
We would advise you not to recline
the seatbacks too far to ensure that
the effectiveness of the seat belts is
not reduced.
Make sure that the seatbacks are
correctly locked in place.
Nothing should be placed on the
floor (area in front of driver) as such
objects may slide under the pedal
during braking manoeuvres, thus
obstructing its use.
4
1
2
3
Heated seats
Depending on the vehicle, with the igni -
tion on, press switch 3.
The system, which has a thermostat,
decides whether or not the heating is
needed.
To tilt the seatback
Depending on the vehicle, move the
handle or control knob 4 and tilt the
seatback to the desired position.
Page 91 of 200
3.1
ENG_UD25062_7
Sommaire 3 (H79 - Dacia)
ENG_NU_898-5_H79_Dacia_3
Section 3: Your comfort
Air vents, air outlets . . . . . . . . . . . . . . . . . . . . . . . . . . . . . . . . . . . . . . . . . . . . . . . . . . . . . . . . . . . . . . 3.2
Air conditioning: information and advice on use . . . . . . . . . . . . . . . . . . . . . . . . . . . . . . . . . . . . . . . . 3.8
Windows . . . . . . . . . . . . . . . . . . . . . . . . . . . . . . . . . . . . . . . . . . . . . . . . . . . . . . . . . . . . . . . . . . . . . . 3.9
Interior lighting . . . . . . . . . . . . . . . . . . . . . . . . . . . . . . . . . . . . . . . . . . . . . . . . . . . . . . . . . . . . . . . . . . 3.12
Sun visor, Grab handle . . . . . . . . . . . . . . . . . . . . . . . . . . . . . . . . . . . . . . . . . . . . . . . . . . . . . . . . . . . 3.13
Ashtrays, Cigarette lighter, Accessories socket . . . . . . . . . . . . . . . . . . . . . . . . . . . . . . . . . . . . . . . . . 3.14
Passenger compartment storage space and fittings . . . . . . . . . . . . . . . . . . . . . . . . . . . . . . . . . . . . . 3.15
Rear bench seat . . . . . . . . . . . . . . . . . . . . . . . . . . . . . . . . . . . . . . . . . . . . . . . . . . . . . . . . . . . . . . . . 3.19
Boot . . . . . . . . . . . . . . . . . . . . . . . . . . . . . . . . . . . . . . . . . . . . . . . . . . . . . . . . . . . . . . . . . . . . . . . . . . 3.20
Transporting objects in the boot . . . . . . . . . . . . . . . . . . . . . . . . . . . . . . . . . . . . . . . . . . . . . . . . . . . . 3.21
Luggage cover . . . . . . . . . . . . . . . . . . . . . . . . . . . . . . . . . . . . . . . . . . . . . . . . . . . . . . . . . . . . . . . . . . 3.22
Roof bars . . . . . . . . . . . . . . . . . . . . . . . . . . . . . . . . . . . . . . . . . . . . . . . . . . . . . . . . . . . . . . . . . . . . . . 3.24
Page 114 of 200
roof bars ............................................... (up to the end of the DU)
roof rack roof bars .......................................... (up to the end of the DU)
3.24
ENG_UD20695_2
Barres de toit (H79 - Dacia)
ENG_NU_898-5_H79_Dacia_3
Roof bars
LONGITuDINAL ROOF BARS
For information on the range of
equipment adapted to your ve -
hicle, we advise you to consult
an approved Dealer. Refer to the
manufacturer ’s instructions for in -
formation on how to fit and operate
the equipment.
Please keep these instructions with
the rest of the vehicle documenta -
tion.
Maximum permissible load on
roof rack: refer to the information
on “Weights” in Section 6.
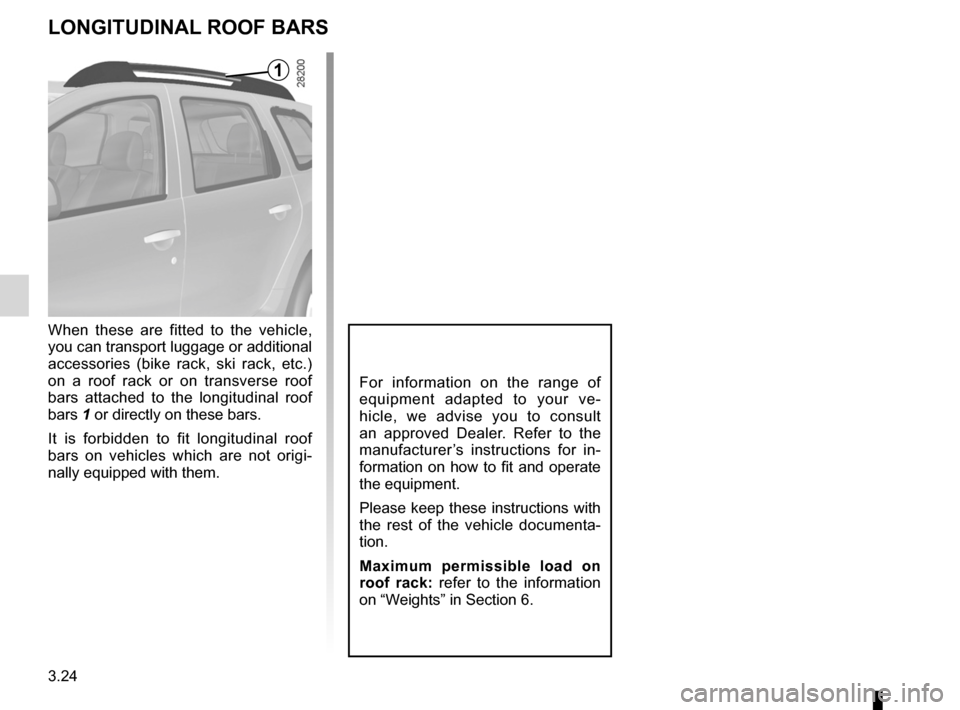
When these are fitted to the vehicle,
you can transport luggage or additional
accessories (bike rack, ski rack, etc.)
on a roof rack or on transverse roof
bars attached to the longitudinal roof
bars 1 or directly on these bars.
It is forbidden to fit longitudinal roof
bars on vehicles which are not origi -
nally equipped with them.
1
Page 125 of 200
tyre pressures ....................................... (up to the end of the DU)
tyres ...................................................... (up to the end of the DU)
tyre pressure ......................................... (up to the end of the DU)
4.11
ENG_UD14128_1
Pressions de gonflage des pneumatiques à froid (H79 - Dacia)
ENG_NU_898-5_H79_Dacia_4
Tyre pressures
TyRE PRESSURE
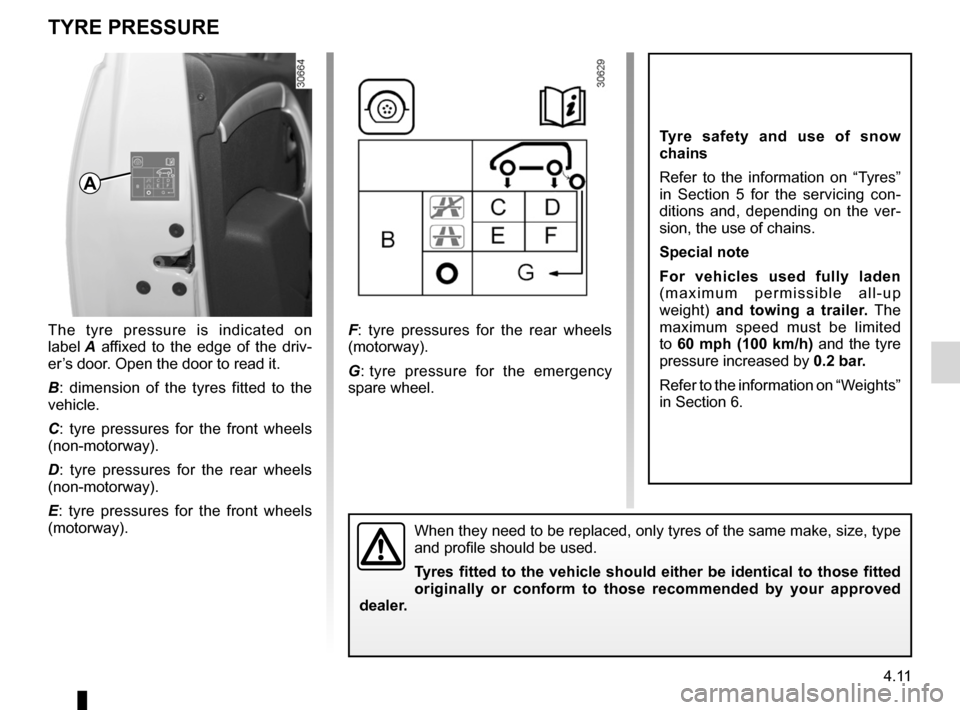
The tyre pressure is indicated on
label A affixed to the edge of the driv -
er’s door. Open the door to read it.
B : dimension of the tyres fitted to the
vehicle.
C : tyre pressures for the front wheels
(non-motorway).
D : tyre pressures for the rear wheels
(non-motorway).
E : tyre pressures for the front wheels
(motorway). F
: tyre pressures for the rear wheels
(motorway).
G : tyre pressure for the emergency
spare wheel.
Tyre safety and use of snow
chains
Refer to the information on “Tyres”
in Section 5 for the servicing con -
ditions and, depending on the ver -
sion, the use of chains.
Special note
For vehicles used fully laden
( m a x i m u m p e r m i s s i b l e a l l - u p
weight) and towing a trailer. The
maximum speed must be limited
to 60 mph (100 km/h) and the tyre
pressure increased by 0.2 bar.
Refer to the information on “Weights”
in Section 6.
When they need to be replaced, only tyres of the same make, size, type
and profile should be used.
Tyres fitted to the vehicle should either be identical to those fitted
originally or conform to those recommended by your approved
dealer.
A
Page 133 of 200
5.1
ENG_UD25064_7
Sommaire 5 (H79 - Dacia)
ENG_NU_898-5_H79_Dacia_5
Section 5: Practical advice
Tools . . . . . . . . . . . . . . . . . . . . . . . . . . . . . . . . . . . . . . . . . . . . . . . . . . . . . . . . . . . . . . . . . . . . . . . . . 5.2
Puncture . . . . . . . . . . . . . . . . . . . . . . . . . . . . . . . . . . . . . . . . . . . . . . . . . . . . . . . . . . . . . . . . . . . . . . 5.3
Tyre inflation kit . . . . . . . . . . . . . . . . . . . . . . . . . . . . . . . . . . . . . . . . . . . . . . . . . . . . . . . . . . . . . . . . . 5.5
Wheel trims and wheels . . . . . . . . . . . . . . . . . . . . . . . . . . . . . . . . . . . . . . . . . . . . . . . . . . . . . . . . . . 5.8
Changing a wheel . . . . . . . . . . . . . . . . . . . . . . . . . . . . . . . . . . . . . . . . . . . . . . . . . . . . . . . . . . . . . . . 5.9
Tyres . . . . . . . . . . . . . . . . . . . . . . . . . . . . . . . . . . . . . . . . . . . . . . . . . . . . . . . . . . . . . . . . . . . . . . . . . 5.11
Changing bulbs . . . . . . . . . . . . . . . . . . . . . . . . . . . . . . . . . . . . . . . . . . . . . . . . . . . . . . . . . . . . . . . . . 5.14
Front lights . . . . . . . . . . . . . . . . . . . . . . . . . . . . . . . . . . . . . . . . . . . . . . . . . . . . . . . . . . . . . . . 5.14
Fog lights . . . . . . . . . . . . . . . . . . . . . . . . . . . . . . . . . . . . . . . . . . . . . . . . . . . . . . . . . . . . . . . . 5.17
Rear lights . . . . . . . . . . . . . . . . . . . . . . . . . . . . . . . . . . . . . . . . . . . . . . . . . . . . . . . . . . . . . . . 5.18
Side indicator lights . . . . . . . . . . . . . . . . . . . . . . . . . . . . . . . . . . . . . . . . . . . . . . . . . . . . . . . . 5.21
Interior lights . . . . . . . . . . . . . . . . . . . . . . . . . . . . . . . . . . . . . . . . . . . . . . . . . . . . . . . . . . . . . . 5.22
Fuses . . . . . . . . . . . . . . . . . . . . . . . . . . . . . . . . . . . . . . . . . . . . . . . . . . . . . . . . . . . . . . . . . . . . . . . . . 5.25
Battery: troubleshooting . . . . . . . . . . . . . . . . . . . . . . . . . . . . . . . . . . . . \
. . . . . . . . . . . . . . . . . . . . . . . 5.28
Radio frequency remote control unit: battery . . . . . . . . . . . . . . . . . . . . . . . . . . . . . . . . . . . . \
. . . . . . . 5.30
Wiper blades . . . . . . . . . . . . . . . . . . . . . . . . . . . . . . . . . . . . . . . . . . . . . . . . . . . . . . . . . . . . . . . . . . . 5.31
Towing: breakdown . . . . . . . . . . . . . . . . . . . . . . . . . . . . . . . . . . . . . . . . . . . . . . . . . . . . . . . . . . . . . . 5.32
Towing: towbar . . . . . . . . . . . . . . . . . . . . . . . . . . . . . . . . . . . . \
. . . . . . . . . . . . . . . . . . . . . . . . . . . . . . 5.35
Fitted audio equipment . . . . . . . . . . . . . . . . . . . . . . . . . . . . . . . . . . . . . . . . . . . . . . . . . . . . . . . . . . . 5.36
Accessories . . . . . . . . . . . . . . . . . . . . . . . . . . . . . . . . . . . . . . . . . . . . . . . . . . . . . . . . . . . . . . . . . . . . 5.38
Operating faults . . . . . . . . . . . . . . . . . . . . . . . . . . . . . . . . . . . . . . . . . . . . . . . . . . . . . . . . . . . . . . . . . 5.39
Page 138 of 200
5.6
ENG_UD22629_3
Kit de gonflage des pneumatiques (H79 - Dacia)
ENG_NU_898-5_H79_Dacia_5
Jaune NoirNoir texte
TYRE INFLATION KIT (2/3)
Depending on the vehicle, in the event
of a puncture, use the kit located on the
left side of the luggage compartment on
4x2 versions or in the in the emergency
spare wheel tray under the luggage
compartment carpet on 4x4 versions. –
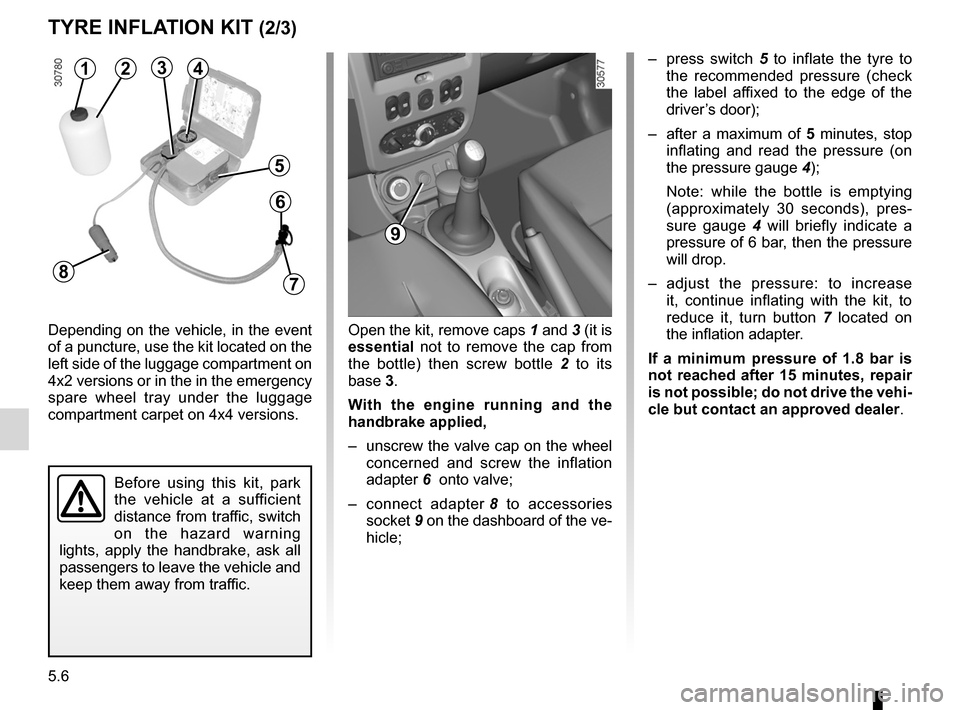
press switch 5 to inflate the tyre to
the recommended pressure (check
the label affixed to the edge of the
driver’s door);
– after a maximum of 5 minutes, stop
inflating and read the pressure (on
the pressure gauge 4);
Note: while the bottle is emptying
(approximately 30 seconds), pres -
sure gauge 4 will briefly indicate a
pressure of 6 bar, then the pressure
will drop.
– adjust the pressure: to increase
it, continue inflating with the kit, to
reduce it, turn button 7 located on
the inflation adapter.
If a minimum pressure of 1.8 bar is
not reached after 15 minutes, repair
is not possible; do not drive the vehi-
cle but contact an approved dealer .
Before using this kit, park
the vehicle at a sufficient
distance from traffic, switch
on the hazard warning
lights, apply the handbrake, ask all
passengers to leave the vehicle and
keep them away from traffic.
Open the kit, remove caps 1 and 3 (it is
essential not to remove the cap from
the bottle) then screw bottle 2 to its
base 3.
With the engine running and the
handbrake applied,
– unscrew the valve cap on the wheel
concerned and screw the inflation
adapter 6 onto valve;
– connect adapter 8 to accessories
socket 9 on the dashboard of the ve-
hicle;
9
1234
5
6
78
Page 139 of 200
JauneNoirNoir texte
5.7
ENG_UD22629_3
Kit de gonflage des pneumatiques (H79 - Dacia)
ENG_NU_898-5_H79_Dacia_5
TYRE INFLATION KIT (3/3)
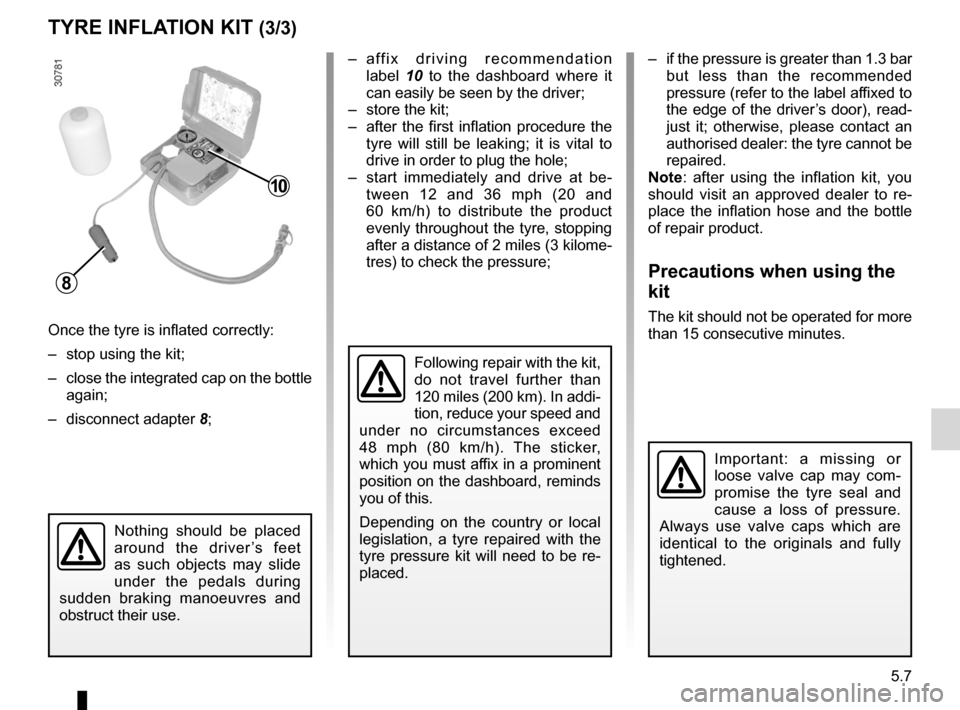
Once the tyre is inflated correctly:
– stop using the kit;
– close the integrated cap on the bottle
again;
– disconnect adapter 8; –
a ff i x d r i v i n g r e c o m m e n d a t i o n
label 10 to the dashboard where it
can easily be seen by the driver;
– store the kit;
– after the first inflation procedure the
tyre will still be leaking; it is vital to
drive in order to plug the hole;
– start immediately and drive at be -
tween 12 and 36 mph (20 and
60 km/h) to distribute the product
evenly throughout the tyre, stopping
after a distance of 2 miles (3 kilome-
tres) to check the pressure; –
if the pressure is greater than 1.3 bar
but less than the recommended
pressure (refer to the label affixed to
the edge of the driver’s door), read-
just it; otherwise, please contact an
authorised dealer: the tyre cannot be
repaired.
Note : after using the inflation kit, you
should visit an approved dealer to re -
place the inflation hose and the bottle
of repair product.
Precautions when using the
kit
The kit should not be operated for more
than 15 consecutive minutes.
Important: a missing or
loose valve cap may com -
promise the tyre seal and
cause a loss of pressure.
Always use valve caps which are
identical to the originals and fully
tightened.
Following repair with the kit,
do not travel further than
120 miles (200 km). In addi -
tion, reduce your speed and
under no circumstances exceed
48 mph (80 km/h). The sticker,
which you must affix in a prominent
position on the dashboard, reminds
you of this.
Depending on the country or local
legislation, a tyre repaired with the
tyre pressure kit will need to be re-
placed.
Nothing should be placed
around the driver ’s feet
as such objects may slide
under the pedals during
sudden braking manoeuvres and
obstruct their use.
10
8
Page 144 of 200
tyre pressure.......................................................... (current page)
5.12
ENG_UD20582_3
Pneumatiques (H79 - Dacia)ENG_NU_898-5_H79_Dacia_5
Jaune NoirNoir texte
Emergency spare wheel
Refer to the information on the
“ E m e r g e n c y s p a r e w h e e l ” a n d
“Changing a wheel” in Section 5.
TYRES (2/3)
Tyre pressures
Adhere to the tyre pressures (including
the emergency spare wheel). The tyre
pressures should be checked at least
once a month and additionally before
any long journey (refer to the label af -
fixed to the edge of the driver’s door).
Incorrect tyre pressures
lead to abnormal tyre wear
and unusually hot running.
These are factors which
may seriously affect safety and lead
to:
– poor road holding;
– risk of blowouts or throwing a
tread.
The tyre pressure depends on the
load and speed of use; adjust the
pressures according to the condi -
tions of use (refer to the information
on “Tyre pressures” in Section 4).
For safety reasons, this op-
eration must be carried out
by a specialist.
Fitting different tyres may
change your vehicle as follows:
– it may mean that your vehicle no
longer conforms to current regu-
lations;
– It may change the way it handles
when cornering;
– It may cause the steering to be
heavy;
– it may affect the use of snow
chains.
Please be aware that a poorly tightened or missing valve cap can make
the tyres less airtight and may lead to pressure loss. Always use valve
caps of the same type as the originals and tighten them fully.
Fitting new tyresPressures should be checked when the
tyres are cold; ignore higher pressures
which may be reached in hot weather
or following a fast journey.
If tyre pressures cannot be checked
when the tyres are cold, assume an in-
crease of 0.2 to 0.3 bar.
Never deflate a hot tyre.
Special note
Depending on the vehicle, there may
be an adapter which needs to be posi-
tioned on the valve before air is added.
Your vehicle is equipped with large
wheels. These are more sensitive
to imbalance. If you experience vi -
bration while driving, contact an ap-
proved dealer.
Page 164 of 200
towing hitch........................................... (up to the end of the DU)
practical advice ..................................... (up to the end of the DU)
towing breakdown ...................................... (up to the end of the DU)
5.32
ENG_UD22437_4
Remorquage : dépannage (H79 - Dacia)
ENG_NU_898-5_H79_Dacia_5
Jaune NoirNoir texte
Towing: troubleshooting
TOWING: breakdown (1/3)
Towing procedure
The steering wheel must be un -
locked and the ignition key must be
in position M (ignition on) to pro -
vide stop lights and hazard warning
lights on the towed vehicle. At night
the vehicle must have its lights on.
Unhitch the trailer, etc., if one is being
towed.
You must observe the towing regu -
lations which apply in the country in
which you are driving: do not exceed
the towing weight for your vehicle.
Contact an approved Dealer.
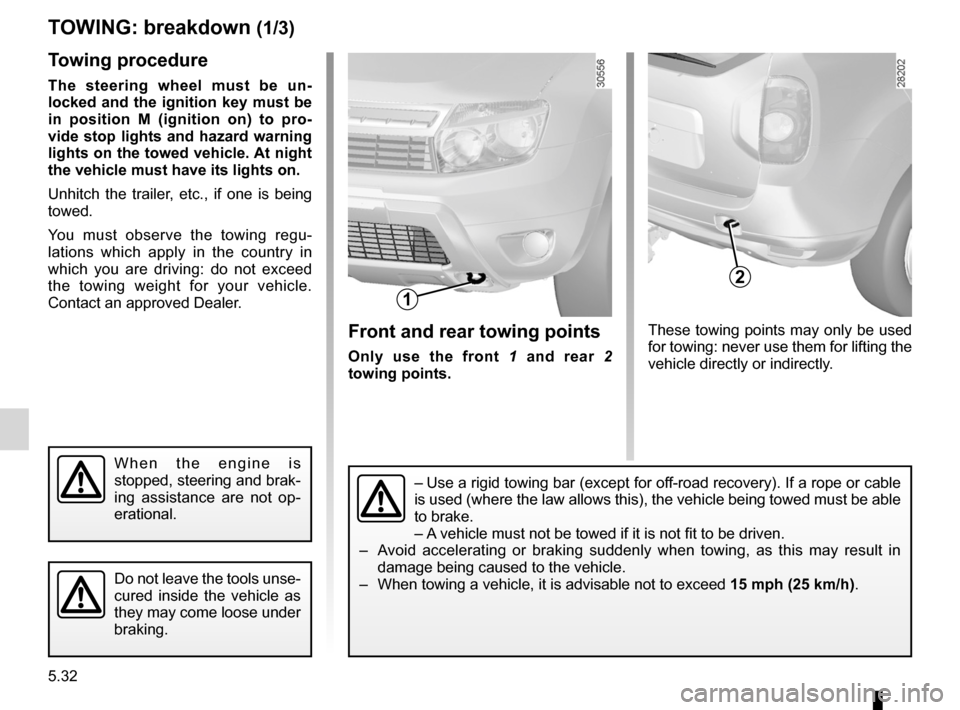
Front and rear towing points
Only use the front 1 and rear 2
towing points.
W h e n t h e e n g i n e i s
stopped, steering and brak-
ing assistance are not op -
erational.
Do not leave the tools unse-
cured inside the vehicle as
they may come loose under
braking.
– Use a rigid towing bar (except for off-road recovery). If a rope or cable
is used (where the law allows this), the vehicle being towed must be able
to brake.
– A vehicle must not be towed if it is not fit to be driven.
– Avoid accelerating or braking suddenly when towing, as this may result in
damage being caused to the vehicle.
– When towing a vehicle, it is advisable not to exceed 15 mph (25 km/h).
These towing points may only be used
for towing: never use them for lifting the
vehicle directly or indirectly.
1
2
Page 165 of 200
JauneNoirNoir texte
5.33
ENG_UD22437_4
Remorquage : dépannage (H79 - Dacia)
ENG_NU_898-5_H79_Dacia_5
TOWING: breakdown (2/3)
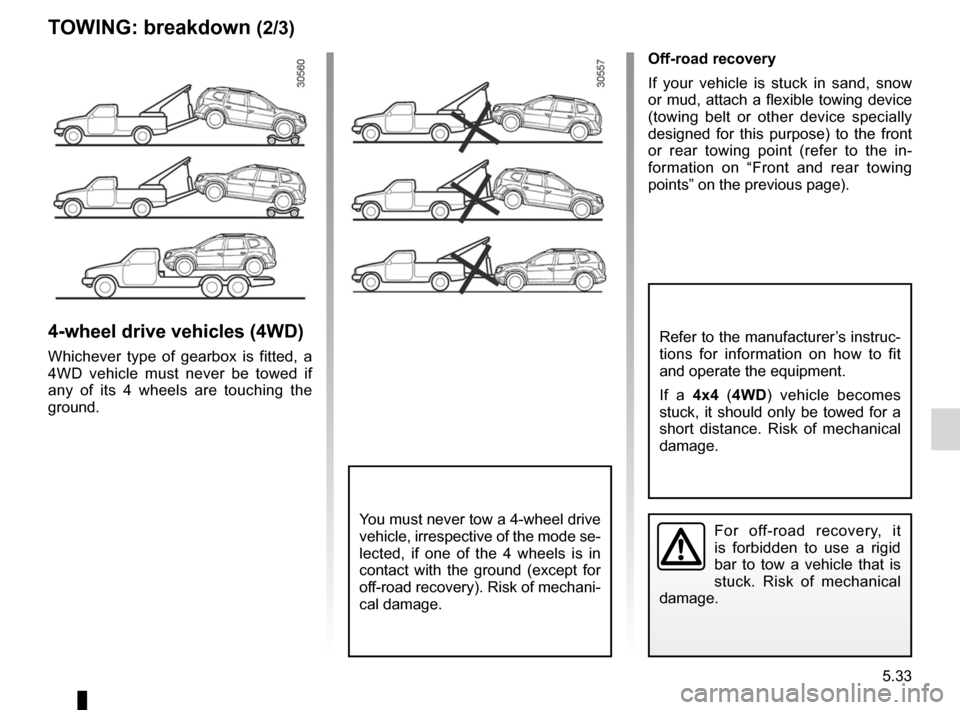
4-wheel drive vehicles (4WD)
Whichever type of gearbox is fitted, a
4WD vehicle must never be towed if
any of its 4 wheels are touching the
ground.
Off-road recovery
If your vehicle is stuck in sand, snow
or mud, attach a flexible towing device
(towing belt or other device specially
designed for this purpose) to the front
or rear towing point (refer to the in -
formation on “Front and rear towing
points” on the previous page).
For off-road recovery, it
is forbidden to use a rigid
bar to tow a vehicle that is
stuck. Risk of mechanical
damage.You must never tow a 4-wheel drive
vehicle, irrespective of the mode se-
lected, if one of the 4 wheels is in
contact with the ground (except for
off-road recovery). Risk of mechani-
cal damage.
Refer to the manufacturer’s instruc-
tions for information on how to fit
and operate the equipment.
If a 4x4 (4WD ) vehicle becomes
stuck, it should only be towed for a
short distance. Risk of mechanical
damage.