Table DACIA SANDERO STEPWAY 2016 2.G User Guide
[x] Cancel search | Manufacturer: DACIA, Model Year: 2016, Model line: SANDERO STEPWAY, Model: DACIA SANDERO STEPWAY 2016 2.GPages: 174, PDF Size: 2.78 MB
Page 46 of 174
fuel level ................................................................ (current page)
1.44
ENG_UD19017_6
Tableau de bord : afficheur et indicateurs (B90 - Dacia)
ENG_NU_817-10_B90_Dacia_1
DISPLAYS AND INDICATORS (2/2)
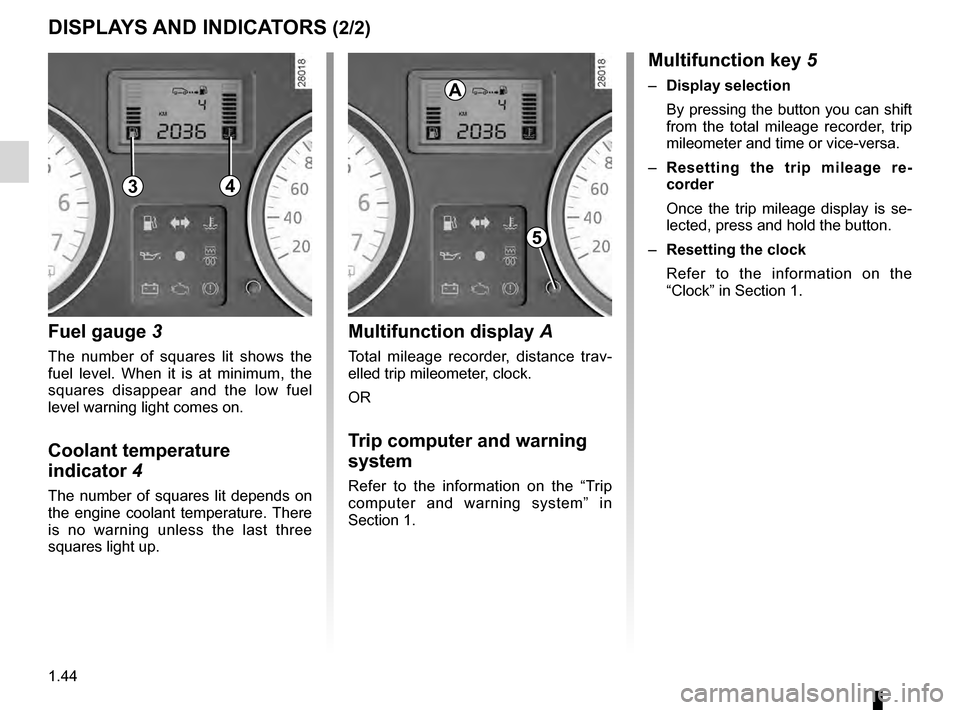
Fuel gauge
3
The number of squares lit shows the
fuel level. When it is at minimum, the
squares disappear and the low fuel
level warning light comes on.
Coolant temperature
indicator
4
The number of squares lit depends on
the engine coolant temperature. There
is no warning unless the last three
squares light up.
Multifunction display A
Total mileage recorder, distance trav-
elled trip mileometer, clock.
OR
Trip computer and warning
system
Refer to the information on the “Trip
computer and warning system” in
Section 1.
Multifunction key 5
– Display selection
By pressing the button you can shift
from the total mileage recorder, trip
mileometer and time or vice-versa.
–
R
esetting the trip mileage re-
corder
Once the trip mileage display is se-
lected, press and hold the button.
–
Resetting the clock
R
efer to the information on the
“Clock” in Section 1.
43
A
5
Page 47 of 174
control instruments ............................... (up to the end of the DU)
trip computer and warning system........ (up to the end of the DU)
warning lights........................................ (up to the end of the DU)
1.45
ENG_UD20446_9
Ordinateur de bord (B90 - L90 Ph2 - F90 Ph2 - R90 Ph2 - Dacia)
ENG_NU_817-10_B90_Dacia_1
Trip computer and warning system
TRIP COMPUTER AND WARNING SYSTEM (1/4)
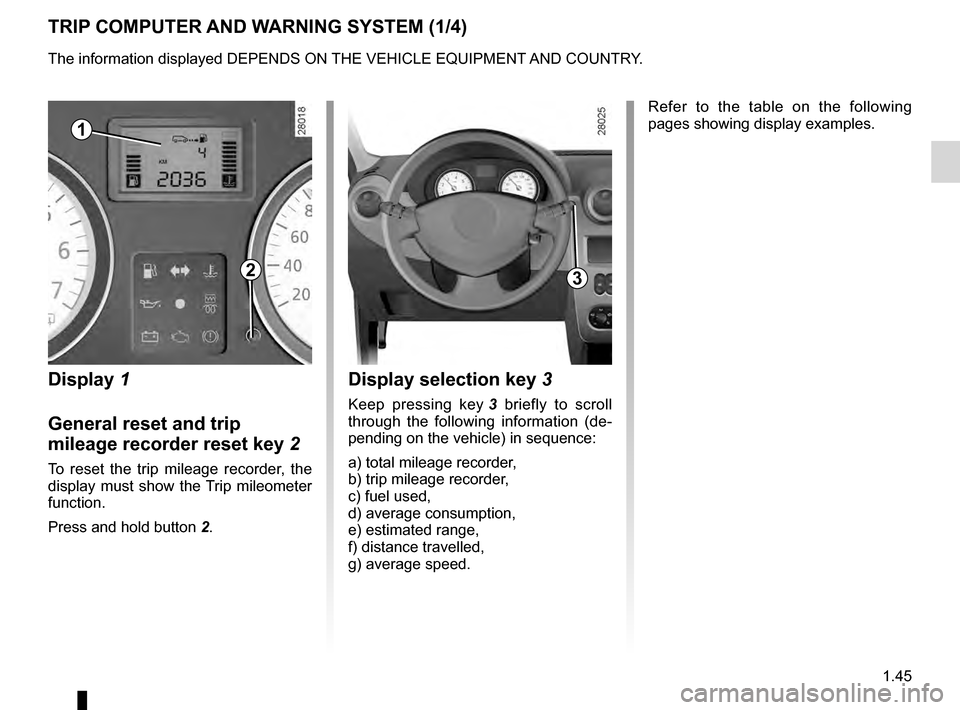
Display 1
General reset and trip
mileage recorder reset key
2
To reset the trip mileage recorder, the
display must show the Trip mileometer
function.
Press and hold button
2
.
Display selection key 3
Keep pressing key 3 briefly to scroll
through the following information (de-
pending on the vehicle) in sequence:
a) total mileage recorder,
b) trip mileage recorder,
c) fuel used,
d) average consumption,
e) estimated range,
f) distance travelled,
g) average speed. Refer to the table on the following
pages showing display examples.
1
23
The information displayed DEPENDS ON THE VEHICLE EQUIPMENT AND COUNTRY.
Page 48 of 174
1.46
ENG_UD20446_9
Ordinateur de bord (B90 - L90 Ph2 - F90 Ph2 - R90 Ph2 - Dacia)
ENG_NU_817-10_B90_Dacia_1
Jaune NoirNoir texte
Interpreting some of the
values displayed after
resetting
The values showing average fuel con-
sumption, range and average speed
will become more stable and reliable
the further you travel after pressing the
reset button.
For the first few miles after pressing the
reset key you will notice that the range
increases as you travel. This range
takes into account the average fuel con-
sumption since the last time the reset
button was pressed. Therefore, the fuel
consumption may decrease when:
–
the vehicle stops accelerating
;
–
t
he engine reaches its operat-
ing temperature (if the engine
was cold when the reset key was
pressed);
–
d
riving from an urban area onto
the open road;
Therefore,
if the average fuel con-
sumption decreases, the range
will increase. –
Y
ou may also notice that the aver-
age fuel consumption increases
when the vehicle is stationary and
the engine idling.
This is normal, since the computer
takes account of fuel used during
idling.
Manually resetting the journey param-
eters: with the display showing one of
the journey parameters, press button 2
until the display is reset.
Automatically resetting the journey pa-
rameters: the reset is automatic when
the capacity of one of the memories is
exceeded.
TRIP COMPUTER AND WARNING SYSTEM (2/4)
The information displayed DEPENDS ON THE VEHICLE EQUIPMENT AND COUNTRY.
Page 58 of 174
fuel filler cap .......................................................... (current page)
fuel tank capacity ................................................... (current page)
fuel grade ................................................................ (current page)
fuel tank ................................................ (up to the end of the DU)
fuel filler cap .......................................................... (current page)
fuel grade............................................................... (current page)
1.56
ENG_UD22575_7
Réservoir carburant (B90 - Dacia)
ENG_NU_817-10_B90_Dacia_1
Jaune NoirNoir texte
Fuel tank (filling with fuel)
FUEL TANK (1/3)
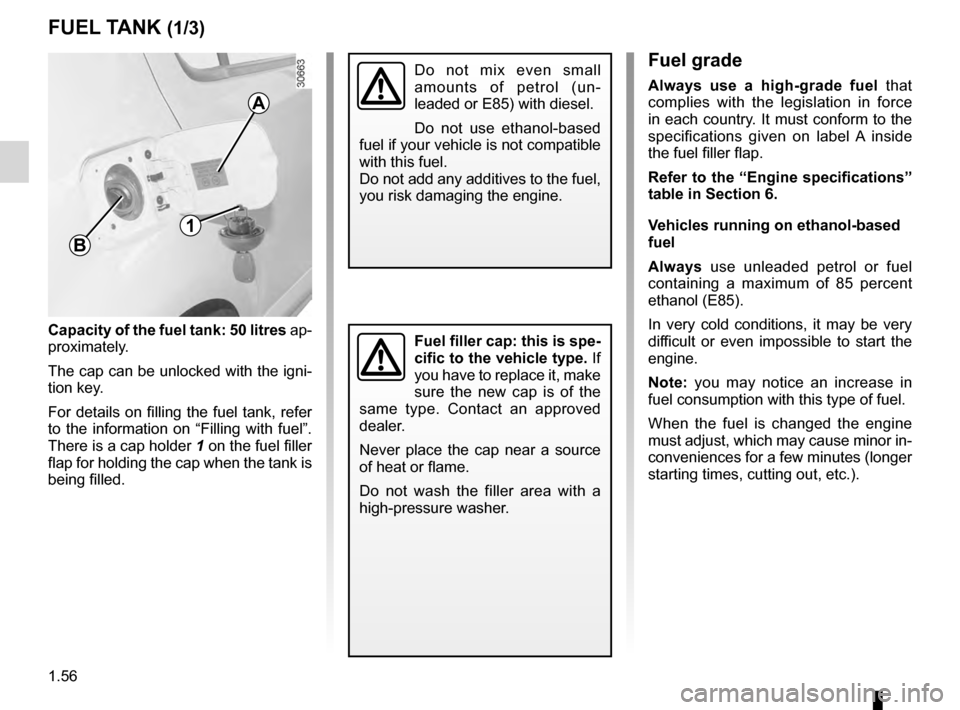
Capacity of the fuel tank: 50 litres ap-
proximately.
The cap can be unlocked with the igni-
tion key.
For details on filling the fuel tank, refer
to the information on “Filling with fuel”.
There is a cap holder
1 on the fuel filler
flap for holding the cap when the tank is
being filled.
Fuel grade
Always use a high-grade fuel that
complies with the legislation in force
in each country. It must conform to the
specifications given on label A inside
the fuel filler flap.
Refer to the “Engine specifications”
table in Section 6.
Vehicles running on ethanol-based
fuel
Always use unleaded petrol or fuel
containing a maximum of 85 percent
ethanol (E85).
In very cold conditions, it may be very
difficult or even impossible to start the
engine.
Note: you may notice an increase in
fuel consumption with this type of fuel.
When the fuel is changed the engine
must adjust, which may cause minor in-
conveniences for a few minutes (longer
starting times, cutting out, etc.).
Fuel filler cap: this is spe-
cific to the vehicle type. If
you have to replace it, make
sure the new cap is of the
same type. Contact an approved
dealer.
Never place the cap near a source
of heat or flame.
Do not wash the filler area with a
high-pressure washer.
A
B
1
Do not mix even small
amounts of petrol (un-
leaded or E85) with diesel.
Do not use ethanol-based
fuel if your vehicle is not compatible
with this fuel.
Do not add any additives to the fuel,
you risk damaging the engine.
Page 69 of 174
environment .......................................... (up to the end of the DU)
2.9
ENG_UD25716_1
Environnement (sans marque) (X44 - X45 - X77 - X81 - X85 - X90 - X91 \
- X83 - X61 - TEST - X95 - J95 - R95 - F90 Ph2 - X33 - X47 - X43 - X38 - H79 - X62 - X32 -\
X09 -
ENG_NU_817-10_B90_Dacia_2
Environment
ENVIRONMENT
Emissions
Your vehicle has been designed to emit
fewer greenhouse gases (CO2) while in
use, and therefore to consume less fuel
(eg. 140 g/km, equivalent to 5.3 l/100
km for a diesel vehicle).
Our vehicles are also equipped with a
particle filter system including a cata-
lytic converter, an oxygen sensor and
an active carbon filter (the latter pre-
vents vapour from the fuel tank being
released into the open air).
For certain diesel vehicles, this system
also has a particle filter to reduce the
volume of soot particles emitted.
Please make your own
contribution towards
protecting the environment
too
– Worn parts replaced in the course of
routine vehicle maintenance (vehi-
cle battery, oil filter, air filter, batter-
ies, etc.) and oil containers (empty or
filled with used oil) must be disposed
of through specialist organisations. –
A
t the end of the vehicle’s service
life, it should be sent to approved
centres to ensure that it is recycled.
–
In
all cases, comply with local legis-
lation.
Recycling
Your vehicle is 85% recyclable and
95% recoverable.
To achieve these objectives, many of
the vehicle components have been de-
signed to enable them to be recycled.
The materials and structures have
been carefully designed to allow these
components to be easily removed and
reprocessed by specialist companies.
In order to preserve raw material re-
sources, this vehicle incorporates nu-
merous parts made from recycled plas-
tics or renewable materials (vegetable
or animal-derived materials such as
cotton or wool).
Your vehicle has been designed with
respect for the
environment in mind for
its entire service life: during production,
use and at the end of its life.
This commitment is illustrated by the of
the manufacturer eco² signature.Manufacture
Your vehicle has been manufactured at
a factory which complies with a policy
to reduce the environmental impact
on the surrounding areas (reduction of
water and energy consumption, visual
and noise pollution, atmospheric emis-
sions and waste water; sorting and re-
using waste).
Page 74 of 174
automatic gearbox (use) ....................... (up to the end of the DU)
changing gear ....................................... (up to the end of the DU)
driving ................................................... (up to the end of the DU)
automatic gearbox selector lever.......... (up to the end of the DU)
2.14
ENG_UD22554_10
Boîte automatique (B90 - L90 Ph2 - F90 Ph2 - R90 Ph2 - Dacia)
ENG_NU_817-10_B90_Dacia_2
Jaune NoirNoir texte
Automatic gearbox
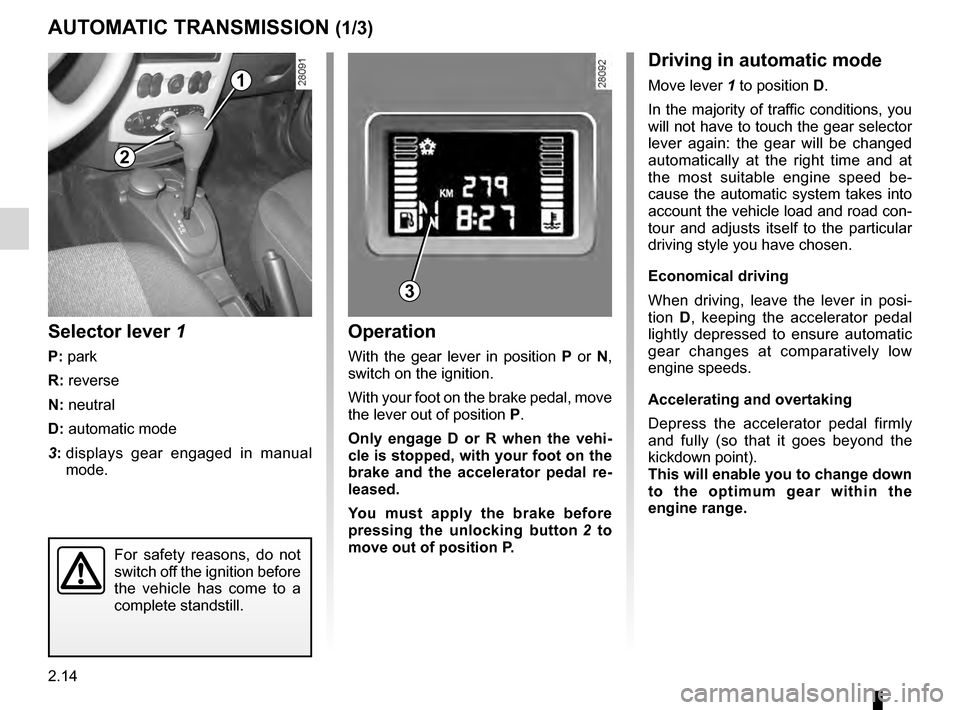
Selector lever 1
P: park
R: reverse
N: neutral
D: automatic mode
3:
d
isplays gear engaged in manual
mode.
Operation
With the gear lever in position P or N,
switch on the ignition.
With your foot on the brake pedal, move
the lever out of position P.
Only engage D or R when the vehi-
cle is stopped, with your foot on the
brake and the accelerator pedal re-
leased.
You must apply the brake before
pressing the unlocking button
2 t
o
move out of position P.
AUTOMATIC TRANSMISSION (1/3)
2
1
Driving in automatic mode
Move lever 1 to position D.
In the majority of traffic conditions, you
will not have to touch the gear selector
lever again: the gear will be changed
automatically at the right time and at
the most suitable engine speed be-
cause the automatic system takes into
account the vehicle load and road con-
tour and adjusts itself to the particular
driving style you have chosen.
Economical driving
When driving, leave the lever in posi-
tion D, keeping the accelerator pedal
lightly depressed to ensure automatic
gear changes at comparatively low
engine speeds.
Accelerating and overtaking
Depress the accelerator pedal firmly
and fully (so that it goes beyond the
kickdown point).
This will enable you to change down
to the optimum gear within the
engine range.
3
For safety reasons, do not
switch off the ignition before
the vehicle has come to a
complete standstill.
Page 81 of 174
JauneNoirNoir texte
3.5
ENG_UD25116_1
Chauffage - Ventilation - Air conditionné (B90 - L90 Ph2 - Dacia)
ENG_NU_817-10_B90_Dacia_3
HEATING, VENTILATION, AIR CONDITIONING (2/2)
In very hot weather or when the vehicle
has been parked in the sun, open the
doors for a few moments to let the hot
air escape before starting the engine.
Use the passenger compartment isola-
tion function to lower the temperature
as quickly as possible to the required
comfort level. Switch off the air recircu-
lation function once a comfortable level
has been reached. When the air conditioning system is op-
erating, all windows must be closed for
maximum efficiency.
If there is an operating fault, contact an
approved dealer.
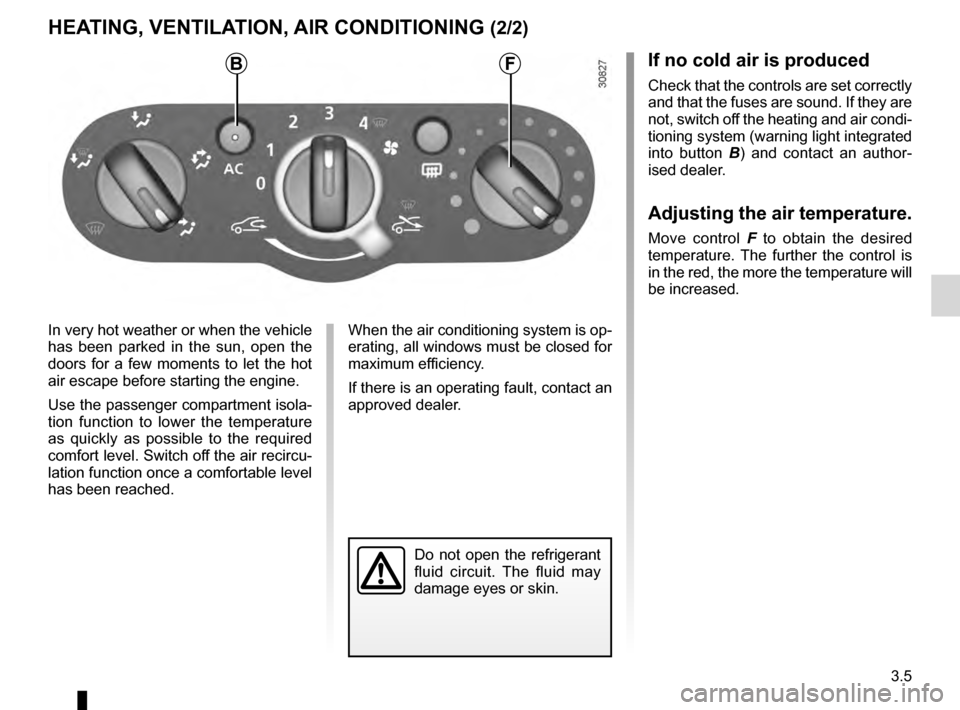
If no cold air is produced
Check that the controls are set correctly
and that the fuses are sound. If they are
not, switch off the heating and air condi-
tioning system (warning light integrated
into button
B
)
and contact an author-
ised dealer.
Adjusting the air temperature.
Move control F to obtain the desired
temperature. The further the control is
in the red, the more the temperature will
be increased.
Do not open the refrigerant
fluid circuit. The fluid may
damage eyes or skin.
BF
Page 97 of 174
rear parcel shelf .................................... (up to the end of the DU)
tailgate .................................................. (up to the end of the DU)
3.21
ENG_UD20456_4
Tablette arrière (B90 - Dacia)
ENG_NU_817-10_B90_Dacia_3
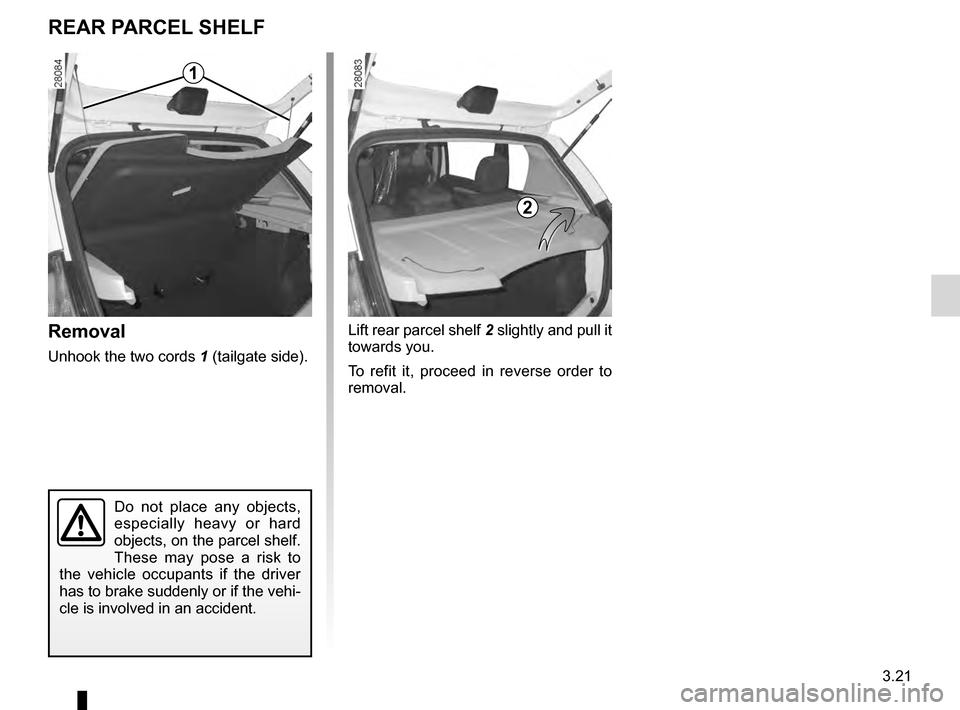
Removal
Unhook the two cords 1 (tailgate side).
Rear parcel shelf
Do not place any objects,
especially heavy or hard
objects, on the parcel shelf.
These may pose a risk to
the vehicle occupants if the driver
has to brake suddenly or if the vehi-
cle is involved in an accident.
Lift rear parcel shelf 2 slightly and pull it
towards you.
T
o refit it, proceed in reverse order to
removal.
REAR PARCEL SHELF
1
2
Page 118 of 174
tyre inflation kit...................................... (up to the end of the DU)
5.4
ENG_UD22290_8
Kit de gonflage des pneumatiques (B90 - L90 Ph2 - F90 Ph2 - R90 Ph2 - D\
acia)
ENG_NU_817-10_B90_Dacia_5
Jaune NoirNoir texte
Tyre inflation kit
TYRE INFLATION KIT (1/3)
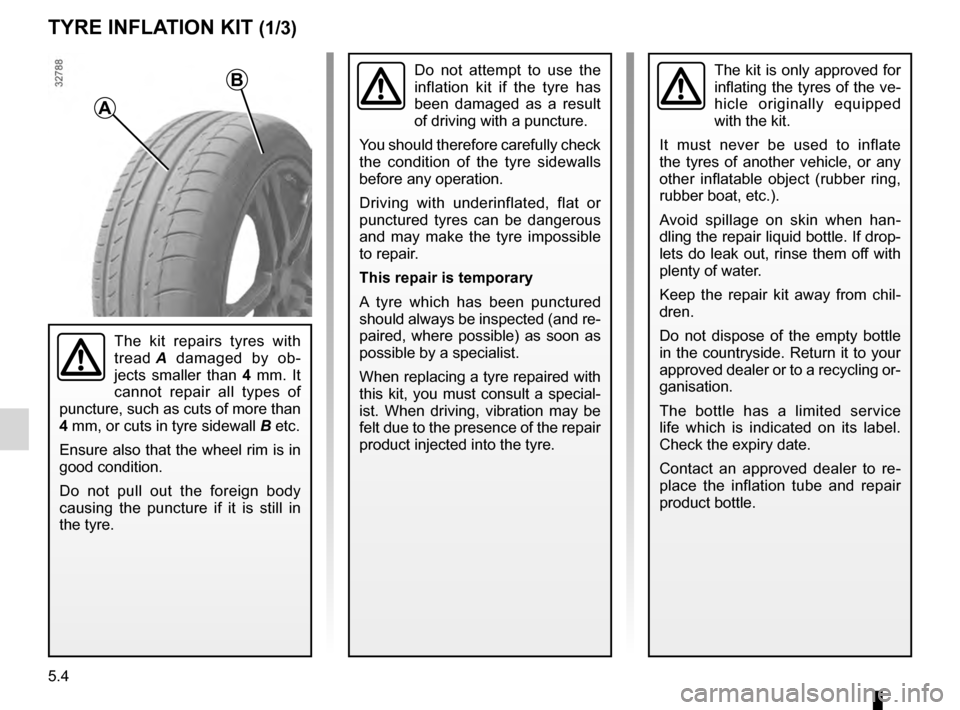
The kit repairs tyres with
tread A
damaged by ob-
jects smaller than 4 mm. It
cannot repair all types of
puncture, such as cuts of more than
4 mm, or cuts in tyre sidewall
B etc.
Ensure also that the wheel rim is in
good condition.
Do not pull out the foreign body
causing the puncture if it is still in
the tyre.
Do not attempt to use the
inflation kit if the tyre has
been damaged as a result
of driving with a puncture.
You should therefore carefully check
the condition of the tyre sidewalls
before any operation.
Driving with underinflated, flat or
punctured tyres can be dangerous
and may make the tyre impossible
to repair.
This repair is temporary
A tyre which has been punctured
should always be inspected (and re-
paired, where possible) as soon as
possible by a specialist.
When replacing a tyre repaired with
this kit, you must consult a special-
ist. When driving, vibration may be
felt due to the presence of the repair
product injected into the tyre.The kit is only approved for
inflating the tyres of the ve-
hicle originally equipped
with the kit.
It must never be used to inflate
the tyres of another vehicle, or any
other inflatable object (rubber ring,
rubber boat, etc.).
Avoid spillage on skin when han-
dling the repair liquid bottle. If drop-
lets do leak out, rinse them off with
plenty of water.
Keep the repair kit away from chil-
dren.
Do not dispose of the empty bottle
in the countryside. Return it to your
approved dealer or to a recycling or-
ganisation.
The bottle has a limited service
life which is indicated on its label.
Check the expiry date.
Contact an approved dealer to re-
place the inflation tube and repair
product bottle.
A
B
Page 127 of 174
JauneNoirNoir texte
5.13
ENG_UD19769_10
Pneumatiques (B90 - U90 - L90 Ph2 - F90 Ph2 - R90 Ph2 - Dacia)ENG_NU_817-10_B90_Dacia_5
Use in winter
Chains
Snow chains must be fitted to the
front wheels.
TYRES (3/3)
It is forbidden to fit snow
chains to only the rear
wheels.
Snow chains may only be
fitted to tyres of the same size as
those originally fitted to your vehicle.
Only certain chains can be fitted to
tyres.
Consult an approved dealer.
Snow or Winter tyres
We would recommend that these be
fitted to all four wheels to ensure that
your vehicle retains maximum adhe-
sion.
Warning: These tyres sometimes
have a specific direction of rotation
and a maximum speed index which
may be lower than the maximum
speed of your vehicle.
Studded tyres
This type of equipment may only be
used for a limited period and as laid
down by local legislation.
It is necessary to observe the speed
specified by current legislation.
These tyres must, at a minimum, be
fitted to the two front wheels.
In all cases, we would recommend
that you contact your approved
Dealer who will be able to advise
you on the choice of equipment
which is most suitable for your ve-
hicle.