Rod DAEWOO LACETTI 2004 Service Repair Manual
[x] Cancel search | Manufacturer: DAEWOO, Model Year: 2004, Model line: LACETTI, Model: DAEWOO LACETTI 2004Pages: 2643, PDF Size: 80.54 MB
Page 3 of 2643

iii
.
NUBIRA/LACETTI
Service Manual
(MY2004)
FOREWORD
This manual includes procedures for maintenance, adjustment, service operations, and removal
and installation of components for the NUBIRA/LACETTI vehicle.
When reference is made in this manual to a brand name, number, or specific tool, an equivalent
product may be used in place of the recommended item.
All information, illustrations and specifications contained in this manual are based on the latest
product information available at the time of publication approval. The right is reserved to make
changes at any time without notice.
GM Daewoo Auto & Technology Co., Ltd.
Service Engineering Team
199–1 Cheong Cheon–Dong, Bupyung–Gu, Incheon, Korea
Tel: 82-32-520–2737, 5752
Fax: 82-32-520–4808
E-mail: [email protected]
[email protected]
GM Daewoo Auto & Technology Co., Ltd.
All Rights Reserved
No part of this publication may be reproduced, stored in any retrieval system or transmitted,
in any form or by any means, including but not limited to electronic, mechanical, photocopy-
ing, recording or otherwise, without the prior written permission of GM Daewoo Auto &
Technology Co., Ltd.
Printed in the Republic of Korea
Page 35 of 2643
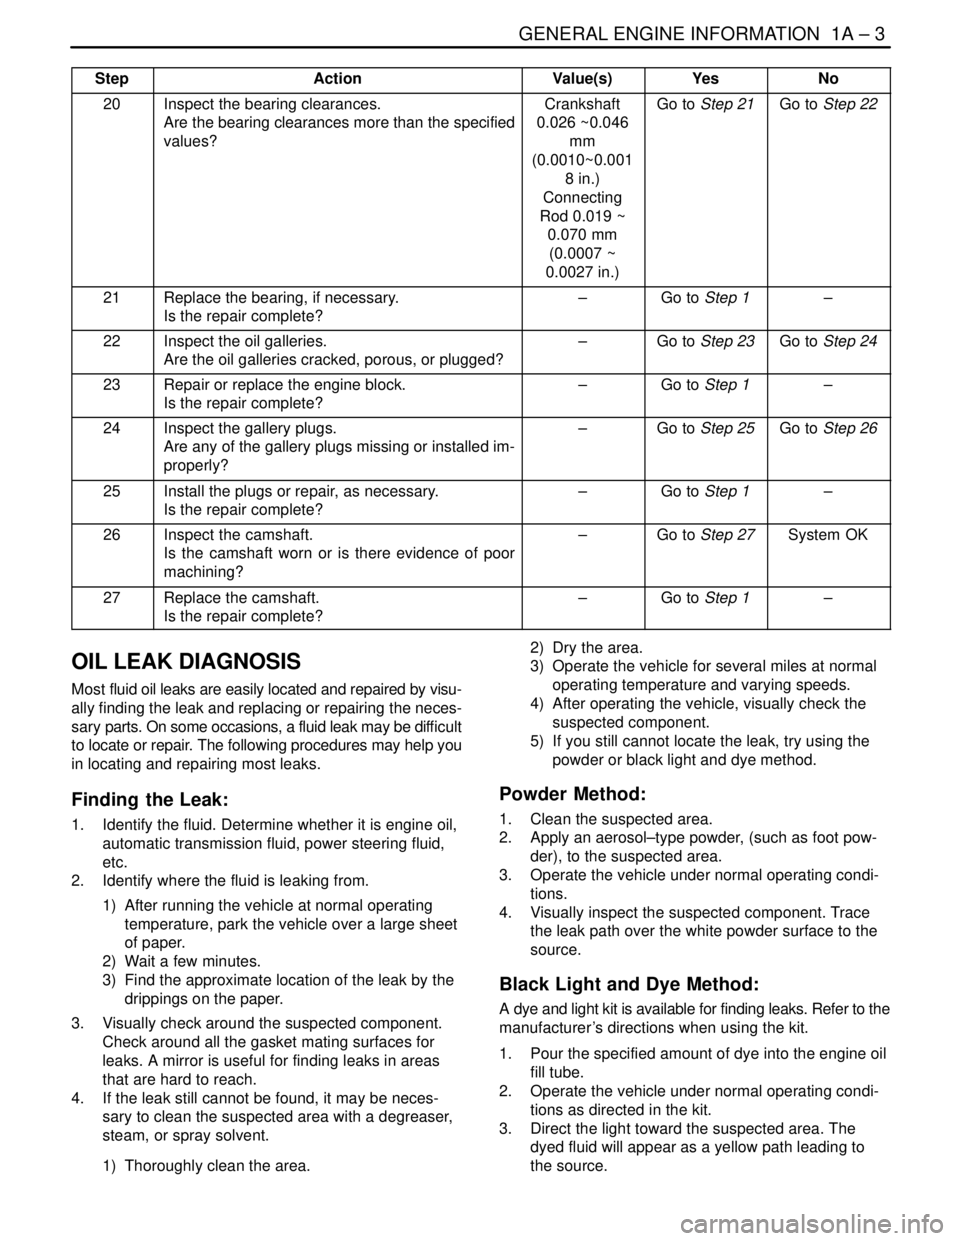
GENERAL ENGINE INFORMATION 1A – 3
DAEWOO V–121 BL4
StepNo Yes Value(s) Action
20Inspect the bearing clearances.
Are the bearing clearances more than the specified
values?Crankshaft
0.026 ~0.046
mm
(0.0010~0.001
8 in.)
Connecting
Rod 0.019 ~
0.070 mm
(0.0007 ~
0.0027 in.)Go to Step 21Go to Step 22
21Replace the bearing, if necessary.
Is the repair complete?–Go to Step 1–
22Inspect the oil galleries.
Are the oil galleries cracked, porous, or plugged?–Go to Step 23Go to Step 24
23Repair or replace the engine block.
Is the repair complete?–Go to Step 1–
24Inspect the gallery plugs.
Are any of the gallery plugs missing or installed im-
properly?–Go to Step 25Go to Step 26
25Install the plugs or repair, as necessary.
Is the repair complete?–Go to Step 1–
26Inspect the camshaft.
Is the camshaft worn or is there evidence of poor
machining?–Go to Step 27System OK
27Replace the camshaft.
Is the repair complete?–Go to Step 1–
OIL LEAK DIAGNOSIS
Most fluid oil leaks are easily located and repaired by visu-
ally finding the leak and replacing or repairing the neces-
sary parts. On some occasions, a fluid leak may be difficult
to locate or repair. The following procedures may help you
in locating and repairing most leaks.
Finding the Leak:
1. Identify the fluid. Determine whether it is engine oil,
automatic transmission fluid, power steering fluid,
etc.
2. Identify where the fluid is leaking from.
1) After running the vehicle at normal operating
temperature, park the vehicle over a large sheet
of paper.
2) Wait a few minutes.
3) Find the approximate location of the leak by the
drippings on the paper.
3. Visually check around the suspected component.
Check around all the gasket mating surfaces for
leaks. A mirror is useful for finding leaks in areas
that are hard to reach.
4. If the leak still cannot be found, it may be neces-
sary to clean the suspected area with a degreaser,
steam, or spray solvent.
1) Thoroughly clean the area.2) Dry the area.
3) Operate the vehicle for several miles at normal
operating temperature and varying speeds.
4) After operating the vehicle, visually check the
suspected component.
5) If you still cannot locate the leak, try using the
powder or black light and dye method.
Powder Method:
1. Clean the suspected area.
2. Apply an aerosol–type powder, (such as foot pow-
der), to the suspected area.
3. Operate the vehicle under normal operating condi-
tions.
4. Visually inspect the suspected component. Trace
the leak path over the white powder surface to the
source.
Black Light and Dye Method:
A dye and light kit is available for finding leaks. Refer to the
manufacturer ’s directions when using the kit.
1. Pour the specified amount of dye into the engine oil
fill tube.
2. Operate the vehicle under normal operating condi-
tions as directed in the kit.
3. Direct the light toward the suspected area. The
dyed fluid will appear as a yellow path leading to
the source.
Page 36 of 2643
1A – 4IGENERAL ENGINE INFORMATION
DAEWOO V–121 BL4
Repairing the Leak
Once the origin of the leak has been pinpointed and traced
back to its source, the cause of the leak must be deter-
mined in order for it to be repaired properly. If a gasket is
replaced, but the sealing flange is bent, the new gasket will
not repair the leak. The bent flange must be repaired also.
Before attempting to repair a leak, check for the following
conditions and correct them as they may cause a leak.
Gaskets:
S The fluid level/pressure is too high.
S The crankcase ventilation system is malfunctioning.
S The fasteners are improperly tightened or the
threads are dirty or damaged.
S The flanges or the sealing surface is warped.S There are scratches, burrs or other damage to the
sealing surface.
S The gasket is damaged or worn.
S There is cracking or porosity of the component.
S An improper seal was used, (where applicable).
Seals:
S The fluid level/pressure is too high.
S The crankcase ventilation system is malfunctioning.
S The seal bore is damaged, scratched, burred or
nicked.
S The seal is damaged or worn.
S Improper installation is evident.
S There are cracks in the component.
S The shaft surface is scratched, nicked or damaged.
S A loose or worn bearing is causing excess seal
wear.
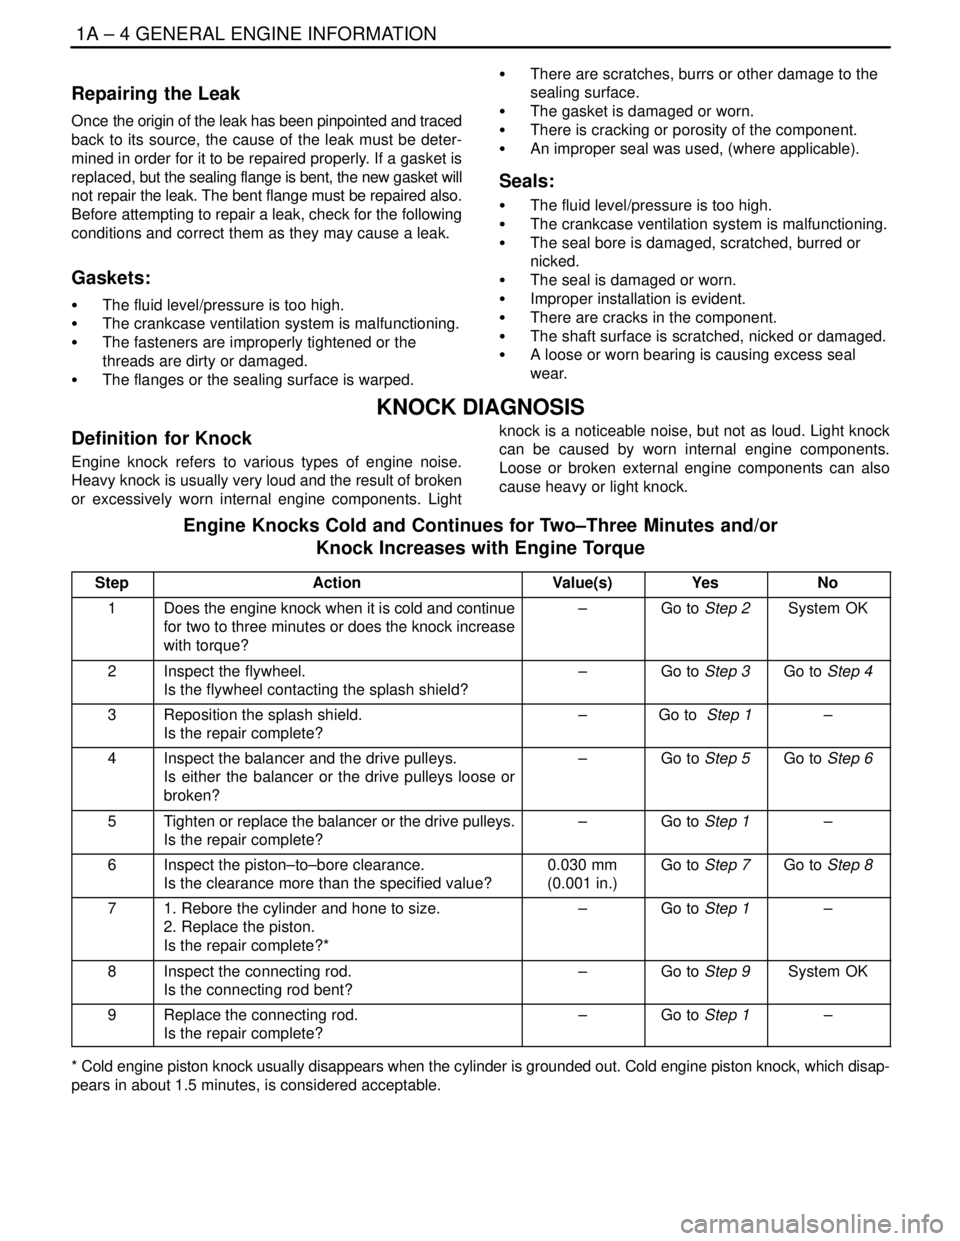
KNOCK DIAGNOSIS
Definition for Knock
Engine knock refers to various types of engine noise.
Heavy knock is usually very loud and the result of broken
or excessively worn internal engine components. Lightknock is a noticeable noise, but not as loud. Light knock
can be caused by worn internal engine components.
Loose or broken external engine components can also
cause heavy or light knock.
Engine Knocks Cold and Continues for Two–Three Minutes and/or
Knock Increases with Engine Torque
StepActionValue(s)YesNo
1Does the engine knock when it is cold and continue
for two to three minutes or does the knock increase
with torque?–Go to Step 2System OK
2Inspect the flywheel.
Is the flywheel contacting the splash shield?–Go to Step 3Go to Step 4
3Reposition the splash shield.
Is the repair complete?–Go to Step 1–
4Inspect the balancer and the drive pulleys.
Is either the balancer or the drive pulleys loose or
broken?–Go to Step 5Go to Step 6
5Tighten or replace the balancer or the drive pulleys.
Is the repair complete?–Go to Step 1–
6Inspect the piston–to–bore clearance.
Is the clearance more than the specified value?0.030 mm
(0.001 in.)Go to Step 7Go to Step 8
71. Rebore the cylinder and hone to size.
2. Replace the piston.
Is the repair complete?*–Go to Step 1–
8Inspect the connecting rod.
Is the connecting rod bent?–Go to Step 9System OK
9Replace the connecting rod.
Is the repair complete?–Go to Step 1–
* Cold engine piston knock usually disappears when the cylinder is grounded out. Cold engine piston knock, which disap-
pears in about 1.5 minutes, is considered acceptable.
Page 37 of 2643
GENERAL ENGINE INFORMATION 1A – 5
DAEWOO V–121 BL4
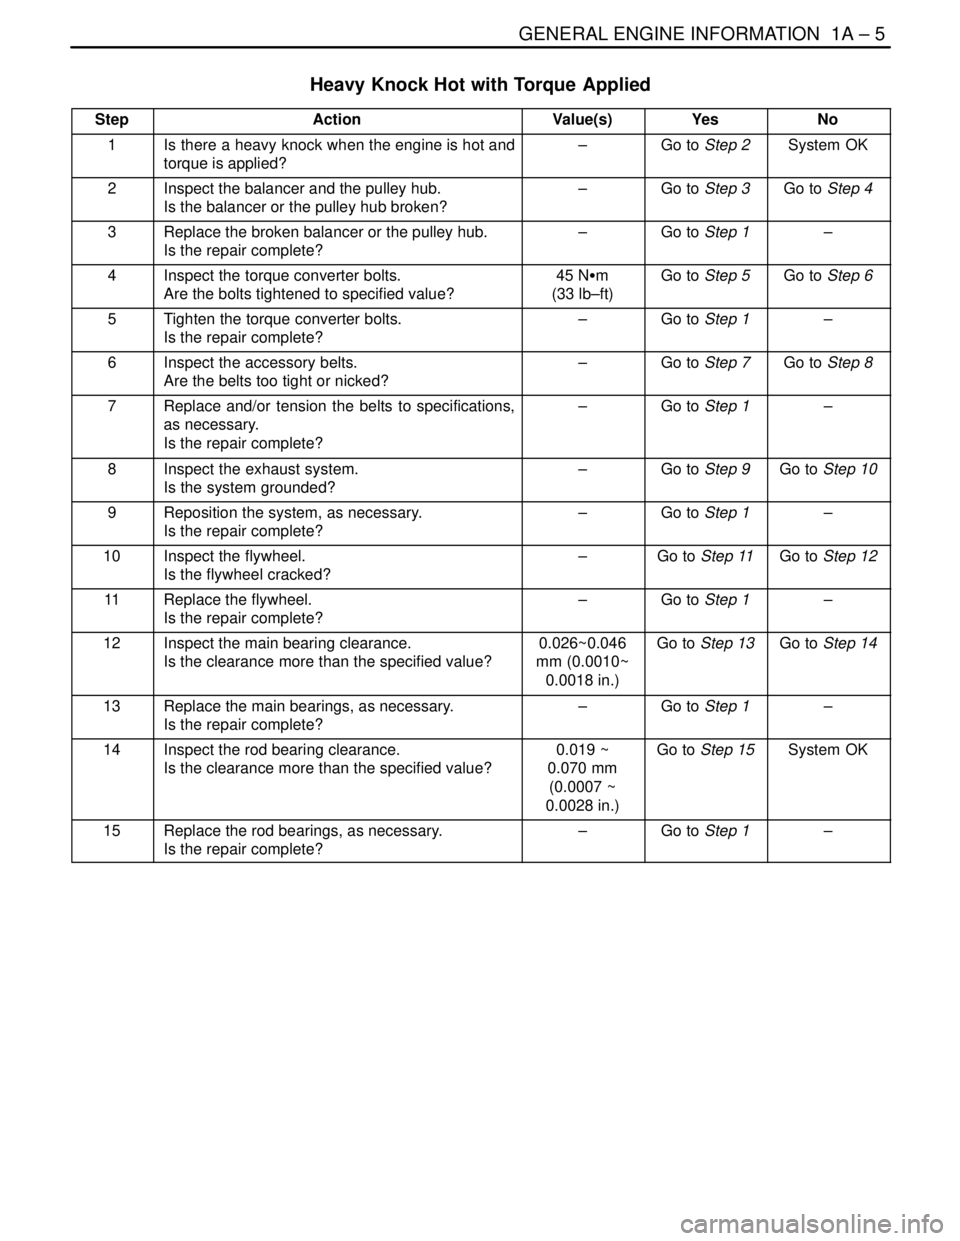
Heavy Knock Hot with Torque Applied
StepActionValue(s)YesNo
1Is there a heavy knock when the engine is hot and
torque is applied?–Go to Step 2System OK
2Inspect the balancer and the pulley hub.
Is the balancer or the pulley hub broken?–Go to Step 3Go to Step 4
3Replace the broken balancer or the pulley hub.
Is the repair complete?–Go to Step 1–
4Inspect the torque converter bolts.
Are the bolts tightened to specified value?45 NSm
(33 lb–ft)Go to Step 5Go to Step 6
5Tighten the torque converter bolts.
Is the repair complete?–Go to Step 1–
6Inspect the accessory belts.
Are the belts too tight or nicked?–Go to Step 7Go to Step 8
7Replace and/or tension the belts to specifications,
as necessary.
Is the repair complete?–Go to Step 1–
8Inspect the exhaust system.
Is the system grounded?–Go to Step 9Go to Step 10
9Reposition the system, as necessary.
Is the repair complete?–Go to Step 1–
10Inspect the flywheel.
Is the flywheel cracked?–Go to Step 11Go to Step 12
11Replace the flywheel.
Is the repair complete?–Go to Step 1–
12Inspect the main bearing clearance.
Is the clearance more than the specified value?0.026~0.046
mm (0.0010~
0.0018 in.)Go to Step 13Go to Step 14
13Replace the main bearings, as necessary.
Is the repair complete?–Go to Step 1–
14Inspect the rod bearing clearance.
Is the clearance more than the specified value?0.019 ~
0.070 mm
(0.0007 ~
0.0028 in.)Go to Step 15System OK
15Replace the rod bearings, as necessary.
Is the repair complete?–Go to Step 1–
Page 38 of 2643
1A – 6IGENERAL ENGINE INFORMATION
DAEWOO V–121 BL4
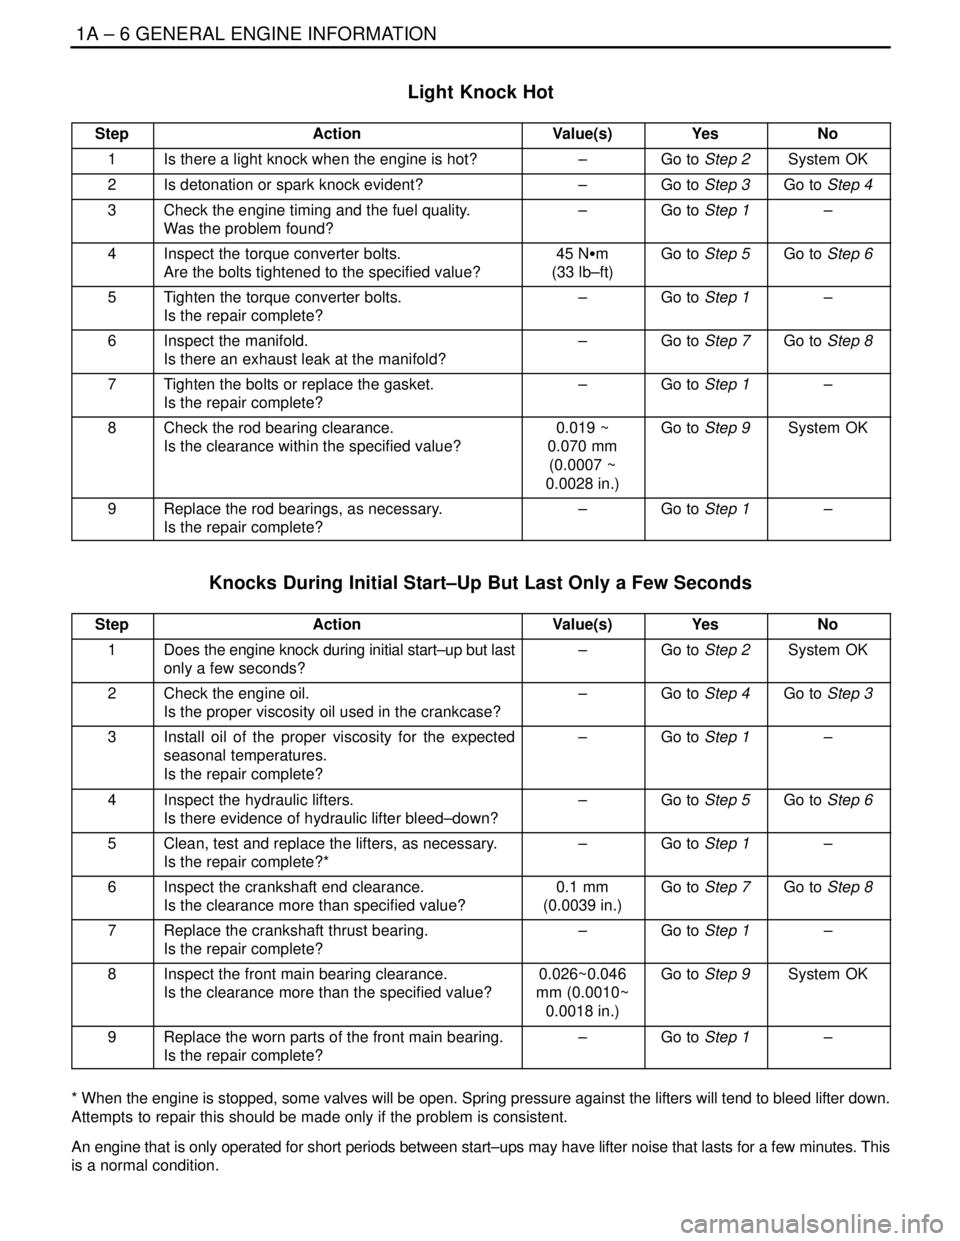
Light Knock Hot
StepActionValue(s)YesNo
1Is there a light knock when the engine is hot?–Go to Step 2System OK
2Is detonation or spark knock evident?–Go to Step 3Go to Step 4
3Check the engine timing and the fuel quality.
Was the problem found?–Go to Step 1–
4Inspect the torque converter bolts.
Are the bolts tightened to the specified value?45 NSm
(33 lb–ft)Go to Step 5Go to Step 6
5Tighten the torque converter bolts.
Is the repair complete?–Go to Step 1–
6Inspect the manifold.
Is there an exhaust leak at the manifold?–Go to Step 7Go to Step 8
7Tighten the bolts or replace the gasket.
Is the repair complete?–Go to Step 1–
8Check the rod bearing clearance.
Is the clearance within the specified value?0.019 ~
0.070 mm
(0.0007 ~
0.0028 in.)Go to Step 9System OK
9Replace the rod bearings, as necessary.
Is the repair complete?–Go to Step 1–
Knocks During Initial Start–Up But Last Only a Few Seconds
StepActionValue(s)YesNo
1Does the engine knock during initial start–up but last
only a few seconds?–Go to Step 2System OK
2Check the engine oil.
Is the proper viscosity oil used in the crankcase?–Go to Step 4Go to Step 3
3Install oil of the proper viscosity for the expected
seasonal temperatures.
Is the repair complete?–Go to Step 1–
4Inspect the hydraulic lifters.
Is there evidence of hydraulic lifter bleed–down?–Go to Step 5Go to Step 6
5Clean, test and replace the lifters, as necessary.
Is the repair complete?*–Go to Step 1–
6Inspect the crankshaft end clearance.
Is the clearance more than specified value?0.1 mm
(0.0039 in.)Go to Step 7Go to Step 8
7Replace the crankshaft thrust bearing.
Is the repair complete?–Go to Step 1–
8Inspect the front main bearing clearance.
Is the clearance more than the specified value?0.026~0.046
mm (0.0010~
0.0018 in.)Go to Step 9System OK
9Replace the worn parts of the front main bearing.
Is the repair complete?–Go to Step 1–
* When the engine is stopped, some valves will be open. Spring pressure against the lifters will tend to bleed lifter down.
Attempts to repair this should be made only if the problem is consistent.
An engine that is only operated for short periods between start–ups may have lifter noise that lasts for a few minutes. This
is a normal condition.
Page 39 of 2643
GENERAL ENGINE INFORMATION 1A – 7
DAEWOO V–121 BL4
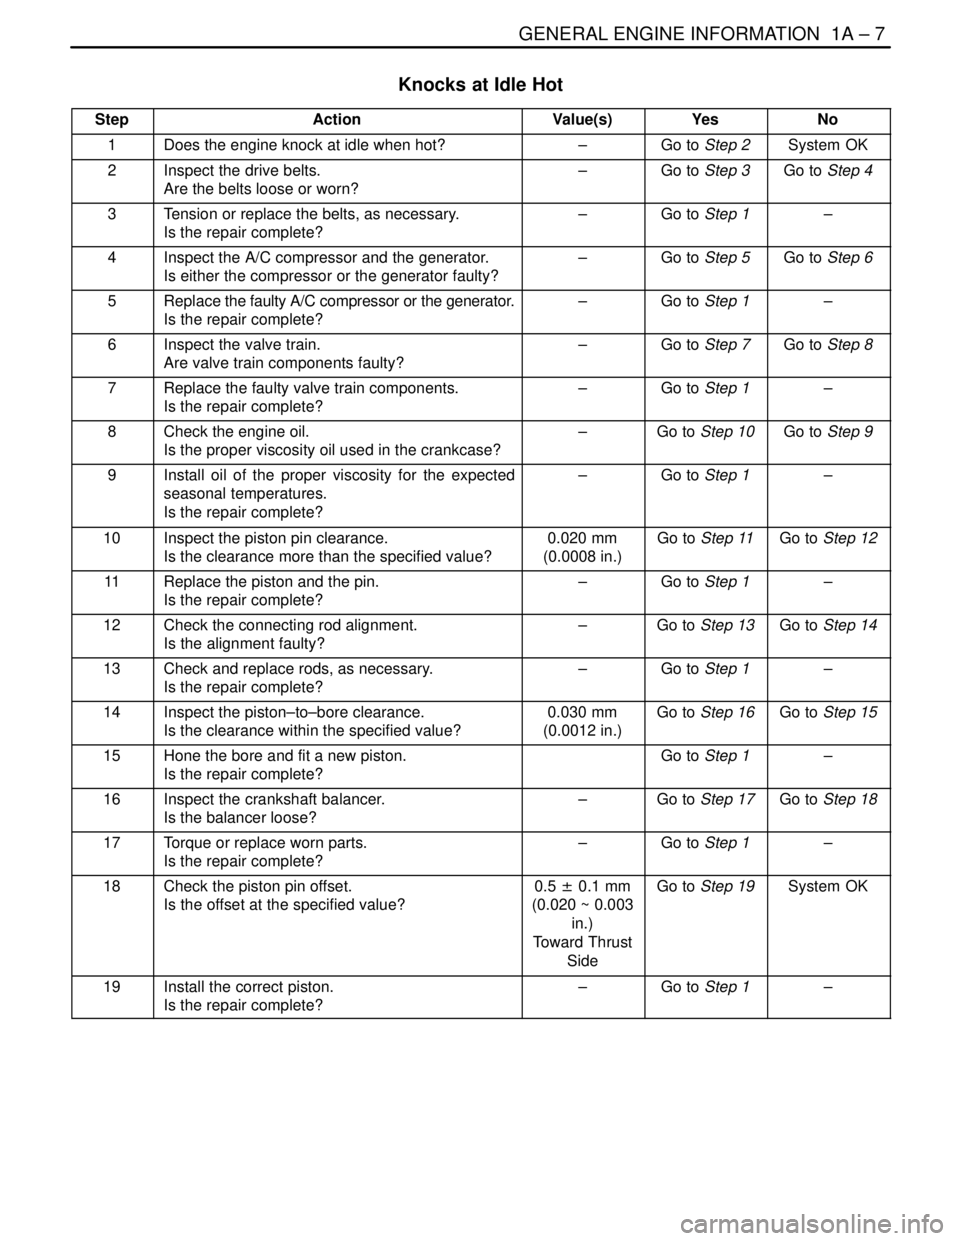
Knocks at Idle Hot
StepActionValue(s)YesNo
1Does the engine knock at idle when hot?–Go to Step 2System OK
2Inspect the drive belts.
Are the belts loose or worn?–Go to Step 3Go to Step 4
3Tension or replace the belts, as necessary.
Is the repair complete?–Go to Step 1–
4Inspect the A/C compressor and the generator.
Is either the compressor or the generator faulty?–Go to Step 5Go to Step 6
5Replace the faulty A/C compressor or the generator.
Is the repair complete?–Go to Step 1–
6Inspect the valve train.
Are valve train components faulty?–Go to Step 7Go to Step 8
7Replace the faulty valve train components.
Is the repair complete?–Go to Step 1–
8Check the engine oil.
Is the proper viscosity oil used in the crankcase?–Go to Step 10Go to Step 9
9Install oil of the proper viscosity for the expected
seasonal temperatures.
Is the repair complete?–Go to Step 1–
10Inspect the piston pin clearance.
Is the clearance more than the specified value?0.020 mm
(0.0008 in.)Go to Step 11Go to Step 12
11Replace the piston and the pin.
Is the repair complete?–Go to Step 1–
12Check the connecting rod alignment.
Is the alignment faulty?–Go to Step 13Go to Step 14
13Check and replace rods, as necessary.
Is the repair complete?–Go to Step 1–
14Inspect the piston–to–bore clearance.
Is the clearance within the specified value?0.030 mm
(0.0012 in.)Go to Step 16Go to Step 15
15Hone the bore and fit a new piston.
Is the repair complete?Go to Step 1–
16Inspect the crankshaft balancer.
Is the balancer loose?–Go to Step 17Go to Step 18
17Torque or replace worn parts.
Is the repair complete?–Go to Step 1–
18Check the piston pin offset.
Is the offset at the specified value?0.5 ± 0.1 mm
(0.020 ~ 0.003
in.)
Toward Thrust
SideGo to Step 19System OK
19Install the correct piston.
Is the repair complete?–Go to Step 1–
Page 40 of 2643
1A – 8IGENERAL ENGINE INFORMATION
DAEWOO V–121 BL4
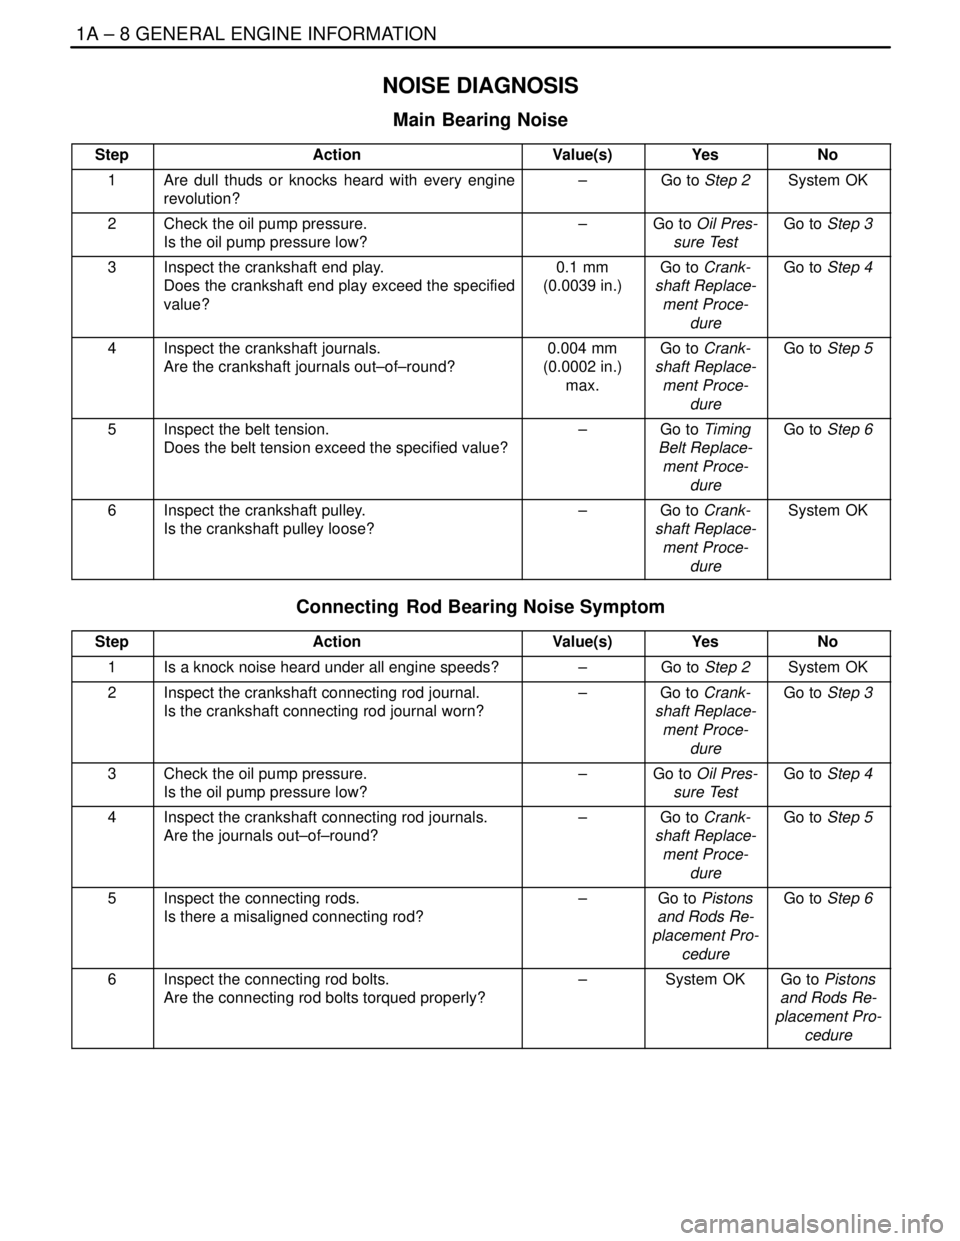
NOISE DIAGNOSIS
Main Bearing Noise
StepActionValue(s)YesNo
1Are dull thuds or knocks heard with every engine
revolution?–Go to Step 2System OK
2Check the oil pump pressure.
Is the oil pump pressure low?–Go to Oil Pres-
sure TestGo to Step 3
3Inspect the crankshaft end play.
Does the crankshaft end play exceed the specified
value?0.1 mm
(0.0039 in.)Go to Crank-
shaft Replace-
ment Proce-
dureGo to Step 4
4Inspect the crankshaft journals.
Are the crankshaft journals out–of–round?0.004 mm
(0.0002 in.)
max.Go to Crank-
shaft Replace-
ment Proce-
dureGo to Step 5
5Inspect the belt tension.
Does the belt tension exceed the specified value?–Go to Timing
Belt Replace-
ment Proce-
dureGo to Step 6
6Inspect the crankshaft pulley.
Is the crankshaft pulley loose?–Go to Crank-
shaft Replace-
ment Proce-
dureSystem OK
Connecting Rod Bearing Noise Symptom
StepActionValue(s)YesNo
1Is a knock noise heard under all engine speeds?–Go to Step 2System OK
2Inspect the crankshaft connecting rod journal.
Is the crankshaft connecting rod journal worn?–Go to Crank-
shaft Replace-
ment Proce-
dureGo to Step 3
3Check the oil pump pressure.
Is the oil pump pressure low?–Go to Oil Pres-
sure TestGo to Step 4
4Inspect the crankshaft connecting rod journals.
Are the journals out–of–round?–Go to Crank-
shaft Replace-
ment Proce-
dureGo to Step 5
5Inspect the connecting rods.
Is there a misaligned connecting rod?–Go to Pistons
and Rods Re-
placement Pro-
cedureGo to Step 6
6Inspect the connecting rod bolts.
Are the connecting rod bolts torqued properly?–System OKGo to Pistons
and Rods Re-
placement Pro-
cedure
Page 41 of 2643
GENERAL ENGINE INFORMATION 1A – 9
DAEWOO V–121 BL4
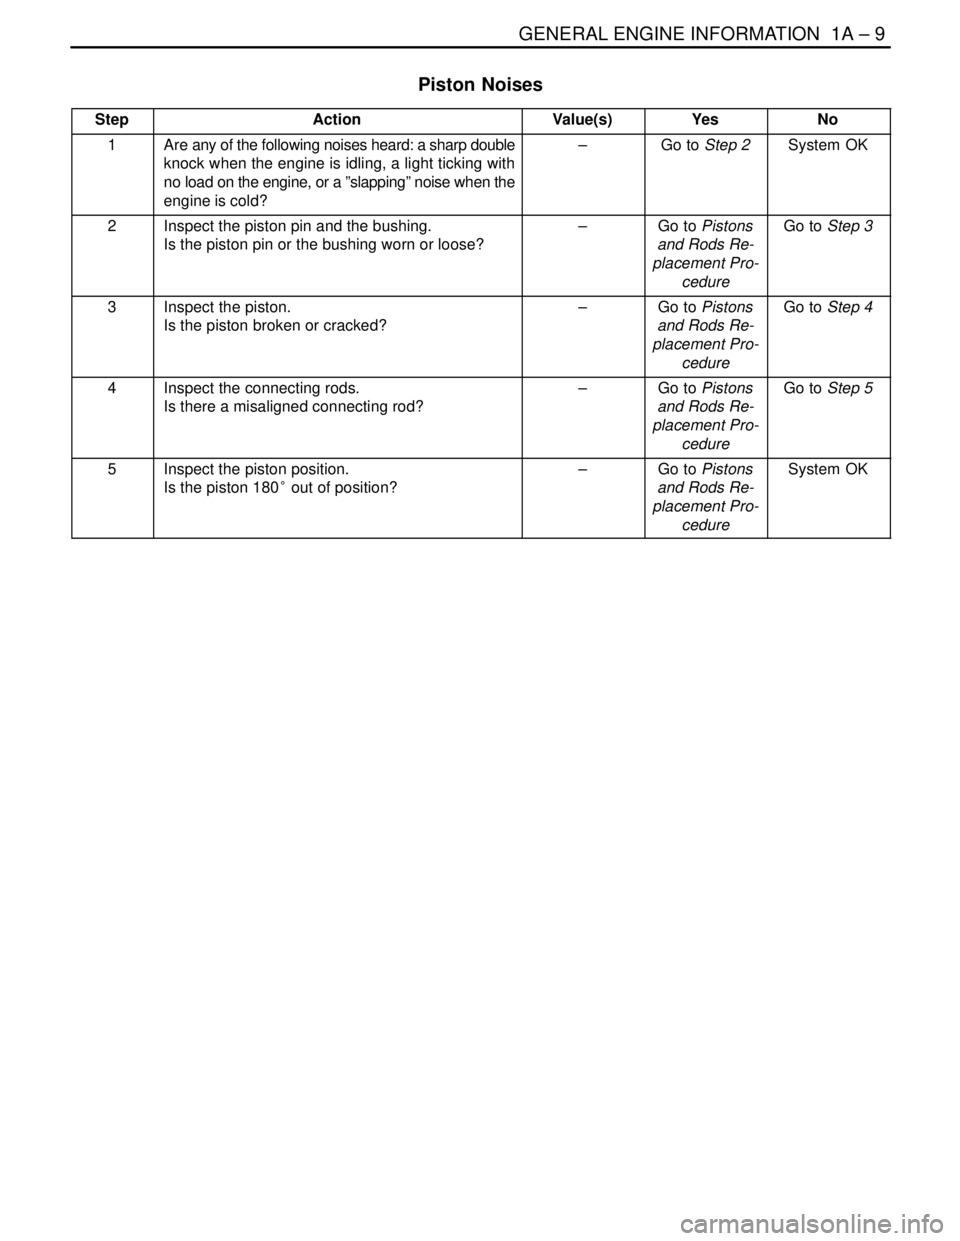
Piston Noises
StepActionValue(s)YesNo
1Are any of the following noises heard: a sharp double
knock when the engine is idling, a light ticking with
no load on the engine, or a ”slapping” noise when the
engine is cold?–Go to Step 2System OK
2Inspect the piston pin and the bushing.
Is the piston pin or the bushing worn or loose?–Go to Pistons
and Rods Re-
placement Pro-
cedureGo to Step 3
3Inspect the piston.
Is the piston broken or cracked?–Go to Pistons
and Rods Re-
placement Pro-
cedureGo to Step 4
4Inspect the connecting rods.
Is there a misaligned connecting rod?–Go to Pistons
and Rods Re-
placement Pro-
cedureGo to Step 5
5Inspect the piston position.
Is the piston 180° out of position?–Go to Pistons
and Rods Re-
placement Pro-
cedureSystem OK
Page 44 of 2643

SECTION : 1C1
1.4L/1.6L DOHC ENGINE MECHANICAL
CAUTION : Disconnect the negative battery cable before removing or installing any electrical unit or when a tool
or equipment could easily come in contact with exposed electrical terminals. Disconnecting this cable will help
prevent personal injury and damage to the vehicle. The ignition must also be in LOCK unless otherwise noted.
TABLE OF CONTENTS
SPECIFICATIONS1C1–2 . . . . . . . . . . . . . . . . . . . . . . . . .
Engine Specifications 1C1–2. . . . . . . . . . . . . . . . . . . . .
Fastener Tightening Specifcations 1C1–5. . . . . . . . . .
SPECIAL TOOLS1C1–7 . . . . . . . . . . . . . . . . . . . . . . . . . .
Special Tools Table 1C1–7. . . . . . . . . . . . . . . . . . . . . . .
COMPONENT LOCATOR1C1–9 . . . . . . . . . . . . . . . . . . .
Cylinder Head 1C1–9. . . . . . . . . . . . . . . . . . . . . . . . . . . .
Cylinder Block 1C1–10. . . . . . . . . . . . . . . . . . . . . . . . . . .
Intake & Exhaust Manifold 1C1–12. . . . . . . . . . . . . . . .
Timing Belt 1C1–13. . . . . . . . . . . . . . . . . . . . . . . . . . . . .
Engine Mounting 1C1–14. . . . . . . . . . . . . . . . . . . . . . . .
MAINTENANCE AND REPAIR1C1–15 . . . . . . . . . . . . .
ON–VEHICLE SERVICE 1C1–15. . . . . . . . . . . . . . . . . . .
Engine Cover 1C1–15. . . . . . . . . . . . . . . . . . . . . . . . . . .
Camshaft Cover 1C1–15. . . . . . . . . . . . . . . . . . . . . . . . .
Intake Manifold 1C1–16. . . . . . . . . . . . . . . . . . . . . . . . . .
Exhaust Manifold 1C1–20. . . . . . . . . . . . . . . . . . . . . . . .
Cylinder Head and Gasket 1C1–21. . . . . . . . . . . . . . . .
Camshaft 1C1–29. . . . . . . . . . . . . . . . . . . . . . . . . . . . . . .
Timing Belt Check and Adjust 1C1–30. . . . . . . . . . . . .
Timing Belt 1C1–34. . . . . . . . . . . . . . . . . . . . . . . . . . . . . Oil Pan 1C1–38. . . . . . . . . . . . . . . . . . . . . . . . . . . . . . . . .
Oil Pump 1C1–40. . . . . . . . . . . . . . . . . . . . . . . . . . . . . . .
Engine Mount 1C1–43. . . . . . . . . . . . . . . . . . . . . . . . . . .
Camshaft Gears 1C1–45. . . . . . . . . . . . . . . . . . . . . . . . .
Rear Timing Belt Cover 1C1–46. . . . . . . . . . . . . . . . . . .
Engine 1C1–48. . . . . . . . . . . . . . . . . . . . . . . . . . . . . . . . .
Pistons and Rods 1C1–53. . . . . . . . . . . . . . . . . . . . . . . .
UNIT REPAIR 1C1–58. . . . . . . . . . . . . . . . . . . . . . . . . . . .
Cylinder Head and Valve Train Components 1C1–58.
Crankshaft 1C1–65. . . . . . . . . . . . . . . . . . . . . . . . . . . . . .
Crankshaft Bearing and Connecting Rod
Beadings – Gauging Plastics 1C1–74. . . . . . . . . . . .
GENERAL DESCRIPTION AND SYSTEM
OPERATION1C1–77 . . . . . . . . . . . . . . . . . . . . . . . . . . . .
Cylinder Head and Gasket 1C1–77. . . . . . . . . . . . . . . .
Crankshaft 1C1–77. . . . . . . . . . . . . . . . . . . . . . . . . . . . . .
Timing Belt 1C1–77. . . . . . . . . . . . . . . . . . . . . . . . . . . . .
Oil Pump 1C1–77. . . . . . . . . . . . . . . . . . . . . . . . . . . . . . .
Oil Pan 1C1–77. . . . . . . . . . . . . . . . . . . . . . . . . . . . . . . . .
Exhaust Manifold 1C1–77. . . . . . . . . . . . . . . . . . . . . . . .
Intake Manifold 1C1–77. . . . . . . . . . . . . . . . . . . . . . . . . .
Camshaft 1C1–77. . . . . . . . . . . . . . . . . . . . . . . . . . . . . . .
Page 46 of 2643
1.4L/1.6L DOHC ENGINE MECHANICAL 1C1 – 3
DAEWOO V–121 BL4
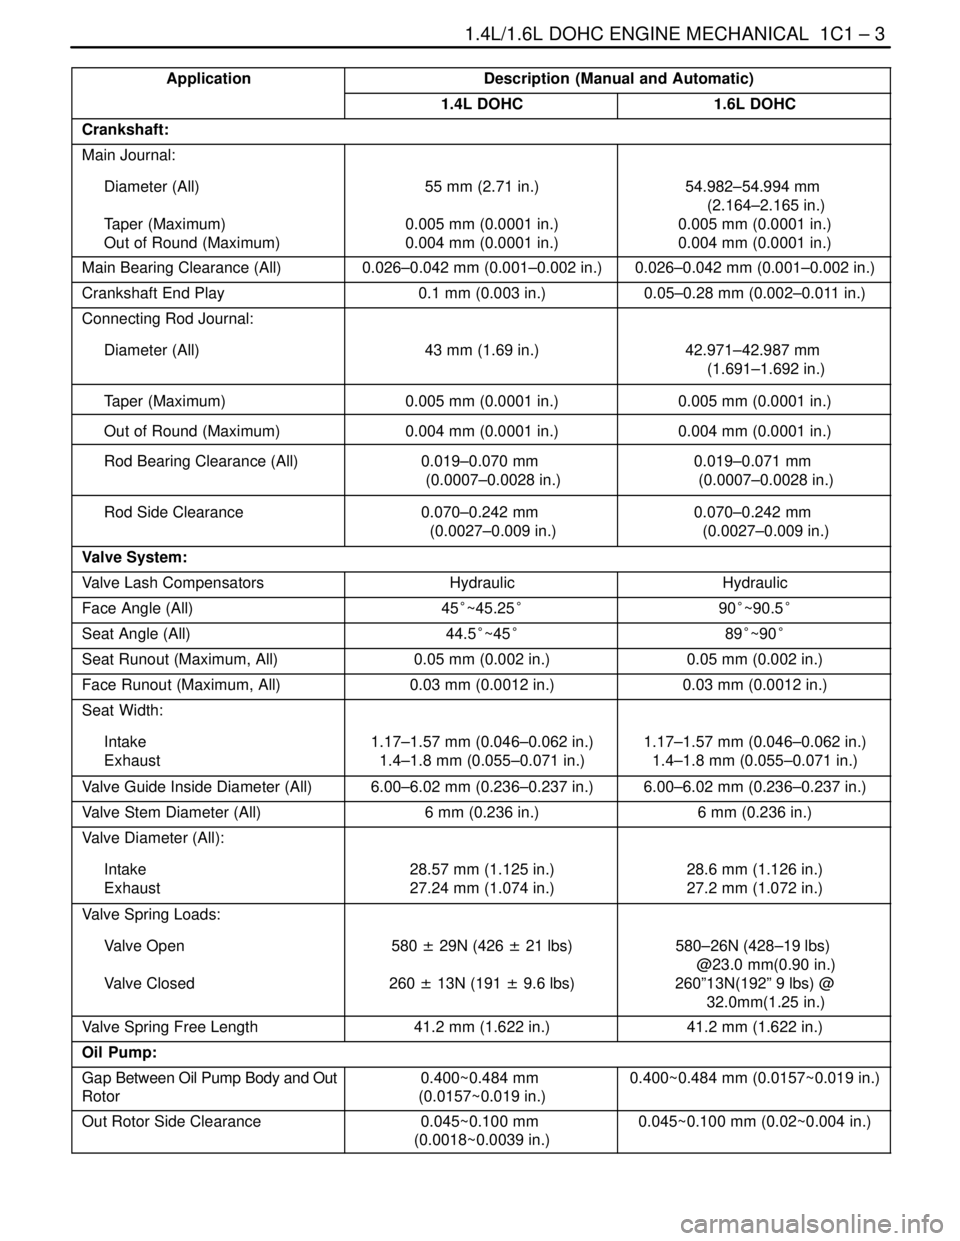
ApplicationDescription (Manual and Automatic)
1.4L DOHC1.6L DOHC
Crankshaft:
Main Journal:
Diameter (All)
Taper (Maximum)
Out of Round (Maximum)55 mm (2.71 in.)
0.005 mm (0.0001 in.)
0.004 mm (0.0001 in.)54.982–54.994 mm
(2.164–2.165 in.)
0.005 mm (0.0001 in.)
0.004 mm (0.0001 in.)
Main Bearing Clearance (All)0.026–0.042 mm (0.001–0.002 in.)0.026–0.042 mm (0.001–0.002 in.)
Crankshaft End Play0.1 mm (0.003 in.)0.05–0.28 mm (0.002–0.011 in.)
Connecting Rod Journal:
Diameter (All)43 mm (1.69 in.)
42.971–42.987 mm
(1.691–1.692 in.)
Taper (Maximum)0.005 mm (0.0001 in.)0.005 mm (0.0001 in.)
Out of Round (Maximum)0.004 mm (0.0001 in.)0.004 mm (0.0001 in.)
Rod Bearing Clearance (All)0.019–0.070 mm
(0.0007–0.0028 in.)0.019–0.071 mm
(0.0007–0.0028 in.)
Rod Side Clearance0.070–0.242 mm
(0.0027–0.009 in.)0.070–0.242 mm
(0.0027–0.009 in.)
Valve System:
Valve Lash CompensatorsHydraulicHydraulic
Face Angle (All)45°~45.25°90°~90.5°
Seat Angle (All)44.5°~45°89°~90°
Seat Runout (Maximum, All)0.05 mm (0.002 in.)0.05 mm (0.002 in.)
Face Runout (Maximum, All)0.03 mm (0.0012 in.)0.03 mm (0.0012 in.)
Seat Width:
Intake
Exhaust1.17–1.57 mm (0.046–0.062 in.)
1.4–1.8 mm (0.055–0.071 in.)1.17–1.57 mm (0.046–0.062 in.)
1.4–1.8 mm (0.055–0.071 in.)
Valve Guide Inside Diameter (All)6.00–6.02 mm (0.236–0.237 in.)6.00–6.02 mm (0.236–0.237 in.)
Valve Stem Diameter (All)6 mm (0.236 in.)6 mm (0.236 in.)
Valve Diameter (All):
Intake
Exhaust28.57 mm (1.125 in.)
27.24 mm (1.074 in.)28.6 mm (1.126 in.)
27.2 mm (1.072 in.)
Valve Spring Loads:
Valve Open
Valve Closed580 ± 29N (426 ± 21 lbs)
260 ± 13N (191 ± 9.6 lbs)580–26N (428–19 lbs)
@23.0 mm(0.90 in.)
260”13N(192” 9 lbs) @
32.0mm(1.25 in.)
Valve Spring Free Length41.2 mm (1.622 in.)41.2 mm (1.622 in.)
Oil Pump:
Gap Between Oil Pump Body and Out
Rotor0.400~0.484 mm
(0.0157~0.019 in.)0.400~0.484 mm (0.0157~0.019 in.)
Out Rotor Side Clearance0.045~0.100 mm
(0.0018~0.0039 in.)0.045~0.100 mm (0.02~0.004 in.)