clock DATSUN 210 1979 User Guide
[x] Cancel search | Manufacturer: DATSUN, Model Year: 1979, Model line: 210, Model: DATSUN 210 1979Pages: 548, PDF Size: 28.66 MB
Page 245 of 548
TRANSMISSION
ASSEMBLY
Transmission
case
assembly
r
I
Remove
adapter
plate
with
gear
assembly
from
Adapter
Setting
Plate
KV32100300
2
Clean
mating
surfaces
of
adapter
plate
and
transmission
case
Apply
sealant
to
mating
surfaces
of
adapter
plate
and
transmission
case
3
Install
counter
gear
tluust
washer
selected
previously
Note
a
Apply
grease
to
sliding
surface
of
thrust
washer
b
When
installing
thrust
washer
note
the
front
and
r
ar
directions
Front
Oil
groove
side
Rear
Thrust
side
TM727
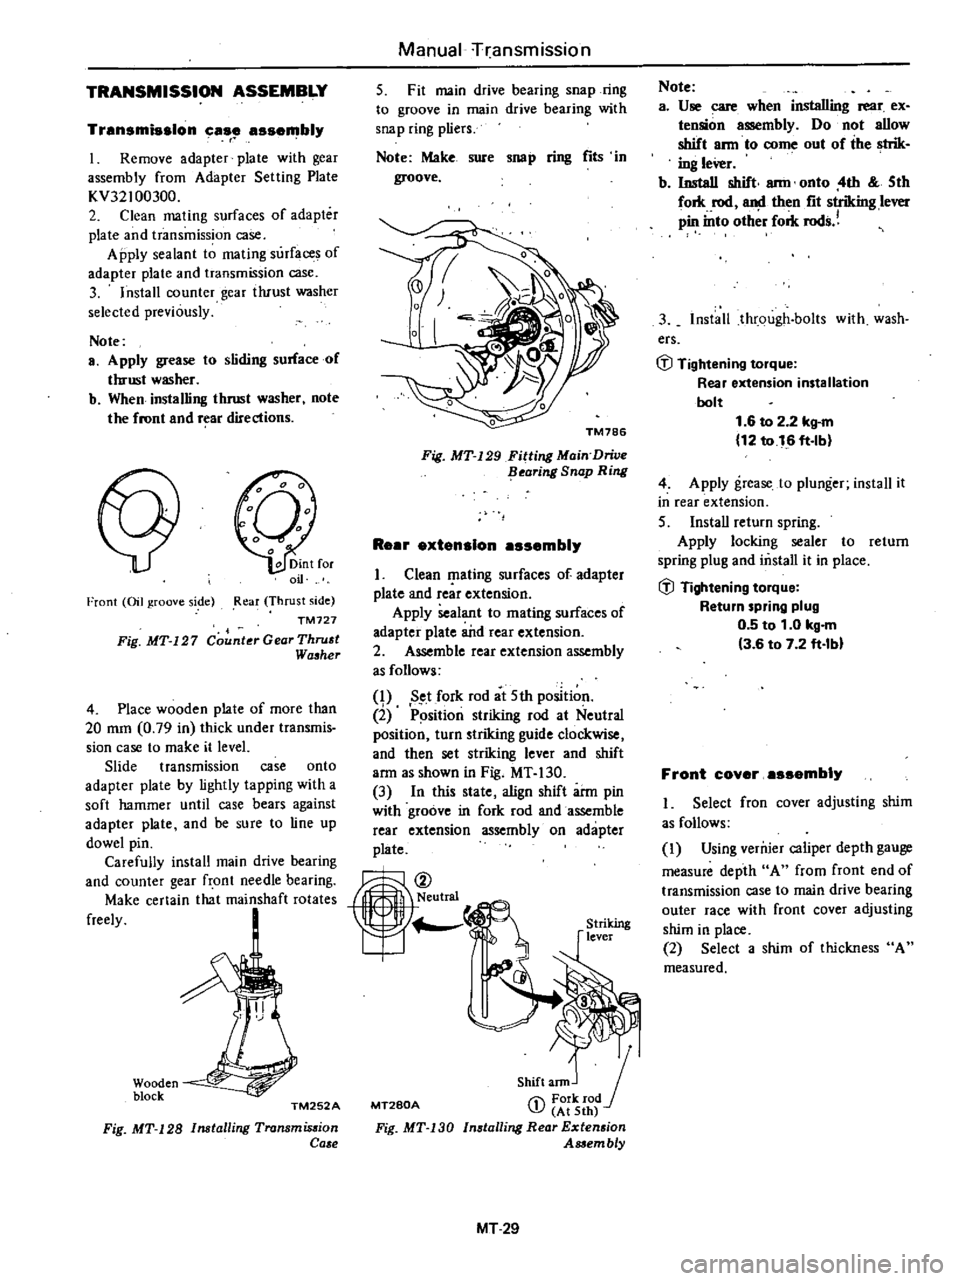
Fig
MT
127
Counter
Gear
Thru
t
Wa
her
4
Place
wooden
plate
of
more
than
20
mm
0
79
in
thick
under
transmis
sion
case
to
make
it
level
Slide
transmission
case
onto
adapter
plate
by
lightly
tapping
with
a
soft
hammer
until
case
bears
against
adapter
plate
and
be
sure
to
line
up
dowel
pin
Carefully
install
main
drive
bearing
and
counter
gear
front
needle
bearing
Make
certain
that
mainshaft
rotates
freely
Wooden
block
TM252A
Fig
MT
128
Installing
Transmis
ion
Ca
e
Manual
rransmission
5
Fit
main
drive
bearing
snap
ring
to
groove
in
main
drive
bearing
with
snap
ring
pliers
Note
Make
sure
sno
p
ring
fits
in
groove
Fig
MT
129
Fitting
Main
Drive
flearing
Snap
Ring
ReBr
extension
assembly
I
Clean
I
lating
surfaces
of
adapter
plate
and
rcar
extension
Apply
sealant
to
mating
surfaces
of
adapter
plate
a
itd
rear
extension
2
Assemble
rear
extension
assembly
as
follows
q
Set
fork
rod
at
5th
position
2
P
sition
striking
rod
at
Neutral
position
turn
striking
guide
clockwise
and
then
set
striking
lever
and
shift
arm
as
shown
in
Fig
MT
130
3
In
this
state
align
shift
arm
pin
with
groove
in
fork
rod
and
assemble
rear
extension
assembly
on
adapter
plate
MT280A
Shift
ann
J
1
Fork
rod
J
At
5th
Installing
Rear
Extension
Assembly
Fig
MT
130
MT29
Note
a
Use
care
when
installing
rear
ex
tension
assembly
Do
not
allow
shift
ann
to
come
out
of
the
strik
ing
leVer
b
Install
shift
ann
onto
4th
5th
fork
rod
and
then
fit
striking
lever
pin
into
oth
r
fork
rods
3
Install
through
bolts
with
wash
ers
GJ
Tightening
torque
Rear
extension
installation
bolt
1
6
to
2
2
kg
m
12
to
16
ft
lb
4
Apply
grease
to
plunger
install
it
in
rear
extension
5
InstaU
return
spring
Apply
locking
sealer
to
return
spring
plug
and
mstall
it
in
place
GJ
Tightening
torque
Return
spring
plug
0
5
to
1
0
kg
m
3
6
to
7
2
ft
lbl
Front
coyer
assembly
I
Select
fron
cover
adjusting
shim
as
follows
I
Using
verruer
caliper
depth
gauge
measure
depth
A
from
front
end
of
transmission
case
to
main
drive
bearing
outer
race
with
front
cover
adjusting
shim
in
place
2
Select
a
shim
of
thickness
A
measured
Page 260 of 548
RANGE
REVERSE
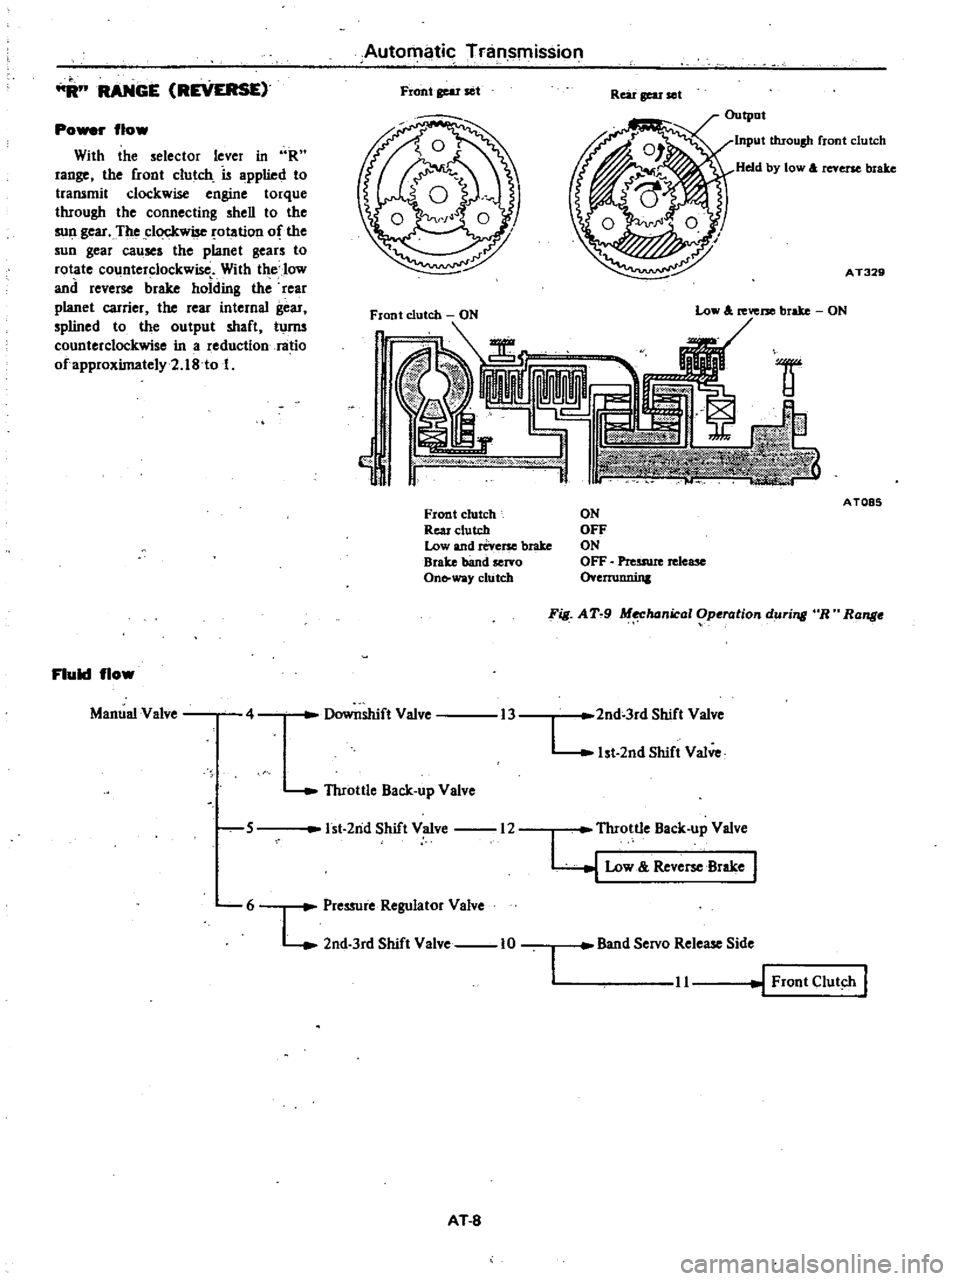
Po
r
flow
With
the
selector
lever
in
R
range
the
front
clutch
is
applied
to
transmit
clockwise
engine
torque
through
the
connecting
shell
to
the
sull
gear
The
clockwise
otation
of
the
sun
gear
causes
the
planet
gears
to
rotate
counterclockwise
With
the
low
and
reverse
brake
holding
the
rear
planet
carrier
the
rear
internal
gear
splined
to
the
output
shaft
turm
counterclockwise
in
a
reduction
ratio
ofapproximately2
18
to
1
Fluid
flow
Manual
Valve
4
Automatic
Tninsmission
Front
gear
set
Rear
gear
ell
Output
Input
throush
front
clutch
Held
by
low
A
reverse
brake
AT329
lW
w
Y
Front
clutch
Rear
clutch
Low
and
reverse
brake
Brake
band
servo
On
way
clutch
5
Throttle
Back
up
Valve
Low
A
reverse
brake
ON
Downshift
Valve
1st
2nd
Shift
Valve
12
6
L
Pressure
Regulator
Valve
2nd
3rd
Shift
Valve
10
AT
8
AT085
ON
OFF
ON
OFF
Preuwe
release
o
ernmnin
F
AT
9
M
hanical
Operation
during
R
Range
13
2nd
3rd
Shift
Valve
L
1st
2nd
Shift
Valve
I
Throttle
Back
up
Valve
y
Low
Reve
Brake
Band
Servo
Release
Side
11
Front
Clut
h
I
Page 264 of 548
DI
RANGE
LOW
GEAR
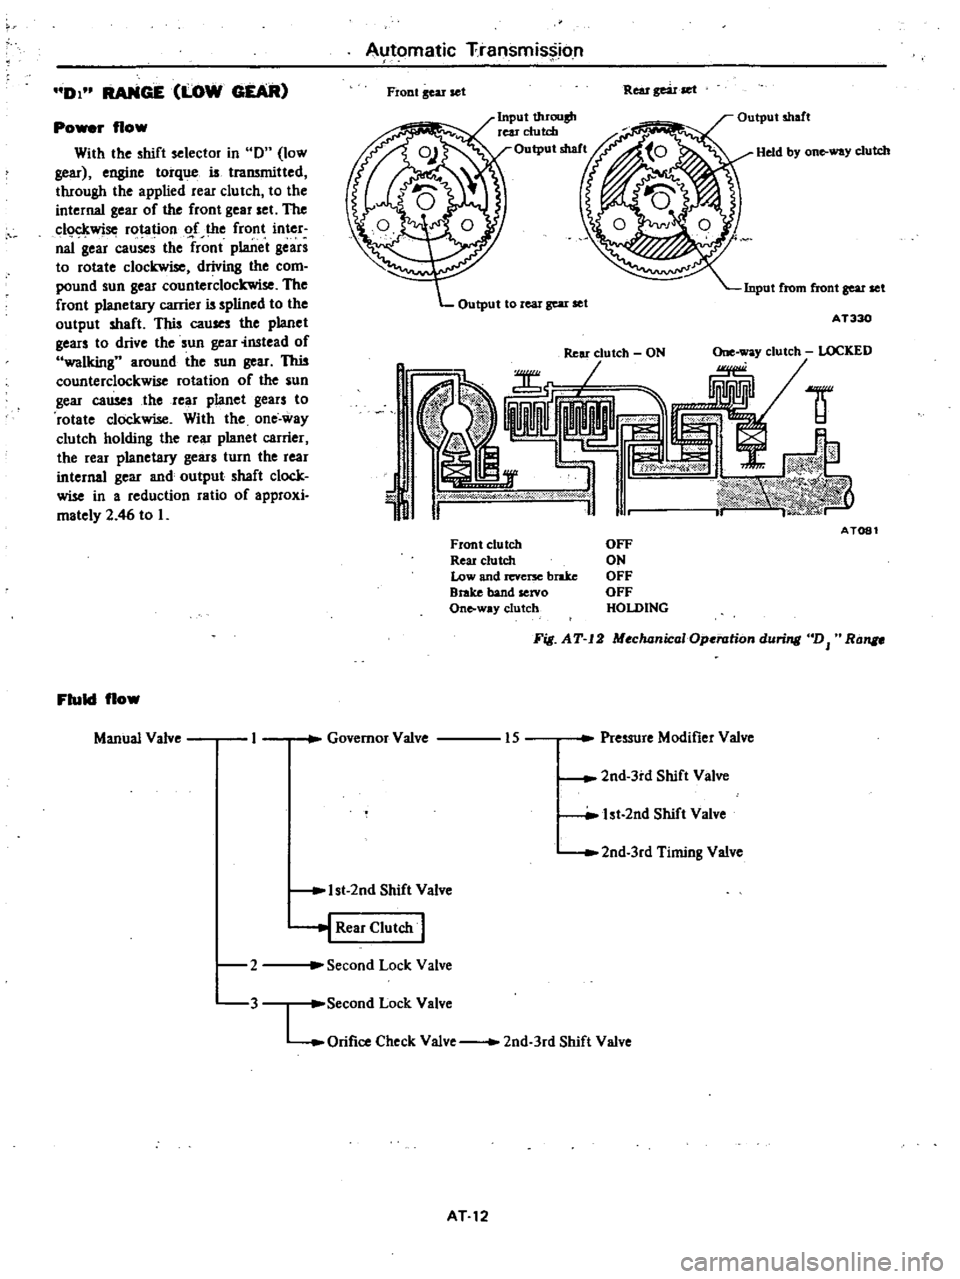
Po
r
flow
With
the
shift
selector
in
0
low
gear
engine
torque
is
traJWnitted
through
the
applied
rear
clu
tch
to
the
internal
gear
of
the
front
gear
set
The
c1o
kwise
rotation
o
f
the
front
inter
naI
gear
causes
the
front
planet
gears
to
rotate
clockwise
driving
the
com
pound
sun
gear
counterclockwise
The
front
planetary
carrier
is
splined
to
the
output
shaft
This
cau
the
planet
gears
to
drive
the
sun
gear
instead
of
walking
around
the
sun
gear
This
counterclockwise
rotation
of
the
sun
gear
causes
the
rear
planet
gears
to
rotate
clockwise
With
the
one
way
clutch
holding
the
rear
planet
carrier
the
rear
planetary
gears
turn
the
rear
internal
gear
and
output
shaft
clock
wise
in
a
reduction
ratio
of
approxi
mately
2
46
to
L
Fluid
flow
Manual
Valve
2
3
Automatic
Transmission
Fiont
gear
set
Rear
gear
set
Input
t1uOllsh
rear
clutch
Output
shaft
Held
by
on
way
clutch
Input
from
front
gear
set
Output
to
real
gear
set
AT330
1
J
ld
AT081
Front
clutch
Reu
clutch
Low
and
revcrx
brake
Brake
band
servo
Onto
way
clutch
OFF
ON
OFF
OFF
HOLDING
Fig
AT
12
MochanicaIOp
rationduri
DJ
Ra
Governor
Valve
Pressure
Modifier
Valve
15
2nd
3rd
Shift
Valve
lst
2nd
Shift
Valve
2nd
3rd
Timing
Valve
1st
2nd
Shift
Valve
j
Rear
Clutch
I
Second
Lock
Valve
Second
Lock
Valve
LOrifice
Check
Valve
2nd
3rd
Shift
Valve
AT12
Page 266 of 548
D2
RA
NGE
2ND
GEAR
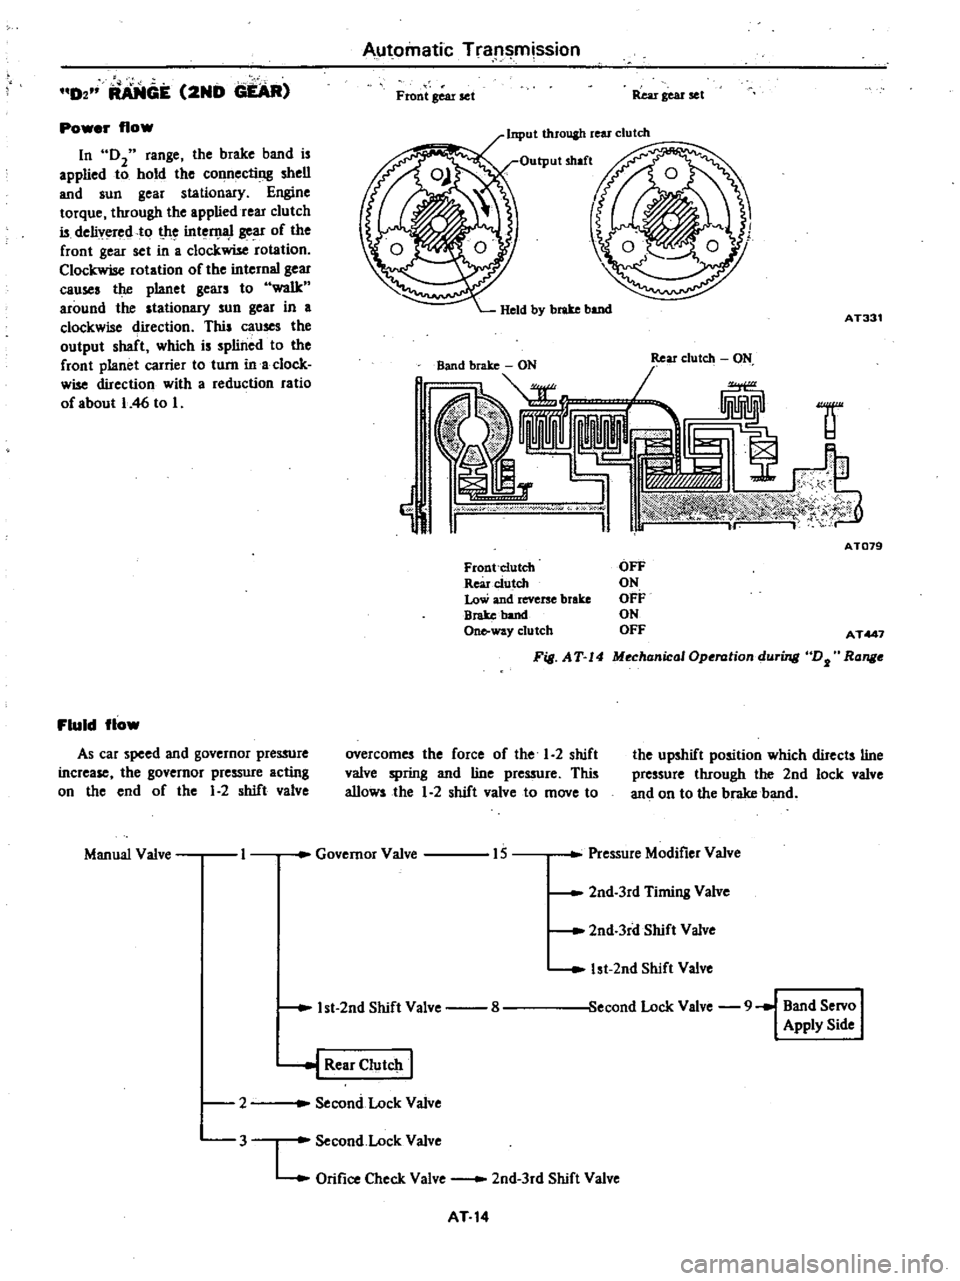
Power
flow
In
02
range
the
brake
band
is
applied
to
hold
the
connecting
shell
and
sun
gear
stationary
Engine
torque
through
the
applied
rear
clutch
is
delivered
to
t
he
int
D
1l
1
gear
of
the
front
gear
set
in
a
clockwise
rotation
Clockwise
rotation
of
the
internal
gear
causes
the
planet
gears
to
walk
around
the
stationary
sun
gear
in
a
clockwise
direction
This
causes
the
output
shaft
which
is
splined
to
the
front
planet
carrier
to
turn
ina
clock
wise
direction
with
a
reduction
ratio
of
about
I
46
to
I
Fluid
flow
As
car
speed
and
governor
pressure
increase
the
governor
pressure
acting
on
the
end
of
the
1
2
shift
valve
Manual
Valve
I
Automatic
Tra
l
mission
Front
Bear
set
Rear
gear
set
Input
throuah
rear
clutch
AT331
1f
j
cW
oo
w
I
ATD79
Front
Clutch
Rearc1utch
Low
and
reverse
brake
Broke
band
One
way
clutch
OFF
ON
OFF
ON
OFF
AT447
F
S
AT
14
MechanicalOperation
during
DJ
Range
overcomes
the
force
of
the
1
2
shift
valve
spring
and
line
pressure
This
allows
the
1
2
shift
valve
to
move
to
the
upshift
position
which
directs
line
pressure
through
the
2nd
lock
valve
and
on
to
the
brake
band
Governor
Valve
15
Pressure
Modifier
Valve
2nd
3rd
Timing
Valve
2nd
3rd
Shift
Valve
1st
2nd
Shift
Valve
econd
Lock
Valve
9
Band
Servo
I
Apply
Side
1st
2nd
Shift
Valve
8
l
Rear
CIutclt
I
Second
Lock
Valve
2
3
Second
Lock
Valve
L
Orifice
Check
Valve
2nd
3rd
Shift
Valve
AT
14
Page 268 of 548
Automatic
Transmission
D3
RANGE
3RD
GEAR
Front
gear
set
Rei
r
gear
set
Input
through
flODt
and
rear
clutches
Power
flow
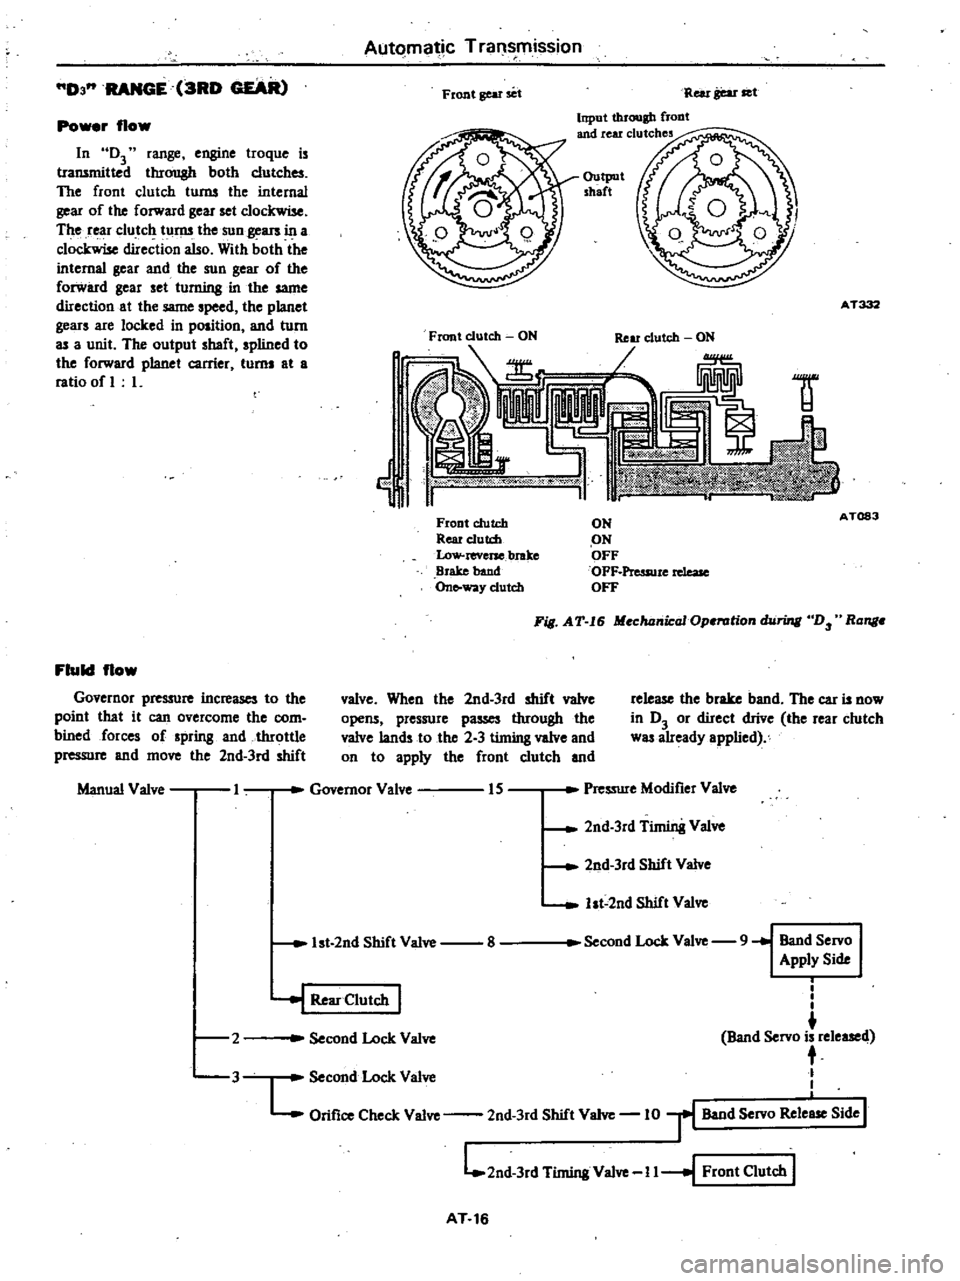
In
D3
range
engine
troque
is
transmitted
through
both
clutches
The
front
clutch
turns
the
internal
gear
of
the
forward
gear
set
clockwise
The
rear
clutch
turns
the
sun
gears
in
a
clockwise
direction
also
With
both
the
internal
gear
and
the
sun
gear
of
the
forward
gear
set
turning
in
the
same
direction
at
the
same
speed
the
planet
gears
are
locked
in
position
and
turn
as
a
unit
The
output
shaft
spIined
to
the
forward
planet
carrier
turns
at
a
ratio
of
L
Output
shaft
AT332
Front
clutch
ON
Ij
1f
Front
clutch
Rear
e1utd
Low
reverse
brake
Brake
band
On
way
clutch
ON
ON
OFF
OFF
Pressure
rdeaJe
OFF
A
T083
Fill
AT
I6
Mechanical
Operation
hiring
D
Ronge
Fluid
flow
Governor
pre
ure
increases
to
the
poinl
that
it
can
overcome
the
com
bined
forces
of
spring
and
throttle
pressure
and
move
the
2nd
3rd
shift
valve
When
the
2nd
3rd
shift
valve
opens
pressure
passes
through
the
valve
lands
to
the
2
3
timing
valve
and
on
to
apply
the
front
clutch
and
release
the
brake
band
The
car
is
now
in
D3
or
direct
drive
the
rear
clutch
was
already
applied
Manual
Valve
I
Governor
Valve
IS
Pressure
Modifier
Valve
2nd
3rd
Timin8
Valve
2nd
3rd
Shift
Valve
ht
2nd
Shift
Valve
1st
2nd
Shift
Valve
8
Second
Lock
Valve
9
Band
Servo
Apply
Side
2
i
I
I
Band
Servo
is
released
t
Second
Lock
Valve
L
Orifice
Check
Valve
2nd
3rd
Shift
Valve
10
r
Band
Servo
Rele
Side
I
L
2nd
3rd
Timing
Valve
I
I
I
Front
Clutch
I
J
Second
Lock
Valve
I
Rear
Clutch
I
3
AT
16
Page 281 of 548
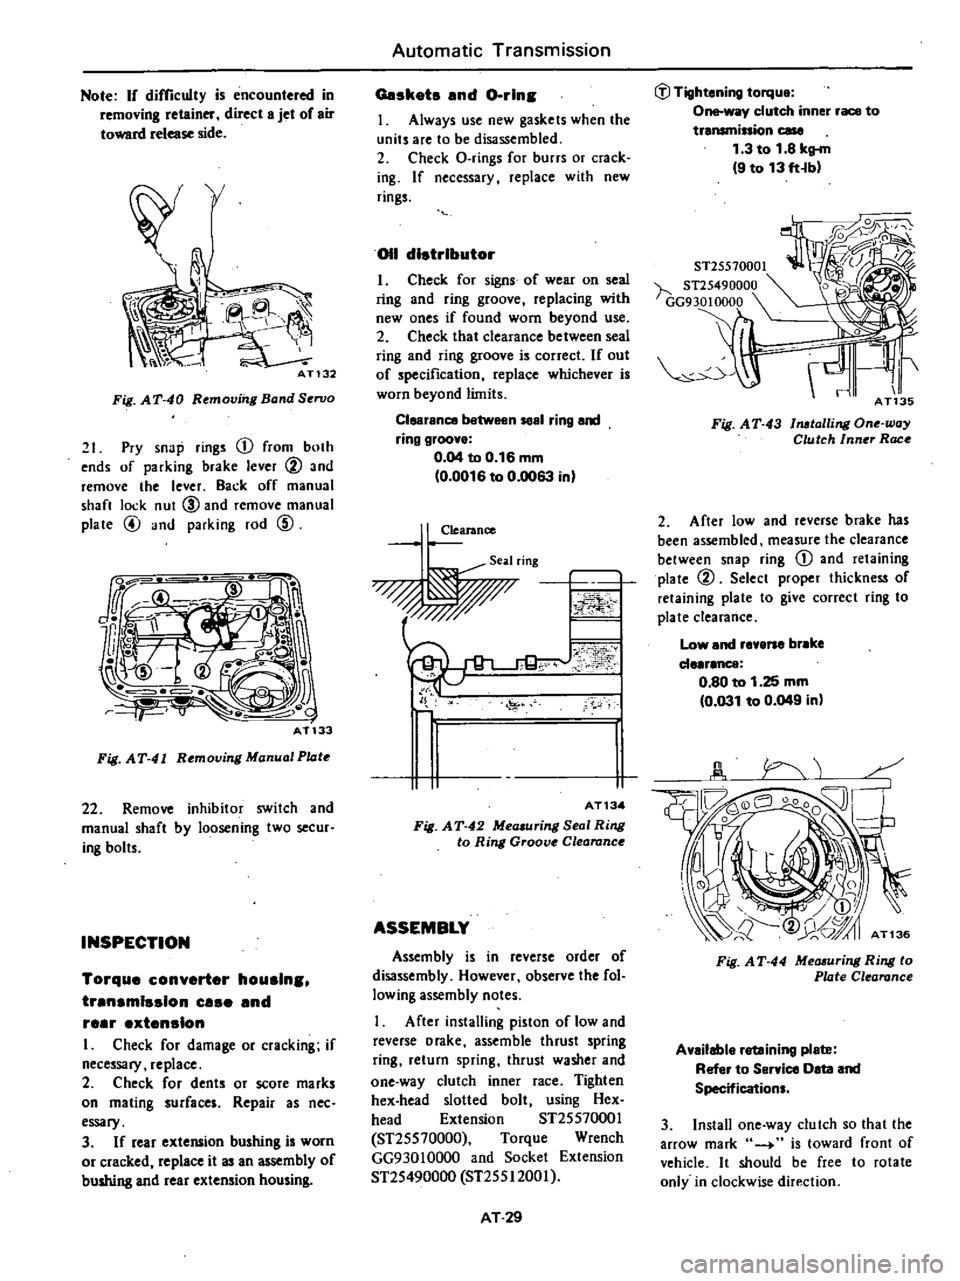
Note
If
difficulty
is
encountered
in
removing
retainer
direct
8
jet
of
air
toward
release
side
Ph
i
AT132
Fig
AT
40
Remov
I
Band
Servo
21
Pry
snap
rings
CD
from
both
ends
of
parking
brake
lever
@
and
remove
the
lever
Back
off
manual
shan
lock
nut
CID
and
remove
manual
plate
@
and
parking
rod
CID
Fig
AT
41
Rtmoving
Manual
Pl4tt
22
Remove
inhibitor
switch
and
manual
shaft
by
loosening
two
secur
ing
bolts
INSPECTION
Torque
converter
houslns
trensmlsslon
use
end
reer
extension
I
Check
for
damage
or
cracking
if
necessary
replace
2
Check
for
dents
or
score
marks
on
mating
surfaces
Repair
as
nee
essary
3
If
rear
extelUlion
bushing
is
worn
or
cracked
replace
it
an
mbly
of
bushing
and
rear
extension
housing
Automatic
Transmission
Geskots
end
Gorin
J
Always
use
new
gaskets
when
the
units
are
to
be
disassembled
2
Check
O
rings
for
burrs
or
crack
ing
If
necessary
replace
with
new
rings
011
distributor
I
Check
for
signs
of
wear
on
seal
ring
and
ring
groove
replacing
with
new
ones
if
found
worn
beyond
use
2
Check
that
clearance
between
seal
ring
and
ring
groove
is
correct
If
out
of
specification
replace
whichever
is
worn
beyond
limits
Clearence
1
n
58el
ring
end
ring
groove
0
04
to
0
16
mm
0
0016
to
0
0063
in
Clearance
Seal
ring
0
o
ii
J
0
1
FI
AT13
Fig
AT
42
Mea
uring
Seal
Ring
to
Ring
Groove
Clearance
ASSEMBLY
Assembly
is
in
reverse
order
of
disassembly
However
observe
the
fol
lowing
assembly
notes
After
installing
piston
of
low
and
reverse
Drake
assemble
thrust
spring
ring
return
spring
thrust
washer
and
one
way
clutch
inner
race
Tighten
hex
head
slotted
bolt
using
Hex
head
Extension
ST2SS7000J
ST2SS70000
Torque
Wrench
GG930JOOOO
and
Socket
Extension
ST2S490000
ST2SSI200J
AT
29
J
Tightening
torque
One
way
clutch
inner
race
to
transminion
case
1
3
to
1
8
kg
m
9
to
13
ft
b
ST25570001
h
ST25490000
GG9
30
10000
Fig
AT
43
1
lalli
ll
One
way
Clutch
Inner
Race
2
After
low
and
reverse
brake
has
been
assembled
measure
the
clearance
between
snap
ring
CD
and
retaining
plate
@
Select
proper
thickness
of
retaining
plate
to
give
correct
ring
to
plate
clearance
Low
and
revene
br
ke
de
r
nce
0
80
to
1
25
mm
0
031
to
0
049
in
Fig
A
T
44
Measuring
Ring
to
Plate
Clearance
Available
retaining
plete
Refer
to
Service
Oeta
and
Specifications
3
Install
one
way
clutch
so
that
the
arrow
mark
4
is
toward
front
of
vehicle
It
should
be
free
to
rotate
only
in
clockwise
direction
Page 385 of 548
Steering
System
STEERING
COLUMN
AND
GEAR
Tightening
torque
of
bolts
and
nuts
kg
rn
ft4b
@
3
8
to
5
2
27
to
38
@
1
3
to
1
8
9
to
13
@
0
35
to
0
45
25
to
3
3
@
4
0
to
5
0
29
to
36
@
7
0
to
8
0
51
to
58
lEi
13
to
15
94
to
108
1
Steering
wheel
2
olumn
clamp
3
Steering
column
4
Jacket
tube
flange
S
RUbbercoupling
6
Steering
gear
ST860
Fig
ST
l
Steering
Column
and
Gear
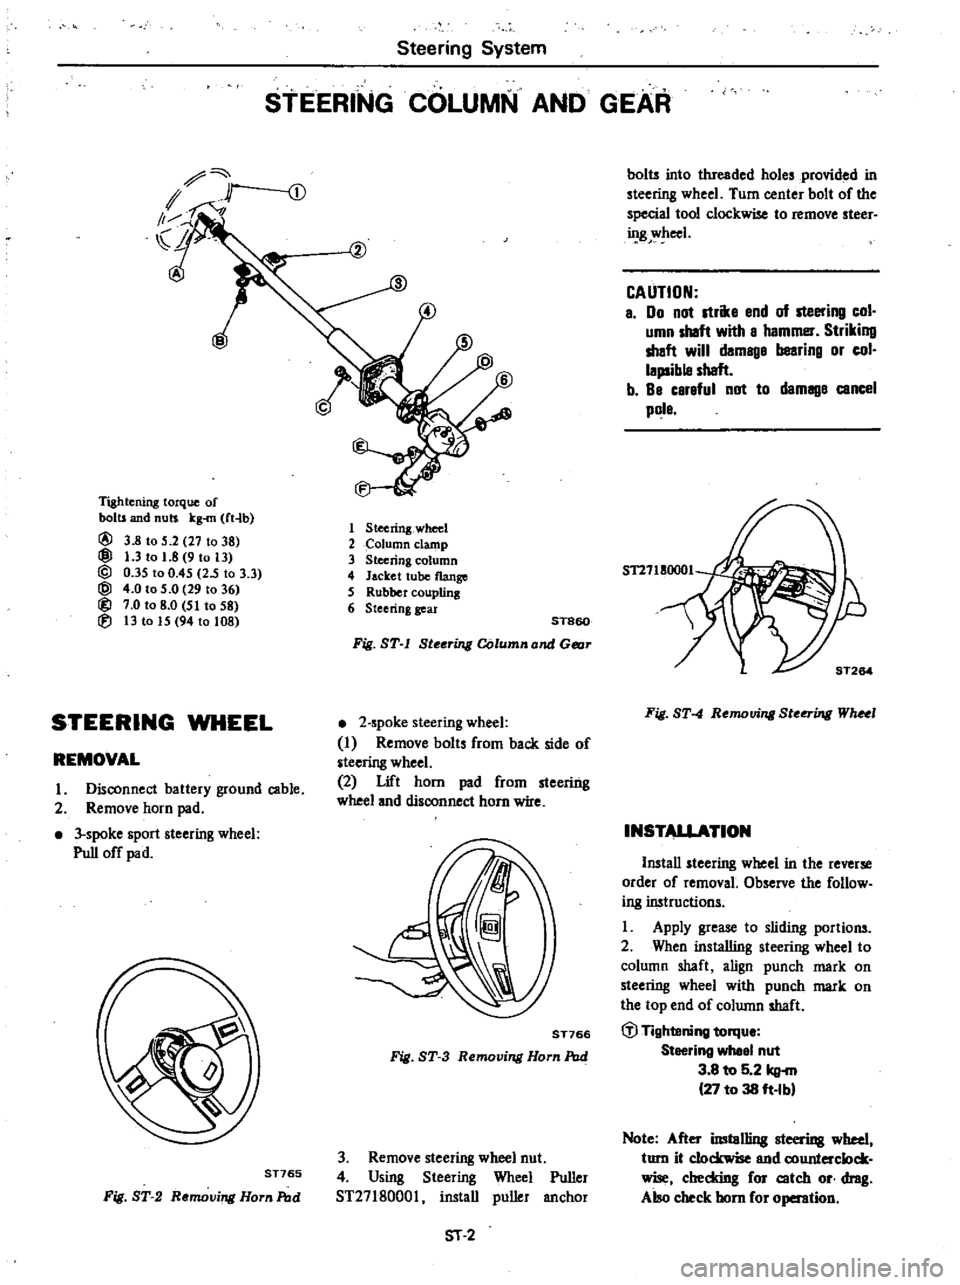
STEERING
WHEEL
2
spoke
steering
wheel
I
Remove
bolts
from
back
side
of
steering
wheel
2
Lift
horn
pad
from
steering
wheel
and
disconnect
horn
wire
REMOVAL
I
Disconnect
battery
ground
cable
2
Remove
horn
pad
3
spoke
sport
steering
wheel
Pull
off
pad
ST766
Fig
ST
3
Removing
Horn
Pod
ST765
Fig
ST
2
Removing
Horn
Pod
3
Remove
steering
wheel
nut
4
Using
Steering
Wheel
Puller
ST2718000l
install
puller
anchor
51
2
bolts
into
threaded
holes
provided
in
steering
wheel
Turn
center
bolt
of
the
special
tool
clockwise
to
remove
steer
ing
wheel
CAUTION
a
00
not
strike
end
of
steering
col
umn
shaft
with
a
hammer
Striking
shaft
will
damage
bearing
or
col
lapsible
shaft
b
Be
careful
not
to
damage
cancel
pole
Fig
ST
4
Removing
Ste
ing
WhHl
INSTALLATION
Install
steering
wheel
in
the
reverse
order
of
removal
Observe
the
follow
ing
instructions
Apply
grease
to
sliding
portions
2
When
installing
steering
wheel
to
column
shaft
align
punch
mark
on
steering
wheel
with
punch
mark
on
the
top
end
of
column
shaft
til
Tightening
torqu
Steering
whee
nut
3
8
to
5
2
kg
27
to
38
ft
Ibl
Note
After
imtol1ing
steering
wheel
turn
it
clockwise
end
counterclock
wise
cheddng
for
catch
or
drag
Also
check
horn
for
operation
Page 389 of 548
Steering
System
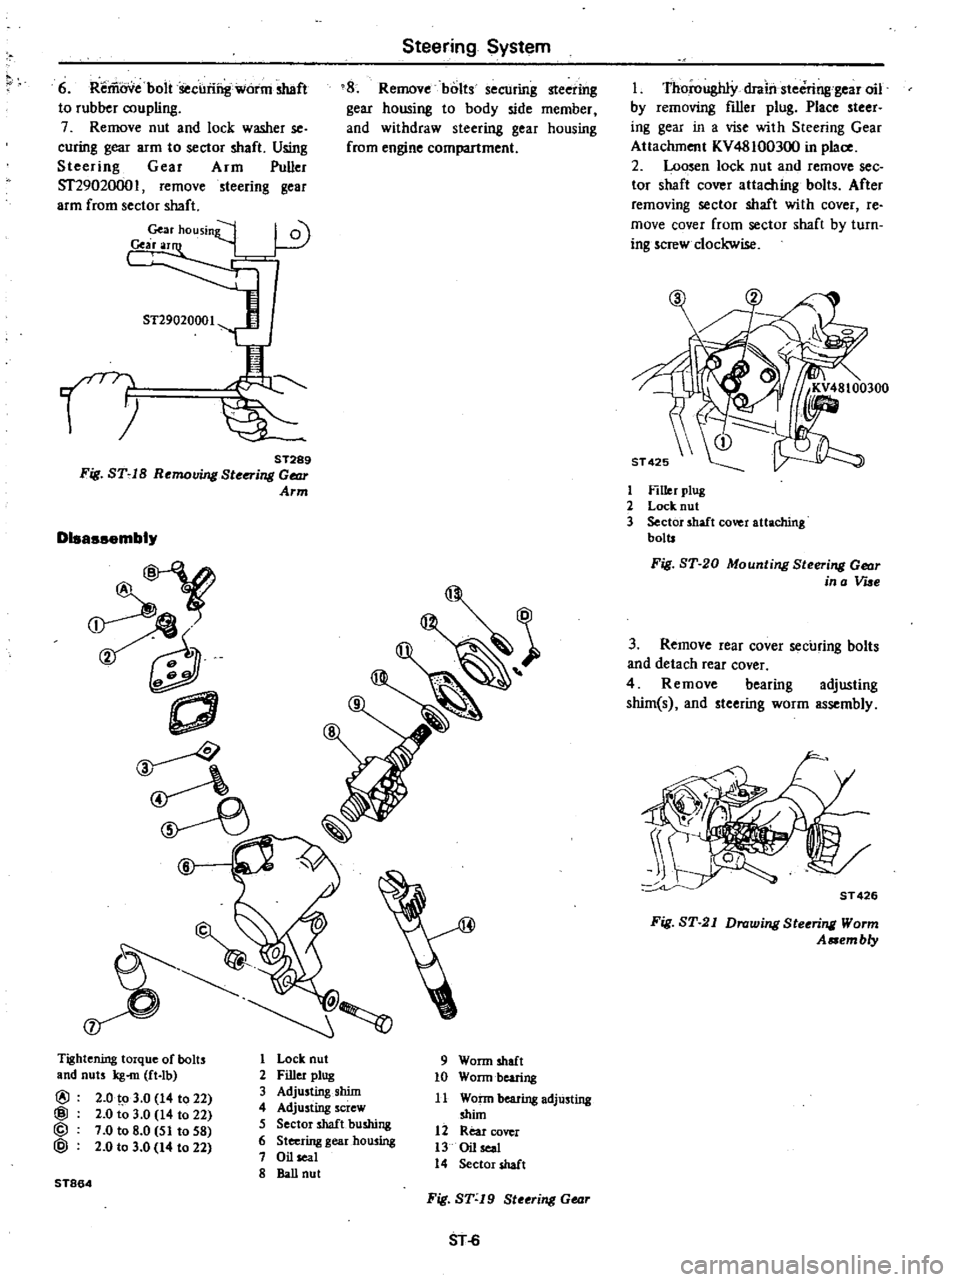
6
Reriiovebolt
Securing
worm
shaft
to
rubber
coupling
7
Remove
nut
and
lock
washer
se
curing
gear
arm
to
sector
shaft
Using
Steering
Gear
Arm
Puller
512902000
I
remove
steering
gear
arm
from
sector
shaft
Gear
housinif
I
0
Cearar
8
Remove
bolts
securing
steering
gear
housing
to
body
side
member
and
withdraw
steering
gear
housing
from
engine
compartment
n
ST289
Fig
ST
IB
Removing
Ste
i1l
Gear
Arm
Disassembly
f
Tightening
torque
of
bolts
and
nuts
kg
m
ft
Ib
@
2
0
to
3
0
14
to
22
@
2
0
to
3
0
14
to
22
@
7
0
to
8
0
51
to
58
@
2
0
to
3
0
14
to
22
ST864
1
Lock
nut
2
Filler
plug
3
Adjusting
shim
4
Adjusting
screw
5
Sector
shaft
bushing
6
Steering
gearhou
ing
7
Oil
seal
8
BaU
nut
9
Worm
shaft
10
Wonn
bearing
11
Wann
bearing
adjUsting
shim
12
Rear
cover
13
Oil
seal
14
Sector
shaft
Fig
ST
19
Steeri1l
Gear
SHi
Thoroughly
drail
steCring
gear
oil
by
removing
filler
plug
Place
steer
ing
gear
in
a
vise
with
Steering
Gear
Attachment
KV48100300
in
place
2
Loosen
lock
nut
and
remove
see
tor
shaft
cover
attaching
bolts
After
removing
sector
shaft
with
cover
re
move
cover
from
sector
shaft
by
turn
ing
screw
clockwise
1
Filler
plug
2
Lock
nut
3
Sector
shaft
cover
attaching
bolts
Fig
ST
20
Mounti1l
Steeri1l
Gear
in
a
Vue
3
Remove
rear
cover
securing
bolts
and
detach
rear
cover
4
Remove
bearing
adjusting
shim
s
and
steering
worm
assembly
ST
426
Fig
ST
21
Drawi1l
Steeri1l
Worm
A
em
b
y
Page 391 of 548
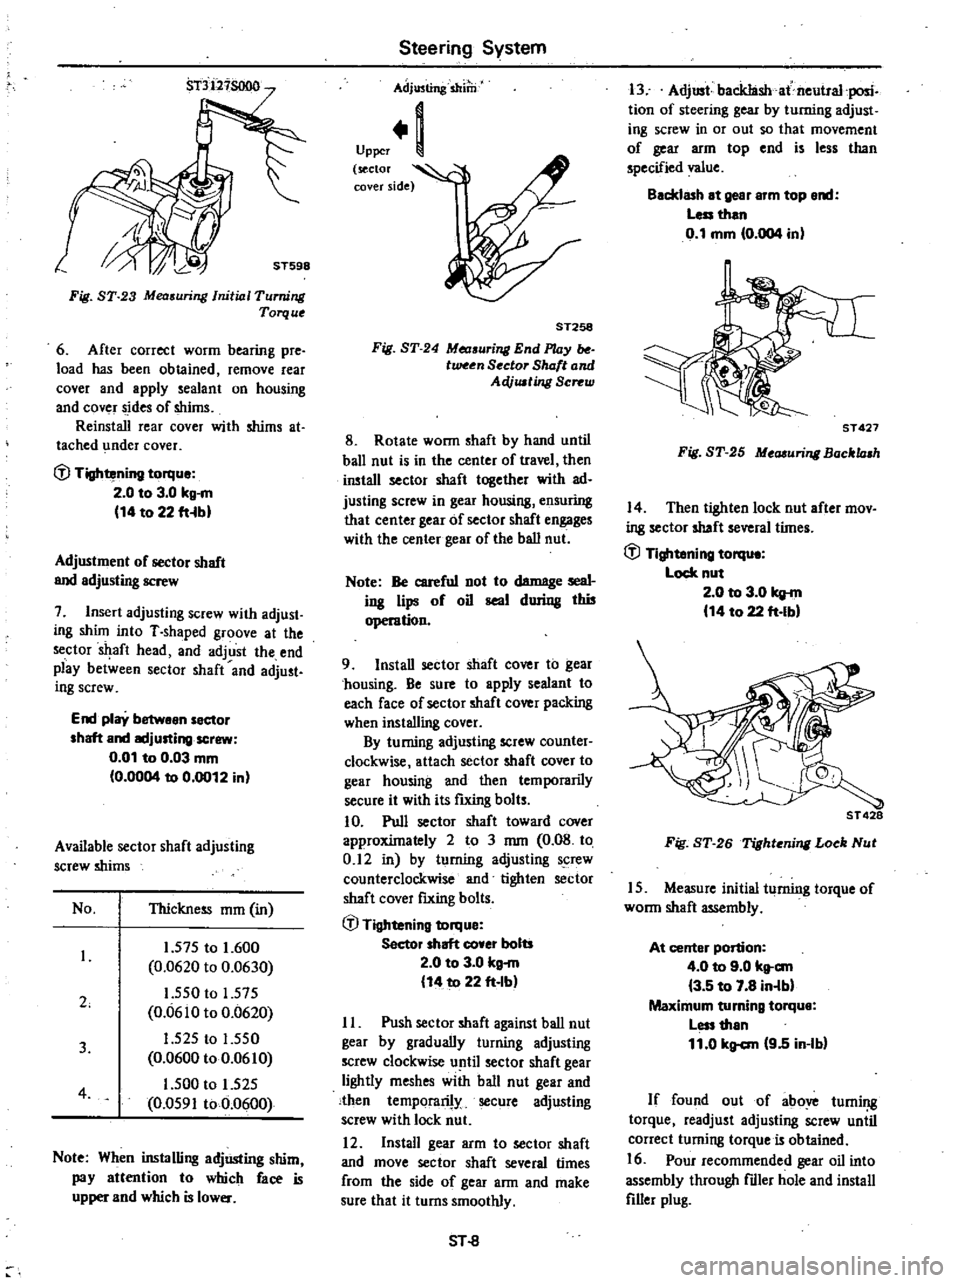
Fig
ST
23
Mea
uring
Initial
Turning
Torque
6
After
correct
worm
bearing
pre
load
has
been
obtained
remove
rear
cover
and
apply
sealant
on
housing
and
cover
sides
of
shims
Reinstall
rear
cover
with
shims
at
tached
under
cover
fJ
Tightening
torque
2
0
to
3
0
kg
m
14
to
22
fHbl
Adjustment
of
sector
shaft
and
adjusting
screw
7
Insert
adjusting
screw
with
adjust
ing
shUn
into
T
shaped
groove
at
the
sector
aft
head
and
adjust
the
end
play
between
sector
shaft
and
adjust
ing
screw
End
play
betwean
sector
shaft
and
IKljusting
screw
0
01
to
0
03
mm
0
0004
to
0
0012
in
Available
sector
shaft
adjusting
screw
shims
No
Thickness
mm
in
2
1
575
to
1
600
0
0620
to
0
0630
1
550
to
1
575
0
0610
to
0
0620
1
525
to
1
550
0
0600
to
0
0610
1
500
to
1
525
0
0591
to
0
0600
3
4
Note
When
installing
adjUsting
shim
pay
attention
to
which
face
is
upper
and
which
is
lower
Steering
System
Adjusting
shilli
Upper
1
sector
l
cover
side
ST258
Fig
ST
24
Measuri
End
l
UJy
tween
Sector
Shaft
and
AeVusting
Screw
8
Rotate
wonn
shaft
by
hand
until
ball
nut
is
in
the
center
of
travel
then
install
sector
shaft
together
with
ad
justing
screw
in
gear
housing
ensuring
that
center
gear
of
sector
shaft
engages
with
the
center
gear
of
the
ball
nut
Note
Be
careful
not
to
damage
seal
ing
lips
of
oil
seal
during
thi5
operation
9
Install
sector
shaft
cover
to
gear
chousing
Be
sure
to
apply
sealant
to
each
face
of
sector
shaft
cover
packing
when
installing
cover
By
turning
adjusting
screw
counter
clockwise
attach
sector
shaft
cover
to
gear
housing
and
then
temporarily
secure
it
with
its
futing
bolts
10
Pull
sector
shaft
toward
cover
approxUnately
2
to
3
mm
0
08
to
0
12
in
by
turning
adjusting
screw
counterclockwise
and
tighten
sector
shaft
cover
fIXing
bolts
fJ
Tightening
torque
Sector
shaft
co
er
bolts
2
0
to
3
0
kg
m
14
to
22
ft
Ib
II
Push
sector
shaft
against
ball
nut
gear
by
gradually
turning
adjusting
screw
clockwise
until
sector
shaft
gear
lightly
meshes
with
ball
nut
gear
and
then
temporarily
secure
adjusting
screw
with
lock
nut
12
Install
gear
arm
to
sector
shaft
and
move
sector
shaft
several
times
from
the
side
of
gear
ann
and
make
sure
that
it
turns
smoothly
SHl
13
Adjust
backIashat
neutral
posic
tion
of
steering
gear
by
turning
adjust
iog
screw
in
or
out
so
that
movement
of
gear
arm
top
end
is
less
than
specified
value
Backlash
at
gear
arm
top
end
Less
than
0
1
mm
0
004
in
ST
427
Fig
ST
25
Measuri
Bocklash
14
Then
tighten
lock
nut
after
mov
ing
sector
shaft
several
tUnes
fJ
Tightening
torqu
Lock
nut
2
0
to
3
0
kg
m
14
to
22
ft
Ibl
ST
428
Fig
ST
26
Tighteni
Loek
Nut
15
Measure
initial
turning
torque
of
wonn
shaft
assembly
At
center
portion
4
0
to
9
0
kt
c
m
3
5
to
7
8
in
lbl
Maximum
turning
torque
Less
than
11
0
kg
c
m
9
5
in
Ib
If
found
out
of
above
turning
torque
readjust
adjusting
screw
uniil
correct
turning
torque
is
obtained
16
Pour
recommended
gear
oil
into
assembly
through
fdler
hole
and
install
filler
plug
Page 406 of 548
Engine
Control
fuel
Exhaust
Systems
Non
California
models
except
FU
model
Automatic
transmission
equipped
models
@
REMOVAL
CALIFORNIA
MODELS
AND
FU
MODEL
I
Remove
catalytic
converter
shel
ter
and
rear
exhaust
tube
shelter
2
Temporarily
loosen
bolts
securing
exhaust
mounting
insulator
to
body
and
remove
bolts
securing
muffler
lower
clamp
imd
muffler
to
muffler
upper
clamp
Note
Take
care
Dot
to
drop
muffler
heat
insulator
3
Remove
rear
exhaust
tube
from
catalytic
converter
and
remove
it
from
car
as
follows
I
Remove
bolts
securing
exhaust
mounting
insulator
to
body
and
put
rear
exhaust
tube
on
rear
axle
case
as
shown
in
Fig
FE
9
1
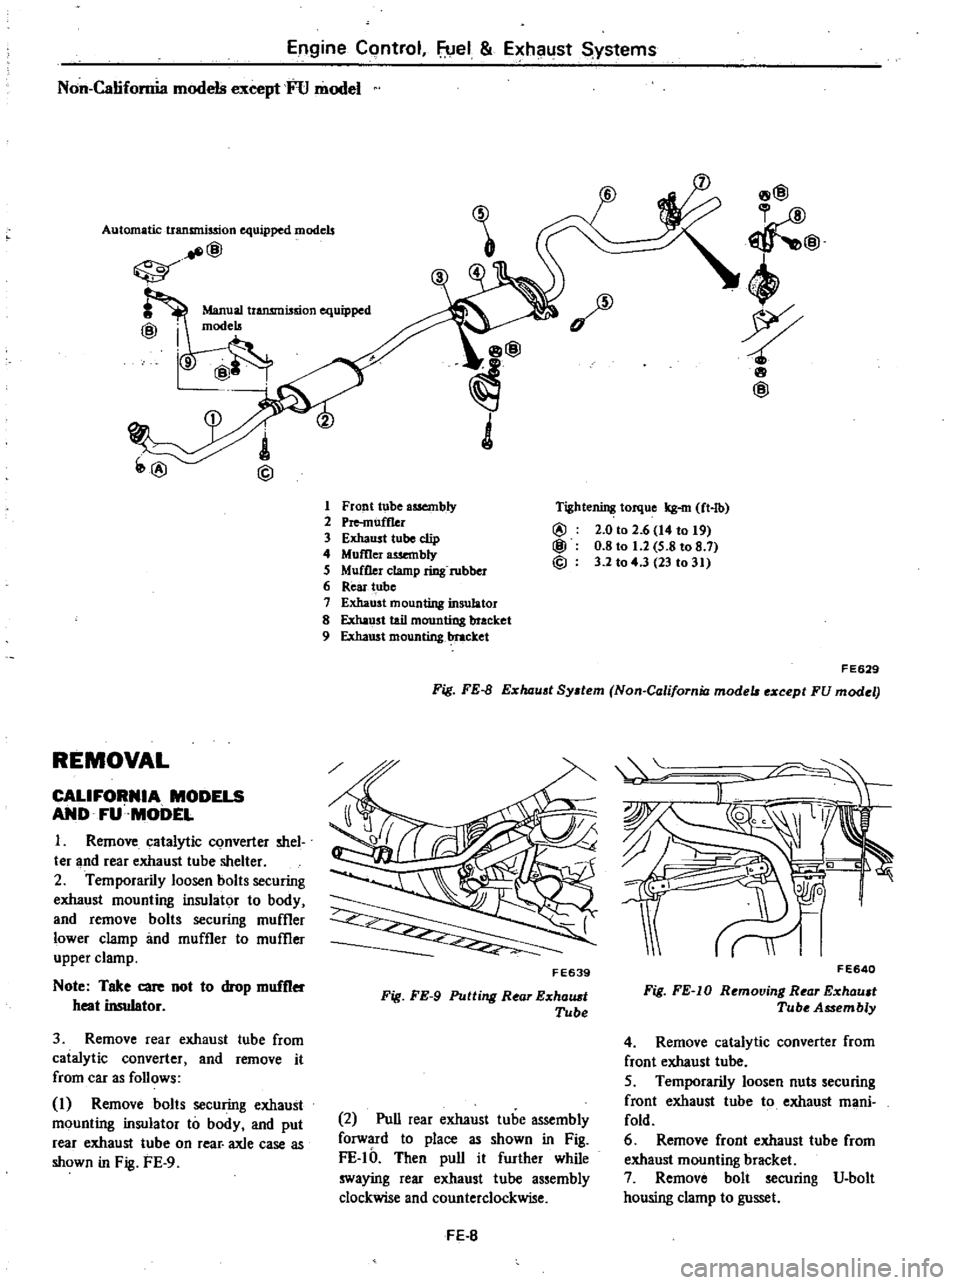
Front
tube
assembly
2
Pre
muff1er
3
Exhaust
tube
clip
4
Momer
wembly
5
Muffler
clamp
ring
rubber
6
Rear
tube
7
Exhaust
mounting
insulator
8
Exha
st
tail
mounting
bracket
9
Exhaust
mounting
1
ttacket
8@
@
4
wp
8
@
Tightening
torque
kg
m
ft
lb
@
2
0
to
2
6
14
to
t9
@
0
8
to
1
2
5
8
to
8
7
@
3
2
to
4
3
23
to
31
FE629
Fig
FE
B
E
haust
System
Non
California
mode
e
cept
FU
modet
FE639
Fig
FE
9
Putting
Rear
E
halUt
Tube
2
Pull
rear
exhaust
tube
assembly
forward
to
place
as
shown
in
Fig
FE
IO
Then
pull
it
further
while
swaying
rear
exhaust
tube
assembly
clockwise
and
counterclockwise
FE
B
II
F
E640
Fig
FE
IO
Removing
Rear
E
xhault
Tube
Assembly
4
Remove
catalytic
converter
from
front
exhaust
tube
5
Temporarily
loosen
nuts
securing
f
root
exhaust
tube
to
exhaust
mani
fold
6
Remove
front
exhaust
tube
from
exhaust
mounting
bracket
7
Remove
bolt
securing
V
bolt
housing
clamp
to
gusset