charging DATSUN 210 1979 Owner's Manual
[x] Cancel search | Manufacturer: DATSUN, Model Year: 1979, Model line: 210, Model: DATSUN 210 1979Pages: 548, PDF Size: 28.66 MB
Page 512 of 548

Air
Conditioning
6
Loosen
the
connection
at
the
center
fitting
of
manifold
gauge
for
a
Clockwise
few
seconds
to
purge
air
inside
charg
ing
hose
See
Fig
AC
14
Counterclockwise
j
3
@
I
Can
tap
handle
2
ChlcginS
hose
3
Needle
4
Refrigerant
can
AC246
Fig
AC
13
Can
Top
Purging
air
R
12
To
L9w
pressure
service
valve
AC247
Fig
AC
14
Purging
Air
Ta
High
pressure
service
valve
f
r
AC181A
Fig
AC
15
Discharging
System
AC
ll
DISCHARGING
SYSTEM
The
pressurized
refrigerant
gas
in
side
system
must
be
discharged
to
a
pressure
approaching
atmospheric
pressure
prior
to
evacuating
refrigerant
inside
system
This
operation
should
be
also
made
to
pennit
safe
removal
when
replacing
system
components
A
Close
high
and
low
pressure
valves
of
manifold
gauge
fully
2
Connect
two
charging
hoses
of
manifold
gauge
to
their
respective
service
valves
WARNING
Securely
connect
high
pressure
dis
charge
service
valve
to
that
of
manifold
gauge
with
a
hose
also
connect
low
pressure
suction
serv
ice
valve
to
that
of
manifold
gauge
For
locations
of
high
and
low
pres
sure
discharge
and
suction
service
valves
see
Fig
AC
29
3
Open
both
manifold
gauge
valves
slightly
and
slowly
discharge
refriger
ant
from
system
See
Fig
AC
15
WARNING
Protect
fingers
with
cloth
against
frostbite
by
refrigerant
when
con
necting
the
charging
hose
to
the
service
valve
or
disconnecting
it
therefrom
Nole
Do
not
allow
refrigerant
to
rush
out
Otherwise
compressor
oil
will
be
discharged
along
with
refriger
ant
EVACUATING
SYSTEM
I
Connect
high
and
low
pressure
charging
hoses
of
manifold
gauge
to
their
respective
service
valves
of
sys
tem
and
discharge
refrigerant
from
system
Refer
to
Discharging
System
WARNING
Securely
connect
high
pressure
dis
charge
service
valve
to
that
of
manifold
gauge
with
a
hose
also
connect
low
pressure
suction
servo
ice
valve
to
that
of
manifold
gauge
For
locations
of
high
and
low
pres
sure
discharge
and
wction
service
valves
see
Fig
AC
29
Page 513 of 548

Air
COl
ditioning
2
When
refrigerant
has
been
dis
charged
to
a
pressure
approaching
at
mospheric
pressure
connect
center
charging
hose
to
a
vacuum
pump
3
Close
both
valves
of
manifold
gauge
fully
Then
start
vacuum
pump
4
Open
low
pressure
valve
and
suck
old
refrigerant
ftom
system
See
Fig
AC
16
5
When
low
pressure
gauge
reading
has
reached
to
approximately
500
nunHg
20
inHg
slowly
open
high
pressure
valve
First
step
To
Low
pressure
service
valve
To
High
pressure
service
valve
rtl
Second
step
To
Low
pressure
service
valve
To
High
pressure
service
valve
f
AC182A
Fig
AC
16
Evacuating
System
First
and
Second
Steps
AC
12
6
When
pressure
insill
system
h
as
dropped
to
710
mmHg
28
inHg
fully
close
both
of
valves
of
manifold
gauge
and
stop
vacuum
pump
Let
stand
it
for
5
to
10
minutes
in
this
state
and
confirm
that
the
reading
does
not
rise
Note
a
The
low
pressure
gauge
reads
lower
by
25
mmHg
I
inHg
per
a
300
m
1
000
ft
elevation
Perfonn
evacu
alion
according
to
the
following
table
Elevation
m
ft
0
0
300
1
000
600
2
000
900
3
000
Vacuum
of
system
nunHg
inHg
710
28
685
27
660
26
635
25
Note
Values
show
reading
of
the
low
pressure
gauge
b
The
rate
of
ascension
of
the
low
pressure
gauge
should
be
less
than
25
mmHg
I
inHg
in
five
min
utes
If
the
pressure
rises
or
the
specified
negative
pressure
can
not
be
obtained
lhere
is
a
leak
in
the
system
In
this
case
immediately
charge
system
with
refrigerant
and
repair
the
leak
de
scribed
in
the
following
J
Charge
system
with
a
can
of
refrigerant
about
0
4
kg
0
9Ib
Re
fer
to
Charging
Refrigerant
2
Check
for
refrigerant
leakige
with
a
leak
detector
Repair
any
leak
ages
found
Refer
to
Checking
for
Leaks
3
Discharge
refrigerant
again
and
then
evacuate
system
CHARGING
REFRIGERANT
I
Install
manifold
gauge
to
system
Refer
to
Handling
Manifold
Gauge
Page 514 of 548

WARNING
Securely
connect
high
pressure
dis
charge
service
valve
to
that
of
manifold
gauge
with
a
hose
also
connect
low
pressure
suction
serv
ice
valve
to
that
of
manifold
gauge
For
locations
of
high
and
low
pres
sure
discharge
and
suction
service
valves
see
Fig
AC
29
CAUTION
a
Be
sure
to
purge
air
from
the
high
and
low
pressure
charging
hoses
b
If
air
is
mixed
with
refrigerant
gas
in
system
evacuation
of
system
should
be
performed
Refer
to
Evacuating
System
2
Attach
center
charging
hose
of
manifold
gauge
to
refrigerant
can
through
can
tap
Break
seal
of
refriger
ant
can
to
allow
refrigerant
to
enter
manifold
gauge
Loo
en
charging
hose
at
the
center
fitting
of
manifold
gauge
and
purge
air
from
inside
charging
hose
Refer
to
Handling
Can
Tap
3
Open
high
and
low
pressure
valves
of
manifold
gauge
and
charge
refrigerant
into
system
See
Fig
AC
17
Note
When
refrigerant
charging
speed
is
slow
immerse
refrigerant
can
in
water
heated
to
a
temperature
of
about
400C
1
040
F
for
a
short
time
See
Fig
AC
18
WARNING
a
Under
any
circumstances
the
re
frigerant
can
must
not
be
warm
ed
in
water
heated
to
a
temper
ature
of
over
520C
1260F
b
A
blow
toreh
or
stove
must
never
be
used
to
warm
up
the
can
Air
Conditioning
To
Low
pressure
service
valve
t
R
12
t
@
I
J
To
High
pressure
service
valve
t
t
AC183A
Fig
AC
17
Charging
Refrigerant
p
CAUTION
When
charging
liquefied
refrigerant
into
the
system
with
the
can
turned
upside
down
to
reduce
charging
time
charge
it
only
through
high
pressure
discharge
service
valve
but
not
through
low
pressure
suction
service
valve
See
Fig
AC
19
After
comple
tion
of
charging
the
compressor
should
always
be
turned
several
times
manually
lmmene
in
water
heated
to
about
400C
1040F
for
a
hort
time
AC184A
Fig
AC
18
Charging
Refrigerant
To
Low
pressure
service
valve
To
High
pressure
service
valve
t
r
J
AC
13
Low
t
AC185A
Fig
AC
19
Chorging
Liquefied
Refrigerant
Page 515 of 548

4
Wfefrlgerant
charging
speed
slows
down
charge
it
while
running
the
compressor
for
ease
of
charging
After
having
taken
the
steps
up
to
3
above
proceed
with
charging
in
the
following
order
1
Shut
off
high
pressure
valve
of
manifold
gauge
2
Run
the
engine
at
idling
speeds
below
1
500
rpm
3
Set
the
Temperature
lever
and
Fan
switch
at
maximum
cool
and
maximum
speed
respectively
To
Lpw
pressure
service
valve
t
Air
Conditioning
4
Charge
efiigerani
while
con
trolling
low
pressure
gauge
reading
at
2
8
kg
cm2
40
psi
or
less
by
turning
in
or
out
low
pressure
valve
of
mani
fold
gauge
See
Fig
A
20
WARNING
Never
charge
refrigerant
through
high
pressure
side
discharge
side
of
system
since
this
will
force
re
frigerant
back
into
refrigerant
can
and
can
may
explode
To
High
pressure
service
valve
A
5
When
refrigerant
can
is
empty
fully
close
both
valves
of
manifold
gauge
and
replace
refrigerant
can
with
a
new
ot
e
Before
opening
manifold
gauge
valve
to
charge
refrigerant
from
new
can
be
sure
to
purge
air
from
inside
charging
hose
6
Charge
the
specified
amount
of
refrigerant
into
system
by
weighing
charged
refrigerant
with
scale
Over
charging
wiU
cause
discharge
pressure
to
rise
AC380A
Fig
AC
20
Charging
Refrigeront
Measure
the
amount
of
charged
refrigerant
with
a
scale
Make
a
note
of
the
amount
charged
from
can
AC252
Fig
AC
21
Chorging
Refrigeront
Refrigerant
capacity
Unit
kg
lb
Refrigerarit
Minimum
Maximum
R
12
0
8
1
8
1
0
2
2
AC14
Note
The
p
Ce
of
btibble
hi
sight
glass
of
receiver
drier
is
an
unsuitable
method
of
checking
the
amount
of
refrigerant
charged
in
system
The
state
of
the
bubbles
iJt
sight
glass
should
only
be
used
ior
checking
whether
the
amount
of
charged
refrigerant
is
small
or
not
The
amount
of
charged
refrigerani
can
be
correcdy
judged
by
means
of
discharge
pressure
Refer
to
Re
frigerant
Level
Check
7
After
the
specified
amount
of
refrigerant
has
been
charged
intosys
tern
close
manifold
gauge
valves
Then
detach
charging
hoses
from
service
valves
of
system
Be
sure
to
install
valve
cap
to
service
valve
8
Confirm
that
there
are
no
leaks
in
system
by
checking
with
a
leak
detec
tor
Refer
to
Checking
for
Leaks
Note
Conducting
8
performance
test
prior
to
removing
manifold
gauge
is
8
good
service
operation
Refer
to
Performance
Test
CHECKING
FOR
LEAKS
Conduct
a
leak
t
st
whenever
leak
age
of
refrigerant
is
suspected
and
when
conducting
service
operations
which
are
accompanied
by
disassembly
or
loosening
of
connection
fittings
Refrigerant
is
a
colorless
odorless
gas
and
leakage
from
system
is
diffi
cult
to
detect
Accordingly
the
use
of
a
leak
detector
facilitates
check
for
leaks
Two
methods
of
checking
are
available
one
employs
a
halide
leak
detector
which
bums
propane
gas
or
butane
gas
and
the
other
is
an
electric
type
leak
detector
If
any
trace
of
oil
is
noted
at
and
around
connection
fittings
it
is
a
sure
indication
that
refrigerant
is
leaking
This
condition
can
be
corrected
easily
by
retightening
the
joints
If
any
joint
on
line
is
suspected
of
small
amount
of
leakage
use
a
leak
detector
to
locate
leaking
points
Page 517 of 548
I
I
3
Set
temperature
lever
to
max
imum
cold
position
Air
Conditioning
4
Sefblower
to
maximum
speed
S
Check
sight
glass
after
the
lapse
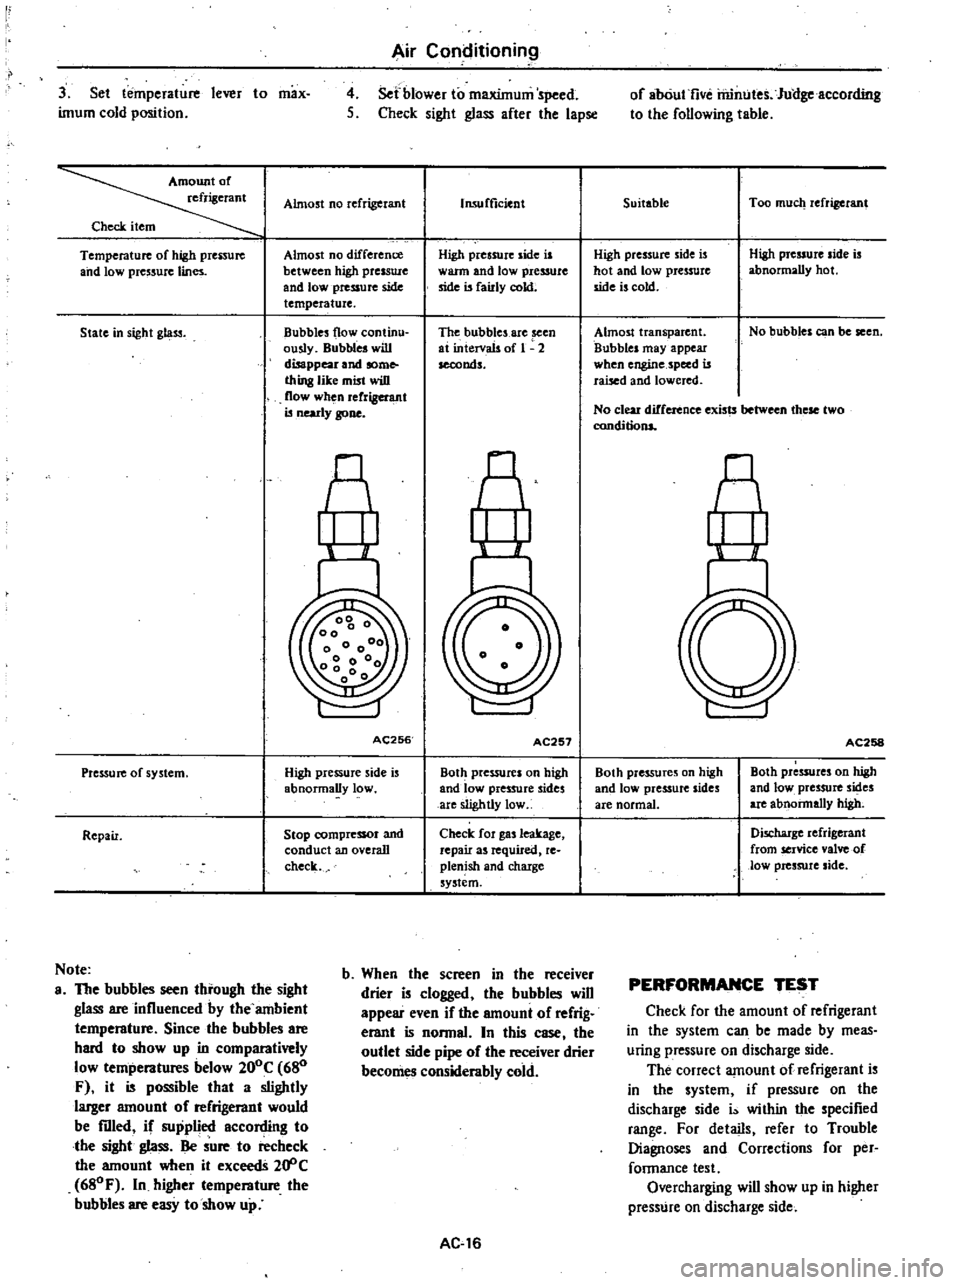
Almost
no
refrigerant
Check
item
Temperature
of
high
prenure
and
low
pressure
lines
Almost
no
difference
between
high
presswc
and
lowpressufC
side
temperature
State
in
sight
gl
ltS3
Bubbles
flow
continu
ously
Bubbles
will
disappear
and
some
thing
like
mist
wiD
flow
when
rerrigel
l
llt
is
nearly
gone
AC256
Pressure
of
system
High
pressure
side
is
abnormally
low
Repair
Stop
compressor
and
conduct
an
overall
check
Note
a
The
bubbles
seen
tbrough
the
sight
glass
are
influenced
by
the
ambient
tempemture
Since
the
bubbles
are
bard
to
show
up
in
comparatively
low
tempemtures
below
200C
680
F
it
is
possible
that
a
slightly
larger
amouot
of
refrigemot
would
be
filled
if
supplied
according
to
tbe
sight
glass
Be
sure
to
recheck
the
amount
when
it
exceedS
20
C
680F
In
higher
tempemture
tbe
bubbles
are
easy
to
show
up
Insufficient
High
pressure
side
is
warm
and
low
pressure
side
is
fairly
cokt
The
bubbles
are
seen
at
intervals
of
1
2
seconds
AC257
Both
pressures
on
high
and
low
pressure
sides
are
slightly
low
Check
for
gas
leakage
repair
as
required
re
plenish
and
chaxge
system
b
Wben
the
screen
in
tbe
receiver
drier
is
clogged
tbe
bubbles
wiD
appear
even
if
the
amount
of
refrig
erant
is
nonnaL
In
this
case
tbe
outlet
side
pipe
of
tbe
receiver
drier
becomes
considembly
cold
AC
16
of
abOut
five
rilintJtes
Jullgeaccording
to
the
following
table
Suitable
Too
much
refrigerant
High
pressure
side
is
hot
and
low
pressure
side
is
cold
High
pressure
side
is
abnormally
hot
Almost
transparent
Bubbles
may
appear
when
engine
speed
is
raised
and
lowered
No
bubbles
can
be
seen
No
clear
difference
exists
these
two
conditions
nl
AC258
Both
pre55ures
on
high
and
low
pressure
sides
are
normal
Both
pressures
on
high
and
low
pressure
sides
are
abnonnally
high
Discharge
refrigerant
from
service
valve
of
low
pressure
side
PERFORMANCE
TEST
Check
for
the
amount
of
refrigerant
in
the
system
can
be
made
by
meas
uring
pressure
on
discharge
side
The
correct
amount
of
refrigerant
is
in
the
system
if
pressure
on
the
discharge
side
i
within
the
specified
range
For
details
refer
to
Trouble
Diagnoses
and
Corrections
for
per
fannance
test
Overcharging
will
show
up
in
higher
presstJre
on
discharge
side
Page 520 of 548

Air
Conditioning
IDLER
PULLEY
AND
COMPRESSOR
DRIVE
BELT
ADJ
USTMENT
OF
BELT
TENSION
Idler
pulley
Alternator
Crankshaft
pulley
Unit
mm
in
Idler
pulley
Fig
AC
25
Belt
Tension
Specified
compressor
belt
tension
is
8
to
12
mm
0
31
to
0
47
in
when
thumb
pressure
of
10
kg
22
Ib
is
applied
midway
between
idler
pulley
and
compressor
pulley
1
Loosen
idler
pulley
lock
nut
and
then
adjust
pulley
by
turning
adjusting
bolt
2
After
adjustment
tighten
idler
pulley
lock
nut
bolt
3
Remove
idler
pulley
4
Install
pulley
in
the
reverse
order
of
removal
5
Adjust
compressor
belt
tension
REMOVAL
AND
INSTALLATION
1
Jack
up
front
of
car
and
remove
under
cover
2
Remove
idler
pulley
lock
nut
and
loosen
belt
tension
adjusting
Fig
AC26
AC382A
Idler
Pulley
TIghtening
torque
@
3
7
to
5
1
kg
m
27
to
37
ft
lb
AC383A
Fig
AC
27
Compressor
and
Bracket
AC
19
REMOVAL
I
Operate
compressor
if
possible
at
engine
idling
speed
with
air
condi
tioner
controls
set
for
maximum
cool
ing
and
high
blower
speed
for20
to
30
minutes
with
all
windows
open
to
return
oil
into
compressor
2
Disconnect
battery
ground
cables
and
compressor
lead
wire
at
con
nector
3
Discharge
refrigerant
from
cool
ing
system
Refer
to
Discharging
Sys
tem
4
Jack
up
front
of
car
and
remove
under
cover
5
Loosen
idler
pulley
lock
nut
and
loosen
tension
adjusting
bolt
fully
Remove
compressor
drive
belt
See
Fig
AC
26
6
Remove
high
and
low
flexible
hoses
from
compressor
WARNING
Gradually
loosen
discharge
side
hose
fitting
and
remove
it
after
remaining
pressure
has
been
re
leased
CAUTION
Be
sure
to
immediately
put
plug
in
flexible
hose
and
compressor
open
ings
7
Remove
bolts
securing
lower
part
of
compressor
8
Remove
bolts
securing
upper
part
of
compressor
Hold
compressor
with
one
hand
when
removing
bolts
and
then
remove
compressor
With
compressor
clutch
up
lift
compressor
out
with
both
hands
CAUTION
00
not
attempt
to
leave
the
com
pressor
on
its
side
or
upside
down
for
more
than
10
minutes
as
the
compressor
oil
will
enter
the
low
pressure
chambers
If
under
that
condition
compressor
should
be
oper
ated
suddenly
internal
damage
would
result
To
expel
oil
from
chambers
hand
crank
compressor
several
times
in
its
installed
condition
Page 521 of 548
INSTA
L1ATION
InstaU
in
the
reverse
order
of
removal
observing
the
following
I
When
installing
add
required
amount
Of
compressor
oil
Refer
to
Compressor
Oil
Level
Check
2
Apply
a
coat
of
fresh
compressor
oil
to
sealing
surfaces
of
pipe
joints
3
Check
tightening
torque
of
com
pressor
mounting
bolts
compressor
mounting
bracket
mounting
bolts
and
refrigerant
line
See
Figs
AC
27
and
AC
29
4
DO
not
remove
plugs
from
com
pressor
and
flexible
hose
before
connecting
hoses
S
Turn
compressor
several
times
before
installing
6
Adjust
compressor
drive
belt
tension
See
Fig
AC
2S
7
Evacuate
and
recharge
system
Refer
to
General
Service
for
evacuating
system
and
charging
re
frigerant
8
Conduct
leak
test
and
make
sure
that
there
is
no
leak
from
connections
CONDE
NSER
REMOVAL
Disconnect
battery
ground
cable
2
Discharge
system
Refer
to
Gen
eral
Service
for
discharging
system
3
Remove
radiator
grille
4
Remove
center
stay
5
Disconnect
refrigerant
lines
from
condenser
CAUTION
8
Use
wrench
to
fix
union
on
con
denser
and
then
loosen
flare
nut
of
refrigerant
line
with
another
wrench
b
Plug
up
all
openings
in
condenser
and
system
Air
COl1ditioning
6
Remove
mounting
bolts
ihen
remove
condenser
from
car
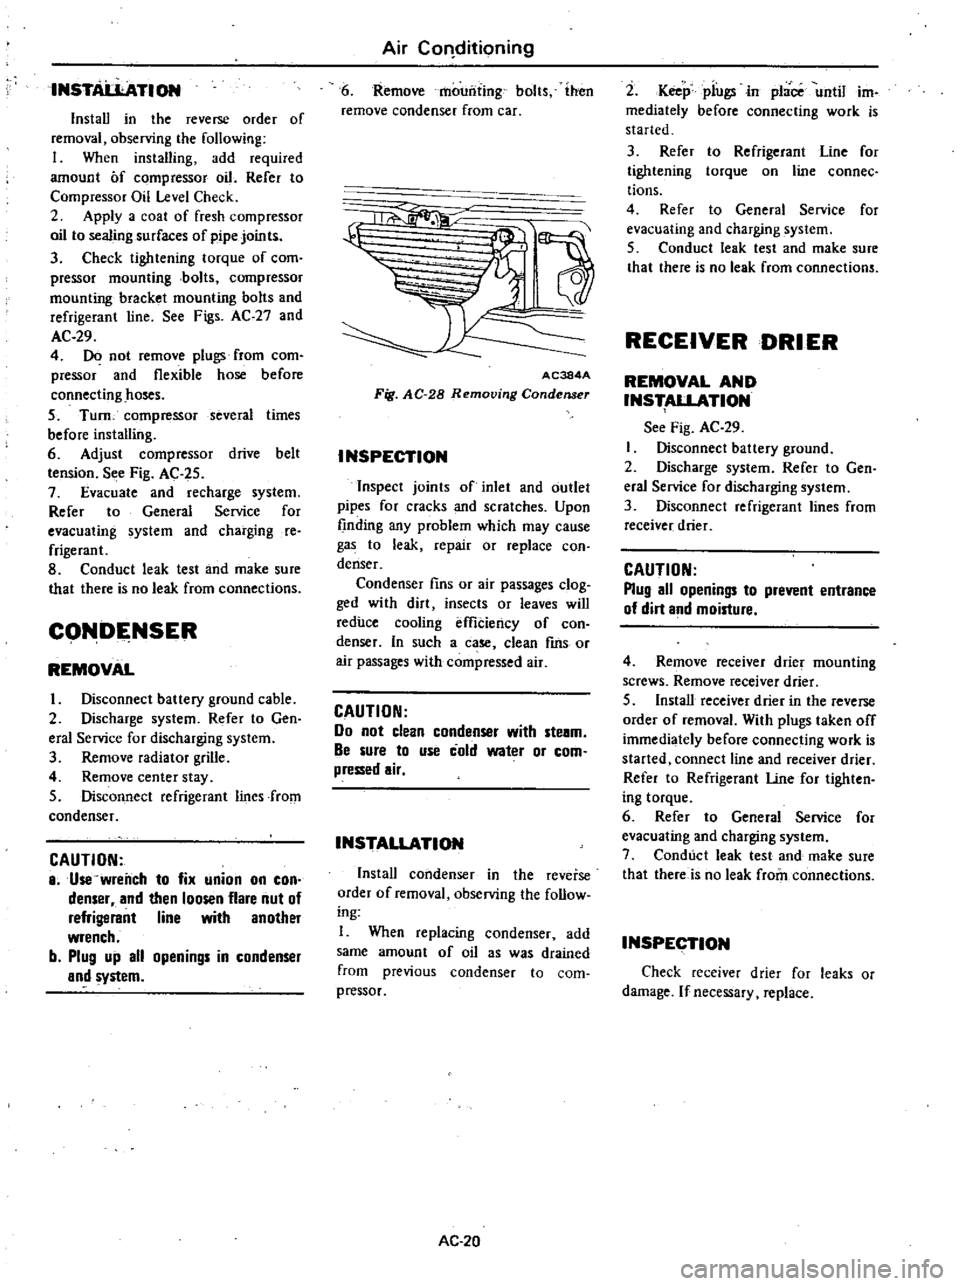
1a
11
AC384A
Fig
AC
28
Removing
Condenser
INSPECTION
Inspect
joints
of
inlet
and
outlet
pipes
for
cracks
and
scratches
Upon
finding
any
problem
which
may
cause
gas
to
leak
repair
or
replace
con
denser
Condenser
fins
or
air
passages
clog
ged
with
dirt
insects
or
leaves
will
reduce
cooling
effiCiency
of
con
denser
In
such
a
case
clean
fms
or
air
passages
with
compressed
air
CAUTION
Do
not
clean
condenser
with
ste8m
Be
sure
to
use
cold
water
or
com
pressed
air
INSTALLATION
Install
condenser
in
the
reverse
order
of
removal
observing
Ihe
follow
ing
I
When
replacing
condenser
add
same
amount
of
oil
as
was
drained
from
previous
condenser
to
com
pressor
AC
20
2
Keep
piugsin
place
until
im
mediately
before
connecting
work
is
started
3
Refer
to
Refrigerant
Line
for
tightening
torque
on
line
connec
tions
4
Refer
to
General
Service
for
evacuating
and
charging
system
5
Conduct
leak
test
and
make
sure
that
there
is
no
leak
from
connections
RECEIVER
DRIER
REMOVAL
AND
INS
ALLATION
See
Fig
AC
29
Disconnect
battery
ground
2
Discharge
system
Refer
to
Gen
eral
Service
for
discharging
system
3
Disconnect
refrigerant
lines
from
receiver
drier
CAUTION
Plug
all
openings
to
prevent
entrance
of
dirt
and
moisture
4
Remove
receiver
drier
mounting
screws
Remove
receiver
drier
5
Install
receiver
drier
in
the
reverse
order
of
removal
With
plugs
taken
off
immediately
before
connecting
work
is
started
connect
line
and
receiver
drier
Refer
to
Refrigerant
Une
for
tighten
ing
torque
6
Refer
to
General
Service
for
evacuating
and
charging
system
7
Conduct
leak
test
and
make
sure
that
there
is
no
leak
from
connections
INSPECTION
Check
receiver
drier
for
leaks
or
damage
If
necessary
replace
Page 522 of 548
REFRIGERANT
LINES
Air
Conditioning
@
I
J
L
S
r
Z
S
t
@
See
Fig
AC
29
When
replacing
flexible
hose
and
tube
observe
the
following
1
Before
starting
work
be
sure
to
discharge
system
2
When
disconnecting
tubes
be
sure
to
use
two
wrenches
on
both
tubes
3
After
discon
ecting
tubes
plug
all
openings
immediately
to
prevent
entrance
of
dirt
and
moisture
4
Compressed
air
must
never
be
used
to
clean
dirty
line
Clean
with
refrigerant
gas
5
In
connecting
tubes
be
sure
to
apply
compressor
oil
to
seating
surface
and
then
tighten
tubes
to
specified
tightening
torque
See
Fig
AC
30
Be
sure
to
use
two
wrenches
when
tightening
a
flare
nut
of
tube
Coat
seat
surfaces
with
com
pressor
oil
and
then
tighten
AC263
Fig
AC
30
Line
Connection
CD
6
Make
sure
refrigerant
line
is
clamped
securely
Start
engine
and
raise
engine
speed
to
inspect
if
there
is
vibration
or
unusual
noise
7
Conduct
leak
t
st
and
make
su
e
that
there
is
no
leak
from
connections
8
Refer
to
General
Service
for
evacuating
and
charging
system
COOLING
UNIT
REMOVAL
I
Disconnect
battery
ground
cable
2
Discharge
refrigerant
from
sys
tern
Refer
to
General
Service
3
Loosen
flare
nuts
at
each
con
nection
of
inlet
and
outlet
pipes
of
evaporator
AC
21
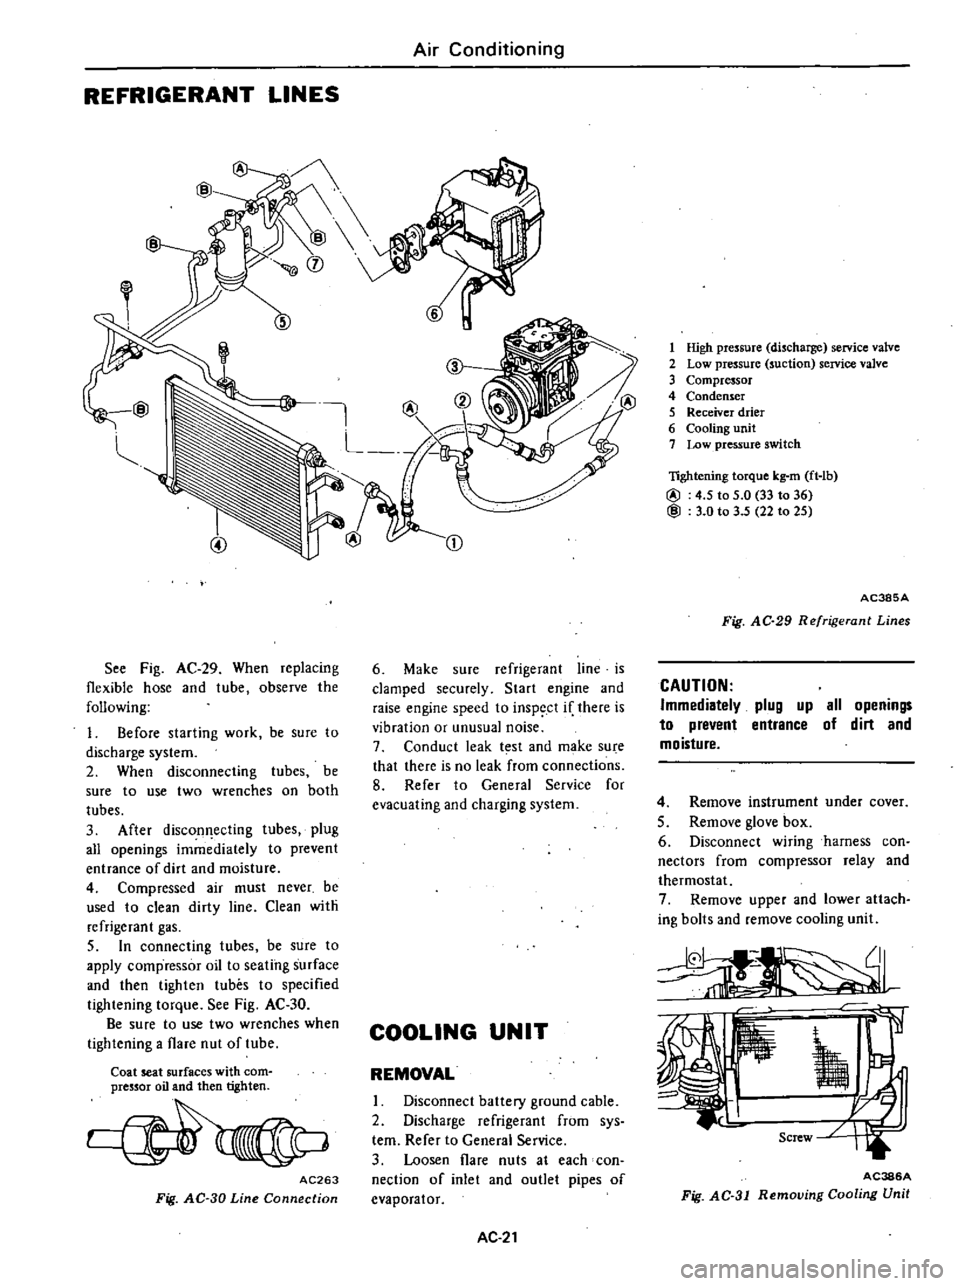
1
High
pressure
discharge
service
valve
2
Low
pressure
suction
service
valve
3
Compressor
4
Condenser
5
Receiver
drier
6
Cooling
unit
7
Low
pressure
switch
lightening
torque
kg
m
ft
lb
@
4
5
to
5
0
33
to
36
@
3
0
to
3
5
22
to
25
AC385A
Fig
AC
29
Refrigerant
Lines
CAUTION
Immediatelv
plug
up
all
openings
to
prevent
entrance
of
dirt
and
moisture
4
Remove
instrument
under
cover
5
Remove
glove
box
6
Disconnect
wiring
harness
con
nectors
from
compressor
relay
and
thermostat
7
Remove
upper
and
lower
attach
ing
bolts
and
remove
cooling
unit
AC386A
Fig
AC
31
Removing
Cooling
Unit
Page 523 of 548
to
DISASSEMBLY
AND
ASSEMBLY
y
1
7
1
r
II
l
1
Using
a
knife
cut
packings
at
upper
and
lower
case
fit
in
portion
2
Remove
clips
fixing
upper
case
to
lower
case
3
Separate
upper
case
from
lower
case
by
pulling
it
upward
4
Withdraw
evaporator
assembly
out
oflower
case
5
Remove
thermostat
from
upper
case
by
removing
attaching
screWs
CAUTION
Capillary
tube
should
not
be
bent
too
sharply
6
To
assemble
reverse
the
order
of
disassembly
Be
sure
to
join
mating
surfaces
of
packings
at
upper
and
lower
case
fit
in
portion
with
an
adhe
sive
substance
Note
When
installing
thermostat
in
sert
capillary
tube
in
same
place
as
it
was
before
removal
Be
sure
to
insert
capillary
tube
end
about
50
em
19
7
in
from
evaporator
core
INSPECT
ON
In
case
evaporator
core
or
expan
sion
valve
have
gas
leaking
repair
or
replace
it
with
a
new
one
as
necessary
Dirt
and
nicotine
accumulation
on
evaporator
case
will
go
b
d
and
smell
Air
Conditioning
1
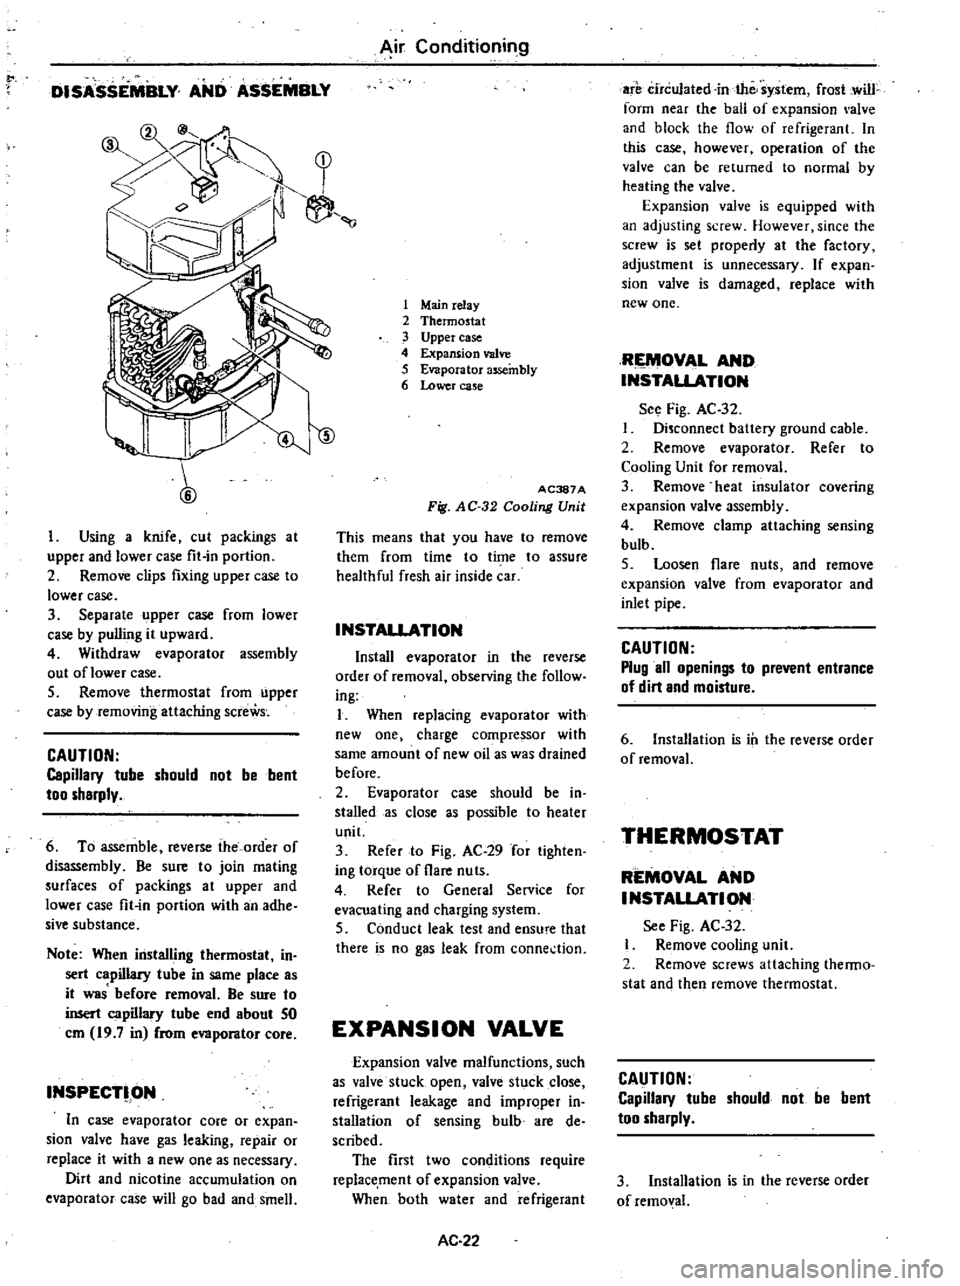
Mainrelay
2
Thermostat
3
Upper
case
4
Expansion
valve
5
Evaporator
assembly
6
Lower
case
ID
AC387A
Fig
AC
32
Cooling
Unit
This
means
that
you
have
to
remove
them
from
time
to
time
to
assure
healthful
fresh
air
inside
car
INSTAllATION
Install
evaporator
in
the
reverse
order
of
removal
observing
the
follow
ing
I
When
replacing
evaporator
with
new
one
charge
compressor
with
same
amount
of
new
oil
as
was
drained
before
2
Evaporator
case
should
be
in
stalled
as
close
s
possible
to
heater
unit
3
Refer
to
Fig
AC
29
for
tighten
ing
torque
of
flare
nuts
4
Refer
to
General
Service
for
evacuating
and
charging
system
5
Conduct
leak
test
and
ensu
e
that
there
is
no
gas
leak
from
conne
tion
EXPANSION
VALVE
Expansion
valve
malfunctions
such
as
valve
stuck
open
valve
stuck
close
refrigerant
leakage
and
improper
in
stall
tion
of
sensing
bulb
are
de
scribed
The
first
two
conditions
require
replacement
of
expansion
valve
When
both
water
and
refrigerant
AC
22
are
circulated
in
the
system
frost
cwill
form
near
the
ball
of
expansion
alve
and
block
the
flow
of
refrigerant
In
this
case
however
operation
of
the
valve
can
be
returned
to
normal
by
heating
the
valve
Expansion
valve
is
equipped
with
an
adjusting
screw
However
since
the
screw
is
set
properly
at
the
factory
adjustment
is
unnecessary
If
expan
sion
valve
is
damaged
replace
with
new
one
RIEMOV
L
AND
INSTALlATION
See
Fig
AC
32
Disconnect
baltery
ground
cable
2
Remove
ev
porator
Refer
to
Cooling
Unit
for
removal
3
Remove
heat
insulator
covering
expansion
valve
assembly
4
Remove
clamp
attaching
sensing
bulb
5
Loosen
flare
nuts
and
remove
expansion
valve
from
evaporator
and
inlet
pipe
CAUTION
Plug
all
openings
to
prevent
entrance
of
dirt
and
moisture
6
Installation
is
ill
the
reverse
order
of
removal
THERMOSTAT
REMOVAL
AND
INSTALlATION
See
Fig
AC
32
Remove
cooling
unit
2
Remove
screws
attaching
thenno
stat
and
then
remove
thermostat
CAUTION
Capillary
tube
should
not
be
bent
too
sharply
3
Installation
is
in
the
reverse
order
of
removal
Page 530 of 548
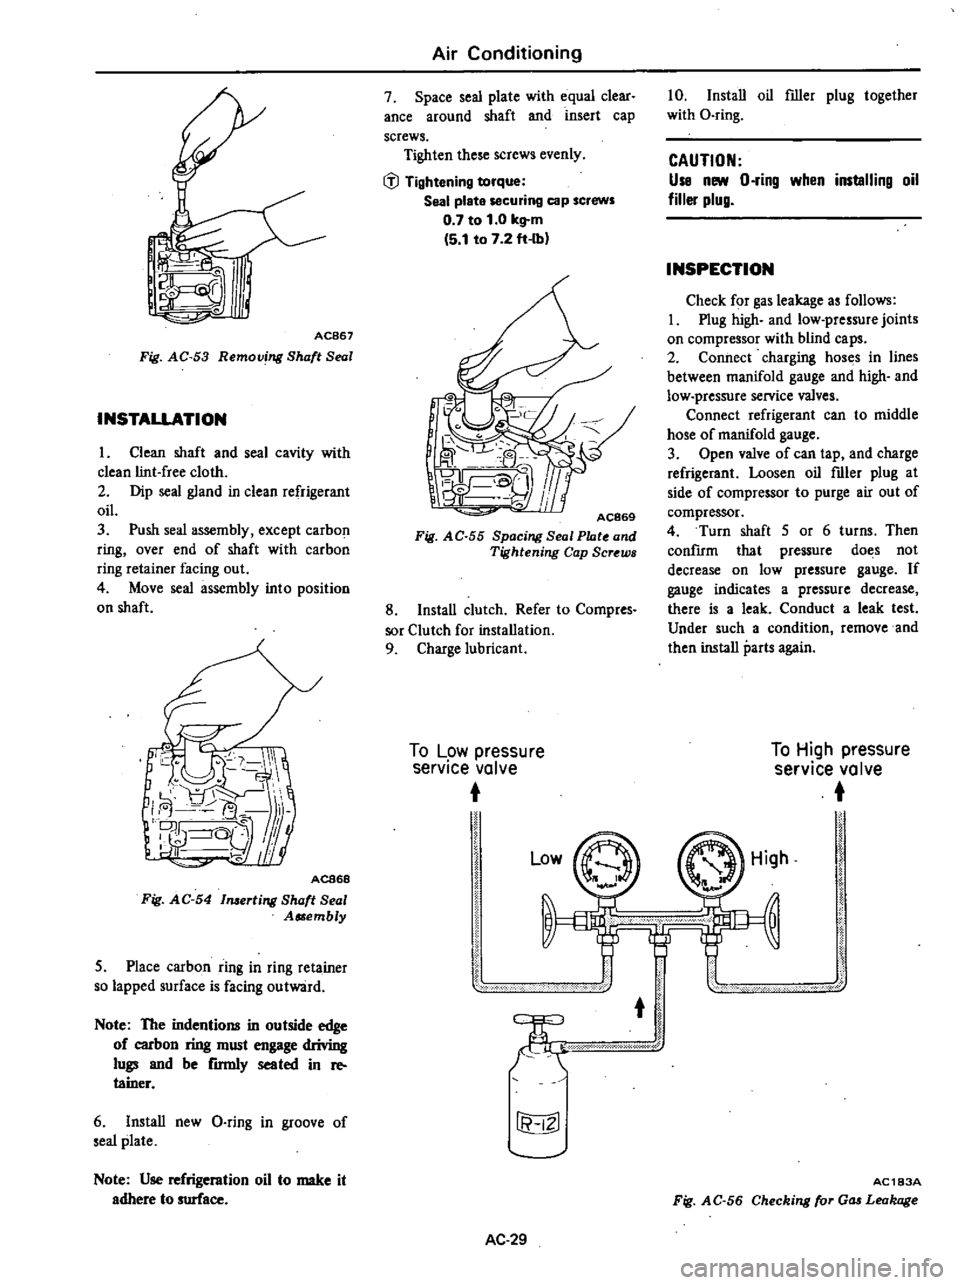
AC867
Fig
AC
53
Removing
Shaft
Seal
INSTALLATION
1
Clean
shaft
and
seal
cavity
with
clean
lint
free
cloth
2
Dip
seal
gland
in
clean
refrigerant
oil
3
Push
seal
assembly
except
carbon
ring
over
end
of
shaft
with
carbon
ring
retainer
facing
out
4
Move
seal
assembly
into
position
on
shaft
ACB68
Fig
AC
54
1merting
Shaft
Seal
Assembly
5
Place
carbon
ring
in
ring
reta
iner
so
lapped
surface
is
facing
outward
Note
The
indentions
in
outside
edge
of
carbon
ring
must
engage
driving
lugs
and
be
rmnly
seated
in
re
tainer
6
Install
new
Q
ring
in
groove
of
seal
plate
Note
Use
refrigeration
oil
to
make
it
adhere
to
surface
Air
Conditioning
7
Space
seal
plate
with
equal
clear
ance
around
shaft
and
insert
cap
screws
Tighten
these
screws
evenly
IiJ
Tightening
torque
Seal
plate
securing
cap
screws
0
7
to
1
0
kg
m
5
1
to
7
2
ft
Ibl
AC869
Fig
AC
55
Spacing
Seal
Plate
and
Tightening
Cap
Screws
8
Install
clutch
Refer
to
Compres
sor
Clutch
for
installation
9
Charge
lubricant
To
Low
pressure
service
valve
10
Install
oil
filler
plug
together
with
O
ring
CAUTION
Use
new
O
ring
when
installing
oil
filler
plug
INSPECTION
Check
for
gas
leakage
as
follows
I
Plug
high
and
low
pressure
joints
on
compressor
with
blind
caps
2
Connect
charging
hoses
in
lines
between
manifold
gauge
and
high
and
low
pressure
service
valves
Connect
refrigerant
can
to
middle
hose
of
manifold
gauge
3
Open
valve
of
can
tap
and
charge
refrigerant
Loosen
oil
filler
plug
at
side
of
compressor
to
purge
air
out
of
compressor
4
Turn
shaft
5
or
6
turns
Then
confIrm
that
pressure
does
not
decrease
on
low
pressure
gauge
If
gauge
indicates
a
pressure
decrease
there
is
a
leak
Conduct
a
leak
test
Under
such
a
condition
remove
and
then
install
parts
again
To
High
pressure
service
valve
Low
r
fi
IZl
AC
29
High
AC183A
Fig
AC
56
Checking
for
Gas
Leakage