check transmission fluid DATSUN 210 1979 Service Manual
[x] Cancel search | Manufacturer: DATSUN, Model Year: 1979, Model line: 210, Model: DATSUN 210 1979Pages: 548, PDF Size: 28.66 MB
Page 83 of 548
10
Replenish
coolant
and
check
for
leaks
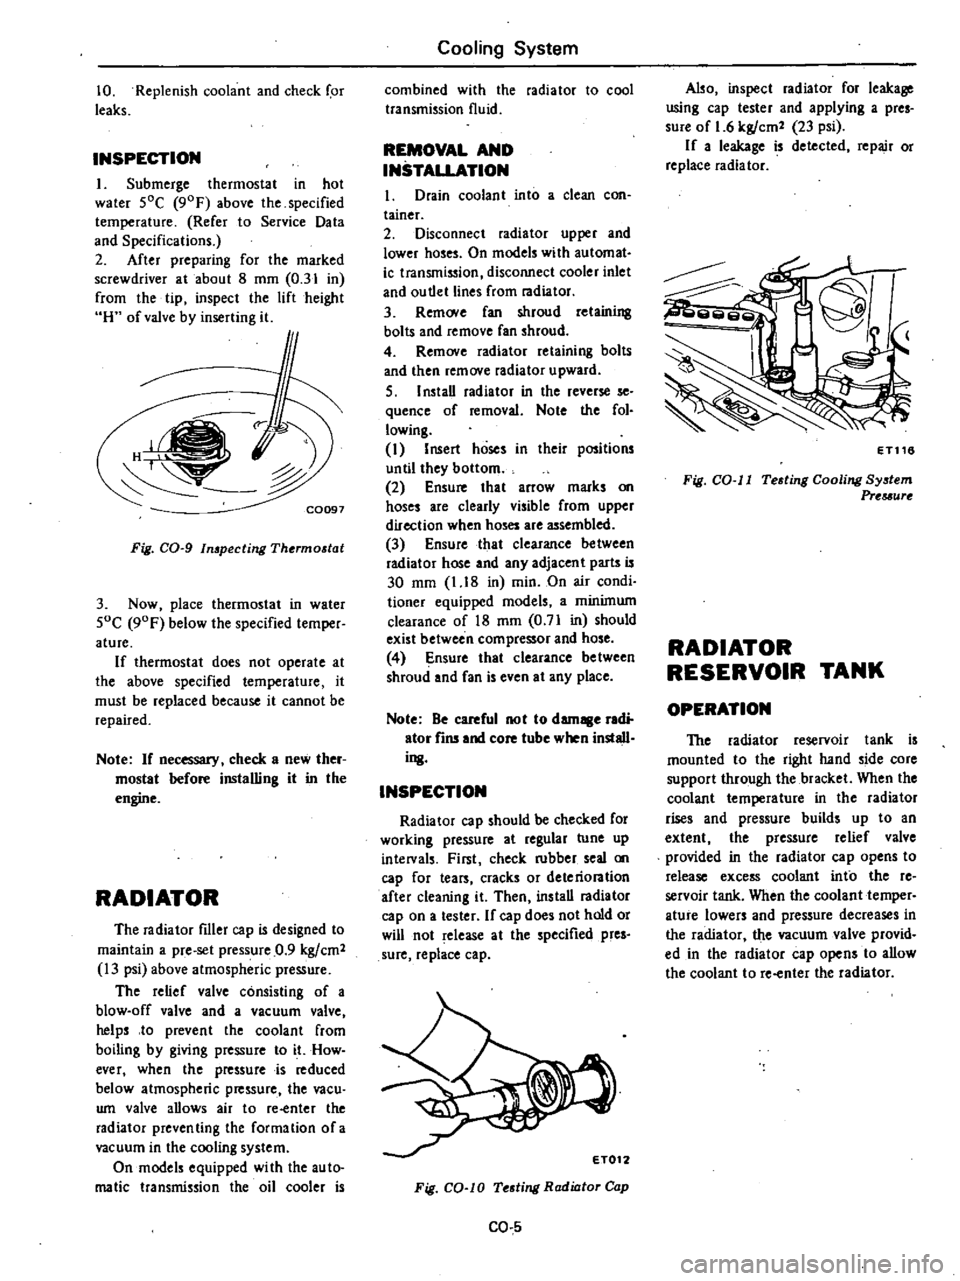
INSPECTION
I
Submerge
thermostat
in
hot
water
SOC
90F
above
the
specified
temperature
Refer
to
Service
Data
and
Specifications
2
After
preparing
for
the
marked
screwdriver
at
about
8
mm
0
31
in
from
the
tip
inspect
the
lift
height
H
of
valve
by
inserting
it
f
C0097
Fig
CO
g
In
pecting
Thermostat
3
Now
place
thermostat
in
water
SoC
90F
below
the
specified
temper
ature
If
thermostat
does
not
operate
at
the
above
specified
temperature
it
must
be
replaced
because
it
cannot
be
repaired
Note
If
necessary
check
a
new
ther
mostat
before
installing
it
in
the
engine
RADIATOR
The
radiator
filler
cap
is
designed
to
maintain
a
pre
set
pressure
0
9
kgfcm2
13
psi
above
atmospheric
pressure
The
relief
valve
consisting
of
a
blow
off
valve
and
a
vacuum
valve
helps
to
prevent
the
coolant
from
boiling
by
giving
pressure
to
it
How
ever
when
the
pressure
is
reduced
below
atmospheric
pressure
the
vacu
wn
valve
allows
air
to
re
enter
the
radiator
preventing
the
formation
ofa
vacuum
in
the
cooling
system
On
models
equipped
wi
th
the
au
to
malic
transmission
the
oil
cooler
is
Cooling
System
combined
with
the
radiator
to
cool
transmission
fluid
REMOVAL
AND
INSTALLATION
1
Drain
coolant
into
a
clean
con
tainer
2
Disconnect
radiator
upper
and
lower
hoses
On
models
with
automat
ic
transmission
disconnect
cooler
inlet
and
ou
tlet
lines
from
radiator
3
Rem
Ne
fan
shroud
retaining
bolts
and
remove
fan
shroud
4
Remove
radiator
retaining
bolts
and
then
remove
radiator
upward
S
I
nstaD
radiator
in
the
reverse
se
quence
of
removal
Note
the
fol
lowing
I
Insert
hoses
in
their
positions
until
they
bottom
2
Ensure
that
arrow
marks
on
hoses
are
clearly
visible
from
upper
direction
when
hoses
are
assembled
3
Ensure
that
clearance
between
radiator
hose
and
any
adjacent
parts
is
30
mm
1
18
in
min
On
air
condi
tioner
equipped
models
a
minimum
clearance
of
18
mm
0
71
in
should
exist
between
compressor
and
hose
4
Ensure
that
clearance
be
tween
shroud
and
fan
is
even
at
any
place
Note
Be
careful
not
to
damage
radi
ator
fins
and
core
tube
when
install
ing
INSPECTION
Radiator
cap
should
be
checked
for
working
pressure
at
regular
tune
up
intelVals
First
check
rubber
seal
on
cap
for
tears
cracks
or
deteriontion
after
cleaning
it
Then
ins
taD
radiator
cap
on
a
tester
If
cap
does
not
hold
or
will
not
release
at
the
specified
pres
sure
replace
cap
Fig
CO
lO
Testing
Radiator
Cap
CO
5
Also
inspect
radiator
for
leakage
using
cap
tester
and
applying
a
pres
sure
of
1
6
kgfcm2
23
psi
If
a
leakage
is
detected
repair
or
replace
radiator
ET116
Fig
CO
II
Testing
Cooling
System
Prtuurt
RADIATOR
RESERVOIR
TANK
OPERATION
The
radiator
reservoir
tank
is
mounted
to
the
right
hand
side
core
support
through
the
bracket
When
the
coolant
temperature
in
the
radiator
rises
and
pressure
builds
up
to
an
extent
the
pressure
relief
valve
provided
in
the
radiator
cap
opens
to
release
excess
coolant
into
the
re
servoir
tank
When
the
coolant
temper
ature
lowers
and
pressure
decreases
in
the
radiator
the
vacuum
valve
provid
ed
in
the
radiator
cap
opens
to
allow
the
coolant
to
re
enter
the
radiator
Page 264 of 548
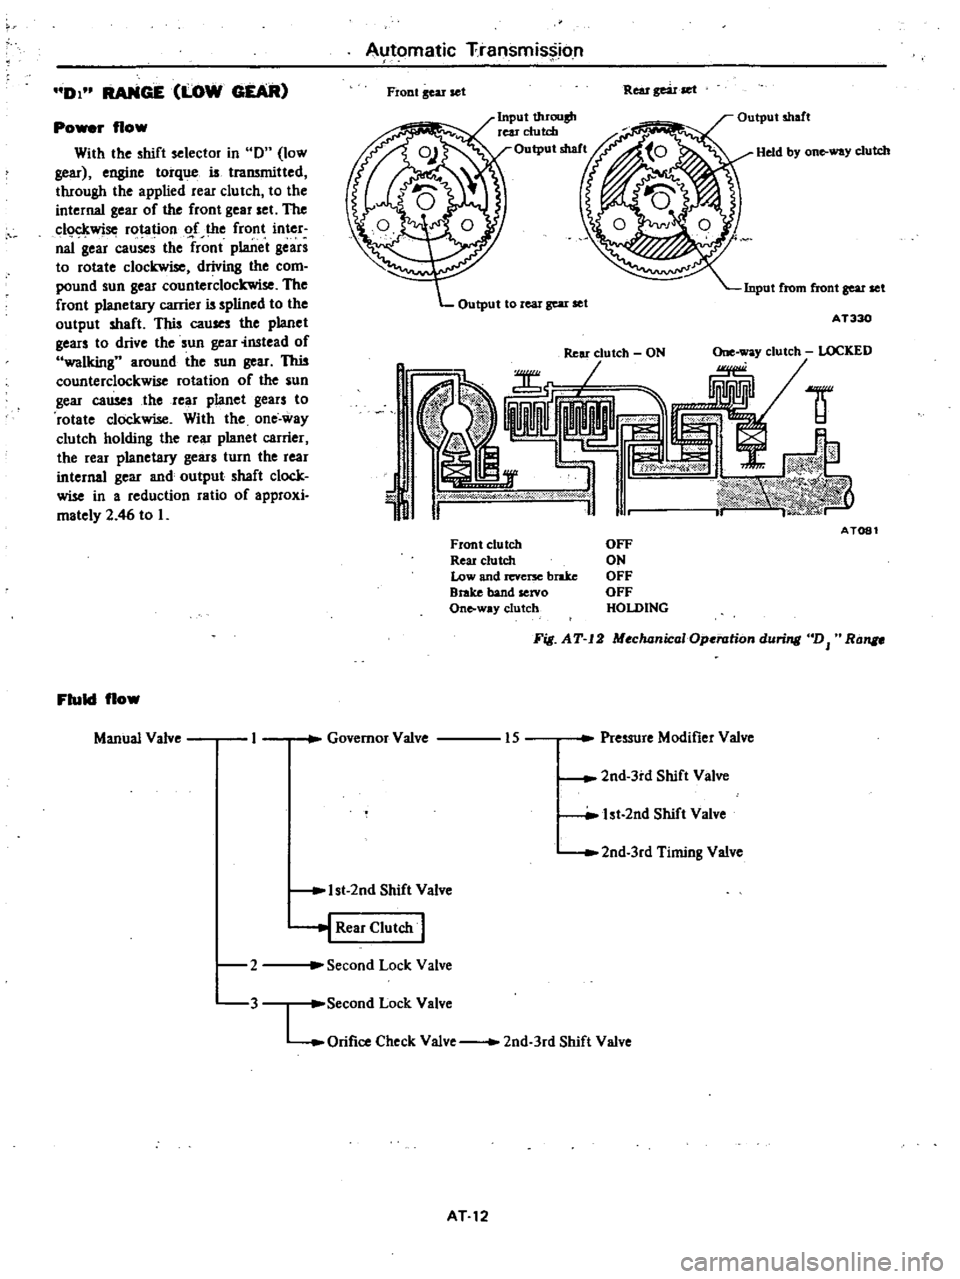
DI
RANGE
LOW
GEAR
Po
r
flow
With
the
shift
selector
in
0
low
gear
engine
torque
is
traJWnitted
through
the
applied
rear
clu
tch
to
the
internal
gear
of
the
front
gear
set
The
c1o
kwise
rotation
o
f
the
front
inter
naI
gear
causes
the
front
planet
gears
to
rotate
clockwise
driving
the
com
pound
sun
gear
counterclockwise
The
front
planetary
carrier
is
splined
to
the
output
shaft
This
cau
the
planet
gears
to
drive
the
sun
gear
instead
of
walking
around
the
sun
gear
This
counterclockwise
rotation
of
the
sun
gear
causes
the
rear
planet
gears
to
rotate
clockwise
With
the
one
way
clutch
holding
the
rear
planet
carrier
the
rear
planetary
gears
turn
the
rear
internal
gear
and
output
shaft
clock
wise
in
a
reduction
ratio
of
approxi
mately
2
46
to
L
Fluid
flow
Manual
Valve
2
3
Automatic
Transmission
Fiont
gear
set
Rear
gear
set
Input
t1uOllsh
rear
clutch
Output
shaft
Held
by
on
way
clutch
Input
from
front
gear
set
Output
to
real
gear
set
AT330
1
J
ld
AT081
Front
clutch
Reu
clutch
Low
and
revcrx
brake
Brake
band
servo
Onto
way
clutch
OFF
ON
OFF
OFF
HOLDING
Fig
AT
12
MochanicaIOp
rationduri
DJ
Ra
Governor
Valve
Pressure
Modifier
Valve
15
2nd
3rd
Shift
Valve
lst
2nd
Shift
Valve
2nd
3rd
Timing
Valve
1st
2nd
Shift
Valve
j
Rear
Clutch
I
Second
Lock
Valve
Second
Lock
Valve
LOrifice
Check
Valve
2nd
3rd
Shift
Valve
AT12
Page 268 of 548
Automatic
Transmission
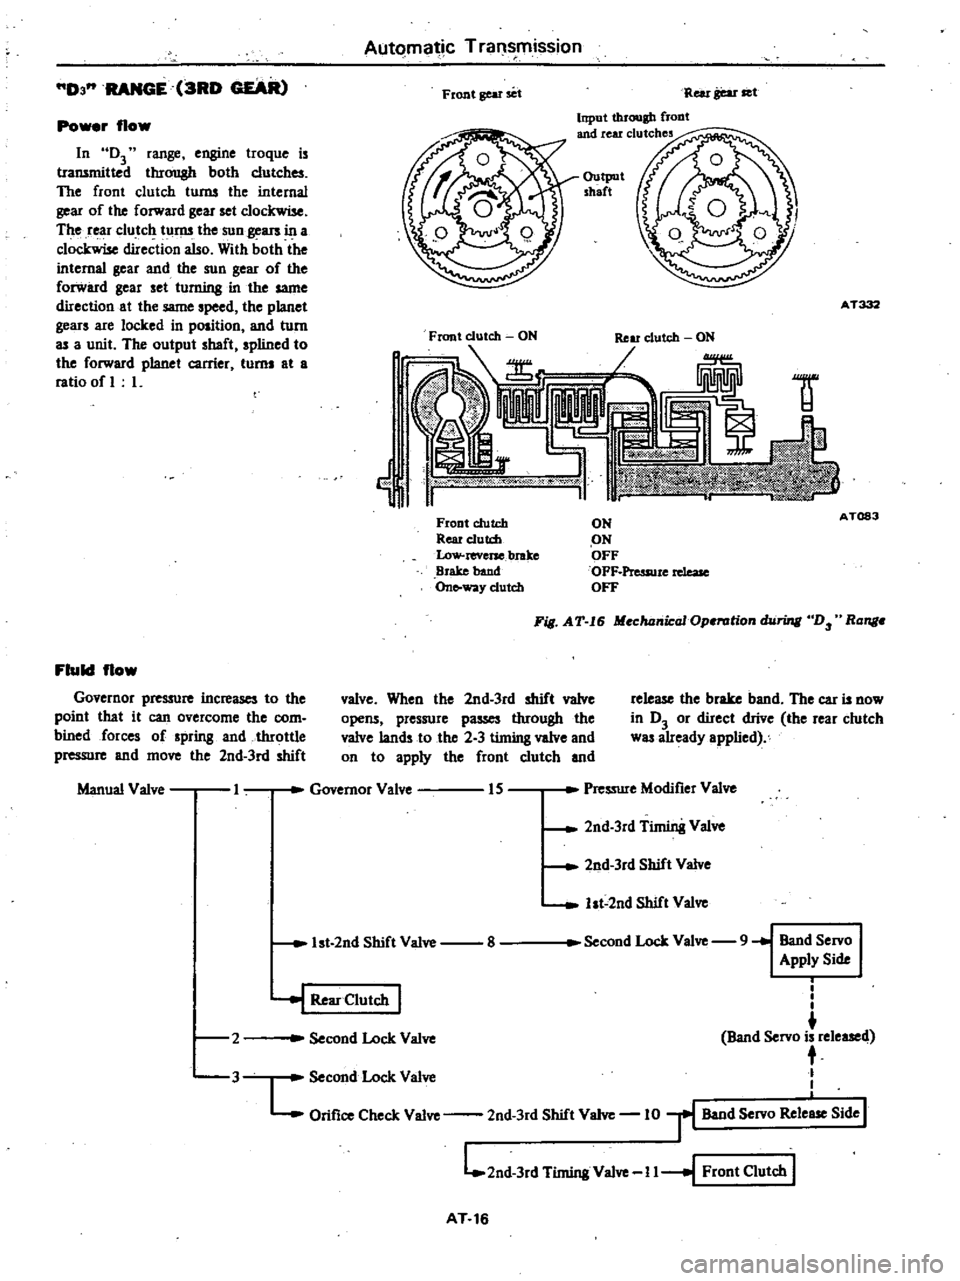
D3
RANGE
3RD
GEAR
Front
gear
set
Rei
r
gear
set
Input
through
flODt
and
rear
clutches
Power
flow
In
D3
range
engine
troque
is
transmitted
through
both
clutches
The
front
clutch
turns
the
internal
gear
of
the
forward
gear
set
clockwise
The
rear
clutch
turns
the
sun
gears
in
a
clockwise
direction
also
With
both
the
internal
gear
and
the
sun
gear
of
the
forward
gear
set
turning
in
the
same
direction
at
the
same
speed
the
planet
gears
are
locked
in
position
and
turn
as
a
unit
The
output
shaft
spIined
to
the
forward
planet
carrier
turns
at
a
ratio
of
L
Output
shaft
AT332
Front
clutch
ON
Ij
1f
Front
clutch
Rear
e1utd
Low
reverse
brake
Brake
band
On
way
clutch
ON
ON
OFF
OFF
Pressure
rdeaJe
OFF
A
T083
Fill
AT
I6
Mechanical
Operation
hiring
D
Ronge
Fluid
flow
Governor
pre
ure
increases
to
the
poinl
that
it
can
overcome
the
com
bined
forces
of
spring
and
throttle
pressure
and
move
the
2nd
3rd
shift
valve
When
the
2nd
3rd
shift
valve
opens
pressure
passes
through
the
valve
lands
to
the
2
3
timing
valve
and
on
to
apply
the
front
clutch
and
release
the
brake
band
The
car
is
now
in
D3
or
direct
drive
the
rear
clutch
was
already
applied
Manual
Valve
I
Governor
Valve
IS
Pressure
Modifier
Valve
2nd
3rd
Timin8
Valve
2nd
3rd
Shift
Valve
ht
2nd
Shift
Valve
1st
2nd
Shift
Valve
8
Second
Lock
Valve
9
Band
Servo
Apply
Side
2
i
I
I
Band
Servo
is
released
t
Second
Lock
Valve
L
Orifice
Check
Valve
2nd
3rd
Shift
Valve
10
r
Band
Servo
Rele
Side
I
L
2nd
3rd
Timing
Valve
I
I
I
Front
Clutch
I
J
Second
Lock
Valve
I
Rear
Clutch
I
3
AT
16
Page 278 of 548
4
Bolt
converter
to
drive
plate
Note
Align
chalk
mark
painted
a
cro5S
both
parts
during
disas
sembling
p
S
After
converter
is
installed
rotat
r
nkshait
veral
turns
and
check
to
be
sure
that
transmission
rotates
freely
without
binding
6
Pour
recommended
automatic
transmission
fluid
up
to
correct
level
through
oil
charge
pipe
7
Connect
manual
lever
to
shift
rod
Operation
should
be
carried
out
with
m
mual
and
selector
levers
in
N
8
Connect
inhibitor
switch
wires
Automatic
Transmission
NOte
a
Refer
to
page
AT40
for
Checking
and
Adjusting
Inhibitor
Switch
b
Inspect
end
edjust
switch
as
abo
whe
ever
it
has
to
be
removed
for
servi
e
9
Check
inhibitor
switch
for
op
eration
Starter
should
be
brought
into
op
eration
only
when
selector
lever
is
in
P
and
N
positions
it
should
not
be
started
when
lever
is
in
D
n
and
Ru
positions
Back
up
lamp
should
Iso
light
when
selector
lever
is
placed
in
R
position
10
Check
level
of
oil
in
transm
sion
For
detailed
procedure
see
page
AT39
AT
26
II
Move
selector
leve
through
all
positions
to
be
sure
that
transmission
operates
correctly
With
hand
brake
applied
rotate
engine
at
idling
Without
disturbing
the
above
seUlng
move
selector
lever
through
N
to
D
to
2
to
I
and
to
R
A
slight
shock
should
be
reU
by
handgripping
selector
each
time
transmission
is
shifted
Note
See
page
AT40
for
Checking
Engine
Idling
Revolution
12
Check
to
be
sure
that
line
pres
sure
is
correct
To
do
this
refer
to
page
AT
43
for
Line
Pressure
Test
13
Perform
stan
test
as
described
in
page
AT41
Page 284 of 548

Insp
ctIon
I
Check
for
signs
of
wear
or
dam
age
to
clutch
drive
plate
facing
If
found
worn
or
damaged
excessively
discard
Drive
plm
th
Standen
1
5
to
1
66mm
0
059
to
O
Inl
Allowable
limit
1A
mm
0
065
inl
2
Check
fOI
weer
on
snap
ring
and
for
weakened
or
broken
coil
spring
If
necessary
replace
with
new
ones
Spring
retainer
should
also
be
in
spected
fOI
warpage
sembi
1
Assembly
is
in
reverse
the
order
of
disassembly
Dip
all
parts
in
clean
automatic
transmission
fluid
before
installing
Fig
AT
56
l
ting
Clutch
PIlIte
2
After
clutch
is
a
embled
make
sure
th
t
clearance
between
snap
ring
CD
and
retaining
plate
V
is
held
within
specified
limits
If
necessary
lIy
with
other
retaining
plate
having
different
thickness
until
correct
clear
ance
is
obteined
S
1
deerence
1
6
to
2
0
mm
0
063
to
0
079
inl
Automatic
Transmission
Awilable
reteiningplate
Thickness
mm
in
10
6
0
417
10
8
0
425
11
0
0
433
11
2
0441
II
4
0
449
11
6
0
457
AT151
Fig
AT
67
Me
ring
Ring
to
PIlIte
Cleo
3
Testing
front
clutch
With
front
clutch
assembled
on
oil
pump
cover
direct
a
jet
of
air
into
hole
in
clutch
drum
for
definite
clutch
operation
AT152
Fig
AT
58
Taring
Front
Clutch
AT
32
REAR
a
UTCH
D1
mbl
AT313
1
Rear
clutch
drum
6
Snap
rina
2
Piston
7
SpriDa
3
Dished
plate
8
SDap
riJlI
4
Coil
sprina
9
Dri
plate
5
Rctainins
plate
10
Iltmm
plate
Fig
AT
59
Sectional
VielD
0
Rear
Clutch
1
Take
out
snap
ring
@
retaining
plate
@
drivc
plate
@
driven
plate
@
and
dished
plate
ID
Same
tech
nique
can
be
applied
as
in
disas
sembling
front
clutch
2
Remove
snap
ring
from
coil
spring
retainer
ST2S3200l
X
Fi6
AT
60
Remouing
SruJP
Ring
Page 285 of 548
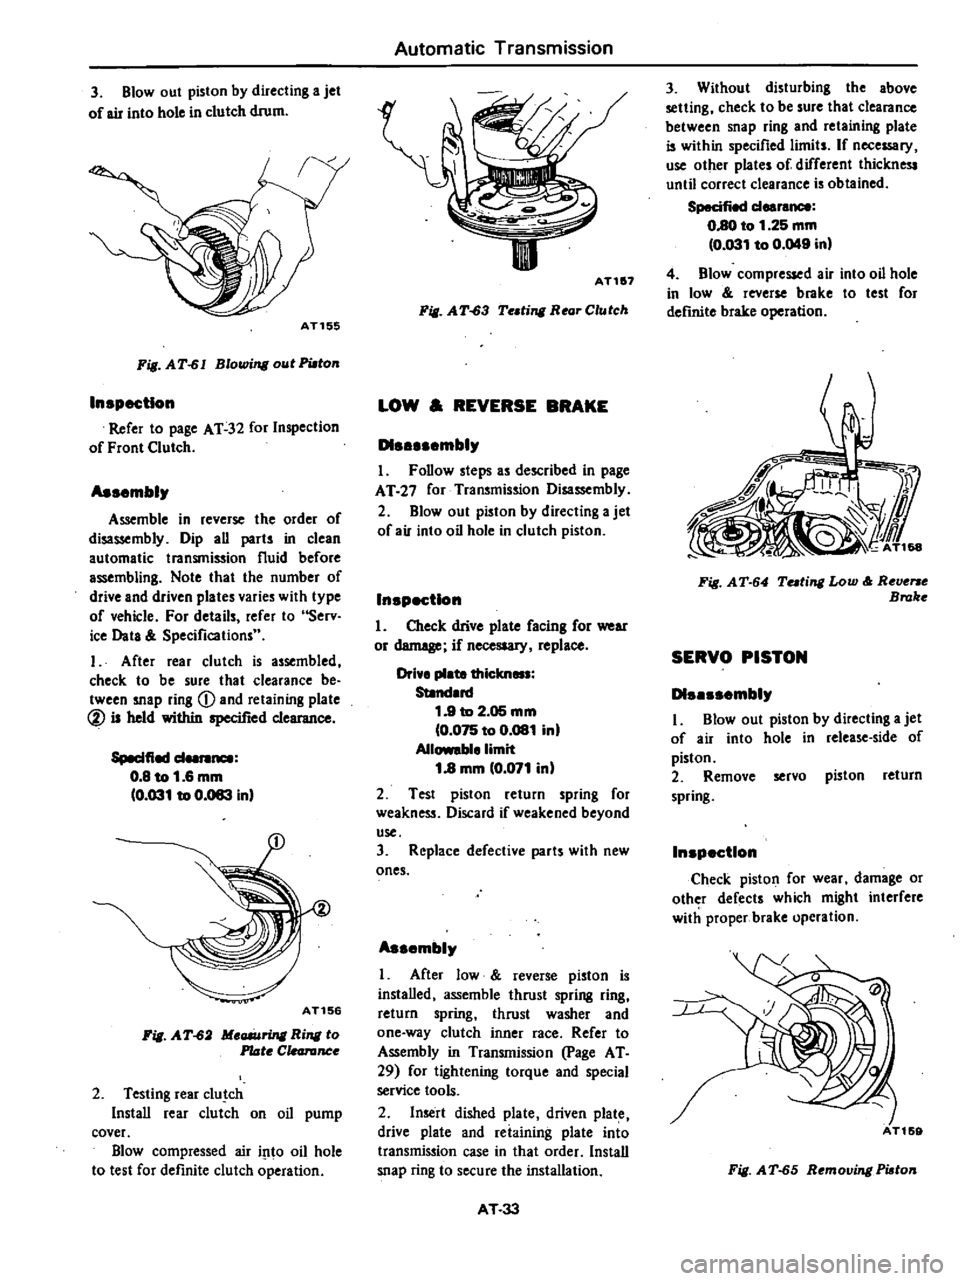
3
Blowout
piston
by
directing
a
jet
of
air
into
hole
in
clutch
drum
AT155
Fig
AT
61
Blowing
out
PWton
In
pectlon
Refer
to
page
AT
32
for
Inspection
of
Front
Clutch
As
mbly
Assemble
in
reverse
the
order
of
disassembly
Dip
all
parts
in
clean
automatic
transmission
fluid
before
assembling
Note
that
the
number
of
drive
and
driven
plates
varies
with
type
of
vehicle
For
details
refer
to
Serv
ice
Data
Specifications
I
After
rear
clutch
is
assembled
check
to
be
sure
that
clearance
be
tween
snap
ring
Q
and
retaining
plate
@
is
held
within
specified
clearance
Speelfied
d
0
8
to
1
6
mm
0
031
to
0
083
inl
AT156
Fig
AT
62
Meaiuring
Ring
to
Plate
C
canInce
2
Testing
rear
c1u
ch
Install
rear
clutch
on
oil
pump
cover
Blow
compressed
air
i
1to
oil
hole
to
test
for
definite
clutch
operation
Automatic
Transmission
II
AT1
7
Fill
A
T
63
Te
ting
Rear
Clutch
LOW
REVERSE
BRAKE
D1
mbly
I
Follow
steps
as
described
in
page
AT
27
for
Transmission
Disassembly
2
Blowout
piston
by
directing
a
jet
of
air
into
oil
hole
in
clutch
piston
In
pectlon
1
Check
drive
plate
facing
for
wear
or
demege
if
necesaary
replace
Drive
plate
thielm
Standard
1
9
to
2
05
mm
0
075
to
0
081
in
Allowable
limit
1
8
mm
0
071
inl
2
Test
piston
return
spring
for
weakness
Discard
if
weakened
beyond
use
3
Replace
defective
parts
with
new
ones
As
mbly
I
After
low
reverse
piston
is
installed
assemble
thrust
spring
ring
return
spring
thrust
washer
and
one
way
clutch
inner
race
Refer
to
Assembly
in
Transmission
page
AT
29
for
tightening
torque
and
special
service
tools
2
Insert
dished
plate
driven
plate
drive
plate
and
reiaining
plate
into
transmission
case
in
that
order
Install
snap
ring
to
secure
the
installation
AT
33
3
Without
disturbing
the
above
setting
check
to
be
sure
that
clearance
between
snap
ring
and
retaining
plate
is
within
specified
limits
If
nece
ry
use
other
plates
of
different
thickness
until
correct
clearance
is
obtained
Specified
deereM8
0
80
to
1
25
mm
0
031
to
0
049
inl
4
Blow
compressed
air
into
oil
hole
in
low
roverse
brake
to
test
for
deftnite
brake
operation
Fill
AT
64
Tuting
Low
Reverse
Broke
SERVO
PISTON
D1
mbly
I
Blowout
piston
by
dilecting
a
jet
of
air
into
hole
in
release
side
of
piston
2
Remove
servo
piston
return
spring
In
p
ctlon
Check
piston
for
wear
damage
or
other
defects
which
might
interfere
with
proper
brake
opcration
Fig
AT
65
Removing
Piaton
Page 286 of 548
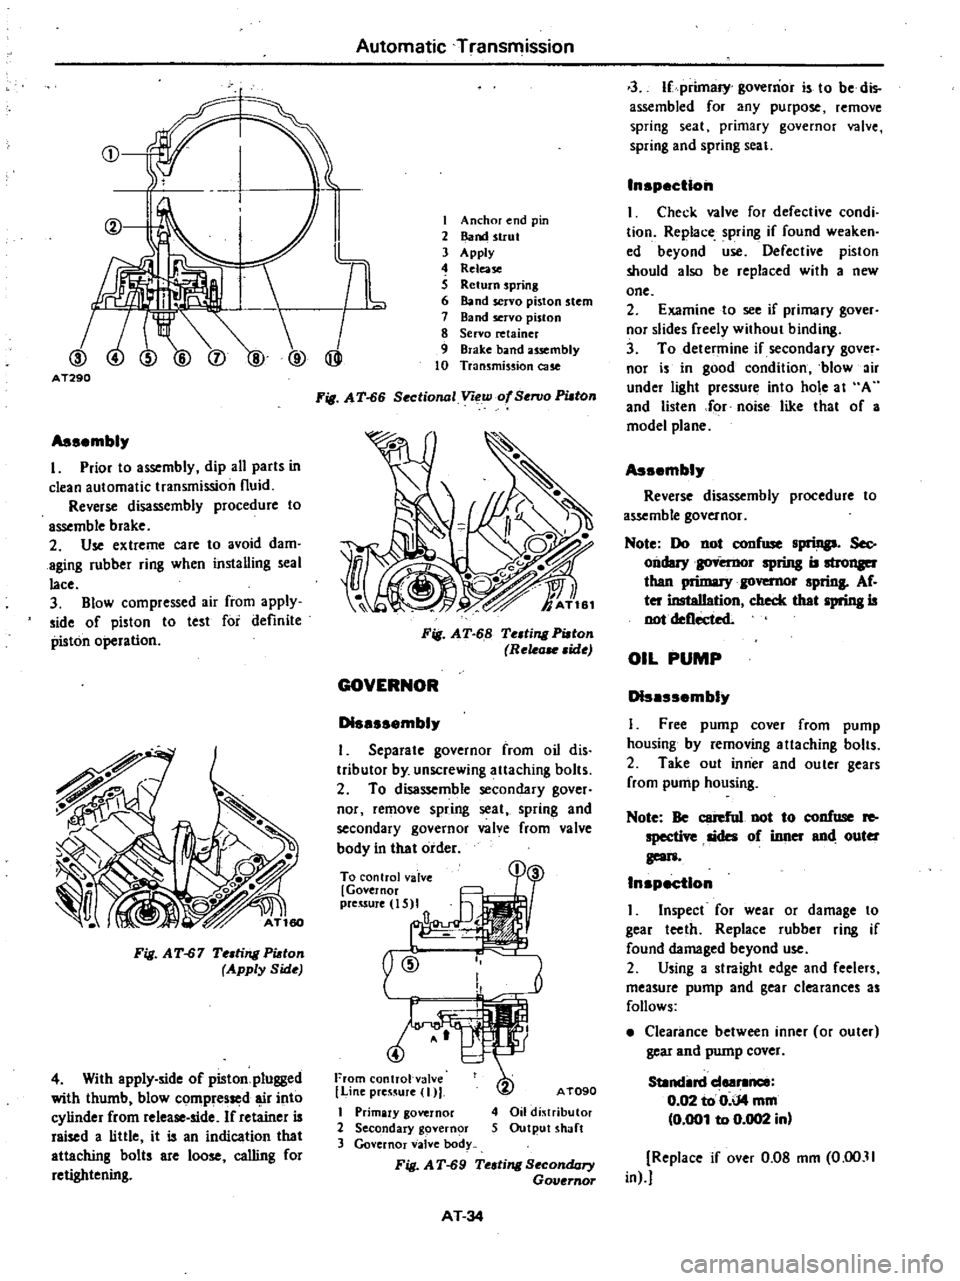
CD
@
I
I
TL
@
@
AT290
Assembl
I
Prior
to
assembly
dip
all
parts
in
clean
automatic
transmission
fluid
Reverse
disassembly
procedure
to
assemble
brake
2
Use
extreme
care
to
avoid
dam
aging
rubber
ring
when
installing
seal
lace
3
Blow
compressed
air
from
apply
side
of
piston
to
test
for
definite
piston
operation
Fig
AT
67
Te
ling
Pi
ton
Apply
Side
4
With
apply
side
of
piston
plugged
with
thumb
blow
compressed
r
into
cylinder
from
release
side
If
retainer
is
raised
a
little
it
is
an
indication
that
attaching
bolts
are
loose
calling
for
retightening
Automatic
Transmission
I
Anchor
end
pin
2
Band
strut
3
Apply
4
Release
S
Return
spring
6
Band
servo
piston
stem
7
Band
servo
piston
8
Servo
retainer
9
Brake
band
usembly
10
Transmission
cue
Fig
A
T
66
Sectional
Voew
of
SenJo
PUlOn
Fig
AT
68
Te
ting
Pi
ton
Rele
ide
GOVERNOR
D1sessembl
I
Separate
governor
from
oil
dis
tributor
by
unscrewing
attaching
bolts
2
To
disassemble
secondary
gover
nor
remove
spring
seat
spring
and
secondary
governor
valve
from
valve
body
in
that
order
To
control
valve
Governor
preuure
IS
I
a
@
From
control
val
e
I
Line
preS
UJe
I
I
Primary
governor
2
Secondary
govern
r
3
Governor
valve
body
Fig
AT
69
Te
ling
SecondQry
Governor
AT090
4
Oil
dj
tributor
5
Output
shaft
AT
34
3
If
primary
governor
is
to
be
dis
assembled
for
any
purpose
remove
spring
seat
primary
governor
valve
spring
and
spring
seal
Inspection
I
Check
valve
for
defective
condi
tion
Replace
spring
if
found
weaken
ed
beyond
use
Defective
piston
should
also
be
replaced
with
a
new
one
2
Examine
to
see
if
primary
gover
nor
slides
freely
without
binding
3
To
determine
if
secondary
gover
nor
is
in
good
condition
blow
ir
under
light
pressure
into
hole
at
A
and
listen
for
noise
like
thaI
of
a
model
plane
Assembl
Reverse
disassembly
procedure
to
assemble
governor
Note
Do
not
confuse
spriDp
Sec
ondary
spring
is
than
1
governor
sprinS
Af
ter
insteIIation
check
thet
spring
is
not
deflected
OIL
PUMP
D1sessembl
I
Free
pump
cover
from
pump
housing
by
removing
allaching
bolts
2
Take
out
inner
and
ouler
gears
from
pump
housing
Note
Be
cerefnl
not
to
confuse
Ie
specti
sides
of
inner
end
outer
geon
Inspection
I
Inspect
for
wear
or
damage
to
gear
teeth
Replace
rub
bel
ring
if
found
damaged
beyond
use
2
Using
a
straight
edge
and
feelers
measure
pump
and
gear
clearances
as
follows
Clearance
between
inner
or
outer
gear
and
pump
cover
SUndin
deer1lnee
0
02
to
0
iJ4
mm
0
001
to
0
002
in
Replace
if
over
0
08
mm
0
00
11
in
Page 287 of 548

Fig
AT
70
MeG6Uring
Clearonce
Clearance
between
seal
ring
and
ring
groove
Stendard
0
04
to
0
16
mm
10
002
to
0
006
in
I
31earance
Seal
ring
w
I
J
7
r
11
AT1
5
II
Fig
AT
71
MeG6Uring
Clearance
As
mblr
L
Set
up
pump
housing
with
inner
and
outer
pump
gears
on
it
2
Using
Oil
Pump
Assembling
Gauge
ST2SS80001
instan
pump
cover
to
pump
houaing
AT166
Fig
AT
72
Centering
Oil
Pump
3
Temporarily
tighten
pump
secur
ing
bolts
4
Set
the
cunout
of
oil
pump
cover
within
specified
total
indicator
read
ing
Automatic
Transmission
Total
indicator
reading
Lell
than
0
07
mm
10
0028
inl
ST2SSBOOOl
AT264
Fig
AT
73
Me
ring
Runout
S
Tighten
pump
securing
bolts
to
specified
torque
r
Tightening
torque
Oil
pump
housing
to
oil
pump
cover
0
6
to
0
8
kg
m
14
3
to
5
8
ft
Ibl
Note
Be
sure
to
align
con
ter
housini
securing
bolt
holes
6
Again
check
the
runout
of
oil
pump
cover
Note
When
former
Oil
Pump
As
sembling
Gauge
is
to
be
used
make
a
screw
hole
in
side
of
it
PLANETARY
CARRIER
The
planetary
carrier
cannot
be
divided
into
its
individual
components
If
any
part
of
component
is
defec
tive
replace
the
carrier
as
a
unit
In
p
ctlon
Check
clearance
between
pinion
washer
and
planetary
carrier
with
a
feeler
Standard
d
0
20
to
0
70
mm
0
008
to
0
028
in
AT
35
uan
r
J
II
I
AT1S7
Fig
AT
74
MeG6Uring
Pinion
Waaher
to
CanUr
Clearance
Replace
if
over
0
80
mm
0
031
in
CONTROL
VALVE
Tlte
control
valve
assembly
consists
of
many
precision
parts
and
requires
extreme
care
when
it
has
to
be
re
moved
and
serviced
It
is
good
practice
to
place
parts
in
a
part
rack
so
that
they
can
be
reassembled
in
valve
body
in
their
proper
positions
Added
care
should
also
be
exercised
to
prevent
springs
and
other
small
parts
from
being
sca
ttered
and
lost
Before
assembly
dip
all
parts
in
clean
automatic
transmission
fluid
and
check
to
be
certain
that
they
are
free
of
lint
and
other
minute
particles
If
clutch
or
band
is
burnt
or
if
oil
becomes
fouled
the
control
valve
as
sembly
should
be
disassembled
and
flushed
DI
mblr
I
Remove
bolts
and
nuts
which
retain
oil
strainer
Bolts
may
be
re
moved
with
a
screwdriver
but
it
is
recommended
that
Hexagon
Wrench
lIT61000S00
and
Spinner
Handle
lIT623S0000
b
used
Page 291 of 548
Automatic
Transmission
TROUBLE
DIAGNOSIS
AND
ADJUSTMENT
Since
mo
automatic
transmission
troubles
can
be
repaired
by
simple
adjustment
do
not
disassemble
im
media
tely
Firstly
inspect
and
adjust
the
auto
D1
3tic
transmission
in
place
utilizing
the
Trouble
Shooting
Chart
If
the
trouble
can
not
be
solved
by
this
procedure
remove
and
disas
semble
the
automatic
tlllnsmission
It
is
advisable
to
check
overhaul
and
repair
each
part
in
the
order
listed
in
the
Trouble
Shooting
Chart
In
the
Trouble
Shooting
Chart
the
diagnosis
items
are
arranged
ac
cording
to
difficulty
from
easy
to
difficult
therefore
please
follow
these
items
The
tlllnsmission
should
riot
be
removed
unless
necessary
2
Tests
and
adjustments
should
be
inade
on
the
basil
of
standard
values
and
the
data
Should
be
recorded
INSPECTION
AND
ADJUSTMENT
BEFORE
TROUBLE
DIAGNOSIS
TESTING
INSTRUMENT
FOR
INSPECTION
I
Engine
t
chometer
2
Vacuum
gauge
3
Oil
pressure
gauge
It
is
convenieni
to
install
these
instruments
in
a
way
that
allows
meas
urements
to
be
made
from
the
driver
s
seat
CHECKING
OIL
LEVEL
In
checkIng
the
automatic
transmis
sion
the
oil
level
and
the
condition
of
oil
around
the
oil
level
gauge
should
be
examined
every
S
ooo
Ion
3
000
miles
This
is
an
easy
and
effective
trouble
shooting
procedure
since
some
changes
in
oil
condition
are
often
linked
with
developed
troubles
For
instance
Lack
of
oil
causes
defective
opera
tion
by
making
the
clutches
and
brakes
slip
resulting
in
severe
wear
This
is
because
the
oil
pump
sucks
air
causing
oil
foaming
thus
rapidly
deteriorating
the
oil
quality
and
pro
ducing
sludge
and
varnish
Excessive
oil
is
also
bad
because
of
oil
foaming
caused
by
the
gears
stirring
up
the
oil
During
high
speed
driving
excessive
oil
in
the
transmission
often
hlows
out
from
the
brealher
Me
urlns
011
level
To
check
the
nuid
leyel
sian
Ihe
engine
and
run
it
until
normal
operat
ing
temperatures
oil
temperature
SO
to
800C
122
to
1160F
Approxi
mately
ten
minute
of
operation
will
raise
the
temperature
to
this
range
and
engine
idling
conditions
are
stabi
lized
Then
apply
the
brakes
and
move
the
transmission
shift
lever
through
aU
drive
positions
and
place
it
in
park
P
position
In
his
inspec
tion
the
car
must
be
placc
d
on
a
level
surface
The
amount
of
the
oil
varies
with
the
temperature
As
a
rule
the
oil
level
must
be
measured
after
its
tempera
ture
becomes
sufficiently
high
I
Fill
the
oil
to
the
line
H
The
difference
of
capacities
between
both
H
and
L
is
approximately
0
4
liter
J
U
S
pt
Y
Imp
pt
and
therefore
do
not
fill
beyond
the
line
H
2
When
topping
up
and
changing
oil
care
should
be
taken
to
prevent
mixing
the
oil
with
dusl
and
water
In
pectlns
oU
condition
The
condition
of
oil
sticking
to
the
level
gauge
indicates
whether
to
OVOl
haul
and
repair
the
transmission
or
luok
for
Ihe
defective
part
If
the
oil
has
deteriorated
to
a
varnish
ike
quality
it
causes
the
con
trol
valve
to
stick
Blackened
oil
indi
cates
a
burned
clutch
brake
band
etc
AT
39
In
these
cases
the
transmission
must
be
repaired
CAUTION
I
In
checking
oil
IlVal
use
special
piper
Cloth
tohandla
the
18V81
llIugi
Ind
be
careful
not
to
let
the
scraps
of
paper
end
cloth
stick
to
the
IlIUp
b
U
lutomatic
transmission
fluid
having
OEXRON
ida
ons
only
in
the
3N71
B
eutomatic
trans
mission
c
Pay
IttBntion
blcau
the
oil
to
be
used
differs
from
that
used
in
the
Nissen
Full
Autometic
TllInsmis
sion
3N71A
N8V8r
mill
thl
oils
Note
Insert
the
gauge
fully
and
take
it
out
quickly
before
splesbing
oil
edheres
to
the
gauge
Then
observe
the
level
INSPECTION
AND
REPAIR
OF
OIL
LEAKAGE
When
oil
leakage
takes
place
the
portion
near
the
leakage
is
covered
with
oil
presenting
difficulty
in
detecting
the
spot
Therefore
the
places
where
oil
seals
and
gaskets
are
equipped
are
enumerated
below
Converter
housing
Rubber
ring
of
oil
pump
housing
Oil
seal
of
oil
pump
housing
Oil
seal
of
engine
crankshaft
Bolts
of
converter
housing
to
case
2
Transmission
and
rear
extension
Junction
of
transmission
and
rear
extension
Oil
cooler
tube
connectors
Oil
pan
Oil
pressure
inspection
holes
See
Fig
AT
81
Mounting
portion
of
vacuum
dia
phragm
and
downshift
solenoid
Breather
and
oil
charging
pipe
Speedometer
pinion
sleeve
Oil
seal
of
rear
extension
To
exactly
locate
Ihe
place
of
oil
leakage
proceed
as
follows