jack points DATSUN 210 1979 Service Manual
[x] Cancel search | Manufacturer: DATSUN, Model Year: 1979, Model line: 210, Model: DATSUN 210 1979Pages: 548, PDF Size: 28.66 MB
Page 5 of 548
DATSUN
210
Model
8310
Series
SECTIONGI
GENERAL
INFORMATION
CONTENTS
MODEL
VARIATION
IDENTIFICATION
NUMBERS
CAR
IDENTIFICATION
PLATE
CAR
SERIAL
NUMBER
IDENTIFICATION
NUMBER
PLATE
ENGINE
SERIAL
NUMBER
COLOR
CODE
NUMBER
LABEL
M
V
S
S
CERTIFICATION
LABEL
EMISSION
CONTROL
INFORMATION
LABE
L
MANUAL
TRf
NSMISSION
NUMBER
AUTOMATIC
TRANSMISSION
NUMBER
APPROXIMATE
REFILL
CAPACITIES
GI
2
GI
3
GI
3
GI
3
GI
4
GI
4
GI
4
GI
4
GI
4
GI
4
GI
4
GI
5
RECOMMENDED
FuEL
RECOMMENDED
LUBRICANTS
RECOf
lMENDED
LUBRICANTS
RECOMMENDED
SAE
VISCOSITY
NUMBER
LUBRICATION
CHART
MAINTENANCE
SCHEDULE
LIFTING
POINTS
AND
TOWING
PANTOGRAPH
JACK
GARAGE
JA
CK
AND
SAFETY
STAND
TOWING
TIE
DOWN
SPECIAL
TOOLS
j
GI
5
GI
5
GI
5
GI
5
GI
6
Gill
j
9
GI
9
GI
eGI
9
p
G
I
O
Page 13 of 548
General
Information
LIFTING
POINTS
AND
TOWING
PANTOGRAPH
JACK
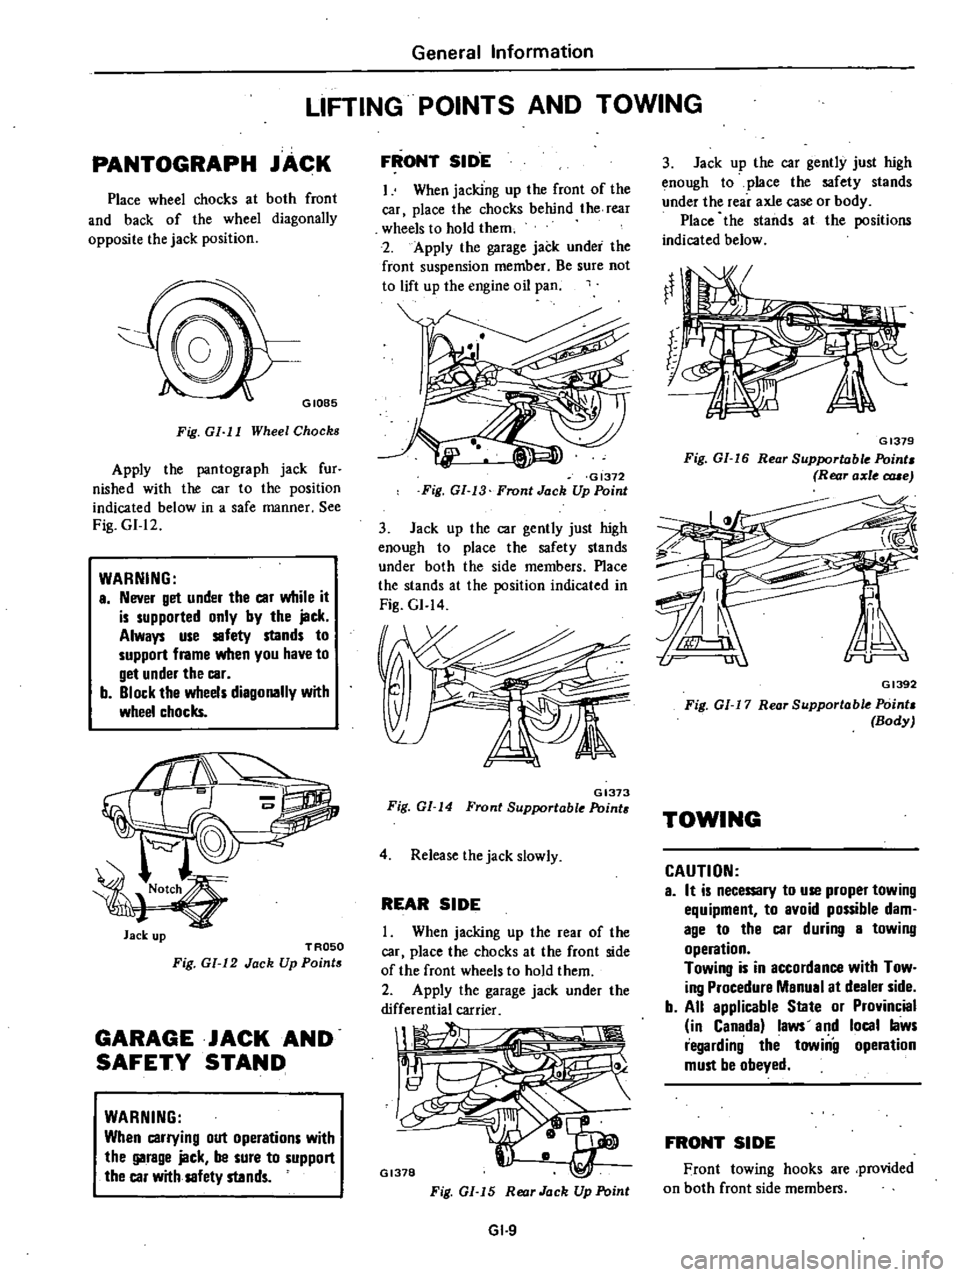
Place
wheel
chocks
at
both
front
and
back
of
the
wheel
diagonally
opposite
the
jack
position
GIOB5
Fig
GI
I
I
Wheel
Chocks
Apply
the
pantograph
jack
fur
nished
with
the
car
to
the
position
indicated
below
in
a
safe
manner
See
Fig
GI
12
WARNING
a
Never
get
under
the
car
while
it
is
supported
only
by
the
jack
Always
use
safety
stands
to
support
frame
when
you
have
to
get
under
the
car
b
Block
the
wheels
diagonally
with
wheel
chocks
Jack
up
TROSO
Fig
GI
12
Jack
Up
Points
GARAGE
JACK
AND
SAFETY
STAND
WARNING
When
carrying
out
operations
with
the
garage
jack
be
sure
to
support
the
car
with
safety
stands
FRONT
SID
E
I
When
jacking
up
the
front
of
the
car
place
the
chocks
behind
the
rear
wheels
to
hold
them
2
Apply
the
garage
jack
under
the
front
suspension
member
Be
sure
not
to
lift
up
the
engine
oil
pan
GI372
Fig
GI
13
Front
Jack
Up
Point
3
Jack
up
the
car
gently
just
high
enough
to
place
the
safety
stands
under
both
the
side
members
Place
the
stands
at
the
position
indicated
in
Fig
GI
14
GI373
Fig
GI
14
Front
Supportable
Point
4
Release
the
jack
slowly
REAR
SIDE
When
jacking
up
the
rear
of
the
car
place
the
chocks
at
the
front
side
of
the
front
wheels
to
hold
them
2
Apply
the
garage
jack
under
the
differential
carrier
1
1
Il
GI378
Fig
GI
15
Rear
Jack
Up
Point
GI
9
3
Jack
up
the
car
gently
just
high
enough
to
place
the
safety
stands
under
the
rear
axle
case
or
body
Place
the
stands
at
the
positions
indicated
below
GI379
Fig
GI
16
Rear
Supportable
Point
Rear
axle
c
rue
GI392
Fig
01
17
Rear
Supportable
Point
Body
TOWING
CAUTION
a
It
is
necemry
to
use
proper
towing
equipment
to
avoid
possible
dam
age
to
the
car
during
a
towing
operation
Towing
is
in
accordance
with
Tow
ing
Procedure
Manual
at
dealer
side
b
All
applicable
State
or
Provincial
in
Canada
laws
and
local
laws
regarding
the
towiilg
operation
must
be
obeyed
FRONT
SIDE
Front
towing
hooks
are
provided
on
both
front
side
members
Page 220 of 548
Fig
MT
5
Removing
Rear
1IIline
Mounting
Croamember
Manual
Transmission
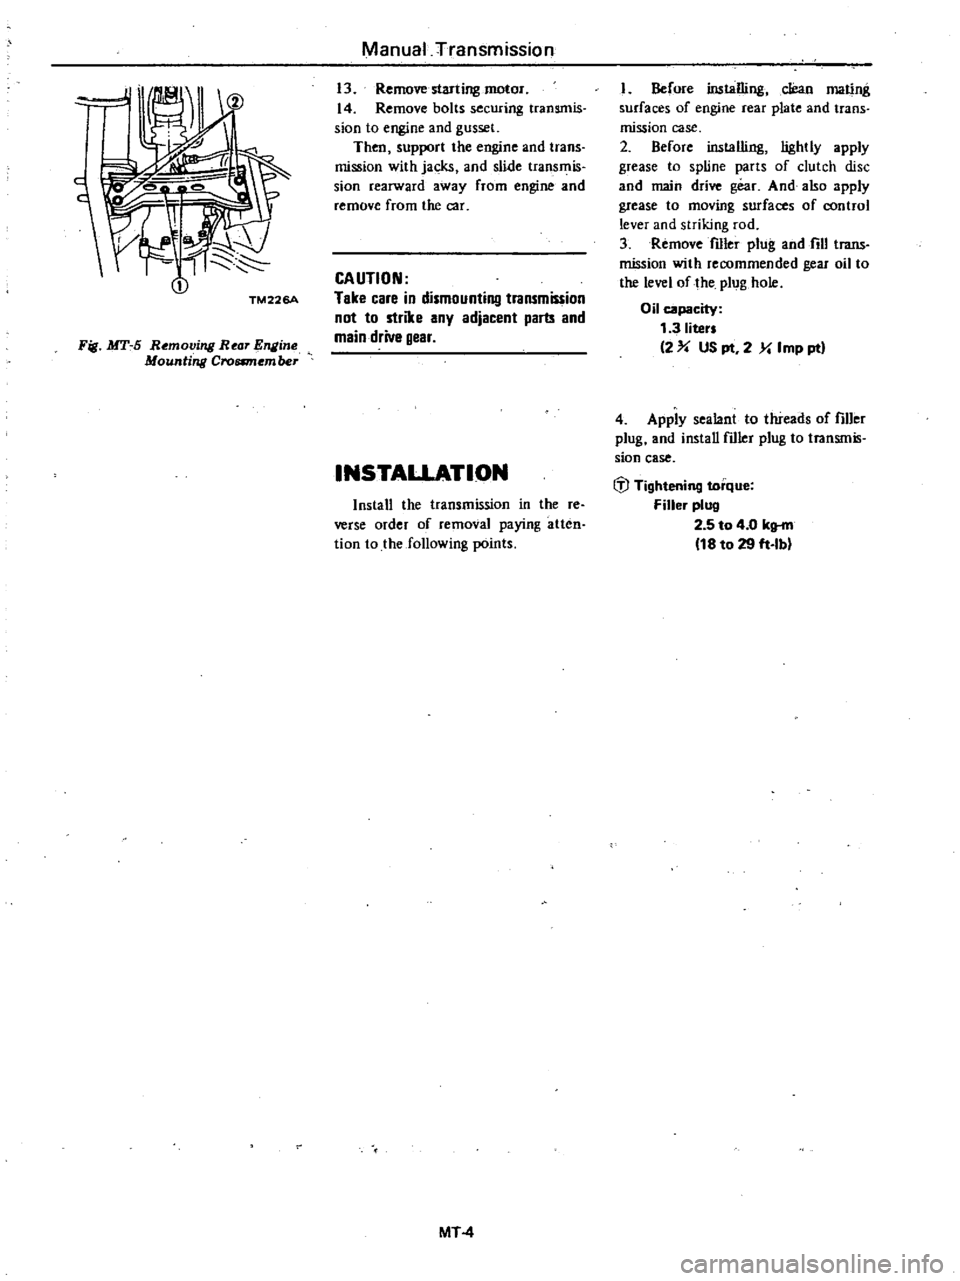
13
Remove
starling
motor
14
Remove
bolts
securing
transmis
sion
to
engine
and
gusset
Then
support
the
engine
and
trans
mission
with
jacks
and
slide
trans
is
sion
rearward
away
from
engine
and
remove
from
the
car
CAUTION
Take
care
in
dismounting
trammission
not
to
strike
any
adjacent
parts
and
main
drive
gear
INSTAUATION
Install
the
transmission
in
the
re
verse
order
of
removal
paying
atten
tion
to
the
following
points
MT
4
I
Before
installing
cJean
mating
surfaces
of
engine
rear
plate
and
trans
mission
case
2
Before
installing
lightly
apply
grease
to
spline
parts
of
clutch
disc
and
main
drive
gear
And
also
apply
grease
to
moving
surfaces
of
control
lever
and
striking
rod
3
Remove
filler
plug
and
fill
trans
mission
with
recommended
gear
oil
to
the
level
of
the
plug
hole
Oil
capacity
1
3
liter
2
US
pt
2
Y
Imp
ptl
4
Apply
sealant
to
threads
of
filler
plug
and
install
fdler
plug
to
transmis
sion
case
IiJ
Tightening
torque
Filler
plug
2
5
to
4
0
klt
fll
18
to
29
ft
Ib
Page 234 of 548
o
Fig
MT
70
R
movi7l
lB
ar
Ensi
Mounting
Croum
mber
Manual
Transmission
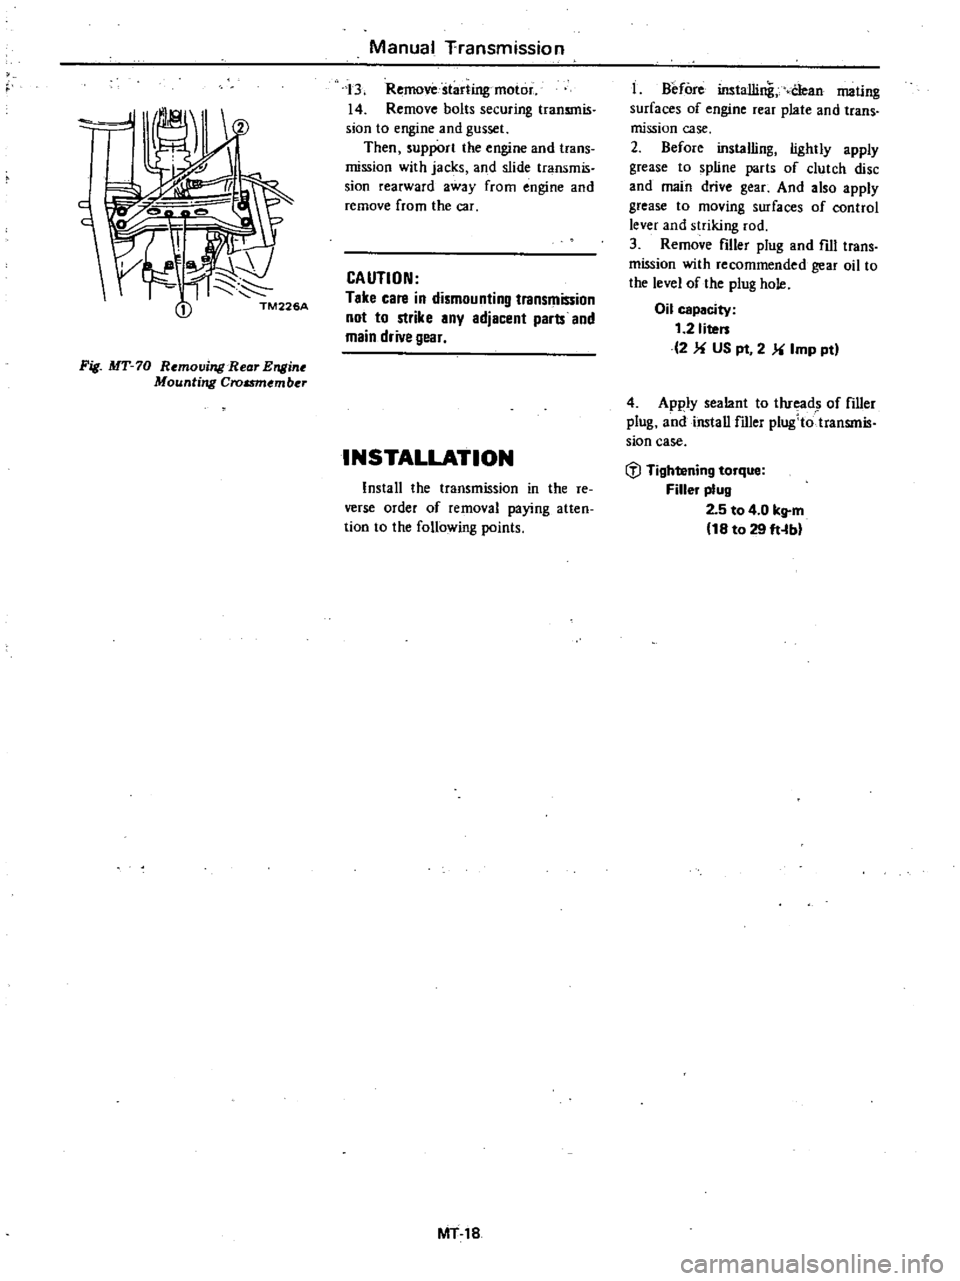
3
Remove
starting
motor
14
Remove
bolts
securing
transmis
sJon
to
engine
and
gusset
Then
support
the
engine
and
trans
mission
with
jacks
and
slide
transmis
sion
rearward
away
from
engine
and
remove
from
the
car
CAUTION
Take
cate
in
dismounting
transmission
not
to
strike
any
adjacenl
parts
and
main
drive
gear
INSTALLATION
Install
the
transmission
in
the
re
verse
order
of
removal
paying
atten
tion
to
the
following
points
MT18
t
Before
installing
Clean
mating
surfaces
of
engine
rear
plate
and
trans
mission
case
2
Before
installing
lightly
apply
grease
to
spline
parts
of
clutch
disc
and
main
drive
gear
And
also
apply
grease
to
moving
surfaces
of
control
lever
and
striking
rod
3
Remove
filler
plug
and
fill
trans
mission
with
recommended
gear
oil
to
the
level
of
the
plug
hole
Oil
capacity
t
2
liters
2
US
pt
2
Imp
ptl
4
Apply
sealant
to
thread
of
filler
plug
and
install
filler
plug
totransmis
sian
case
l
l
Tightening
torque
Filler
plug
2
5
to
4
0
kg
m
t8
to
29
ft
bl
Page 277 of 548
Automatic
Transmission
REMOVAL
AND
INSTALLATION
TRANSMISSION
ASSEMBLY
When
dismounting
the
automatic
transmission
from
a
car
pay
attention
to
the
following
points
I
Before
dismounting
the
trans
mission
rigidly
inspect
it
by
aid
of
the
Trouble
shooting
Chart
and
dis
mount
it
only
when
coll5idered
to
be
necessary
2
Dismount
the
transmission
with
utmost
care
and
when
mounting
observe
the
tightening
torque
indi
cated
on
another
table
not
to
exert
excessive
force
REMOVAL
In
dismounting
automatic
transmis
sion
from
car
proceed
as
follows
I
Disconnect
battery
ground
cable
from
terminal
2
Disengage
torsion
shaft
from
ac
eelerator
linkage
3
Jack
up
vehicle
and
support
its
weight
on
safety
stands
Recommend
a
hydraulic
hoist
or
open
pit
be
utilized
if
available
Make
sure
that
safety
is
insured
4
Remove
propeller
shaft
Note
Pl
ll
up
the
openina
in
the
rear
extension
to
prevent
oil
from
flow
ing
out
S
Disconnect
front
exhaust
tube
6
Disconnect
selector
ra
8e
lever
from
manual
shaft
7
Disconnect
wire
connections
at
inhibitor
switch
8
Disconnect
vacuum
lube
from
vacuum
diaphragm
and
wire
connee
tions
at
downshift
solenoid
9
Disconnect
speedometer
cable
from
rear
exlension
10
Disconnect
oil
charging
pipe
II
Disconnect
oil
cooler
inlet
and
outlet
tubes
al
transmission
case
12
Support
engine
by
locating
a
jack
under
oil
pan
with
a
wooden
block
used
between
oil
pan
and
jack
Support
transmission
by
means
of
a
transmission
jack
CAUTION
Do
not
plecs
the
jack
under
the
oil
pin
dnin
plug
13
Detach
converter
housing
dust
cover
Remove
bolts
securing
torque
converter
to
drive
plate
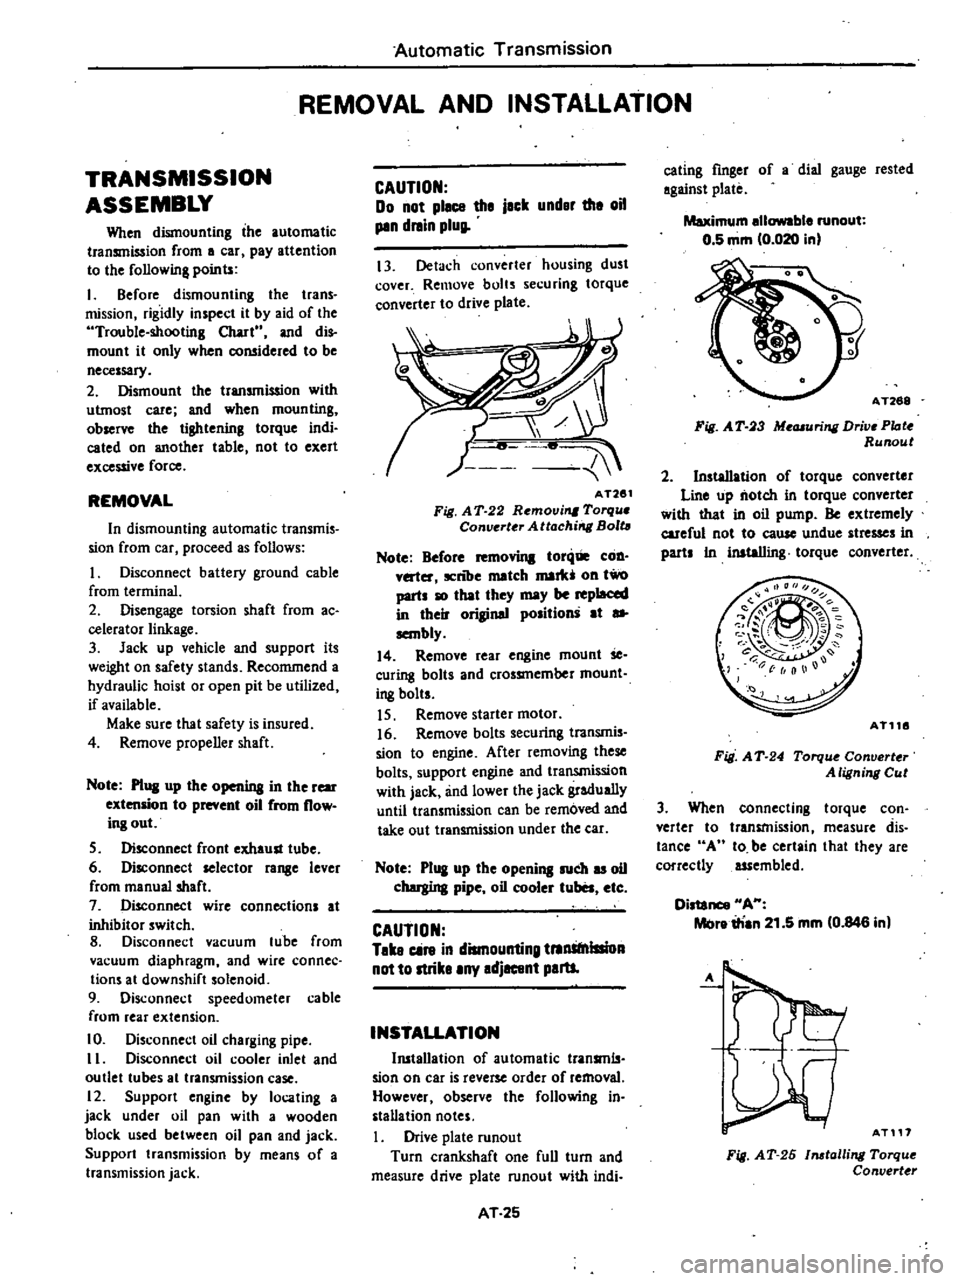
AT261
Fig
A
T
22
Removi
Torqu
Converter
Attachirrg
Bolt
Note
Before
toni
COD
v
ter
ICnlJe
match
mark
011
two
parts
10
that
they
may
be
replaced
in
their
original
position
at
sa
sembly
14
Remove
rear
engine
mount
Se
curing
bolts
and
crossmember
mount
i
8
bolts
IS
Remove
starter
motor
16
Remove
bolts
securing
transmis
sion
to
engine
After
removing
these
bolts
support
engine
and
transmission
with
jack
and
lower
the
jack
gradually
until
transmission
can
be
removed
and
take
out
transmission
under
the
ear
Note
P1
I
up
the
opening
such
u
oil
chergina
pipe
oil
cooler
tuba
etc
CAUTION
Take
cin
in
dismounting
tnnStnlllioA
not
to
strike
any
adjacent
paru
INSTALLATION
Ill5tallation
of
automatic
transmls
sian
on
car
is
reverse
order
of
removal
However
observe
the
following
in
stallation
notes
Drive
plate
runout
Turn
crankshaft
one
full
turn
and
measure
drive
plate
runout
with
indi
AT
25
eating
finger
of
a
dial
gauge
rested
against
plate
Maximum
ellowable
runout
0
5
mm
0
020
in
AT268
Fig
A
T
3
Me
uring
Drive
PIote
Runout
2
Installation
of
torque
converter
Line
up
notch
in
torque
converter
with
that
in
oil
pump
Be
extremely
careful
not
to
eause
undue
stresses
in
parts
In
inataIIing
torque
converter
AT116
Fig
A
T
24
Torqu
Converter
A
ligning
Cut
3
When
connecting
torque
con
verter
to
transmission
measure
dis
tance
A
10
be
certain
that
they
are
correctly
assembled
Distance
HA
Melre
irian
21
5
mm
0
846
in
A
AT117
Fig
AT
26
1116talling
Torque
Convert
r
Page 309 of 548
Propeller
Shaft
Differential
Carrier
DIFFERENTIAL
CARRIER
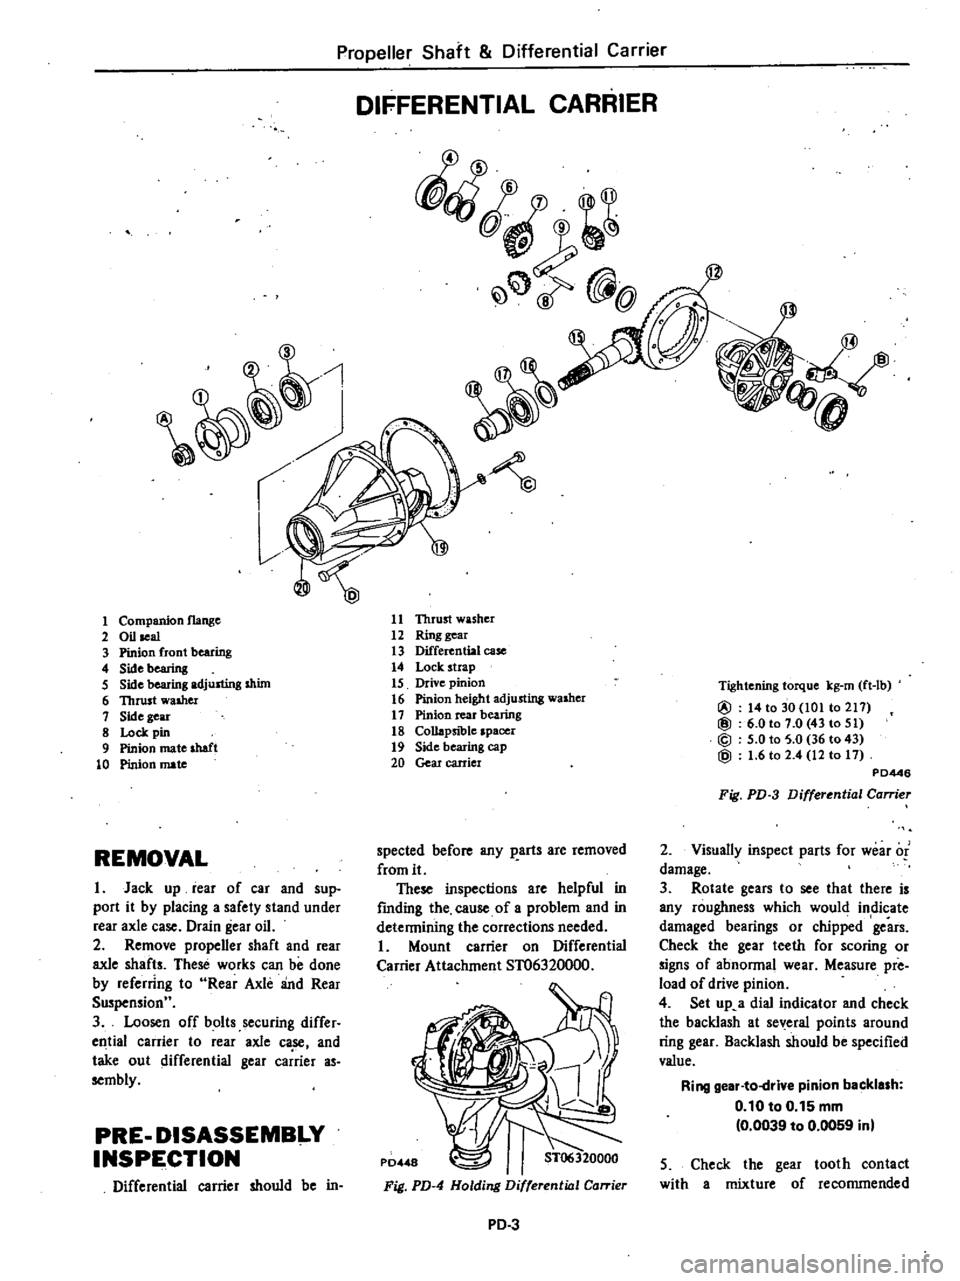
fQ
@
1
11
Thrust
washer
12
Ring
gear
13
Differential
case
14
Lock
strap
15
Drive
pinion
16
Pinion
height
adjusting
washer
17
Pinion
rear
bearing
18
Collapsible
spacer
19
Side
bearing
cap
20
Gear
carrier
1
Companion
flange
2
Oil
seal
3
Pinion
front
bearing
4
Sidebearing
5
Side
bearing
adjusting
shim
6
Thrust
walher
1
Side
gear
8
Lock
pin
9
Pinion
mate
shaft
10
Pinion
mate
Tightening
torque
kg
rn
ft
lb
@
14
to
30
101
to
211
@
6
0101
0
43
to
51
@
5
0
to
5
0
36
to
43
@
1
6
to
2
4
12
to
11
PD446
Fig
PD
3
Differential
Carrier
2
Visuany
inspect
parts
for
wear
of
damage
3
Rotate
gears
to
see
that
there
is
any
roughness
which
would
indicate
damaged
bearings
or
chipped
gears
Check
the
gear
teeth
for
scoring
or
signs
of
abnonnal
wear
Measure
pre
load
of
drive
pinion
4
Set
up
a
dial
indicator
and
check
the
backlash
at
several
points
around
ring
gear
Backlash
should
be
specified
value
Ring
gear
to
drive
pinion
backlash
0
10
to
0
15
mm
0
0039
to
0
0059
inl
spected
before
any
parts
are
removed
from
it
These
inspections
are
helpful
in
fmding
the
cause
of
a
problem
and
in
detennining
the
corrections
needed
Mount
carrier
on
Differential
Carrier
Attachment
ST06320000
REMOVAL
I
Jack
up
rear
of
car
and
sup
port
it
by
placing
a
safety
stand
under
rear
axle
case
Drain
gear
oil
2
Remove
propener
shaft
and
rear
axle
shafts
These
works
can
be
done
by
referring
to
Rear
Axle
and
Rear
Suspensionu
3
Loosen
off
bolts
securing
differ
ell
tial
carrier
to
rear
axle
ca
se
and
take
out
differential
gear
carrier
as
sembly
PRE
DISASSEMBI
Y
INSPE
CTION
Differential
carrier
should
be
in
5
Check
the
gear
tooth
contact
with
a
mixture
of
recommended
Fig
PD
4
Holding
Differential
Carrier
PD
3
Page 324 of 548
Front
Axle
Front
Suspension
INSPECTION
AND
ADJUSTIVIENT
INSPECTION
Inspect
in
accordance
with
periodic
maintenance
schedule
Block
rear
wheels
with
chocks
2
Jack
up
the
front
of
car
and
support
it
with
safety
stands
Refer
to
Section
GI
for
lifting
points
and
towing
3
Shaking
each
fiont
wheel
by
grasping
the
upper
and
lower
surfaces
of
the
tires
check
suspension
parts
for
looseness
wear
or
damage
Tighten
aU
loose
bolts
and
nuts
to
the
specified
torque
Replace
all
worn
parts
as
described
under
Front
Suspension
4
Check
wheel
bearings
If
there
is
any
axial
end
play
adjust
bearings
to
specifications
Replace
worn
or
damaged
bearings
as
described
under
Front
Axle
S
Check
strut
for
oil
leakage
or
damage
ADJUSTMENT
WHEEL
BEARING
Block
rear
wheels
with
chocks
2
Jack
up
the
front
of
car
and
support
it
with
safety
stands
3
Remove
brake
pads
Refer
to
Section
BR
for
pad
replacement
4
Remove
hub
cap
cotter
pin
ad
justing
cap
and
wheel
bearing
nut
S
Sparingly
apply
recommended
multi
purpose
grease
to
threaded
por
tion
of
spindle
and
contact
surface
between
wheel
bearing
washer
and
outer
wheel
bearing
6
Tighten
wheel
bearing
nut
using
a
suitable
torque
wrench
P
Tightening
torque
Wheel
bearing
nut
3
0
to
3
5
kll
m
22
to
25
ft
Ibl
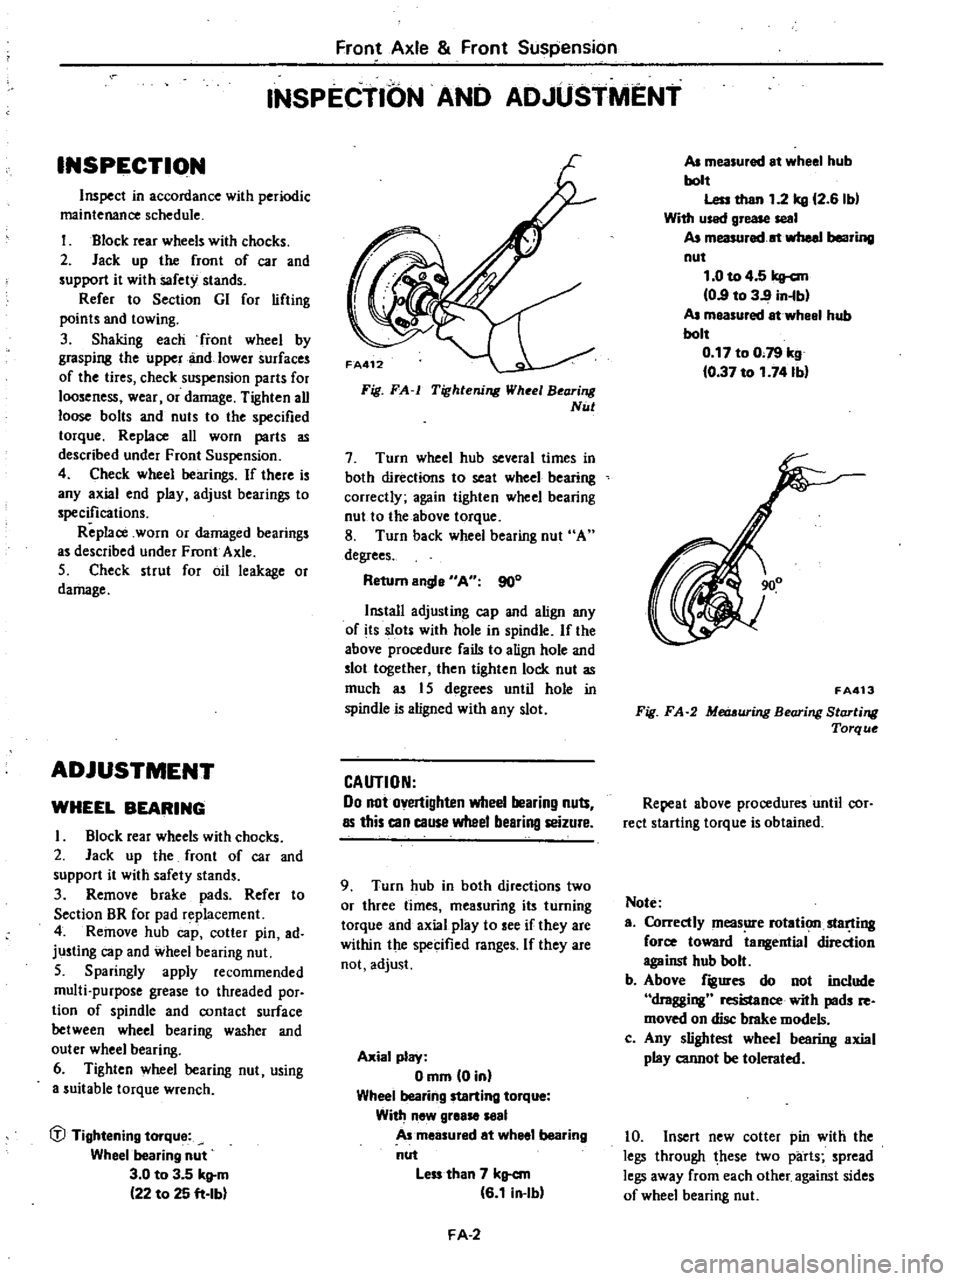
Fig
FA
Tighlening
Wheel
Bearing
Nul
7
Turn
wheel
hub
several
times
in
both
directions
to
seat
wheel
bearing
correctly
again
tighten
wheel
bearing
nut
to
the
above
torque
8
Turn
back
wheel
bearing
nut
A
degrees
Return
engle
AU
900
Install
adjusting
cap
and
align
any
of
its
slots
with
hole
in
spindle
If
the
above
procedure
fails
to
align
hole
and
slot
together
then
tighten
lock
nut
as
much
as
I
S
degrees
until
hole
in
spindle
is
aligned
with
eny
slot
CAUTION
00
not
overtighten
wheel
bearing
nuts
as
this
can
cause
wheel
bearing
seizure
9
Turn
hub
in
both
directions
two
or
three
times
measuring
its
turning
torque
and
axial
play
to
ee
if
they
are
within
the
specified
range
If
they
are
not
adjust
Axial
play
Omm
Din
Wheel
bealing
starting
torque
With
new
gleaS8
l8al
A
measured
et
wheel
bearing
nut
less
than
7
kg
cm
G
1
in
Ibl
FA
2
AJ
measuled
et
wheel
hub
bolt
Less
then
1
2
kg
12
G
Ibl
With
u
ed
gr
seal
AJ
measured
at
wheel
bealing
nut
1
0
to
4
5
kg
cm
0
9
to
3
9
in
b
AJ
measuled
at
wheel
hub
bolt
0
17
to
0
79
kg
0
37
to
1
741bl
FA413
Fig
FA
2
Metr
uring
Bearing
Starting
Torq
ue
Repeat
above
procedures
until
cor
rect
starting
torque
is
obtained
Note
a
Correctly
meas
e
rotation
slar
ting
force
toward
tangential
direction
against
hub
bolt
b
Above
figures
do
not
include
dragging
resistance
with
pads
re
moved
on
disc
brake
models
c
Any
slightest
wheel
bearing
axial
play
cannot
be
tolerated
10
Insert
new
cotter
pin
with
the
legs
through
hese
two
parts
spread
legs
away
from
each
other
against
sides
of
wheel
bearing
nut
Page 331 of 548
FA070
FA071
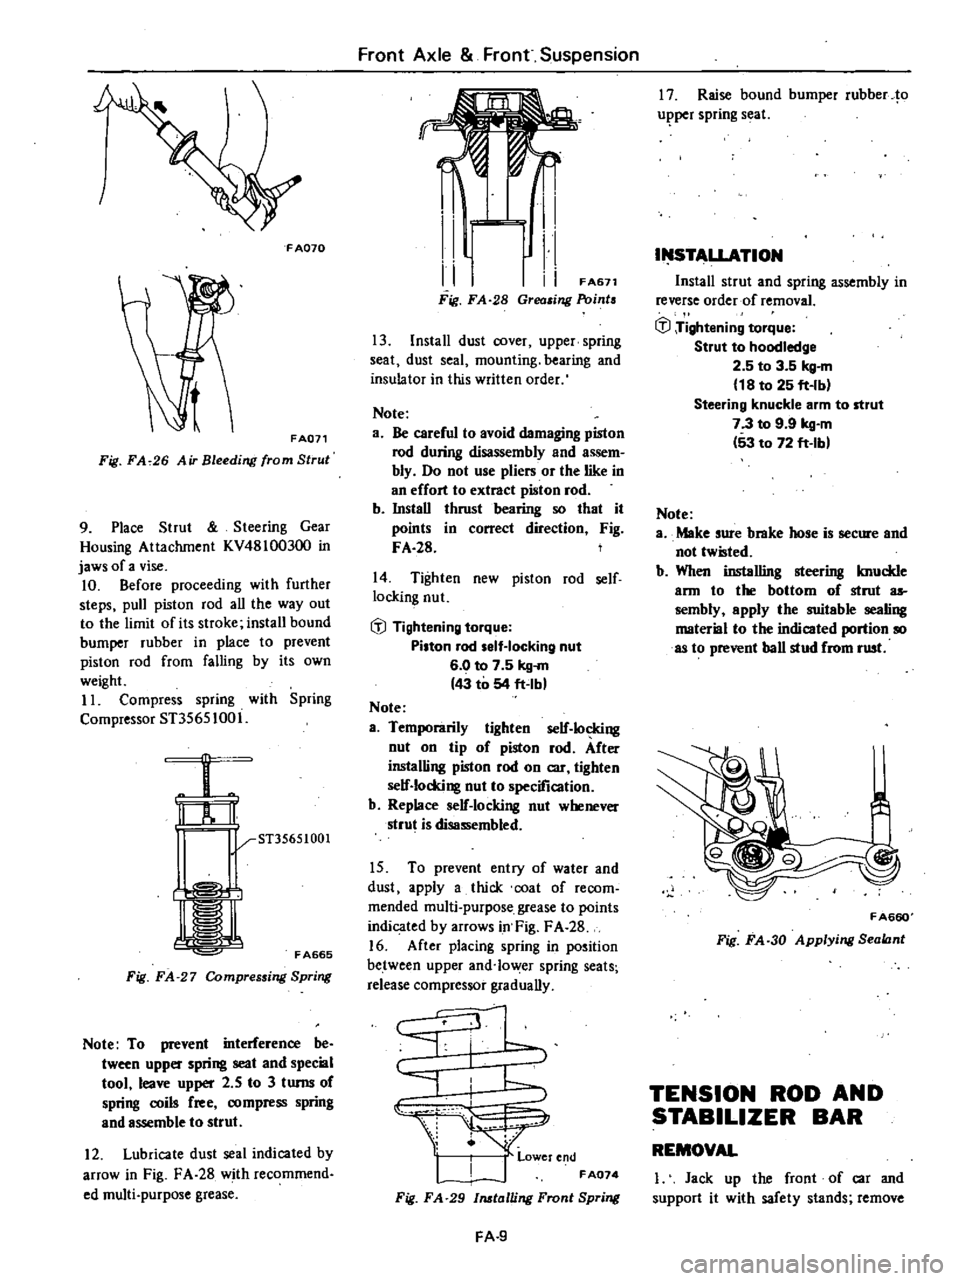
Fig
FA
26
Air
Bleeding
from
Strul
9
Place
Strut
Steering
Gear
Housing
Attachment
KV48100300
in
jaws
of
a
vise
10
Before
proceeding
with
further
steps
pull
piston
rod
all
the
way
out
to
the
limit
of
its
stroke
install
bound
bumper
rubber
in
place
to
prevent
piston
rod
from
falling
by
its
own
weight
11
Compress
spring
with
Spring
Compressor
ST35651001
ST35651001
r
l
I
FA665
Fig
FA
27
Compressing
Spring
Note
To
prevent
interference
be
tween
upper
spring
seat
and
special
tool
leave
upper
2
5
to
3
turns
of
spring
coils
free
compress
spring
and
assemble
to
strut
12
Lubricate
dust
seal
indicated
by
arrow
in
Fig
FA
28
with
recommend
ed
multi
purpose
grease
Front
Axle
Front
Suspension
I
1
i
I
FA671
Fig
FA
28
Grea
ing
Point
13
Install
dust
cover
upper
spring
seat
dust
seal
mounting
bearing
and
insulator
in
this
written
order
Note
a
Be
careful
to
avoid
damaging
piston
rod
during
disassembly
and
assem
bly
Do
not
use
pliers
or
the
like
in
an
effort
to
extract
piston
rod
b
InstaU
thrust
bearing
so
that
it
points
in
correct
direction
Fig
FA
28
14
Tighten
new
piston
rod
self
locking
nut
fil
Tightening
torque
Pi
ton
rod
elf
Iocking
nut
6
0
to
7
5
kg
m
43
to
54
ft
lbl
Note
a
Temporarily
tighten
self
locking
nut
on
tip
of
piston
rod
After
installing
piston
rod
on
car
tighten
self
locking
nut
to
specification
b
Replace
self
locking
nut
whenever
strut
is
disassembled
15
To
prevent
entry
of
water
and
dust
apply
a
thick
coat
of
recom
mended
multi
purpose
grease
to
points
indicated
by
arrows
in
Fig
F
A
28
16
After
placing
spring
in
position
between
upper
and
lo
er
spring
seats
release
compressor
graduaUy
I
J
k
1
jt
r
end
FA074
Fig
FA
29
talling
Front
Spring
FA
9
17
Raise
bound
bumper
rubber
10
u
per
spring
seal
I
STALLATION
Install
strut
and
spring
assembly
in
reverse
order
of
removaL
fil
Tightening
torque
Strut
to
hoodledge
2
5
to
3
5
kg
m
18
to
25
ft
Ib
Steering
knuckle
arm
to
strut
7
3
to
9
9
kg
m
53
to
72
ft
lb
Note
a
Make
sure
brake
hose
is
secure
and
not
tw
ted
b
When
installing
steering
knuckle
ann
to
the
bottom
of
strut
as
sembly
epply
the
suitable
sealing
material
to
the
indicated
portion
so
as
to
prevent
ball
stud
from
rust
FA660
Fig
FA
30
Applying
Sealant
TENSION
ROD
AND
STABILIZER
BAR
REMOVAL
I
Jack
up
the
front
of
car
and
support
it
with
safety
stands
remove
Page 378 of 548
t
MAINTEN
NCE
TIRE
INFLATION
Correct
tire
pressure
is
very
impor
tant
for
steering
ease
and
riding
com
fort
Correct
pressure
also
makes
for
a
quieter
ride
and
extends
tire
life
If
all
tires
are
inspected
frequently
and
maintained
at
correct
pressure
any
sharp
objects
in
tread
can
be
quickiy
detected
nd
abnormal
wear
which
invites
serious
problems
can
be
avoided
After
inflating
tires
valves
should
be
checked
for
leakage
Without
valve
caps
leakage
will
occur
due
to
dirt
and
water
resulting
in
underinflation
Ac
cordingly
whenever
tire
pressure
is
checked
be
sure
to
tighten
vaive
caps
firmly
by
hand
JW
Sri
in
1
II
I
i
I
1
I
1
1
I
I
I
II
I
I
I
i
M
I
l
1
14
nl
01
I
II
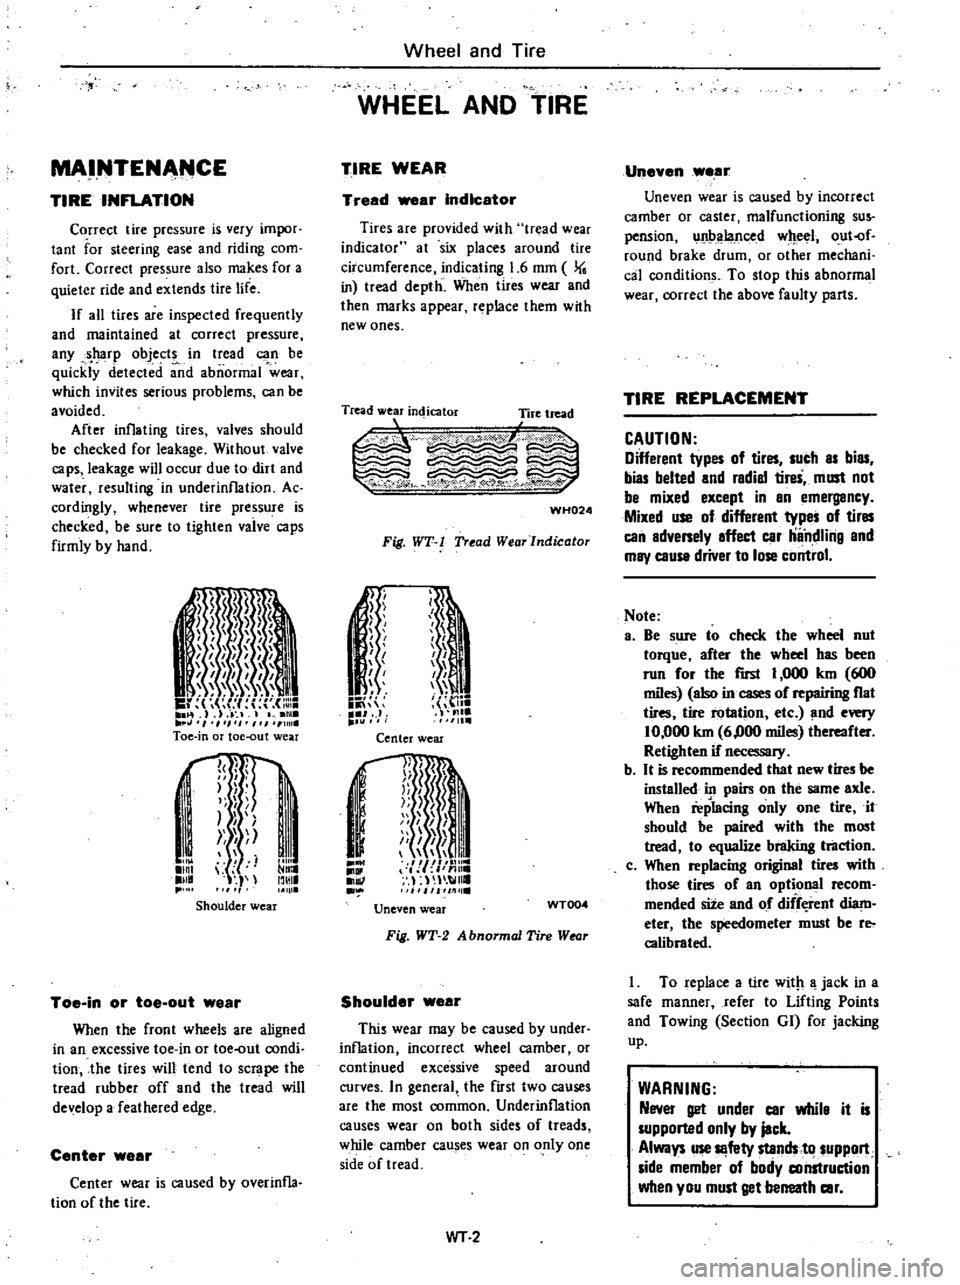
Toe
in
or
toe
out
wear
I
J
I
I
p
rt
i
Ilnl
lll
11111
IllIlI
Shoulder
wear
Toe
in
or
toe
out
wear
When
the
front
wheels
are
aligned
in
an
excessive
toe
in
or
toe
out
condi
tion
the
tires
will
tend
to
scrape
the
tread
rubber
off
and
the
tread
will
de
elop
a
feathered
edge
Center
wear
Center
wear
is
caused
by
overinfla
tion
of
the
tire
Wheel
and
Tire
WHEEL
AND
TIRE
TIRE
WEAR
Tread
ar
Indicator
Tires
are
provided
with
tr
lad
wear
indicator
at
six
places
around
tire
circumference
indicating
1
6
mm
J
in
tread
depth
When
tires
wear
and
then
marks
appear
replace
them
wtth
new
ones
Tread
wear
indicator
Tire
tread
L
1
c
WH024
Fig
WT
l
Tread
WearJndicator
n
1
ii
J
J
f
J
I
h
I
me
1111
Center
wear
j
I
1II
mnr
I
j
n
Ii
Ii
i
I
Jil
111
lie
Uneven
wear
WT004
Fig
WT
2
A
bnormal
Tire
Wtor
Shoulder
wear
This
wear
may
be
caused
by
under
inflation
incorrect
wheel
camber
or
continued
excessive
speed
around
curves
In
general
the
first
two
causes
are
the
most
common
Underinflation
causes
wear
on
both
sides
of
treads
while
camber
causes
wear
on
only
one
side
of
tread
WT
2
Uneven
wear
Uneven
wear
is
caused
by
incorrect
camber
or
caster
malfunctioning
sus
pension
unbalanced
wheel
out
of
round
brake
drum
or
other
mechani
cal
conditions
To
stop
this
abnormal
wear
correct
the
above
faulty
parts
TIRE
REPLACEMENT
CAUTION
Different
types
of
tires
sucb
as
bias
bias
belted
and
radial
tireS
must
not
be
mixed
except
in
an
emergancy
Mixed
use
of
different
types
of
tires
can
adversely
affect
car
ilndlilig
and
may
cause
driver
to
lose
control
Note
a
Be
sure
to
check
the
wheel
nut
torque
after
the
wheel
has
been
run
for
the
rust
I
000
km
600
miles
also
in
cases
of
repairing
fiat
tires
tire
rotation
etc
and
every
10
000
km
6
000
miles
thereafter
Retighten
if
necessary
b
It
is
recommended
that
new
tires
be
installed
in
pairs
on
the
same
axle
When
replacing
only
one
tire
it
should
be
paired
with
the
most
tread
to
equalize
braking
tl1lction
c
When
replacing
original
tires
with
those
tires
of
an
optional
recom
mended
site
and
of
diff
rent
diam
eter
the
speedometer
must
be
reo
calibrated
I
To
replace
a
tire
with
a
jack
in
a
safe
manner
refer
to
Lifting
Points
and
Towing
Section
GI
for
jacking
up
WARNING
Never
get
under
car
whila
it
is
supported
only
by
jack
Always
use
Il
fety
stands
to
suppon
side
member
of
body
construction
when
you
must
get
berreatb
car