window DATSUN 210 1979 Service Manual
[x] Cancel search | Manufacturer: DATSUN, Model Year: 1979, Model line: 210, Model: DATSUN 210 1979Pages: 548, PDF Size: 28.66 MB
Page 99 of 548
DASH
POT
SYSTEM
These
carburetors
are
equipped
with
a
dash
pot
interlocked
with
the
primary
thrott
Ie
valve
through
a
link
mechanism
The
dash
pot
prevents
the
throttle
valve
from
closing
abruptly
thereby
reducing
He
emissions
during
deceleia
tion
or
gear
shifting
In
automatic
transmissi9fi
models
it
also
prevents
engine
stall
resulting
from
quick
application
of
the
brake
or
from
quick
release
of
the
accelerator
pedal
after
it
s
been
tread
upon
slightly
INSPECTION
AND
ADJUSTMENT
CARBURETOR
IDLE
R
P
M
AND
MIXTURE
RATIO
CO
idle
adjustment
with
CO
meter
Refer
to
Carburetor
Idle
rpm
and
Mixture
Ratio
Section
ET
for
check
ing
and
a
justment
CO
idle
adjustment
without
CO
meter
Non
California
models
Refer
to
Carburetor
Idle
rpm
and
Mixture
Ratio
Section
ETl
fot
check
ing
and
adjustment
Idle
limiter
cap
Refer
to
Idle
Limiter
Cap
SeCtio
ET
for
checking
and
adjustment
FUEL
LEVEL
I
With
engine
idling
visually
check
fuel
level
through
sight
window
of
float
chamber
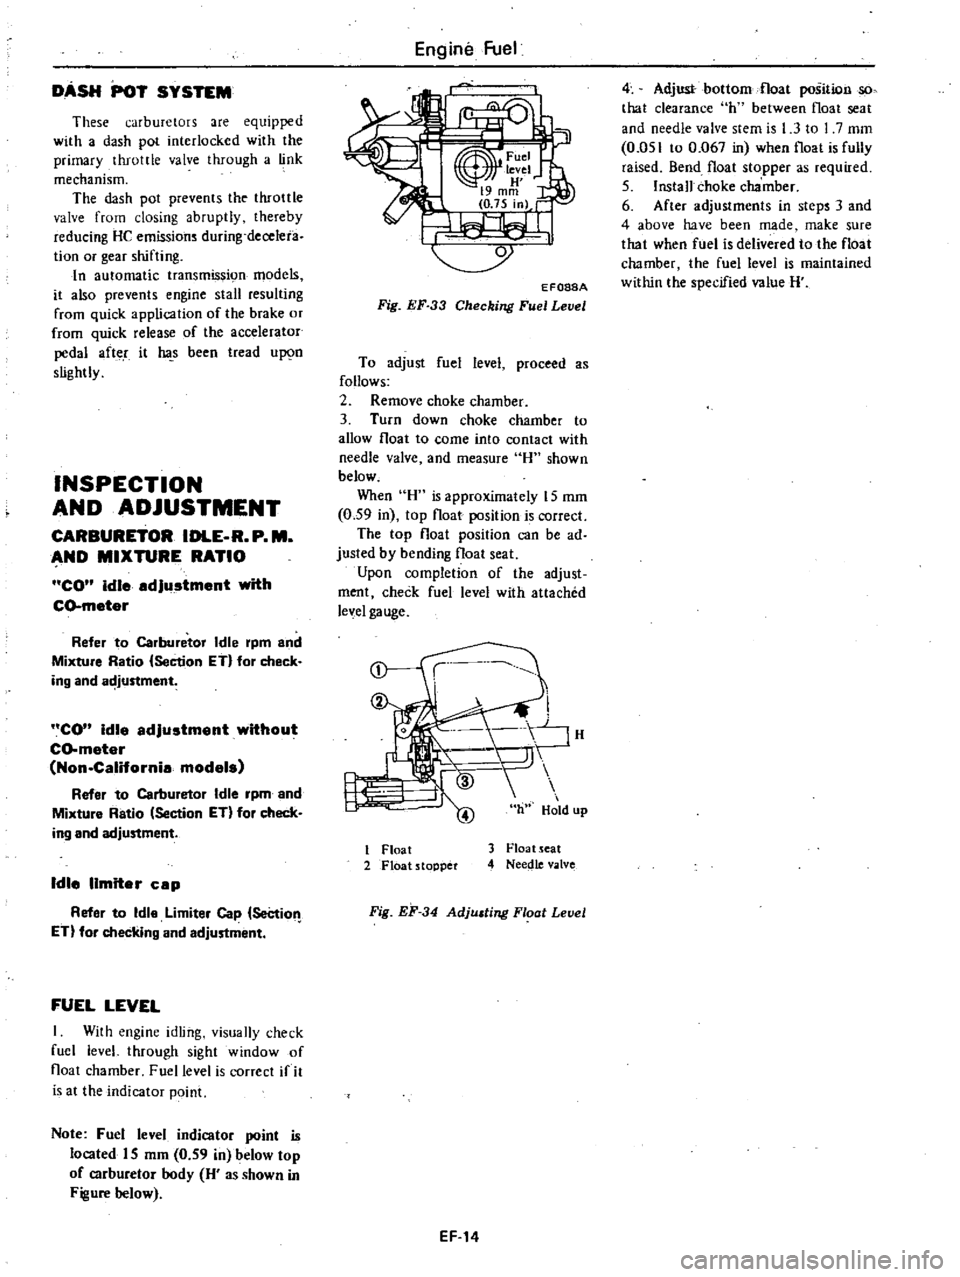
Fuel
level
is
correct
if
it
is
at
the
indicator
point
Note
Fuel
level
indicator
point
is
located
IS
mm
0
59
in
below
top
of
carburetor
body
H
as
shown
in
Figure
below
Engine
Fuel
EF088A
Fig
EF
33
Checking
Fuel
Level
To
adjust
fuel
level
proceed
as
follows
2
Remove
choke
chamber
3
Turn
down
choke
chamber
to
allow
float
to
come
into
contact
with
needle
valve
and
measure
H
shown
below
When
H
is
approximately
15
mm
0
59
in
top
float
position
is
correct
The
top
float
position
can
be
ad
justed
by
bending
float
seat
Upon
completion
of
the
adjust
ment
check
fuel
level
with
attached
level
gauge
nhH
J
1
Float
2
Float
stopper
3
Float
seat
4
Needle
valve
Fig
EF
34
Adjusting
Floot
Level
EF
14
4
Adjust
bottom
float
position
so
that
clearance
hl
between
float
seat
and
needle
valve
stem
is
1
3
to
I
7
mm
0
051
to
0
067
in
when
float
is
fully
raised
Bend
float
stopper
as
required
5
Install
choke
chamber
6
After
adjustments
in
steps
3
and
4
above
have
been
made
make
sure
that
when
fuel
is
delivered
to
the
float
chamber
the
fuel
level
is
maintained
within
the
specified
value
H
Page 412 of 548
DATSUN
210
Model
8310
Series
F
BODY
CONSTRUCTION
BODY
ALIGNMENT
BUMPER
DESCRIPTION
INSPECTION
FRONT
BUMPER
REAR
BUMPER
BODY
FRONT
END
RADIATOR
GRILLE
FRONT
APRON
COWL
TOP
GRILLE
FRONT
FENDER
FENDER
PROTECTOR
HOOD
HOOD
LOCK
CONTROL
DOORS
FRONT
DOOR
REAR
DOOR
4
door
Sedan
and
Wagon
BODY
REAR
END
TRUNK
LID
Sedan
SAC
K
000
R
Hatchabck
BODY
CONTENTS
BF
2
BF
4
BF
5
BF
5
BF
6
BF
8
SF
8
BF
9
BF
9
BF
9
BF
10
BF
10
BF
10
BF
11
BF
11
BF
12
BF
12
BF
15
BF
16
BF
16
BF
18
TAILGATE
Wagon
WINDSHIELD
AND
WINDOW
GLASS
WINDSHIELD
GLASS
REAR
WINDOW
GLASS
Sedan
and
Hatchback
REAR
WINDOW
GLASS
Wagon
SIDE
WINDOW
GLASS
2
Door
Sedan
and
Hatchback
REAR
QUARTER
WINDOW
GLASS
Hatchback
REAR
SIDE
WINDOW
GLASS
Wagon
INTERIOR
INSTRUMENT
PANEL
CONSOLE
BOX
SEAT
SEAT
BELT
TRIM
AND
MOLDING
ROOF
TRIMMING
BODY
SIDE
TRIM
AND
MOLDING
SPECIAL
SERVICE
TOOLS
BF
20
8F
21
SF
21
BF
22
SF
23
BF
26
BF
26
BF
27
SF
29
BF
29
SF
30
BF
30
BF
31
SF
32
BF
32
BF
32
BF
34
Page 424 of 548
FRONT
DOOR
ASSEMBLY
Adjustment
Proper
door
alignment
can
be
ob
tained
by
adjusting
door
hinge
and
door
lock
striker
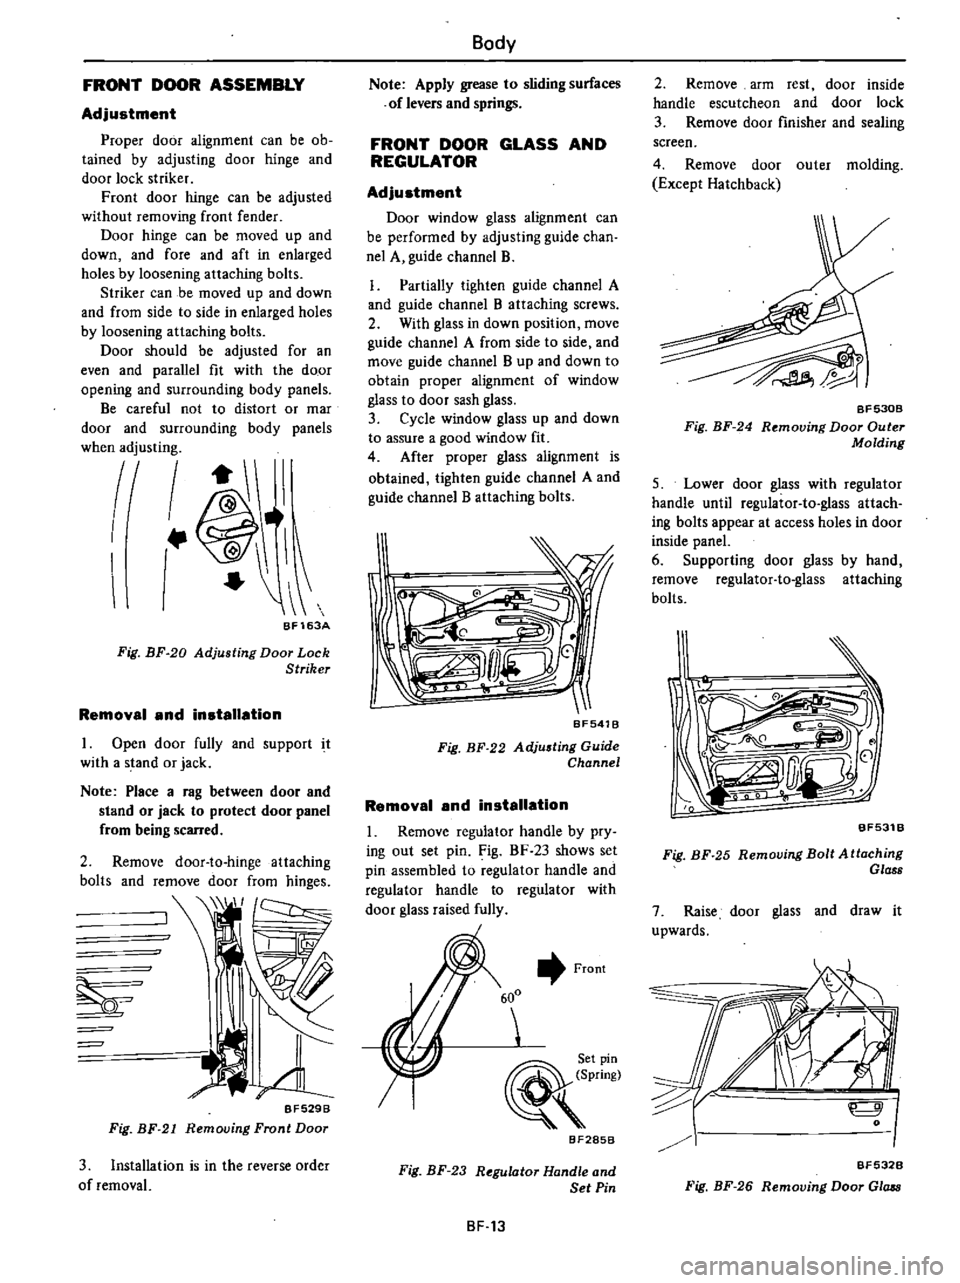
Front
door
hinge
can
be
adjusted
without
removing
front
fender
Door
hinge
can
be
moved
up
and
down
and
fore
and
aft
in
enlarged
holes
by
loosening
attaching
bolts
Striker
can
be
moved
up
and
down
and
from
side
to
side
in
enlarged
holes
by
loosening
attaching
bolts
Door
should
be
adjusted
for
an
even
and
parallel
fit
with
the
door
opening
and
surrounding
body
panels
Be
careful
not
to
distort
or
mar
door
and
surrounding
body
panels
when
adjusting
II
I
J
BF163A
Fig
BF
20
Adjusting
Door
Lock
Striker
Removal
and
installation
I
Open
door
fully
and
support
it
with
a
stand
or
jack
Note
Place
a
rag
between
door
and
stand
or
jack
to
protect
door
panel
from
being
sCaRed
2
Remove
door
to
hinge
attaching
bolts
and
remove
door
from
hinges
BF529B
Fig
BF
21
Removing
Front
Door
3
Installation
is
in
the
reverse
order
of
removal
Body
Note
Apply
grease
to
sliding
surfaces
of
levers
and
springs
FRONT
DOOR
GLASS
AND
REGULATOR
Adjustment
Door
window
glass
alignment
can
be
performed
by
adjusting
guide
chan
nel
A
guide
channel
B
I
Partially
tighten
guide
channel
A
and
guide
channel
B
attaching
screws
2
With
glass
in
down
position
move
guide
channel
A
from
side
to
side
and
move
guide
channel
B
up
and
down
to
obtain
proper
alignment
of
window
glass
to
door
sash
glass
3
Cycle
window
glass
up
and
down
to
assure
a
good
window
fit
4
After
proper
glass
alignment
is
obtained
tighten
guide
channel
A
and
guide
channel
B
attaching
bolts
I
I
b
G
O
J
V
moC
BF541B
Fig
BF
22
Adjusting
Guide
Channel
Removal
and
installation
I
Remove
reguiator
handle
by
pry
ing
out
set
pin
Fig
BF
23
shows
set
pin
assembled
to
regulator
handle
and
regulator
handle
to
regulator
with
door
glass
raised
fully
Front
600
Set
pin
Pring
BF285B
Fig
BF
23
Regulator
Handle
and
Set
Pin
BF
13
2
Remove
arm
rest
door
inside
handle
escutcheon
and
door
lock
3
Remove
door
finisher
and
sealing
screen
4
Remove
door
outer
molding
Except
Hatchback
fT
BF530B
Fig
BF
24
Removing
Door
Outer
Molding
5
Lower
door
glass
with
regulator
handle
until
regulator
to
glass
attach
ing
bolts
appear
at
access
holes
in
door
inside
panel
6
Supporting
door
glass
by
hand
remove
regulator
to
glass
attaching
bolts
b
a8
BF531B
Fig
BF
25
Removing
Bolt
Attaching
Glass
7
Raise
door
glass
and
draw
it
upwards
9
o
BF532B
Fig
BF
26
Removing
Door
Gla
8
Page 432 of 548
Body
WINDSHIELD
AND
WINDOW
GLASS
WINDSHIELD
GLASS
00
REMOVAL
I
Place
a
protective
cover
over
hood
front
fenders
instrument
panel
and
front
seats
2
Remove
windshield
wiper
arm
as
semblies
3
Remove
windshield
moldings
4
On
inside
of
body
loosen
lip
of
weatherstrip
from
body
flange
along
top
and
sides
of
windshield
opening
Use
a
conventional
screwdriver
and
carefully
put
weatherstrip
over
body
flange
BF5618
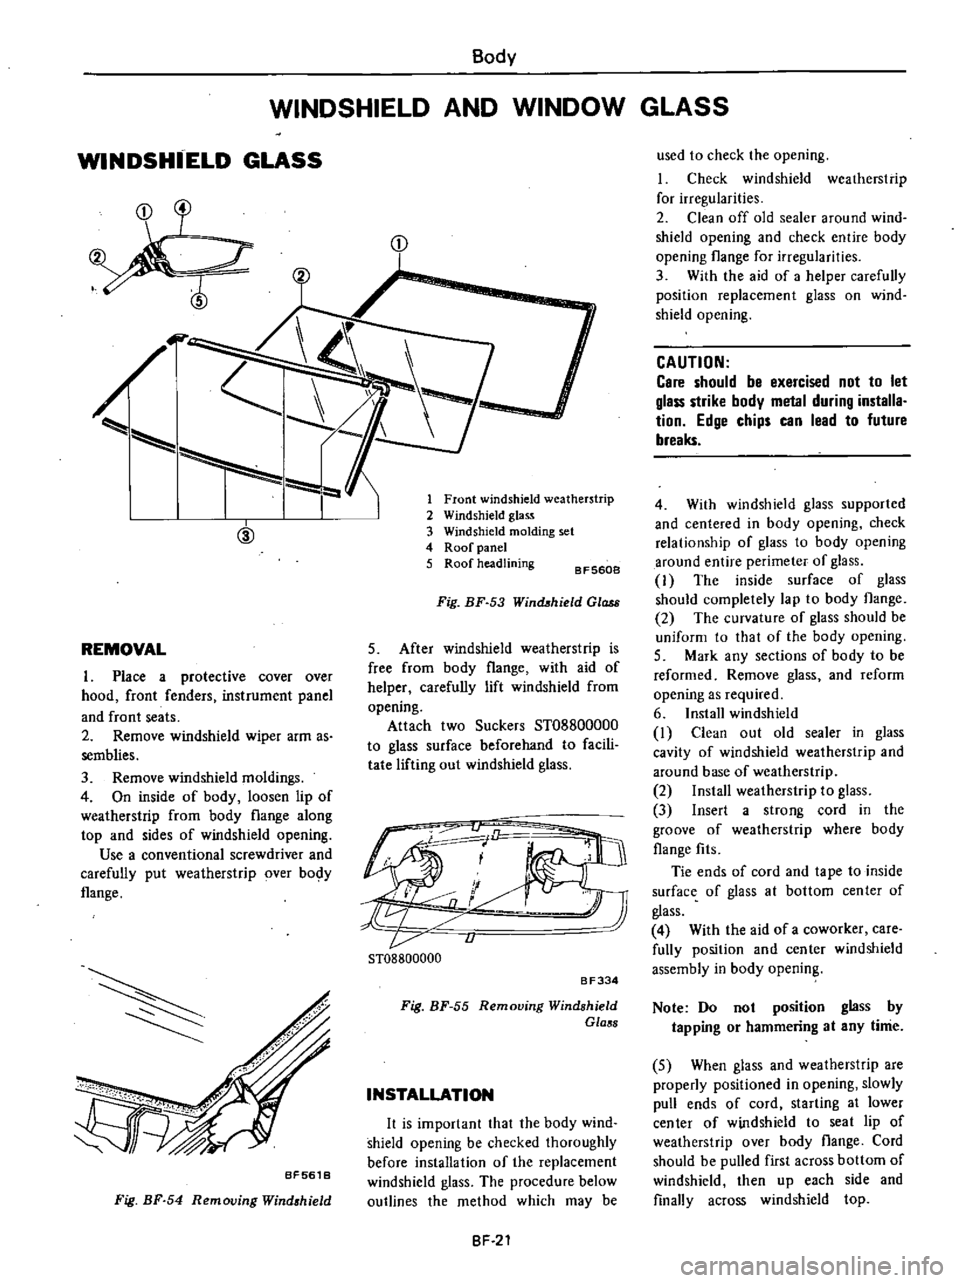
Fig
BF
54
Removing
Wind
hield
D
1
Front
windshield
weatherstrip
2
Windshield
glass
3
Windshield
molding
set
4
Roof
panel
5
Roof
headlining
BF5608
Fig
BF
53
Winct
hield
Ol
5
After
windshield
weatherstrip
is
free
from
body
flange
with
aid
of
helper
carefully
lift
windshield
from
opening
Attach
two
Suckers
ST08800000
to
glass
surface
beforehand
to
facili
tate
lifting
out
windshield
glass
Li
ST08800000
BF334
Fig
BF
55
Removing
Windshield
Glass
INSTALLATION
It
is
important
that
the
body
wind
shield
opening
be
checked
thoroughly
before
installation
of
the
replacement
windshield
glass
The
procedure
below
outlines
the
method
which
may
be
BF
21
used
to
check
the
opening
I
Check
windshield
weatherstrip
for
irregularities
2
Clean
off
old
sealer
around
wind
shield
opening
and
check
entire
body
opening
flange
for
irregularities
3
With
the
aid
of
a
helper
carefully
position
replacement
glass
on
wind
shield
opening
CAUTION
Care
should
be
exercised
not
to
let
glass
strike
body
metal
during
installa
tion
Edge
chips
can
lead
to
future
breaks
4
With
windshield
glass
supported
and
centered
in
body
opening
check
relationship
of
glass
to
body
opening
around
entire
perimeter
of
glass
I
The
inside
surface
of
glass
should
completely
lap
to
body
flange
2
The
curvature
of
glass
should
be
uniform
to
that
of
the
body
opening
5
Mark
any
sections
of
body
to
be
reformed
Remove
glass
and
reform
opening
as
required
6
Install
windshield
I
Clean
out
old
sealer
in
glass
cavity
of
windshield
weatherstrip
and
around
base
of
weatherstrip
2
Install
weatherstrip
to
glass
3
Insert
a
strong
cord
in
the
groove
of
weatherstrip
where
body
flange
fits
Tie
ends
of
cord
and
tape
to
inside
surface
of
glass
at
bottom
center
of
glass
4
With
the
aid
of
a
coworker
care
fully
position
and
center
windshield
assembly
in
body
opening
Note
Do
not
position
glass
by
tapping
or
hammering
at
any
time
5
When
glass
and
weatherstrip
are
properly
positioned
in
opening
slowly
pull
ends
of
cord
starting
at
lower
center
of
windshield
to
seat
lip
of
weatherstrip
over
body
flange
Cord
should
be
pulled
first
across
bottom
of
windshield
then
up
each
side
and
finally
across
windshield
top
Page 433 of 548
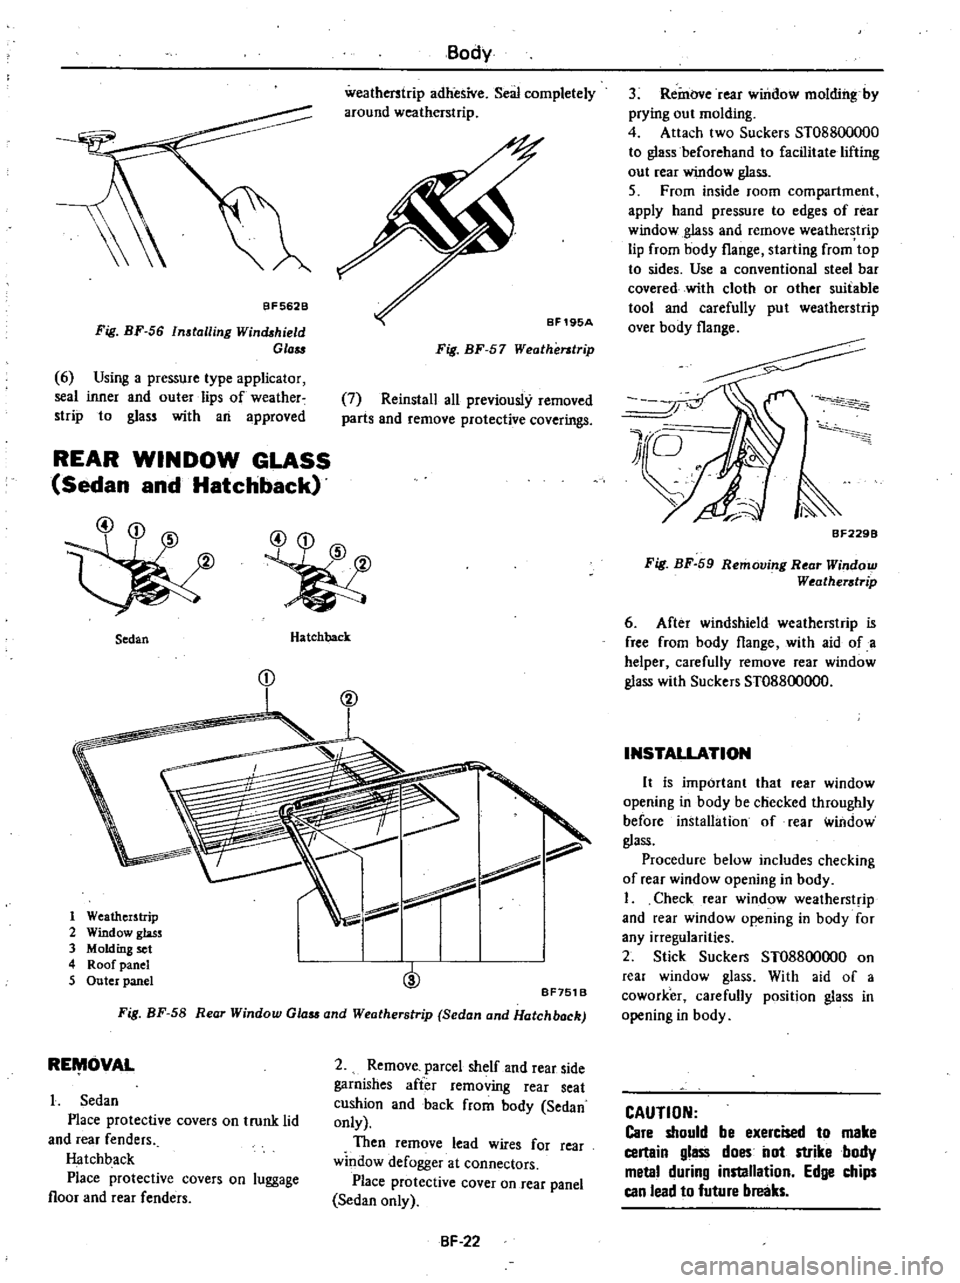
BF562B
Fig
BF
56
Installing
Winchhield
Gla
6
Using
a
pressure
type
applicator
seal
inner
and
outer
lips
of
weather
strip
to
glass
with
an
approved
REAR
WINDOW
GLASS
Sedan
and
Hatchback
Body
weatherstrip
adhesive
Seal
completely
around
weatherstrip
Bf195A
Fig
BF
57
Weatherstrip
7
Reinstall
all
previously
removed
parts
and
remove
protective
coverings
Sedan
Hatchback
1
Weatherstrip
2
Window
glass
3
Molding
set
4
Roof
panel
@
5
Outer
panel
BF751
B
Fig
BF
58
Rear
Window
Glau
and
Weatherstrip
Sedan
and
Hatchback
RE
OVAL
l
Sedan
Place
protective
covers
on
trunk
lid
and
rear
fenders
Hatchback
Place
protective
covers
on
luggage
floor
and
rear
fenders
2
Remove
parcel
shelf
and
rear
side
garnishes
after
removing
rear
seat
cushion
and
back
from
body
Sedan
only
Then
remove
lead
wires
for
rear
willdow
defogger
at
connectors
Place
protective
cover
on
rear
panel
Sedan
only
BF
22
3
Remove
rear
window
molding
by
prying
out
molding
4
Attach
two
Suckers
ST088oo000
to
glass
beforehand
to
facilitate
lifting
out
rear
window
glass
5
From
inside
room
compartment
apply
hand
pressure
to
edges
of
rear
window
glass
and
remove
weather
trip
lip
from
body
flange
starting
from
top
to
sides
Use
a
conventional
steel
bar
covered
with
cloth
or
other
suitable
tool
and
carefully
put
weatherstrip
over
body
flange
BF229B
Fig
BF
59
Removing
Rear
Window
Weatheratrip
6
After
windshield
weatherstrip
is
free
from
body
flange
with
aid
of
a
helper
carefully
remove
rear
window
glass
with
Suckers
ST08800000
INSTALLATION
It
is
important
that
rear
window
opening
in
body
be
checked
throughly
before
installation
of
rear
window
glass
Procedure
below
includes
checking
of
rear
window
opening
in
body
1
Check
rear
window
weatherstrip
and
rear
window
opening
in
body
for
any
irregularities
2
Stick
Suckers
ST08800000
on
rear
window
glass
With
aid
of
a
coworker
carefuUy
position
glass
in
opening
in
body
CAUTION
Care
should
be
exercised
to
make
certain
glass
does
not
strike
body
metal
during
installation
Edge
chips
can
lead
to
future
breaks
Page 434 of 548
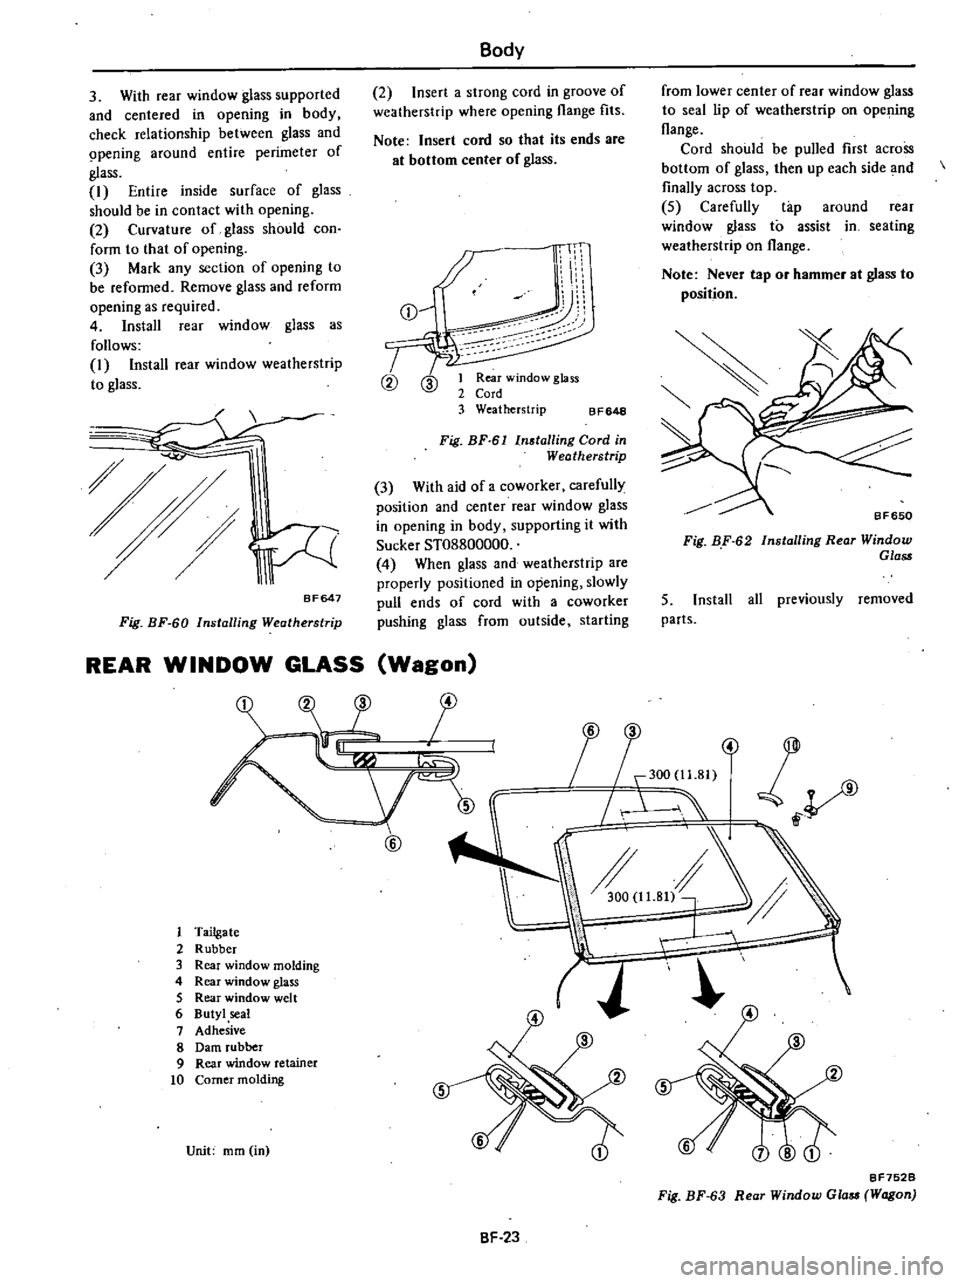
Body
2
Insert
a
strong
cord
in
groove
of
weatherstrip
where
opening
flange
fits
Note
Insert
cord
so
that
its
ends
are
at
bottom
center
of
glass
from
lower
center
of
rear
window
glass
to
seal
lip
of
weatherstrip
on
opening
flange
Cord
should
be
pulled
first
across
bottom
of
glass
then
up
each
side
and
finally
across
top
5
Carefully
tap
around
rear
window
glass
to
assist
in
seating
weatherstrip
on
flange
Note
Never
tap
or
hammer
at
glass
to
position
3
With
rear
window
glass
supported
and
centered
in
opening
in
body
check
relationship
between
glass
and
9pening
around
entire
perimeter
of
glass
I
Entire
inside
surface
of
glass
should
be
in
contact
with
opening
2
Curvature
of
glass
should
con
form
to
that
of
opening
3
Mark
any
section
of
opening
to
be
refonned
Remove
glass
and
reform
opening
as
required
4
Install
rear
window
glass
as
follows
I
Install
rear
window
weatherstrip
to
glass
n
I
Ii
V
i
I
1
j
CD
I
CV
ID
1
Rear
window
glass
2
Cord
3
Weatherstrip
BF648
Fig
BF
61
In5talling
Cord
in
Weatherstrip
3
With
aid
of
a
coworker
carefully
position
and
center
rear
window
glass
in
opening
in
body
supporting
it
with
SuckerST08800000
4
When
glass
and
weatherstrip
are
properly
positioned
in
opening
slowly
pull
ends
of
cord
with
a
coworker
pushing
glass
from
outside
starting
Fig
BF
62
Installing
Rear
Window
Glass
5
Install
all
previously
removed
parts
8F647
Fig
BF
60
Installing
Weatherstrip
REAR
WINDOW
GLASS
Wagon
ll3
eOO
l1
81
fJ
1
2
wV
6pf
@
1
Tailgate
2
Rubber
3
Rear
window
molding
4
Rear
window
glass
5
Rear
window
welt
6
Butyl
seal
7
Adhesive
8
Dam
rubber
9
Rear
window
retainer
10
Corner
molding
Unit
mm
in
BF752B
Fig
BF
63
Rear
Window
Gla
Wagon
BF
23
Page 435 of 548
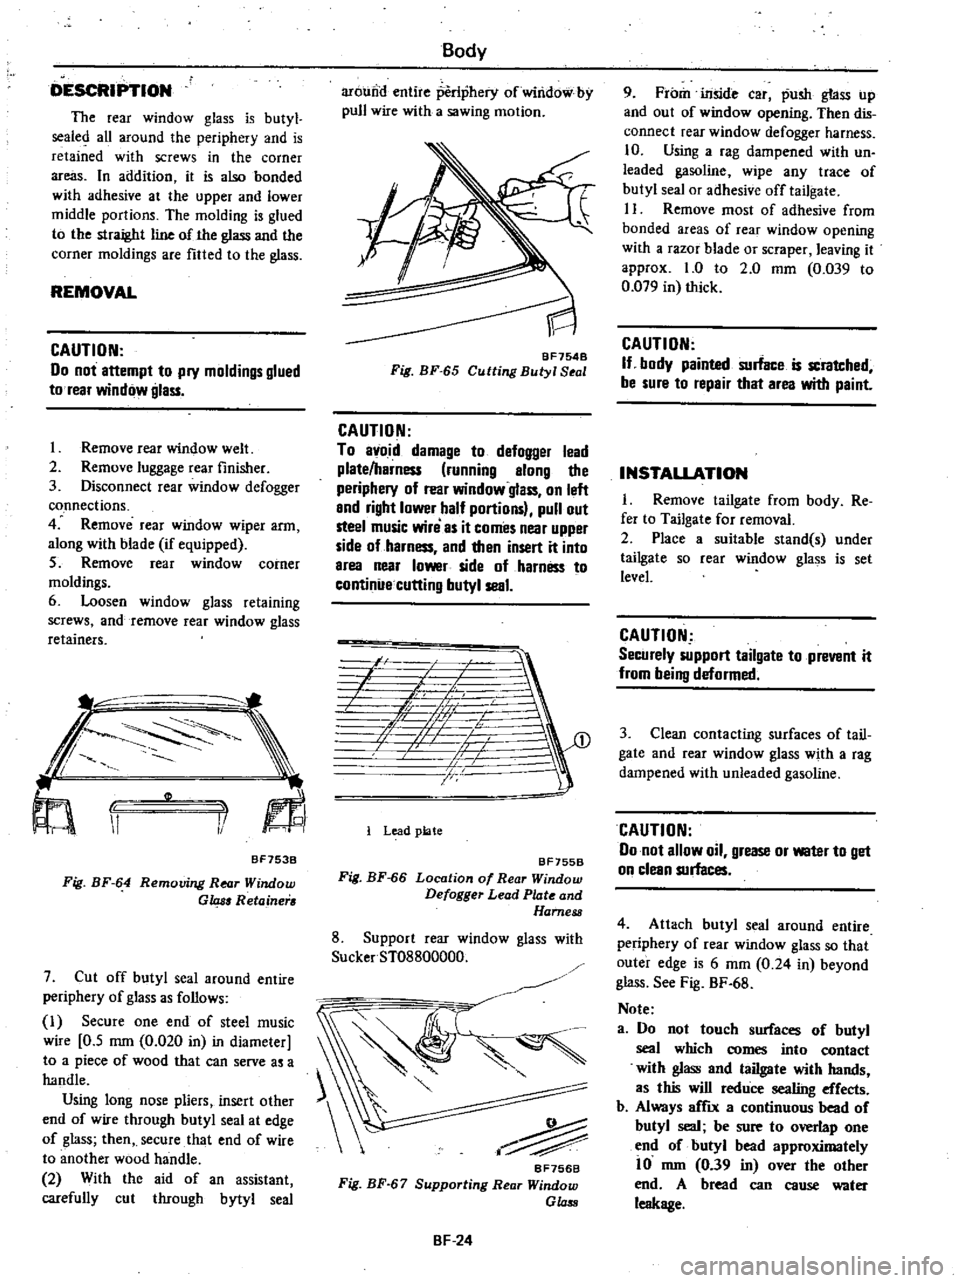
DESCRIPTION
The
rear
window
glass
is
butyl
sealed
aU
around
the
periphery
and
is
retained
with
screws
in
the
corner
areas
In
addition
it
is
also
bonded
with
adhesive
at
the
upper
and
lower
middle
portions
The
molding
is
glued
to
the
straight
line
of
the
glass
and
the
corner
moldings
are
fitted
to
the
glass
REMOVAL
CAUTION
00
not
attempt
to
pry
moldings
glued
to
rear
window
glass
1
Remove
rear
window
welt
2
Remove
luggage
rear
finisher
3
Disconnect
rear
window
defogger
connections
4
Remove
rear
window
wiper
arm
along
with
blade
if
equipped
5
Remove
rear
window
comer
moldings
6
Loosen
window
glass
retaining
screws
and
remove
rear
window
glass
retainers
II
1
BF753B
Fig
BF
64
Removing
RNr
Window
G
Retainer
7
Cut
off
butyl
seal
around
entire
periphery
of
glass
as
follows
I
Secure
one
end
of
steel
music
wire
0
5
mm
0
020
in
in
diameter
to
a
piece
of
wood
that
can
serve
as
a
handle
Using
long
nose
pliers
insert
other
end
of
wire
through
butyl
seal
at
edge
of
glass
then
secure
that
end
of
wire
to
another
wood
handle
2
With
the
aid
of
an
assistant
carefully
cut
through
bytyl
seal
Body
arDUna
entire
periphery
ofwirid6
by
pull
wire
with
a
sawing
motion
BF754B
Fig
BF
65
Cutting
Butyl
S
I
CAUTION
To
avoid
damage
to
defogger
lead
plate
harness
running
along
the
periphery
of
rear
window
glass
on
left
and
right
lower
half
portions
pull
out
steel
music
willi
as
it
comes
near
upper
side
of
harness
and
then
insert
it
into
area
near
lower
side
of
harness
to
continue
cutting
butyl
seal
71
A
L
0
fr
f
1
Lead
plate
BF755B
Fig
BF
66
Location
of
Rear
Window
Defogger
Lead
Plate
and
Harness
8
Support
rear
window
glass
with
SuckerST08800000
BF756B
Fig
BF
67
Supporting
Rear
Window
GLus
BF
24
9
From
inside
car
push
glass
up
and
out
of
window
opening
Then
dis
connect
rear
window
defogger
harness
10
Using
a
rag
dampened
with
un
leaded
gasoline
wipe
any
trace
of
butyl
seal
or
adhesive
off
tailgate
II
Remove
most
of
adhesive
from
bonded
areas
of
rear
window
opening
with
a
razor
blade
or
scraper
leaving
it
approx
1
0
to
2
0
mm
0
039
to
0
079
in
thick
CAUTION
If
body
painted
surtin
e
is
scratched
be
sure
to
repair
that
area
with
paint
INSTALLATION
I
Remove
tailgate
from
body
Re
fer
to
Tailgate
for
removal
2
Place
a
suitable
stand
s
under
tailgate
so
rear
window
gla
s
is
set
level
CAUTION
Securely
support
tailgate
to
prevent
it
from
being
deformed
3
Clean
contacting
surfaces
of
tail
gate
and
rear
window
glass
with
a
rag
dampened
with
unleaded
gasoline
CAUTION
00
not
allow
oil
grease
or
water
to
get
on
clean
surfaces
4
Attach
butyl
seal
around
entire
periphery
of
rear
window
glass
so
that
outer
edge
is
6
mm
0
24
in
beyond
glass
See
Fig
BF
68
Note
a
Do
not
touch
surfaces
of
butyl
seal
which
comes
into
contact
with
glass
and
tailgate
with
hands
as
this
will
reduce
sealing
effects
b
Always
amx
a
continuous
bead
of
butyl
seal
be
sure
to
overlap
one
end
of
butyl
bead
approximately
i
0
mm
0
39
in
over
the
other
end
A
bread
can
cause
water
leakage
Page 436 of 548
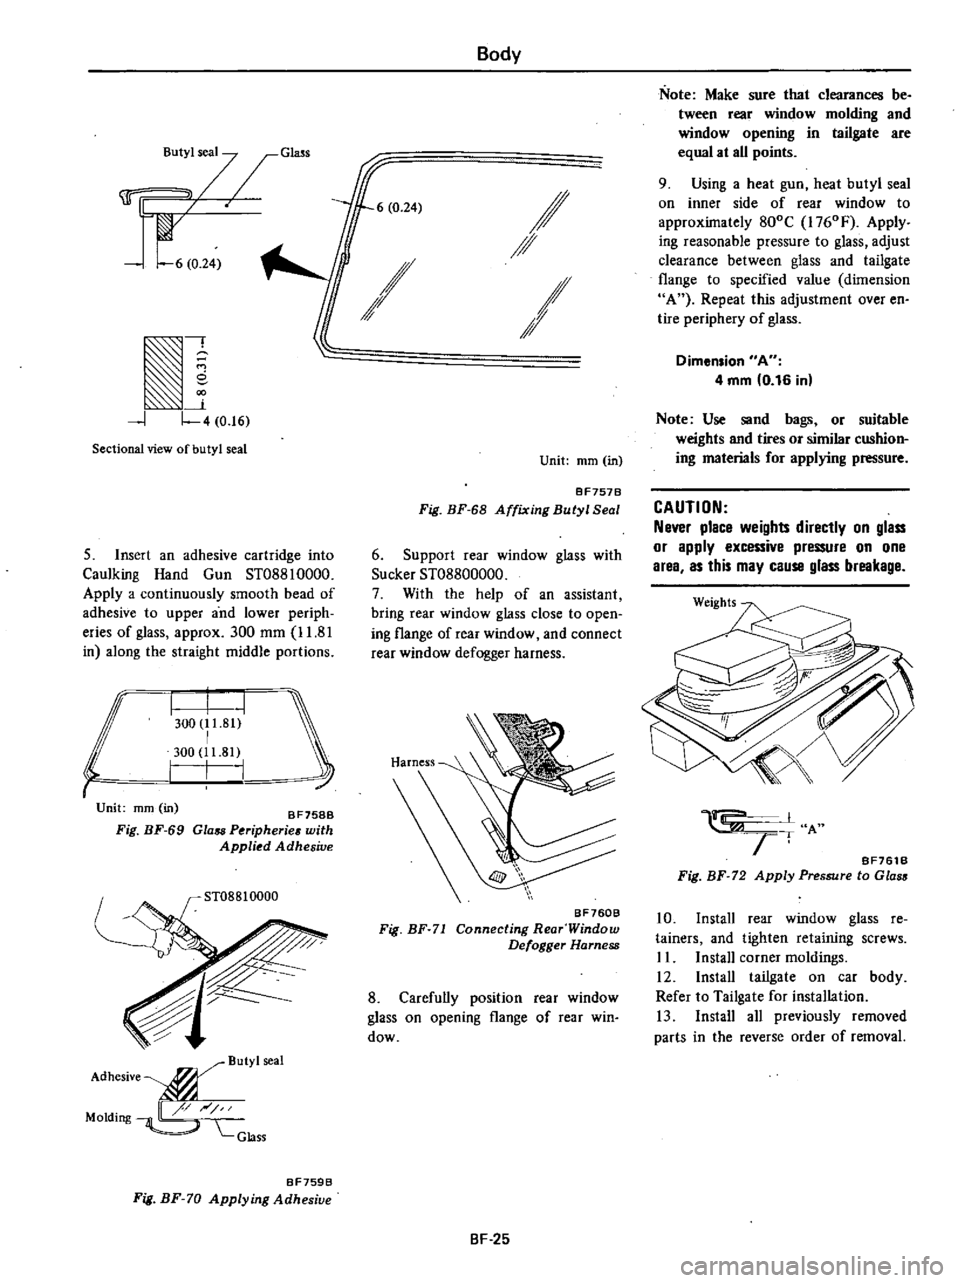
r
t
s7
Glm
I
6
0
24
k
IJ
4
0
16
Sectional
view
of
butyl
seal
5
Insert
an
adhesive
cartridge
into
Caulking
Hand
Gun
ST08810000
Apply
a
continuously
smooth
bead
of
adhesive
to
upper
and
lower
periph
eries
of
glass
approx
300
mm
11
81
in
along
the
straight
middle
portions
r
300
1
S
300
11
81
I
I
Unit
mm
in
Fig
BF
69
aF7SaB
Glass
Puipherie
with
Applied
Adhesive
ST08810000
ButYlseal
Adhesive
P
Molding
GlaSS
BF759B
Fig
BF
70
Applying
Adhesiue
Body
6
0
24
If
I
Unit
mm
in
BF7578
Fig
BF
68
Affixing
Butyl
Seal
6
Support
rear
window
glass
with
SuckerST08800000
7
With
the
help
of
an
assistant
bring
rear
window
glass
close
to
open
iog
flange
of
rear
window
and
connect
rear
window
defogger
harness
BF760B
Fig
BF
71
Connecting
Rear
Window
Defogger
Harness
8
Carefully
position
rear
window
glass
on
opening
flange
of
rear
win
dow
BF
25
Note
Make
sure
that
clearances
be
tween
rear
window
molding
and
window
opening
in
tailgate
are
equal
at
all
points
9
Using
a
heat
gun
heat
butyl
seal
on
inner
side
of
rear
window
to
approxilnately
800C
l760F
Apply
ing
reasonable
pressure
to
glass
adjust
clearance
between
glass
and
tailgate
flange
to
specified
value
dimension
A
Repeat
this
adjustment
over
en
tire
periphery
of
glass
Dimension
A
4
mm
0
16
in
Note
Use
sand
bags
or
suitable
weights
and
tires
or
similar
cushion
ing
materials
for
applying
pressure
CAUTION
Never
place
weights
directly
on
glass
or
apply
excessive
pressure
on
one
area
as
this
may
cause
glass
breakage
1
I
I
A
1T
BF761B
Fig
BF
72
Apply
Pressure
to
Glass
10
Install
rear
window
glass
re
tainers
and
tighten
retaining
screws
II
Install
corner
moldings
12
Install
tailgate
on
car
body
Refer
to
Tailgate
for
installation
13
Install
all
previously
removed
parts
in
the
reverse
order
of
removal
Page 437 of 548
B
dy
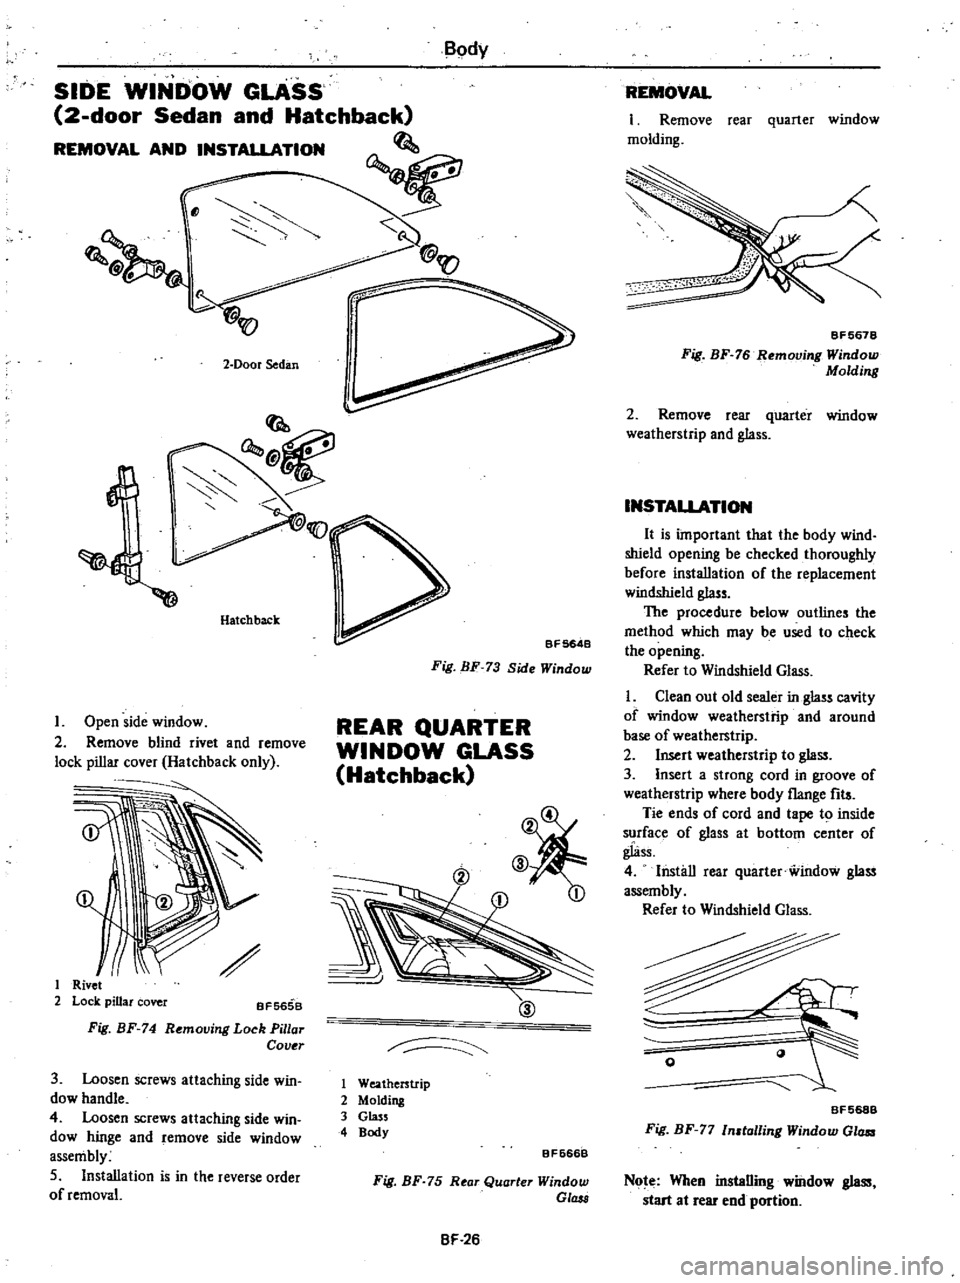
SIDE
WINIJOW
GLASS
2
door
Sedan
and
Hatchback
REMOVAL
AND
INSTALLATION
@V
2
Door
Sedan
l
Hatchback
I
Open
side
window
2
Remove
blind
rivet
and
remove
lock
pillar
cover
Hatchback
only
1
Rivet
2
Lock
piUar
cover
BF5658
Fig
BF
74
Removing
Lock
Pillar
Caller
3
Loosen
screws
attaching
side
win
dow
handle
4
Loosen
screws
attaching
side
win
dow
hinge
and
remove
side
window
assembly
5
Installation
is
in
the
reverse
order
of
removal
SF
5648
Fig
BF
73
Side
Window
REAR
QUARTER
WINDOW
GLASS
Hatchback
@
ID
1
Weatherstrip
2
Molding
3
Glass
4
Body
BF666B
Fig
BF
75
Rear
Quarter
Window
GI
BF
26
REMOVAL
I
Remove
rear
quarter
window
molding
BF5678
Fig
BF
76
Removing
Window
Molding
2
Remove
rear
quarter
window
weatherstrip
and
glass
INSTAUATION
It
is
ilnportant
that
the
body
wind
shield
opening
be
checked
thoroughly
before
installation
of
the
replacement
windshield
glass
The
procedure
below
outlines
the
method
which
may
be
used
to
check
the
opening
Refer
to
Windshield
Glass
I
Clean
out
old
sealer
in
glass
cavity
of
window
weatherstrip
and
around
base
of
weatherstrip
2
Insert
weatherstrip
to
glass
3
Insert
a
strong
cord
in
groove
of
weatherstrip
where
body
flange
fits
Tie
ends
of
cord
and
tape
to
inside
surface
of
glass
at
bottom
center
of
gliss
4
Install
rear
quarter
window
glass
assembly
Refer
to
Windshield
Glass
A
r
BF568B
Fig
BF
77
In
talling
Window
GltlII
Note
When
installing
window
glass
start
at
rear
end
portion
Page 438 of 548
Body
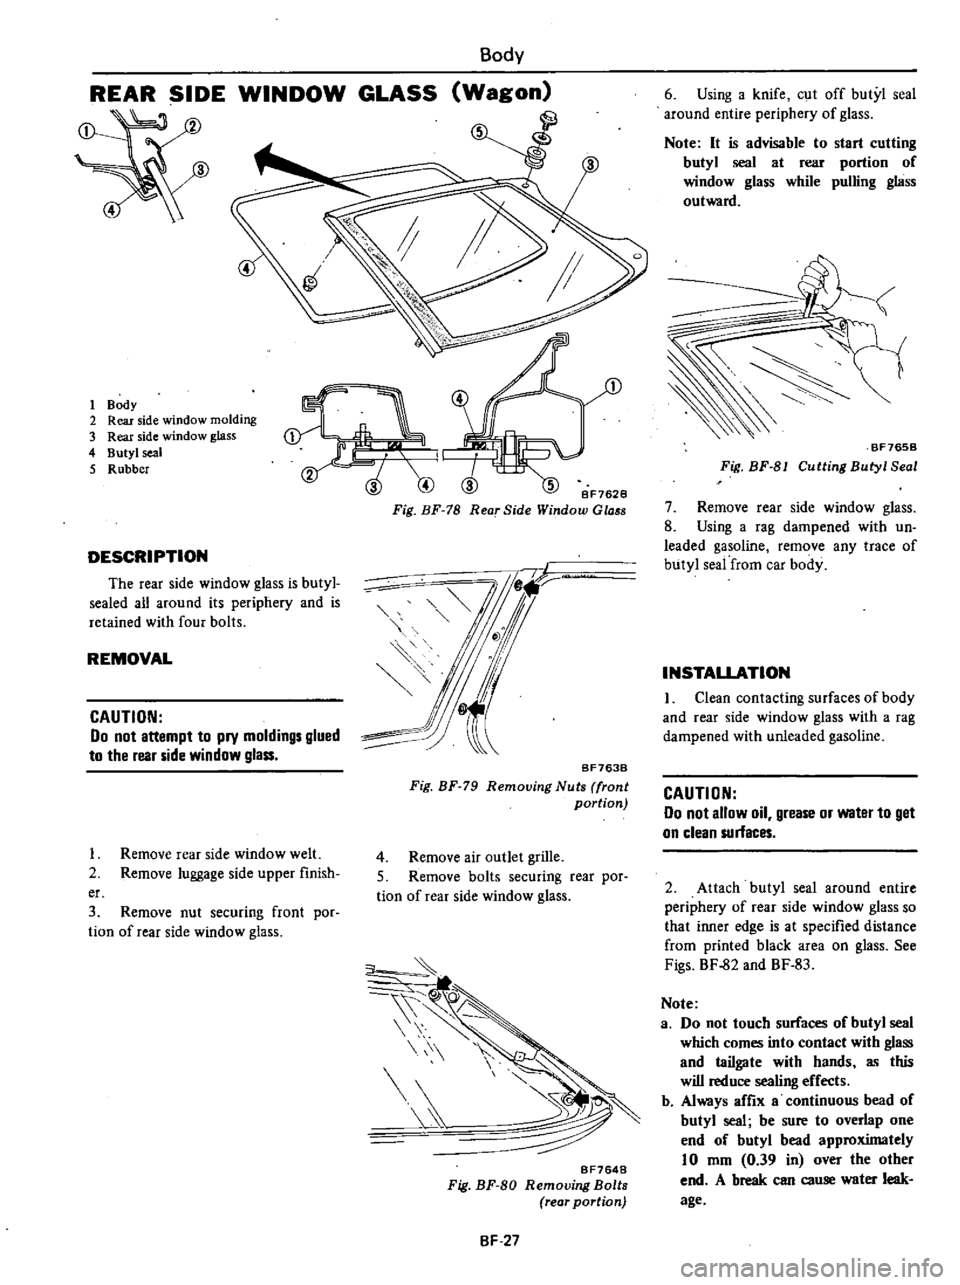
REAR
SIDE
WINDOW
GLASS
Wagon
4
1
Body
2
Rear
side
window
molding
3
Rear
side
window
glass
4
Butyl
seal
5
Rubber
Bf7628
Fig
BF
78
Rear
Side
Window
Glo
8
DESCRIPTION
The
rear
side
window
glass
is
butyl
sealed
all
around
its
periphery
and
is
retained
with
four
bolts
REMOVAL
CAUTION
Do
not
attempt
to
pry
moldings
glued
to
the
rear
side
window
glass
BF763B
Fig
BF
79
Removing
Nuts
front
portion
1
Remove
rear
side
window
welt
2
Remove
luggage
side
upper
finish
4
Remove
air
outlet
grille
S
Remove
bolts
securing
rear
por
tion
of
rear
side
window
glass
er
3
Remove
nut
securing
front
por
tion
of
rear
side
window
glass
lt
BF7648
Fig
BF
80
Removing
Bolts
rear
portion
BF
27
6
Using
a
knife
cut
off
butyl
seal
around
entire
periphery
of
glass
Note
It
is
advisable
to
start
cutting
butyl
seal
at
rear
portion
of
window
glass
while
pulling
glass
outward
BF765B
Fig
BF
81
Cutting
Butyl
Seal
7
Remove
rear
side
window
glass
8
Using
a
rag
dampened
with
un
leaded
gasoline
remove
any
trace
of
butyl
seai
from
car
body
INSTALLATION
I
Clean
contacting
surfaces
of
body
and
rear
side
window
glass
with
a
rag
dampened
with
unleaded
gasoline
CAUTION
Do
not
allow
oil
grease
or
water
to
get
on
clean
surfaces
2
Attach
butyl
seal
around
entire
periphery
of
rear
side
window
glass
so
that
inner
edge
is
at
specified
distance
from
printed
black
area
on
glass
See
Figs
BF
82
and
BF
83
Note
a
Do
not
touch
surfaces
of
butyl
seal
which
comes
into
contact
with
glass
and
tailgate
with
hands
as
this
will
reduce
sealing
effects
b
Always
affix
a
continuous
bead
of
butyl
seal
be
sure
to
overlap
one
end
of
butyl
bead
approximately
10
mm
0
39
in
over
the
other
end
A
break
can
cause
water
leak
age