length DATSUN 610 1969 User Guide
[x] Cancel search | Manufacturer: DATSUN, Model Year: 1969, Model line: 610, Model: DATSUN 610 1969Pages: 171, PDF Size: 10.63 MB
Page 51 of 171
other
end
of
the
tube
into
a
clean
container
partly
filled
with
brake
fluid
Top
up
the
master
cylinder
reservoir
with
recommended
fluid
and
open
the
bleed
screw
approximately
three
quarters
of
a
turn
Depress
the
clutch
pedal
slowly
and
hold
it
completely
down
re
tighten
the
bleed
screw
and
allow
the
pedal
to
return
slowly
Repeat
the
operation
until
the
fluid
emerging
from
the
tube
is
free
from
air
bubbles
It
should
be
noted
that
assistance
will
be
required
when
carrying
out
bleeding
operations
as
not
only
must
the
fluid
entering
the
glass
container
be
watched
but
also
the
clutch
pedal
has
to
be
operated
and
the
reservoir
topped
up
frequently
throughout
the
procedure
When
the
fluid
is
completely
free
from
air
bubbles
the
bleed
screw
should
be
retightened
on
a
down
stroke
of
the
pedal
Finally
remove
the
bleed
tube
and
replace
the
dust
cap
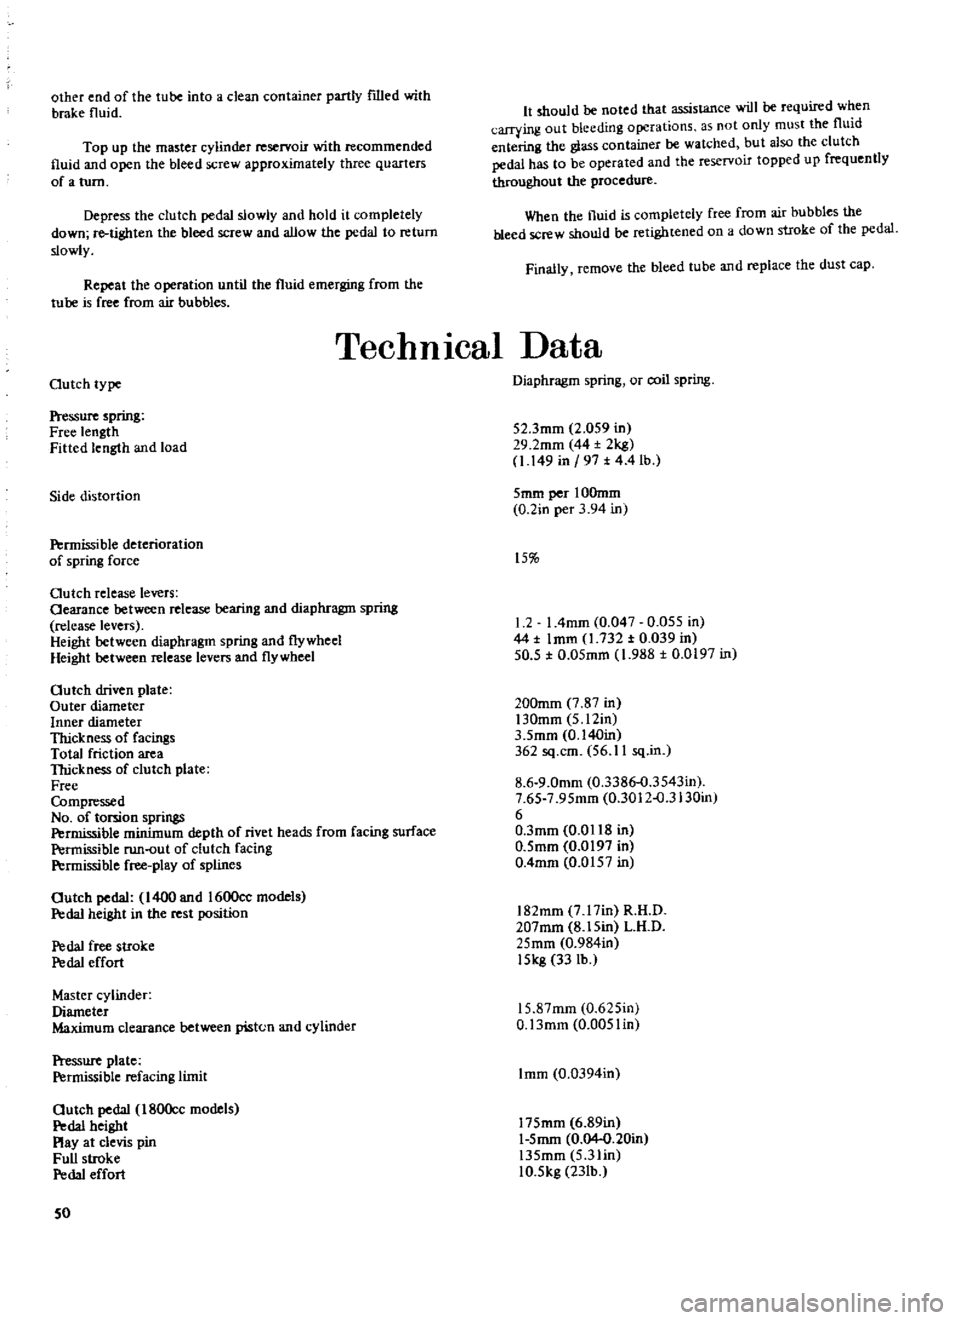
TechnIcal
Data
Outch
type
Pressure
spring
Free
length
Fitted
length
and
load
Side
distortion
Permissible
deterioration
of
spring
force
Outch
release
levers
Oearance
between
release
bearing
and
diaphragm
spring
release
levers
Height
between
diaphragm
spring
and
flywheel
Height
between
release
levers
and
flywheel
Outch
driven
plate
Outer
diameter
Inner
diameter
Thickness
of
facingS
Total
friction
area
TIrickness
of
clutch
plate
Free
Compressed
No
of
torsion
springs
Permissible
minimum
depth
of
rivet
heads
from
facing
surface
Permissible
run
out
of
clutch
facing
P
rmissible
free
play
of
splines
Outch
pedal
1400
and
1600cc
models
Pedal
height
in
the
rest
position
P
da1
free
stroke
P
da1
effort
Master
cylinder
Diameter
Maximum
clearance
between
piston
and
cylinder
Pressure
plate
Permissible
refacing
limit
Outch
pedal
180Occ
models
P
da1
height
Play
at
clevis
pin
Full
stroke
P
da1
effort
50
Diaphragm
spring
or
coil
spring
52
3mm
2
059
in
29
2mm
44
2kg
1
149
in
197
t
4
4
lb
5mm
per
IOOmm
0
2in
per
3
94
in
15
1
2
I
4mm
0
047
0
055
in
44
t
Imm
1
732
t
0
039
in
50
5
t
0
05mm
1
988
t
0
0197
in
200mm
7
87
in
130mm
5
12in
3
5mm
0
140in
362
sq
cm
56
11
sq
in
8
6
9
0mm
0
3386
o
3543in
7
65
7
95mm
0
3012
o
3130in
6
O
3mm
0
0118
in
0
5mm
0
0197
in
0
4mm
0
0157
in
182mm
7
17in
R
H
D
207mm
8
15in
L
H
D
25mm
0
984in
15kg
33
lb
15
87mm
0
625in
O
13mm
0
005lin
Imm
0
0394in
175mm
6
89in
1
5mm
0
04
0
20in
135mm
5
3lin
10
5kg
23Ib
Page 68 of 171
cage
Mcasure
the
clearance
between
the
rear
face
of
thc
side
gear
and
the
differential
cage
as
shown
in
Fig
G
ll
and
if
necessary
use
a
tluust
washer
which
will
given
a
clearance
of
0
1
0
2mm
0
004
0
008
in
Fit
the
pinion
shaft
lock
pin
and
secure
it
by
caulking
with
a
punch
Lubricate
the
gear
teeth
and
check
the
gear
for
freedom
of
rotation
Install
the
crown
wheel
in
the
differential
cage
and
insert
the
bolts
with
new
lock
straps
Tap
the
head
of
each
bolt
lightly
and
tighten
the
bolts
in
a
diagonal
pattern
to
a
torque
reading
of
7
0
8
0
kgm
51
58Ib
ft
Measure
the
width
of
the
side
bearings
before
installing
them
Place
a
weight
of
2
5
kg
5
5
1b
on
the
bearings
and
check
the
nominal
width
which
should
be
20mm
0
787
in
Press
the
side
bearings
into
the
differential
cage
Adjustment
of
drive
pinion
preload
This
adjustment
is
carried
out
without
fitting
the
oil
seal
Press
the
front
and
rear
bearing
outer
races
into
the
gear
carrier
and
fit
the
pinion
height
adjusting
washer
Fig
G
12
the
shims
and
the
rear
bearing
inner
race
onto
a
dummy
shaft
special
tool
ST
31
120000
The
old
washers
and
shims
can
be
re
used
if
the
tooth
contact
pattern
was
found
to
be
correct
on
the
pre
dismantling
check
Fit
the
drive
pinion
bearing
spacer
the
washer
ans
special
collar
5T
312140000
or
5T
31500000
and
the
drive
flange
on
to
the
dummy
shaft
Tighten
the
drive
pinion
nut
to
a
torque
reading
of
17
20
kgm
123
145
Ib
ft
Measure
the
drive
pinion
bearing
pre
load
and
select
washers
and
spacers
to
give
a
pre
load
of
7
1
0
kg
cm
6
9Ib
in
with
new
bearings
or
3
6
kg
cm
2
6
5
Ib
in
with
used
bearings
Adjusting
spacers
are
available
in
lengths
of
56
2
57
2
mm
2
2126
2
2520
in
and
adjusting
washers
in
thicknesses
of
59
2
31
mm
0
1020
0
0909
in
Adjustment
of
pinion
height
The
pinion
height
or
distance
of
the
face
of
the
pinion
to
the
axis
of
the
crownwheel
is
adjusted
by
the
thickness
of
the
adjusting
washer
behind
the
drive
pinion
gcar
The
drive
pinion
has
a
tolerance
mark
etched
on
its
face
this
tokrance
is
accompanied
by
a
or
sign
to
show
the
deviation
from
the
nominal
dimension
Thc
plus
sign
indicates
that
the
nominal
distance
must
be
increased
and
the
minus
sign
that
it
mllst
be
decreased
The
tolerances
are
shown
in
Fig
G
I3
The
pinion
height
can
be
adjusted
using
the
original
adjusting
washer
and
shims
between
the
rear
bearing
cone
and
the
drive
pinion
Install
the
setting
gauge
5T
31210000
on
the
carrier
with
the
dummy
pinion
installed
Sce
Fig
G
14
Measure
the
clearance
between
the
head
of
the
dummy
shaft
and
the
tip
of
the
setting
g
wge
using
a
feeler
gauge
as
shown
in
Fig
G
15
The
clearance
is
also
shown
at
the
point
T
in
Fig
G
14
The
required
thickness
of
the
adj
lsting
washer
can
be
obtained
using
the
following
formula
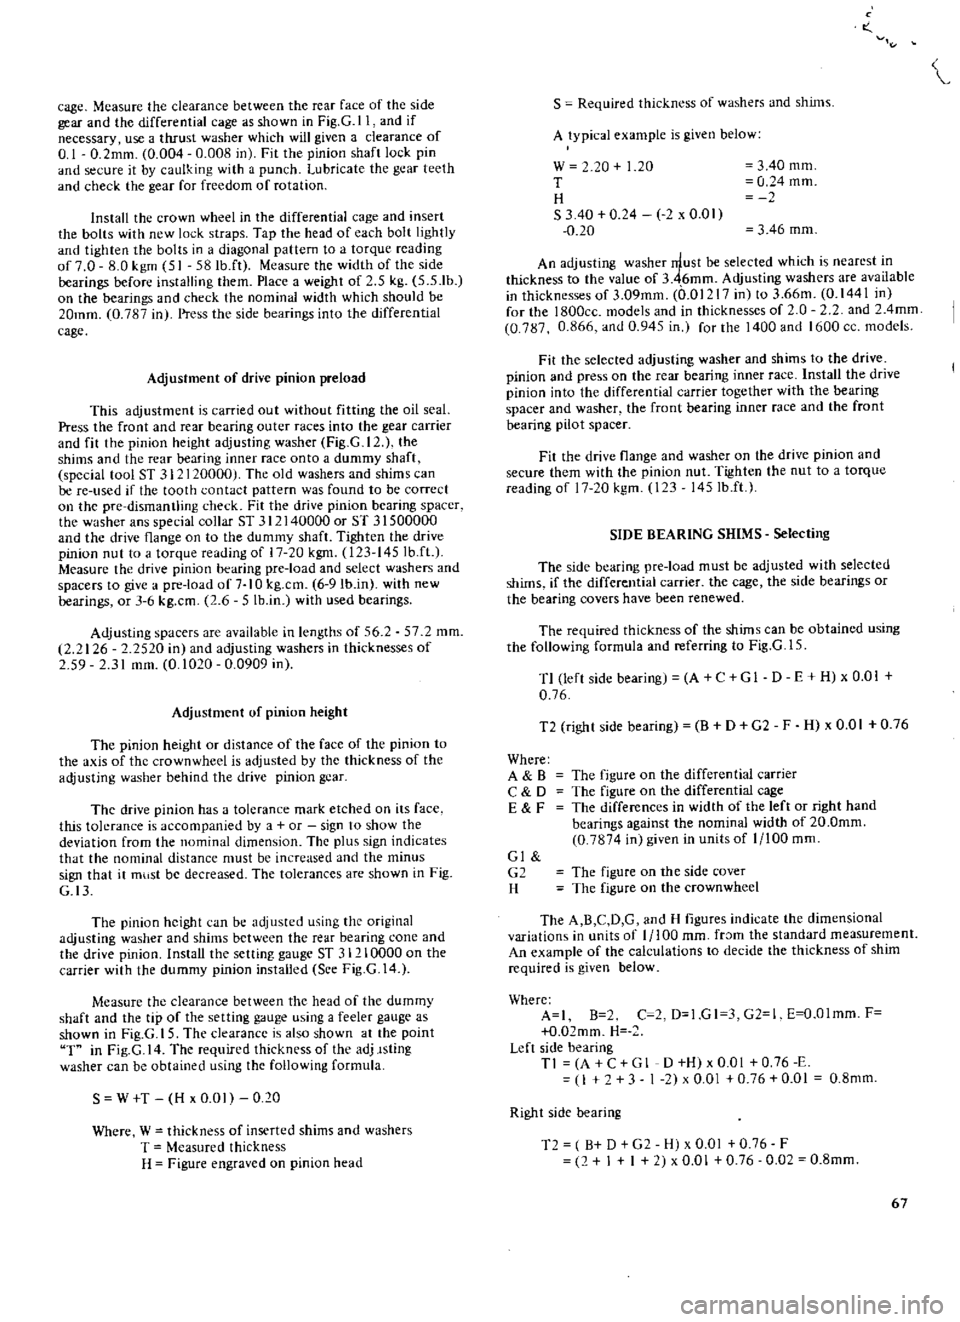
S
W
T
H
x
0
01
0
20
Where
W
thickness
of
inserted
shims
and
washers
T
Measured
thickness
H
Figure
engraved
on
pinion
head
o
S
Required
thickn
ss
of
washers
and
shims
A
typical
example
is
given
below
w
20
1
20
T
H
S
340
0
24
2
x
0
01
0
20
3
40
mm
0
24
mm
3
46
mm
An
adjusting
washer
rrlust
be
selected
which
is
nearest
in
thickness
to
the
value
of
3
46mm
Adjusting
washers
are
available
in
thicknesses
of
3
09mm
0
01217
in
to
3
66m
0
1441
in
for
the
l800cc
models
and
in
thicknesses
of
O
2
and
2
4mm
0
787
0
866
and
0
945
in
for
the
1400
and
1600
cc
models
Fit
the
selected
adjusting
washer
and
shims
to
the
drive
pinion
and
press
on
the
rear
bearing
inner
race
Install
the
drive
pinion
into
the
differential
carrier
together
with
the
bearing
spacer
and
washer
the
front
bearing
inner
race
and
the
front
bearing
pilot
spacer
Fit
the
drive
flange
and
washer
on
the
drive
pinion
and
secure
them
with
the
pinion
nut
Tighten
the
nut
to
a
torque
reading
of
17
20
kgm
123
145Ib
ft
SIDE
BEARING
SHIMS
Selecting
The
side
bearing
pre
load
must
be
adjusted
with
selected
shims
if
the
differential
carrier
the
cage
the
side
bearings
or
the
bearing
covers
have
been
renewed
The
required
thickness
of
the
shims
can
be
obtained
using
the
following
formula
and
referring
to
Fig
G
l
5
T1
left
side
bearing
A
C
GI
D
E
H
x
0
01
0
76
T2
right
side
bearing
B
D
G2
F
H
x
0
01
0
76
Where
A
B
C
D
E
F
The
figure
on
the
differential
carrier
The
figure
on
the
differential
cage
The
differences
in
width
of
the
left
or
right
hand
bearings
against
the
nominal
width
of
20
0mm
0
7874
in
given
in
units
of
1
100
mm
Gl
G2
H
The
figure
on
the
side
cover
The
figure
on
the
crownwheel
The
A
B
C
D
G
and
H
figures
indicate
the
dimensional
variations
in
units
of
1
100
mm
fr
Jm
the
standard
measurement
An
example
of
the
calculations
to
decide
the
thickness
of
shim
required
is
given
below
Where
A
I
B
2
C
2
D
1
GI
3
G2
1
E
O
Olmm
F
O
02mm
H
Left
side
bearing
Tl
A
C
G
1
D
H
x
0
01
0
76
E
I
3
1
2
x
0
01
0
76
0
01
0
8mm
Right
side
bearing
T2
B
D
G2
H
x
0
01
0
76
F
2
I
I
2
x
0
01
0
76
0
02
0
8mm
67
Page 72 of 171
greased
Install
the
flange
washer
and
pinion
nut
Tighten
the
nut
to
a
torque
reading
of
14
17
kgm
101
130
Ib
fL
If
the
cotter
pin
hole
is
not
correctly
aligned
a
suitable
washer
should
be
fitted
Do
NOT
adjust
by
overtightening
the
pinion
nul
Van
Lubricate
the
front
bearing
with
oil
and
place
it
in
the
carrier
Grease
the
lip
of
the
oil
seal
and
install
it
to
the
final
drive
housing
Install
the
drive
pinion
the
new
collapsible
spacer
and
the
drive
flange
Fit
the
drive
pinion
nut
and
tighten
temporarily
until
all
slackness
is
eliminated
from
the
front
and
rear
of
the
drive
pinion
NOTE
Ensure
that
oil
and
grease
have
been
completely
removed
from
the
threads
of
the
pinion
gear
the
pinion
nut
and
the
washer
Tighten
the
pinion
nut
and
check
the
preload
with
a
preload
gauge
As
the
nut
is
tightened
to
the
specified
torque
reading
of
13
20
kgm
94
0
144
6Ib
fL
the
preload
must
be
measured
at
every
five
to
ten
degrees
turn
of
the
pinion
nut
As
the
pinion
nut
is
tightened
the
stepped
portion
of
the
spacer
is
deformed
See
Fig
G
29
J
and
the
length
between
the
bearings
adjusted
The
drive
pinion
bearing
preload
with
oil
seal
and
new
bearing
is
7
15
kg
cm
6
1
13
0
lb
in
Turn
the
drive
pinion
to
settle
the
bearing
and
re
check
the
preload
and
tightening
torque
If
the
preload
rate
is
exceeded
it
will
be
necessry
to
fit
a
new
spacer
the
old
spa
cr
cannot
be
reused
and
the
preload
must
not
be
adjusted
by
loosening
the
pinion
nul
Side
bearing
pre
load
adjusting
If
the
original
side
bearings
arc
to
be
used
the
shims
must
be
of
the
same
thickness
as
those
previously
fitted
To
select
shims
for
new
side
bearings
proceed
as
follows
The
standard
width
of
the
side
bearings
is
given
in
Technical
Data
This
width
must
be
measured
before
attempting
to
calculate
the
required
thickness
of
the
adjusting
shims
Place
a
weight
of
approximately
5
kg
5
5
lb
and
of
predetermined
height
onto
the
side
bearing
as
shown
in
Fig
G
30
Mcasure
the
width
of
the
bearing
with
a
dial
gauge
as
illustrated
turning
the
bearing
two
or
three
times
to
gain
an
accurate
meaSurement
Dimensional
variations
from
the
standard
measurements
are
marked
on
the
left
side
bearing
housing
of
the
gear
carrier
on
the
right
side
bearing
housing
of
the
gear
carrier
and
on
the
differential
case
These
variations
are
marked
in
units
of
l
lOOmm
and
are
used
for
the
f
rmula
to
calculate
t1H
thickness
of
the
adjusting
shims
in
the
following
manner
Where
TI
equals
the
left
side
bearing
shim
crownwhecl
side
T2
equals
the
right
side
bearing
shim
pinion
gear
A
equals
the
figure
marked
on
the
left
side
bearing
housing
B
equals
the
figure
marked
on
the
right
side
bearing
housing
C
and
0
equals
the
figure
marked
on
the
differential
case
and
E
and
F
is
the
difference
bctween
the
width
of
the
side
bearings
and
the
standard
bearing
width
H
the
figure
marked
on
the
crownwhcel
Fig
G
31
The
following
formulae
can
now
be
used
to
deter
mine
the
required
shim
thicknessl
s
for
both
side
bearings
I
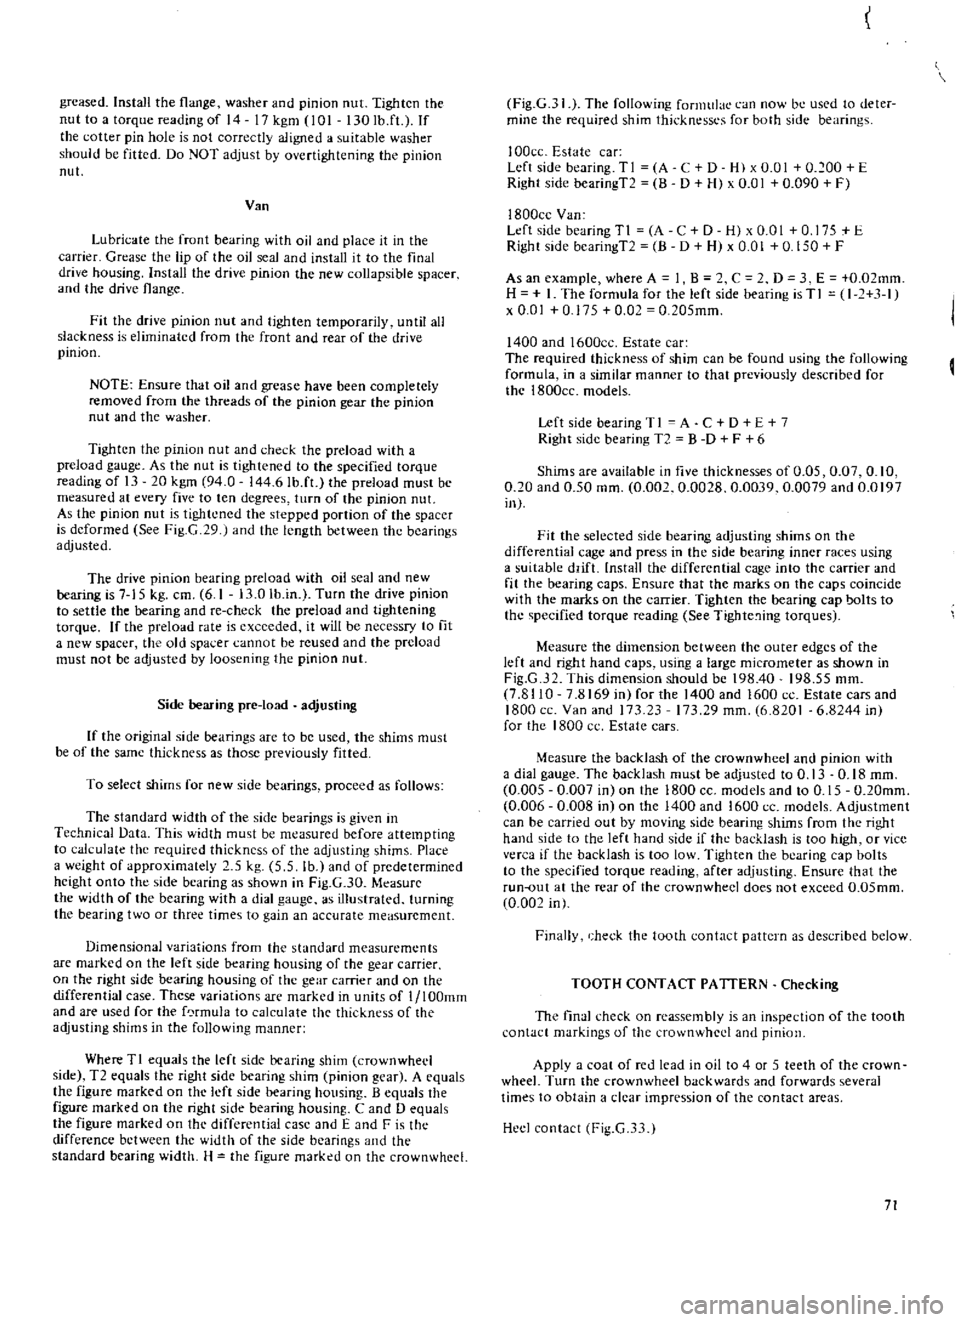
OOcc
Estate
car
Left
side
bearing
TI
A
C
D
H
x
0
01
0
100
E
Right
side
bearingT2
B
D
H
x
0
01
0
090
F
I800cc
Van
Left
side
bearingTI
A
C
D
H
xO
OI
0
175
E
Right
side
bcaringT2
8
D
H
x
0
01
0
150
F
As
an
example
where
A
1
B
C
2
D
3
E
0
02mm
H
I
The
formula
for
the
left
side
bearing
is
T
I
I
1
3
1
x
0
01
0
175
0
02
0
205mm
1400
and
1600cc
Estate
car
The
required
thickness
of
shim
can
be
found
using
the
following
formula
in
a
similar
manner
to
that
previously
described
for
the
1800cc
models
Left
side
bearing
T
I
A
C
D
E
7
Right
side
bearing
T2
B
D
F
6
Shims
are
available
in
five
thicknesses
of
0
05
0
07
0
10
0
20
and
0
50
mm
0
002
0
0028
0
0039
0
0079
and
0
0197
in
Fit
the
selected
side
bearing
adjusting
shims
on
the
differential
cage
and
press
in
the
side
bearing
inner
races
using
a
suitable
ddfL
nstall
the
differential
cage
into
the
carrier
and
fit
the
bearing
caps
Ensure
that
the
marks
on
the
caps
coincide
with
the
marks
on
the
carrier
Tighten
the
bearing
cap
bolts
to
the
specified
torque
reading
See
Tighte
ing
torques
Measure
the
dimension
between
the
outer
edges
of
the
left
and
right
hand
caps
using
a
large
micrometer
as
shown
in
Fig
G
32
This
dimension
should
be
198
40
198
55
mm
7
8110
7
8169
in
for
the
1400
and
1600
ce
Estate
cars
and
1800
ce
Van
and
173
23
17329
mm
6
8201
6
8244
inl
for
the
1800
cc
Estate
cars
Measure
the
backlash
of
the
crownwhcel
and
pinion
with
a
dial
gauge
The
backlash
must
be
adjusted
to
0
13
0
18
mm
0
005
0
007
in
on
the
1800
CC
models
and
to
0
15
0
20mm
0
006
0
008
in
on
the
1400
and
1600
cc
models
Adjustment
can
be
carried
out
by
moving
side
bearing
shims
from
the
right
hand
side
to
the
left
hand
side
if
the
backlash
is
too
high
or
vice
verca
if
the
backlash
is
too
low
Tighten
the
bearing
cap
bolts
to
the
specified
torque
reading
after
adjusting
Ensure
that
the
run
out
at
the
rear
of
the
crown
wheel
does
not
exceed
O
05mm
0
002
in
Finally
heck
the
tooth
contact
pattern
as
described
below
TOOTH
CONTACT
PATTERN
Checking
The
final
check
on
reassembly
is
an
inspection
of
the
tooth
contact
markings
of
the
crownwhed
and
pinion
Apply
a
coal
of
red
lead
in
oil
to
4
or
5
teeth
of
the
crown
wheel
Turn
the
crownwheel
backwards
and
forwards
several
times
to
obtain
a
clear
impression
of
the
contact
areas
Heel
contact
Fig
G
3
1
71
Page 75 of 171
J
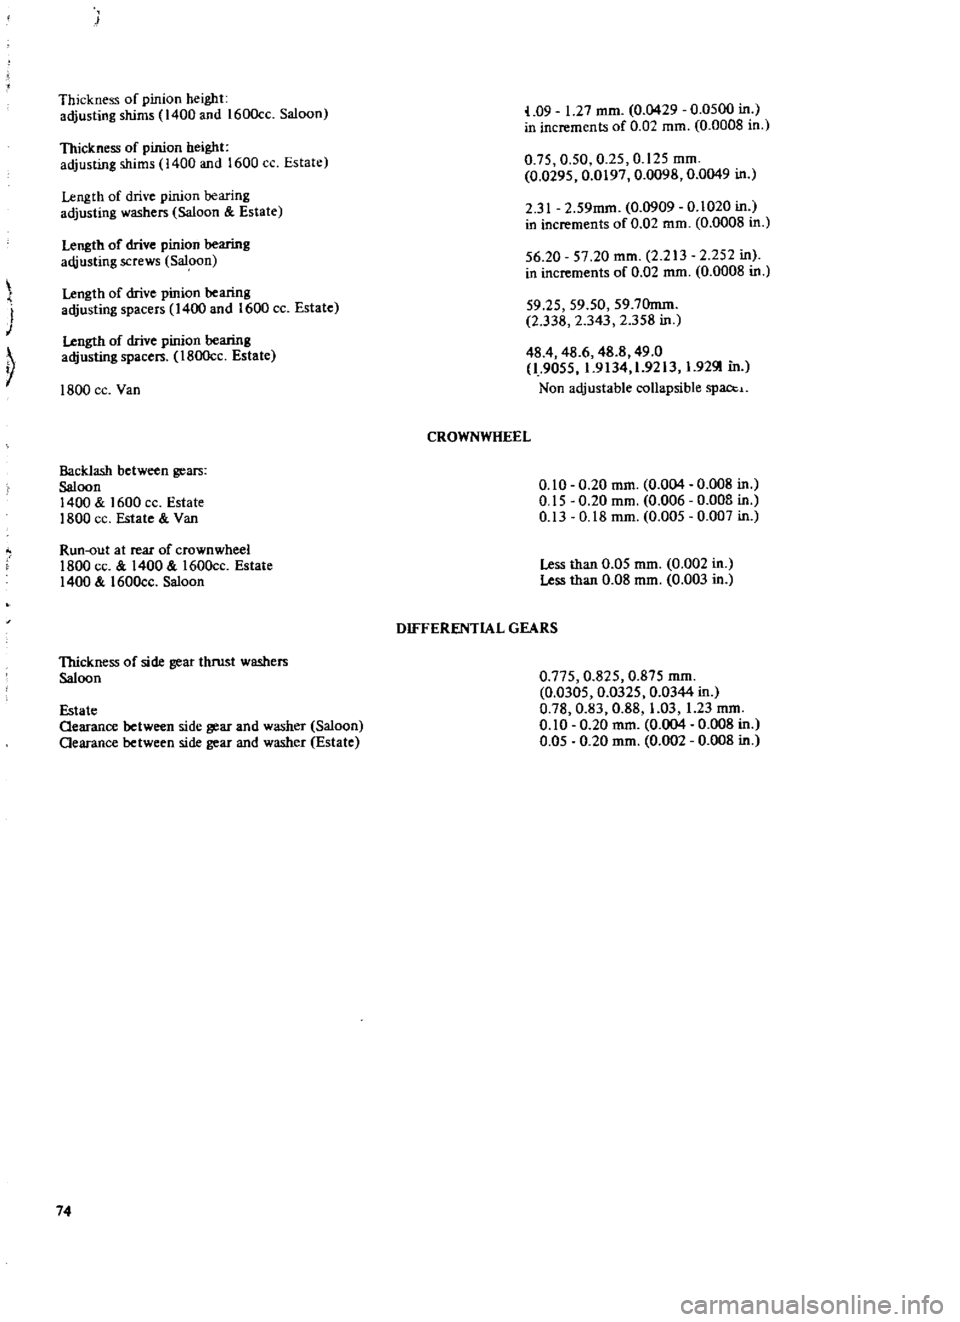
Thickness
of
pinion
height
adjusting
shims
1400
and
160Occ
Saloon
Thickness
of
pinion
height
adjusting
shims
1400
and
1600
cc
Estate
Length
of
drive
pinion
bearing
adjusting
washers
Saloon
Estate
Length
of
drive
pinion
bearing
aqjusting
screws
Saloon
y
Length
of
drive
pinion
bearing
adjusting
spacers
1400
and
1600
cc
Estate
Length
of
drive
pinion
bearing
alljusting
spacer
1800cc
Estate
1800
cc
Van
Backlash
between
gears
Saloon
1400
1600
cc
Estate
1800
cc
Estate
Van
Run
out
at
rear
of
crown
wheel
1800
cc
1400
1600cc
Estate
1400
1600cc
Saloon
Thickness
of
side
gear
thrust
washers
Saloon
Estate
Qearance
between
side
gear
and
washer
Saloon
aearance
between
side
gear
and
washer
Estate
74
L09
1
27
mm
0
0429
0
0500
in
in
increments
of
0
02
mm
0
0008
in
0
75
0
50
0
25
0
125
mm
0
0295
0
0197
0
0098
0
0049
in
2
31
2
59mm
0
0909
0
1020
in
in
increments
of
0
02
mm
0
0008
in
56
20
57
20
mm
2
213
2
252
in
in
increments
of
0
02
mm
0
0008
in
59
25
59
50
597Omm
2
338
2
343
2
358
in
48
4
48
6
48
8
49
0
0
9055
1
9134
1
9213
1
9291
in
Non
adjustable
collapsible
SP3
O
L
CROWNWHEEL
0
10
0
20
mm
0
004
0
008
in
0
15
0
20
mm
0
006
0
008
in
0
13
0
18
mm
0
005
0
007
in
Less
than
0
05
mm
0
002
in
Less
than
0
08
mm
0
003
in
DIFFERENTIAL
GEARS
0
775
0
825
0
875
mm
0
0305
0
0325
0
0344
in
0
78
0
83
0
88
1
03
1
23
mm
0
10
0
20
mm
0
004
0
008
in
0
05
0
20
mm
0
002
0
008
in
Page 76 of 171
Rear
Axle
Rear
SuspensIon
DESCRIPTION
REAR
AXLE
AND
SUSPENSION
Removal
Saloons
COIL
SPRINGS
Saloons
REAR
SHOCK
ABSORBERS
Saloons
REAR
SUSPENSION
ARM
Saloons
DESCRIPTION
Saloon
models
are
fitted
with
independent
rear
suspension
with
semi
trailing
arms
suspension
arms
coil
springs
and
telescopic
hydraulic
double
acting
shock
absorbers
The
differ
ential
gear
carrier
and
suspension
member
is
mounted
directly
onto
the
body
structure
via
rubber
mountings
See
Fig
H
I
Estate
cars
and
1800
ce
Vans
are
fitted
with
a
semi
floating
rear
axle
with
semi
elliptic
leaf
springs
and
telescopic
hydraulic
shock
absorbers
mounted
on
rubrer
bushes
See
Fig
H
2
REAR
AXLE
AND
SUSPENSION
Removal
Saloon
models
I
Jack
up
the
rear
of
the
vehicle
and
support
it
on
stands
2
Remove
the
road
wheels
disconnect
the
hand
brake
linkage
and
the
return
spring
Fig
H
3
3
Remove
the
exhaust
tail
pipe
and
silencer
4
Disconnect
the
brake
hoses
and
plug
the
openings
to
prevent
the
ingress
of
dirt
5
Remove
the
propeller
shaft
assembly
as
described
in
the
relevant
section
after
marking
the
propeller
rear
flange
and
differential
pinion
flange
6
Jack
up
the
suspension
ann
and
remove
the
shock
absorber
lower
mountings
taking
care
not
to
lose
the
rubber
bushings
7
Place
ajack
under
the
centre
of
the
suspension
member
and
differential
carrier
and
remove
the
nuts
securing
the
suspension
member
to
the
body
7
in
Fig
H
3
Remove
the
differential
mounting
nuts
8
8
Carefully
lower
and
remove
the
suspension
assembly
REAR
SUSPENSION
Inspection
Saloons
Examine
all
parts
for
wear
and
damage
paying
particular
attention
to
the
rubber
bushes
in
the
suspension
arms
and
the
bump
rubbers
Check
the
condition
of
the
spring
rubber
insulators
in
the
suspension
member
and
differential
mounting
memrer
The
rubber
insulators
must
be
replaced
if
the
dimension
A
in
Fig
H
4
is
less
than
5mm
0
2
in
REAR
AXLE
SHAFTS
BEARINGS
AND
SEALS
Saloons
DRNE
SHAFTS
REAR
AXLE
Removal
Estate
cars
and
Vans
REAR
SPRING
Estate
cars
and
Vans
REAR
SHOCK
ABSORBERS
Estate
cars
and
Vans
REAR
SUSPENSION
Installation
Saloons
Installation
is
a
reversal
of
the
removal
procedures
noting
the
following
points
Ensure
that
the
suspension
member
and
differential
mount
ing
member
are
correctly
aligned
as
shown
in
Fig
U
5
and
insert
the
rubber
insulators
from
the
underside
of
the
vehicle
Tighten
the
differential
mounting
member
the
suspension
member
and
lower
shock
absorber
nuts
to
the
specified
tighten
ing
torques
COIL
SPRINGS
Removal
Saloons
Jack
up
the
rear
of
the
vehicle
and
support
it
on
stands
2
Remove
the
road
wheels
and
disconnect
the
handbrake
linkage
and
return
spring
3
Remove
the
drive
shaft
flange
nuts
at
the
wheel
side
Fig
H
6
and
the
bump
rubber
securing
nuts
4
Place
ajack
under
the
suspension
ann
and
remove
the
shock
absorber
from
the
lower
mounting
bracket
Carefully
lower
the
jack
and
remove
the
coil
spring
spring
scat
and
bump
rubber
Fig
H7
COIL
SPRINGS
Installation
Saloons
Oleck
the
coil
springs
for
signs
of
deformation
or
cracks
Test
the
spring
for
its
free
length
and
height
under
load
and
compare
the
figures
obtained
with
the
information
in
Technical
Data
Inspect
all
rubber
parts
and
replace
any
which
are
damaged
or
deformed
Installation
is
a
reversal
of
the
removal
procedure
making
sure
that
the
flat
face
of
the
spring
is
at
the
top
REAR
SHOCK
ABSORBERS
Removal
and
Installation
Saloons
Remove
the
trim
in
the
boot
trunk
and
take
off
the
two
nuts
securing
the
upper
shock
absorber
mounting
See
Fig
H
S
Detach
the
shock
absorber
from
the
lower
mounting
bracket
The
shock
absorber
should
be
tested
and
the
fIgUres
com
pared
with
the
specifications
in
Technical
Data
Cbeck
for
oil
leaks
and
cracks
Make
sure
that
the
shaft
is
straight
and
that
the
rubber
bushes
are
not
damaged
or
defonned
Renew
all
unsatis
75
Page 80 of 171
factory
parts
Installation
is
a
reversal
of
the
removal
procedure
REAR
SUSPENSION
ARM
Removal
and
Installation
Saloon
I
J
ad
up
the
car
at
the
rear
and
support
it
on
stands
2
Remove
the
road
wheel
and
brake
drum
as
described
in
the
section
BRAKES
3
Disconnect
the
drive
shaft
from
the
axle
shaft
4
Disconnect
the
handbrake
cable
from
the
equalizer
bracket
and
the
wheel
cylinder
lever
Disconnect
the
brake
hose
from
the
brake
line
by
removing
the
lock
spring
and
then
withdrawing
through
the
connector
Plug
the
end
of
the
brake
line
to
avoid
loss
of
fluid
and
ingress
of
dirt
5
Remove
the
wheel
bearing
locknut
Fig
H
9
the
rear
axle
shaft
wheel
bearings
and
oil
seal
Remove
the
rear
brake
assembly
from
the
suspension
ann
See
section
BRAKES
6
Jack
up
the
suspension
arm
to
relieve
the
tension
on
the
shock
absorber
and
disconnect
the
shock
absorber
from
the
lower
mounting
Lower
the
jack
gradually
and
remove
the
coil
spring
seat
and
bump
rubber
7
Remove
the
bolts
securing
the
suspension
arm
to
the
suspension
member
Fig
H
IO
and
withdraw
the
suspension
arm
The
rubber
bushes
can
be
drawn
out
of
the
suspension
arm
if
necessary
using
the
special
tool
ST
38280000
Fig
H
Il
O1eck
the
suspension
arm
for
distortion
or
cracks
and
inspect
the
rubber
bushes
for
signs
of
wear
or
damage
Renew
any
part
which
is
unsatisfactory
Installation
is
a
reversal
of
the
removal
procedure
Tighten
all
the
suspension
arm
mounting
bolts
with
the
weight
of
the
vehicle
resting
on
the
rear
wheels
The
self
locking
nuts
must
be
renewed
at
each
overhaul
REAR
AXLE
SHAFTS
BEARINGS
AND
SEALS
Saloon
Removal
and
Dismantling
I
Raise
the
vehicle
at
the
rear
and
place
stands
under
the
body
member
2
Remove
the
road
wheel
and
brake
drum
3
Disconnect
the
drive
shaft
from
the
axle
shaft
and
remove
the
wheel
bearing
locknut
The
special
wrench
ST
38060001
can
be
used
to
hold
the
flange
as
shownin
Fig
H
12
4
Withdraw
the
axle
shaft
assembly
as
shown
in
Fig
H
13
using
the
special
tool
ST
07640000
and
sliding
hammer
ST
36230000
Remove
the
rear
axle
drive
flange
5
Use
a
suitable
drift
or
special
tool
ST
37750000
See
Fig
H
14
to
drive
out
the
inner
bearing
and
oil
seal
F
6
Remove
the
grease
retainer
and
withdraw
the
outer
bearing
with
a
conventional
puller
DO
NOT
re
use
this
outer
bearing
REAR
AXLE
SHAFTS
BEARINGS
AND
SEALS
Saloon
Assembly
and
Installation
Oleck
the
axle
shaft
for
straightness
make
sure
that
it
is
not
cracked
or
damaged
in
any
way
00
NOT
heat
the
shaft
if
attempting
to
re
straighten
Make
sure
that
the
lip
of
the
oil
seal
is
not
damaged
or
distorted
Check
the
bearing
for
excessive
wear
and
damage
Oean
the
wheel
bearings
the
oil
seal
and
the
inside
of
the
axle
housing
When
installing
the
wheel
bearings
the
sealed
side
of
the
outer
bearing
should
face
the
wheel
and
the
sealed
side
of
the
inner
bearing
should
face
the
differential
See
Fig
H
IS
Pressure
must
be
applied
to
the
inner
race
when
fitting
When
replacing
the
suspension
arm
check
that
the
distance
piece
is
0
05
mm
0
002
in
shorter
than
the
length
of
the
housing
dimension
LI
See
Fig
H
16
The
distance
piece
and
axle
housing
code
markings
must
coincide
The
wheel
bearing
grease
must
be
replaced
every
50
000
km
30
000
miles
Pack
the
wheel
bearings
with
grease
at
the
positions
shown
in
Fig
H
IS
and
coat
the
lip
of
the
oil
seal
Renew
the
locknut
and
oil
seal
at
each
overhaul
Wheel
bearing
adjustment
Tighten
the
locknut
to
the
specified
torque
reading
of
25
33
kgm
181
239
lb
ft
and
check
that
the
rear
axle
shaft
end
play
does
not
exceed
0
15
mm
0
006
in
with
a
turning
torque
of
less
than
7
kg
em
6
11b
in
for
the
1400
and
1600cc
models
510
series
or
4
5
kg
em
3
91b
in
for
the
1800cc
610
series
If
the
correct
end
play
or
turning
torque
cannot
be
obtained
it
will
be
necessary
to
change
the
distance
piece
See
above
DRIVE
SHAFTS
Removal
and
Dismantlill8
Disconnect
the
end
flanges
and
remove
the
shaft
See
Fig
H
17
The
drive
shaft
should
only
be
dismantled
to
lubricate
the
splines
This
operation
will
only
be
necessary
every
two
years
or
50
000
km
30
000
miles
Remove
the
universal
joint
spider
at
the
differential
side
Refer
to
the
propeller
shaft
section
Remove
the
snap
ring
securiilg
the
sleeve
yoke
plug
and
take
out
the
plug
Compress
the
drive
shaft
and
remove
the
snap
ring
and
stopper
Fig
H
17
Disconnect
the
boot
and
split
the
shaft
Make
sure
that
the
balls
and
spacers
are
retained
DRIVE
SHAFTS
Inspection
and
Assembly
The
drive
shaft
should
be
replaced
as
an
assembly
if
any
part
is
found
to
be
defective
Check
the
shaft
for
straightness
damage
or
wear
Old
79
Page 83 of 171

REAR
SHOCK
ABSORBERS
Replacing
Estate
cars
and
Vans
Jack
up
the
reaT
of
the
vehicle
and
place
stands
under
the
rear
axle
housing
Disconnect
the
lower
end
of
the
rear
shock
absorber
from
the
spring
seat
Fig
H
23
Remove
the
shock
absorber
upper
attachment
nuts
and
withdraw
the
shock
absorber
The
upper
attachment
nuts
are
located
behind
the
Tear
seat
backrest
as
shown
in
Fig
H
24
Check
the
shock
absorber
for
leakage
or
cracks
and
make
sure
that
the
shaft
is
straight
Inspect
the
rubber
bushings
for
damage
and
deterioration
Renew
all
defective
components
lnstallation
is
a
reversal
of
the
removal
procedures
Tighten
the
upper
and
lower
shock
absorber
attachment
nuts
to
the
torque
readings
stipulated
in
TIGlITENING
TORQUES
NOTE
The
weight
of
the
vehicle
must
be
resting
on
the
fear
wheels
when
tightening
the
lower
mounting
to
damp
the
rubber
bushes
in
an
unloaded
position
TechnICal
Data
I
Type
Independent
suspension
with
semi
tralllI1g
arms
or
semi
floating
COIL
SPRINGS
14
2mm
0
559
in
14
5mm
0
571
in
90
mm
3
543
in
306
mm
12
047
in
299
mm
II
772
in
290
mm
11417
in
I
1400
and
1600cc
Wire
diameter
Wire
diameter
hard
suspension
Coil
diameter
Free
length
R
H
Free
length
L
H
Free
length
Hard
suspension
1800cc
Wire
diameter
Coil
diameter
Free
length
RHD
R
H
Free
length
RHD
L
H
Free
length
LHD
both
Free
length
Hard
suspension
RHD
R
H
RHD
L
H
LHD
both
14
5
mm
0
571
in
90
3
54
in
321
mm
12
6
in
307
mm
12
1
in
321
mm
12
6
in
306
mm
12
0
in
299
mm
I
1
8
in
306
mm
12
0
in
SHOCK
ABSORBERS
34
56
kg
75
123
lb
21
39
kg
46
86
lb
SHOCK
ABSORBERS
Estate
cars
and
Vans
1400
and
1600cc
estate
cars
and
rigid
axle
sedan
Piston
diameter
2S
mm
0
984
in
Stroke
205
mm
8
071
in
Max
length
518
mm
20
39
in
Damping
force
at
0
3
in
see
Estate
cars
Expansion
Compression
Damping
force
at
0
3m
jsec
Sedan
Expansion
Compression
1400
and
1600
cc
Piston
diameter
Piston
diameter
Hard
suspension
Stroke
Max
length
Damping
force
at
0
3m
sec
Expansion
Compression
1800
cc
Stroke
Max
lengtb
Damping
force
at
0
3
m
sec
Expansion
Compression
82
35
mm
1
378
in
40
mm
1
575
in
206
mm
8
110
in
568
mm
22
362
in
45
kg
99
21b
28
kg
61
7
lb
220
mm
8
60
in
595
mm
23
4
in
90
kg
198
4
lb
50
kg
110
3
lb
75
kg
165
4Ib
40
kg
88
2
lb
1800cc
Estate
cars
Stroke
Max
length
Damping
force
at
O
3m
sec
Estate
cars
Expansion
Compression
205mm
8
071
in
518
mm
20
39
in
63
87
kg
139
192
lb
33
43
kg
73
95
lb
Damping
force
at
0
3
m
sec
Estate
car
and
Van
with
hard
suspension
Expansion
Compression
97
131
kg
214
289
lb
29
43
kg
64
95
lb
REAR
SPRINGS
1400
and
1600cc
Estate
car
Length
Width
Thickness
No
of
leaves
Free
camber
Laden
camber
1200mm
47
2
in
60
mm
f2
362
in
6
mm
0
236
in
4
137
mm
5
394
in
15
mm
265
kg
0
59
in
584
lb
Spring
eye
bolt
diameter
Front
Rear
45
mm
I
772
in
30
mm
U81
in
1400
and
1600
cc
Free
camber
Laden
cam
her
rigid
axle
sedan
100
mm
3
937
in
15mm
250
kg
0
591
in
551
lb
1800cc
Estate
Laden
camber
Turning
torque
15
mm
265
kg
0
591
in
1
584
lb
2
2
kg
mm
123
Ib
in
REAR
AXLE
SHAFT
less
than
4
5
kg
cm
3
91b
in
less
than
0
1
S
mm
0
006
in
DRIVE
SHAFT
AND
JOURNAL
Spring
constant
End
play
Sliding
resistance
1400
and
1600
cc
Sliding
resistance
1800cc
0
15
kg
0
33
lib
less
than
20
kg
44
lb
Radial
play
of
ball
spline
less
than
O
lmm
0
004
in
Page 89 of 171
Removal
from
the
vehicle
can
be
carried
out
in
the
following
manner
Jack
up
the
front
of
the
vehicle
and
support
it
on
stands
2
Remove
the
stabilizer
bar
and
tension
rod
from
the
transverse
link
as
previously
described
Remove
the
knuckle
arm
fixing
bolts
and
separate
the
ball
joint
from
the
strut
asse
m
bly
3
Remove
the
transverse
link
mounting
bolt
Fig
J
16
and
detach
the
transverse
link
from
the
suspension
member
Remove
the
cotter
pin
from
the
knuckle
arm
castle
nut
and
remove
the
knuckle
arm
from
the
ban
joint
Unfasten
the
ball
joint
securing
nut
and
withdraw
the
ball
joint
from
the
transverse
link
r
The
bushing
can
be
withdrawn
from
the
transverse
link
using
a
press
and
the
special
tools
shown
in
Fig
J
17
TRANSVERSE
LINK
AND
LOWER
BALL
JOINT
Inspection
The
transverse
link
bushing
is
shown
in
Fig
J
18
If
the
rubber
and
inner
tube
joints
are
melted
or
cracked
the
complete
transverse
link
assembly
must
be
replaced
The
ban
joint
cannot
be
dismantled
and
should
be
replaced
if
the
dust
cover
is
split
or
if
the
axial
play
of
the
joint
exceeds
1
0
mm
0
039
in
Oleck
the
axial
play
with
a
spring
balance
The
force
required
at
the
cotterpin
hole
pOsition
is
between
6
6
1
I
3
kg
15
25
lb
Lubricate
the
ball
joint
with
multi
purpose
grease
every
50
000
km
30
000
miles
or
two
year
whichever
comes
first
A
grease
nipple
must
be
installed
in
place
of
the
plug
See
Fig
J
19
and
the
old
grease
completely
replaced
If
a
high
pressure
grease
gun
j
used
make
sure
that
the
grease
is
injected
slowly
and
is
not
forced
out
through
the
joint
clamp
Remove
the
grease
nipple
and
replace
the
plug
TRANSVERSE
LINK
AND
BALL
JOINT
Installation
Installation
is
a
reversal
of
the
removal
procedure
noting
the
following
points
Remove
all
rust
from
the
transverse
link
bushing
interior
with
a
piece
of
emery
cloth
The
bushing
and
transverse
link
bore
should
be
wetted
with
soapy
water
so
that
the
bushing
can
be
more
easily
inserted
Fit
the
bushing
into
the
transverse
link
using
the
special
tool
ST
36700000
Adjust
the
bushing
inner
tubes
so
that
the
distances
from
the
transverse
link
collar
ends
are
equal
at
both
sides
88
Install
the
lower
ball
joint
on
the
transverse
link
and
tighten
the
installation
bolt
to
a
torque
reading
of
1
9
5kgm
14
18Ib
ft
Oean
the
knuckle
arm
and
the
ball
joint
stud
install
the
knuckle
arm
on
the
ball
joint
and
tighten
the
castle
nut
to
a
torque
reading
of
5
5
74
kgm
4o
53Ib
ft
fit
the
cotterpin
and
bend
it
over
Apply
sealing
agent
over
the
ball
joint
castle
nut
to
prevent
the
formation
of
rust
Locate
the
knuckle
arm
beneath
the
strut
assembly
and
tighten
the
mounting
bolts
to
a
torque
reading
of
4
9
63kgm
35
46Ib
ft
Make
sure
that
the
shorter
of
the
bolts
is
fitted
at
the
front
Install
the
transverse
link
on
the
suspension
crossrnember
and
temporarily
tighten
the
mounting
bolts
Make
sure
that
the
nut
faces
the
front
of
the
car
and
not
the
bolt
head
Fit
the
tension
rod
and
stabilizer
bar
Lower
the
vehicle
and
remove
the
jack
Tighten
the
trans
verse
link
mounting
bolts
to
a
torque
reading
of
9
0
10
0
kgm
65
72
Ib
ft
with
the
vehicle
unladen
FRONT
WHEEL
ALIGNMENT
The
castor
and
camber
angles
are
preset
and
cannot
be
adjusted
If
the
angles
do
not
conform
with
the
fIgures
in
Techni
al
Data
then
a
check
must
be
made
for
damage
to
the
uspenSlon
system
Wheel
alignment
is
carried
out
with
the
tyres
mflated
to
the
correct
pressures
and
with
the
vehicle
on
a
level
surface
The
toe
in
should
be
checked
and
adjusted
if
necessary
by
slackening
the
locknuts
FigJ
20
and
turning
the
track
rods
by
an
equal
amount
until
the
correct
toe
in
is
achieved
The
standard
length
between
the
ball
joints
is
309
5
mm
12
19
in
for
the
1400
and
1600
cc
models
and
105
5
mm
4
14
in
for
the
1800
cc
models
ADJ
USTING
THE
STEERING
ANGLE
The
steering
angle
at
the
full
lock
positions
must
be
checked
with
the
front
wheels
placed
on
a
turntable
Adjust
ment
can
be
made
changing
the
length
of
the
stopper
bolt
shown
arrowed
in
FigJ
21
The
clearance
between
the
tyre
and
tension
rod
should
be
30
mm
1
181
in
or
more
and
can
be
increased
if
necessary
by
extending
the
length
of
the
stopper
bolt
The
bolt
length
should
not
exceed
27
5
mm
1
083
in
when
the
adjustment
is
completed
Steering
angle
figures
are
given
in
Technical
Data
at
the
end
of
this
section
Page 91 of 171
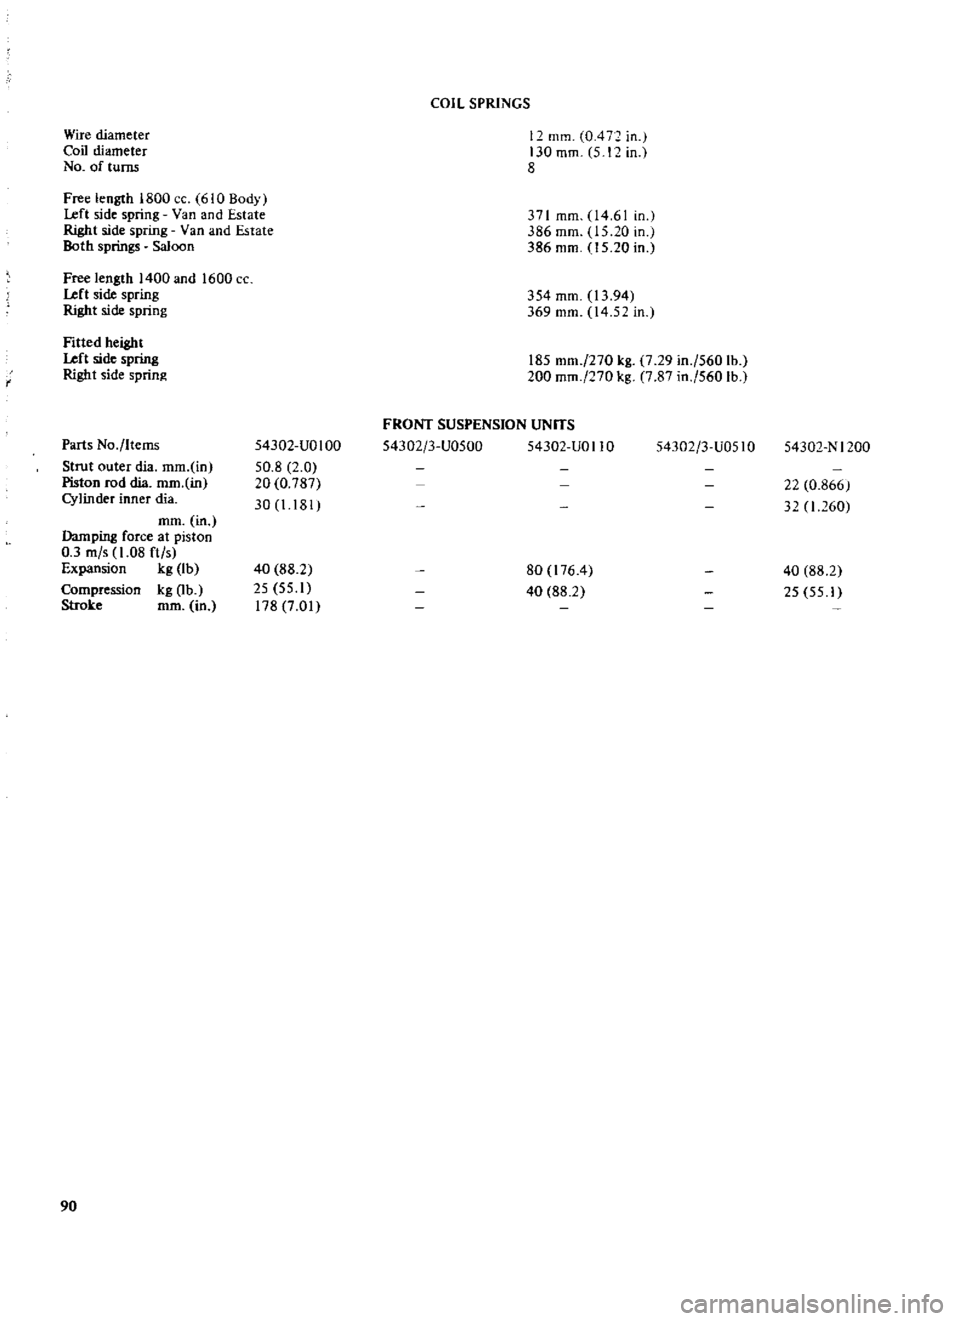
Wire
diameter
Coil
diameter
No
of
turns
Free
length
1800
CC
1610
Body
Left
side
spring
Van
and
Estate
Right
side
spring
Van
and
Estate
Both
springs
Saloon
Free
length
1400
and
1600
cc
Left
side
spring
Right
side
spring
f
Fitted
height
Left
side
spring
Right
side
spring
Parts
No
Items
Strut
outer
dia
mm
in
Piston
rod
dia
mm
in
Cylinder
inner
dia
mm
in
Damping
force
at
piston
0
3
m
s
1
08
ft
s
Expansion
kg
Ib
Compression
kg
Ob
Stroke
mm
in
90
54302
UO
100
50
8
2
0
20
0
787
30
I
181
40
88
2
25
55
1
178
7
01
COIL
SPRINGS
12
mill
0
4
in
130
mm
5
I
in
8
371
mm
04
61
in
386
mm
15
20
in
386
mm
15
20
in
354
mm
13
94
369
mm
14
52
in
185
mm
270
kg
7
29
in
560
lb
200
mm
270
kg
7
87
in
560
lb
FRONT
SUSPENSION
UNITS
54302
3
U0500
54302
UOI10
54302
3
U051O
80
176
4
40
88
2
54302
N
1200
22
0
866
32
1
260
40
88
2
25
55
1
Page 98 of 171
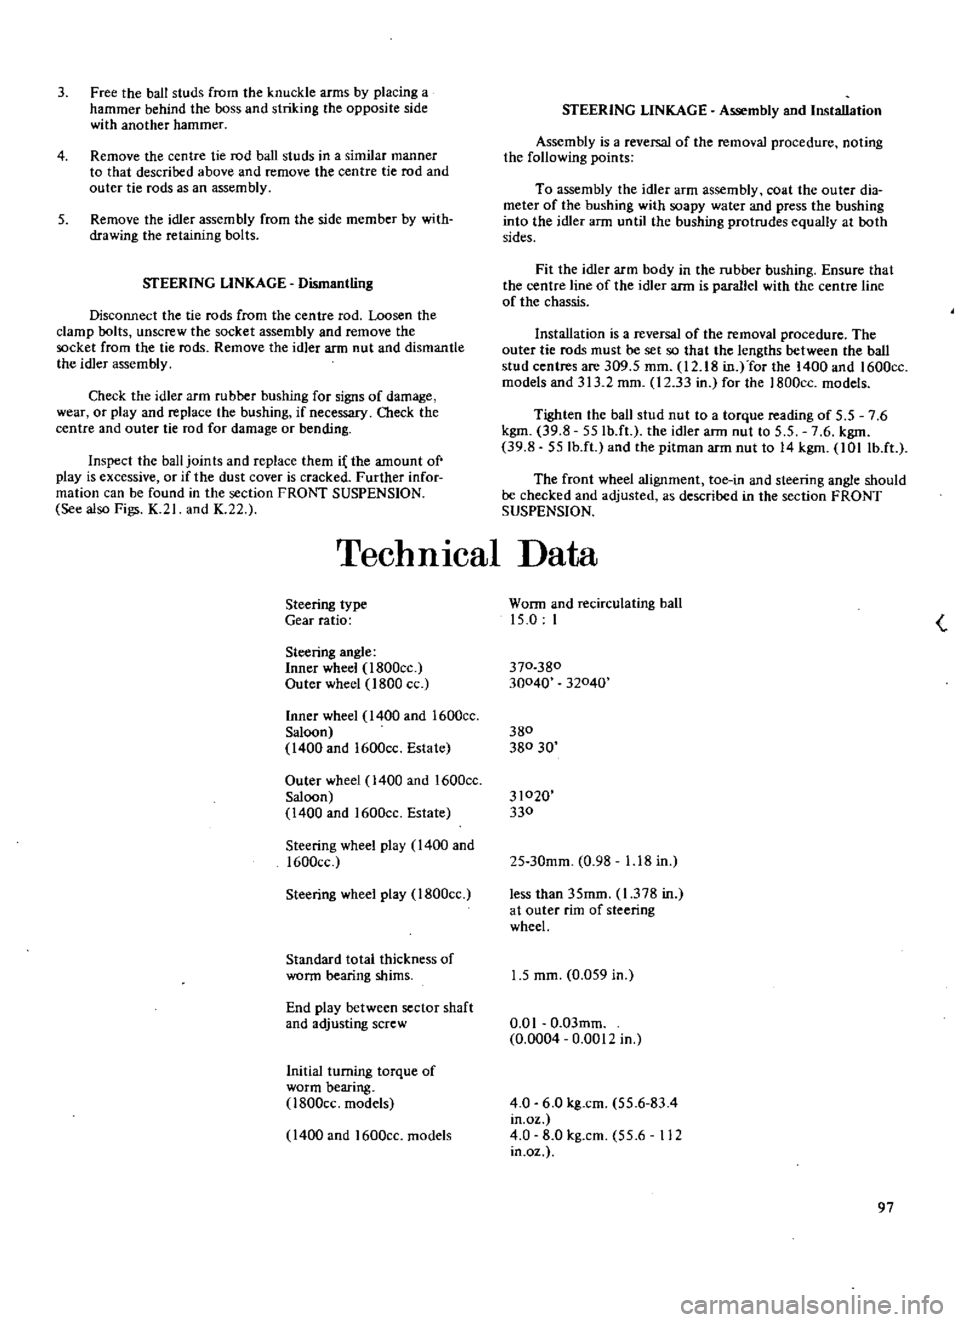
3
Free
the
ball
studs
from
the
knuckle
arms
by
placing
a
hammer
behind
the
boss
and
striking
the
opposite
side
with
another
hammer
4
Remove
the
centre
tie
rod
ball
studs
in
a
similar
manner
to
that
described
above
and
remove
the
centre
tie
rod
and
outer
tie
rods
as
an
assembly
5
Remove
the
idler
assembly
from
the
side
member
by
with
drawing
the
retaining
bolts
SfEERING
LINKAGE
Dismantling
Disconnect
the
tie
rods
from
the
centre
rod
Loosen
the
clamp
bolts
unscrew
the
socket
assembly
and
remove
the
socket
from
the
tie
rods
Remove
the
idler
arm
nut
and
dismantle
the
idler
assembly
Check
the
idler
arm
rubber
bushing
for
signs
of
damage
wear
or
play
and
replace
the
bushing
if
necessary
Oteck
the
centre
and
outer
tie
rod
for
damage
or
bending
Inspect
the
ball
joints
and
replace
them
i
the
amount
of
play
is
excessive
or
if
the
dust
cover
is
cracked
Further
infor
mation
can
be
found
in
the
section
FRONT
SUSPENSION
See
also
Figs
K
21
and
K
22
STEERING
LINKAGE
Assembly
and
Installation
Assembly
is
a
reversal
of
the
removal
procedure
noting
the
following
points
To
assembly
the
idler
arm
assembly
coat
the
outer
dia
meter
of
the
bushing
with
soapy
water
and
press
the
bushing
into
the
idler
arm
until
the
bushing
protrudes
equally
at
both
sides
Fit
the
idler
arm
body
in
the
rubber
bushing
Ensure
that
the
centre
line
of
the
idler
arm
is
parallel
with
the
centre
line
of
the
chassis
Installation
is
a
reversal
of
the
removal
procedure
The
outer
tie
rods
must
be
set
so
that
the
lengths
between
the
ball
stud
centres
are
309
5
mm
12
18
in
for
the
1400
and
1600cc
models
and
313
2
mm
12
33
in
for
the
1800cc
models
Tighten
the
ball
stud
nut
to
a
torque
reading
of
5
5
7
6
kgm
39
8
55Ib
ft
the
idler
ann
nut
to
5
5
7
6
kgm
39
8
55Ib
ft
and
the
pitman
arm
nut
to
14
kgm
lOllb
ft
The
front
wheel
alignment
toe
in
and
steering
angle
should
be
checked
and
adjusted
as
described
in
the
section
FRONT
SUSPENSION
TechnIcal
Data
Steering
type
Gear
ratio
Steering
angle
Inner
wheel
l800cc
Outer
wheel
1800
cc
Inner
wheel
1400
and
1600cc
Saloon
1400
and
1600cc
Estate
Outer
wheel
1400
and
1600cc
Saloon
1400
and
1600cc
Estate
Steering
wheel
play
1400
and
1600cc
Steering
wheel
play
1800cc
Standard
total
thickness
of
worm
bearing
shims
End
play
between
sector
shaft
and
adjusting
screw
Initial
turning
torque
of
worm
bearing
l800cc
models
1400
and
1600cc
models
Worm
and
recirculating
ball
15
0
I
370
380
30040
32040
380
380
30
31020
330
25
30mm
0
98
1
18
in
less
than
35mm
1
378
in
at
outer
rim
of
steering
wheel
1
5
mm
0
059
in
0
0
I
0
03mm
0
0004
0
0012
in
4
0
6
0
kg
cm
55
6
83
4
in
oz
4
0
8
0
kg
cm
55
6
112
in
oz
97